> ## Documentation Index
> Fetch the complete documentation index at: https://hc.starbridge.ai/llms.txt
> Use this file to discover all available pages before exploring further.
# Connect your CRM
> Authenticate Salesforce or HubSpot and configure the objects and fields Starbridge can access.
Connecting your CRM is the first step in the CRM integration setup. Once connected, Starbridge can match your accounts to Starbridge buyers, sync territories, and push and pull data through lookup and sync columns in your Bridges.
This step requires Starbridge Admin access.
Before integrating your CRM to Starbridge, we strongly recommend adding the following custom fields to your CRM Account and Contact objects
* **Starbridge Account ID** (text) — Starbridge's unique identifier for every account. Enables lookups by Starbridge account identifier and helps admins identify which accounts were created or modified by Starbridge.
* **Starbridge Contact ID** (text) — Starbridge's unique identifier for every contact. Enables lookups by Starbridge contact identifier and helps admins identify which contacts were created or modified by Starbridge.
* **Starbridge Is Active** (boolean) — whether Starbridge considers the contact currently active. Defaults to `true` for active contacts; set to `false` when Starbridge detects the contact is no longer employed at the account.
These fields aren't required, but they significantly improve deduplication accuracy and let Starbridge maintain accounts and contacts up to date in your CRM over time.
**Account field: Starbridge Account ID**
Before connecting Starbridge to Salesforce, you need to create a custom field on the Account object to store Starbridge data.
1. In Salesforce, click the **Gear icon (⚙)** → **Setup**
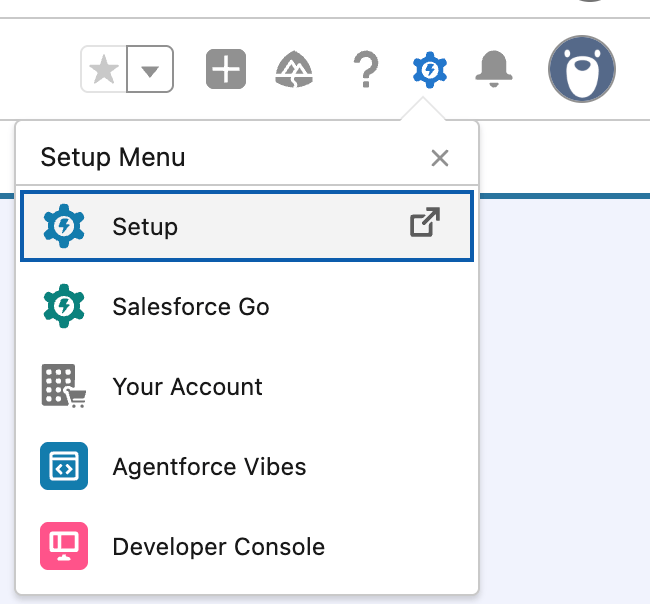 2. In the left sidebar, search for **Object Manager** and open it, or directly click **Objects and Fields** → **Object Manager**
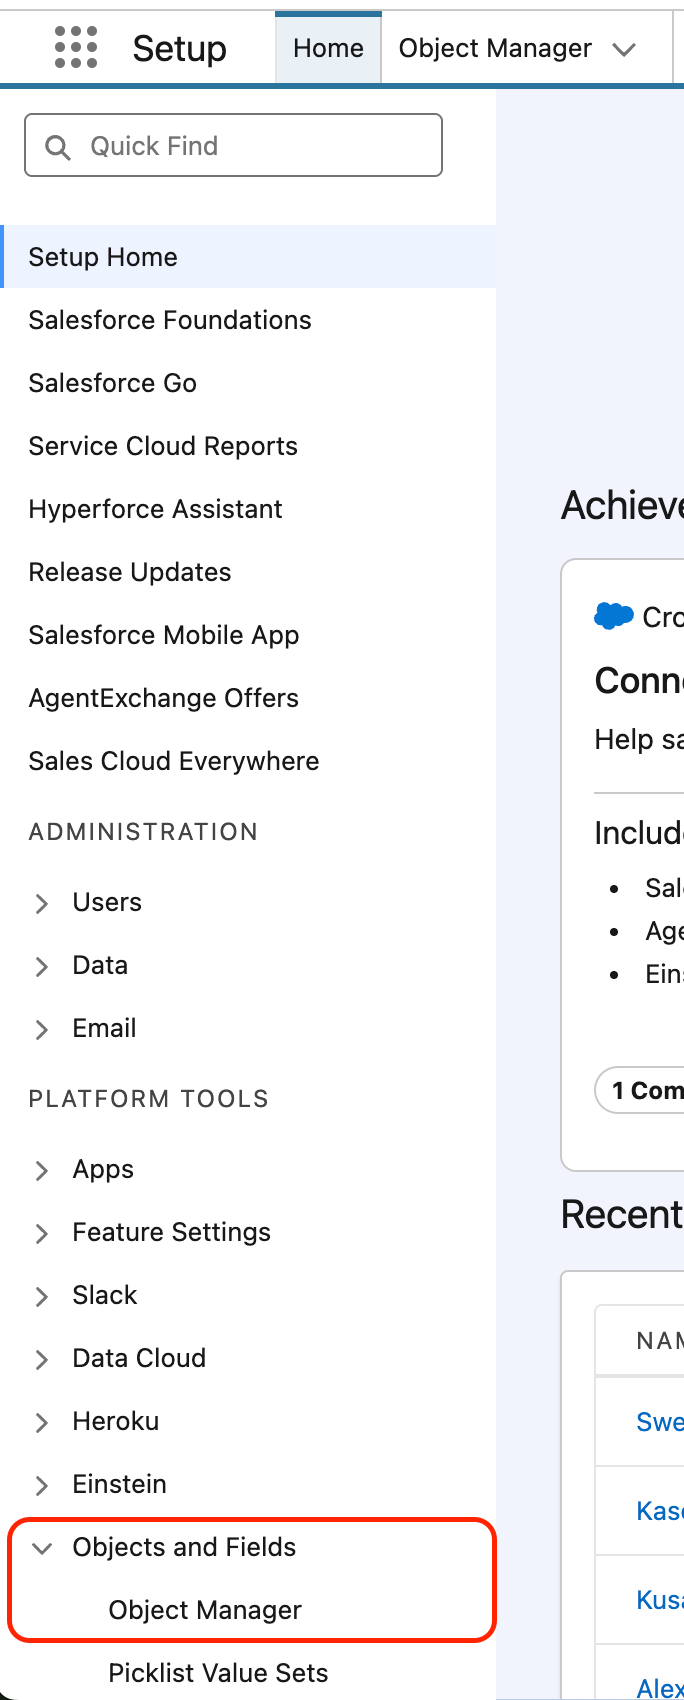 3. Click **Account** → **Fields & Relationships** → **New**
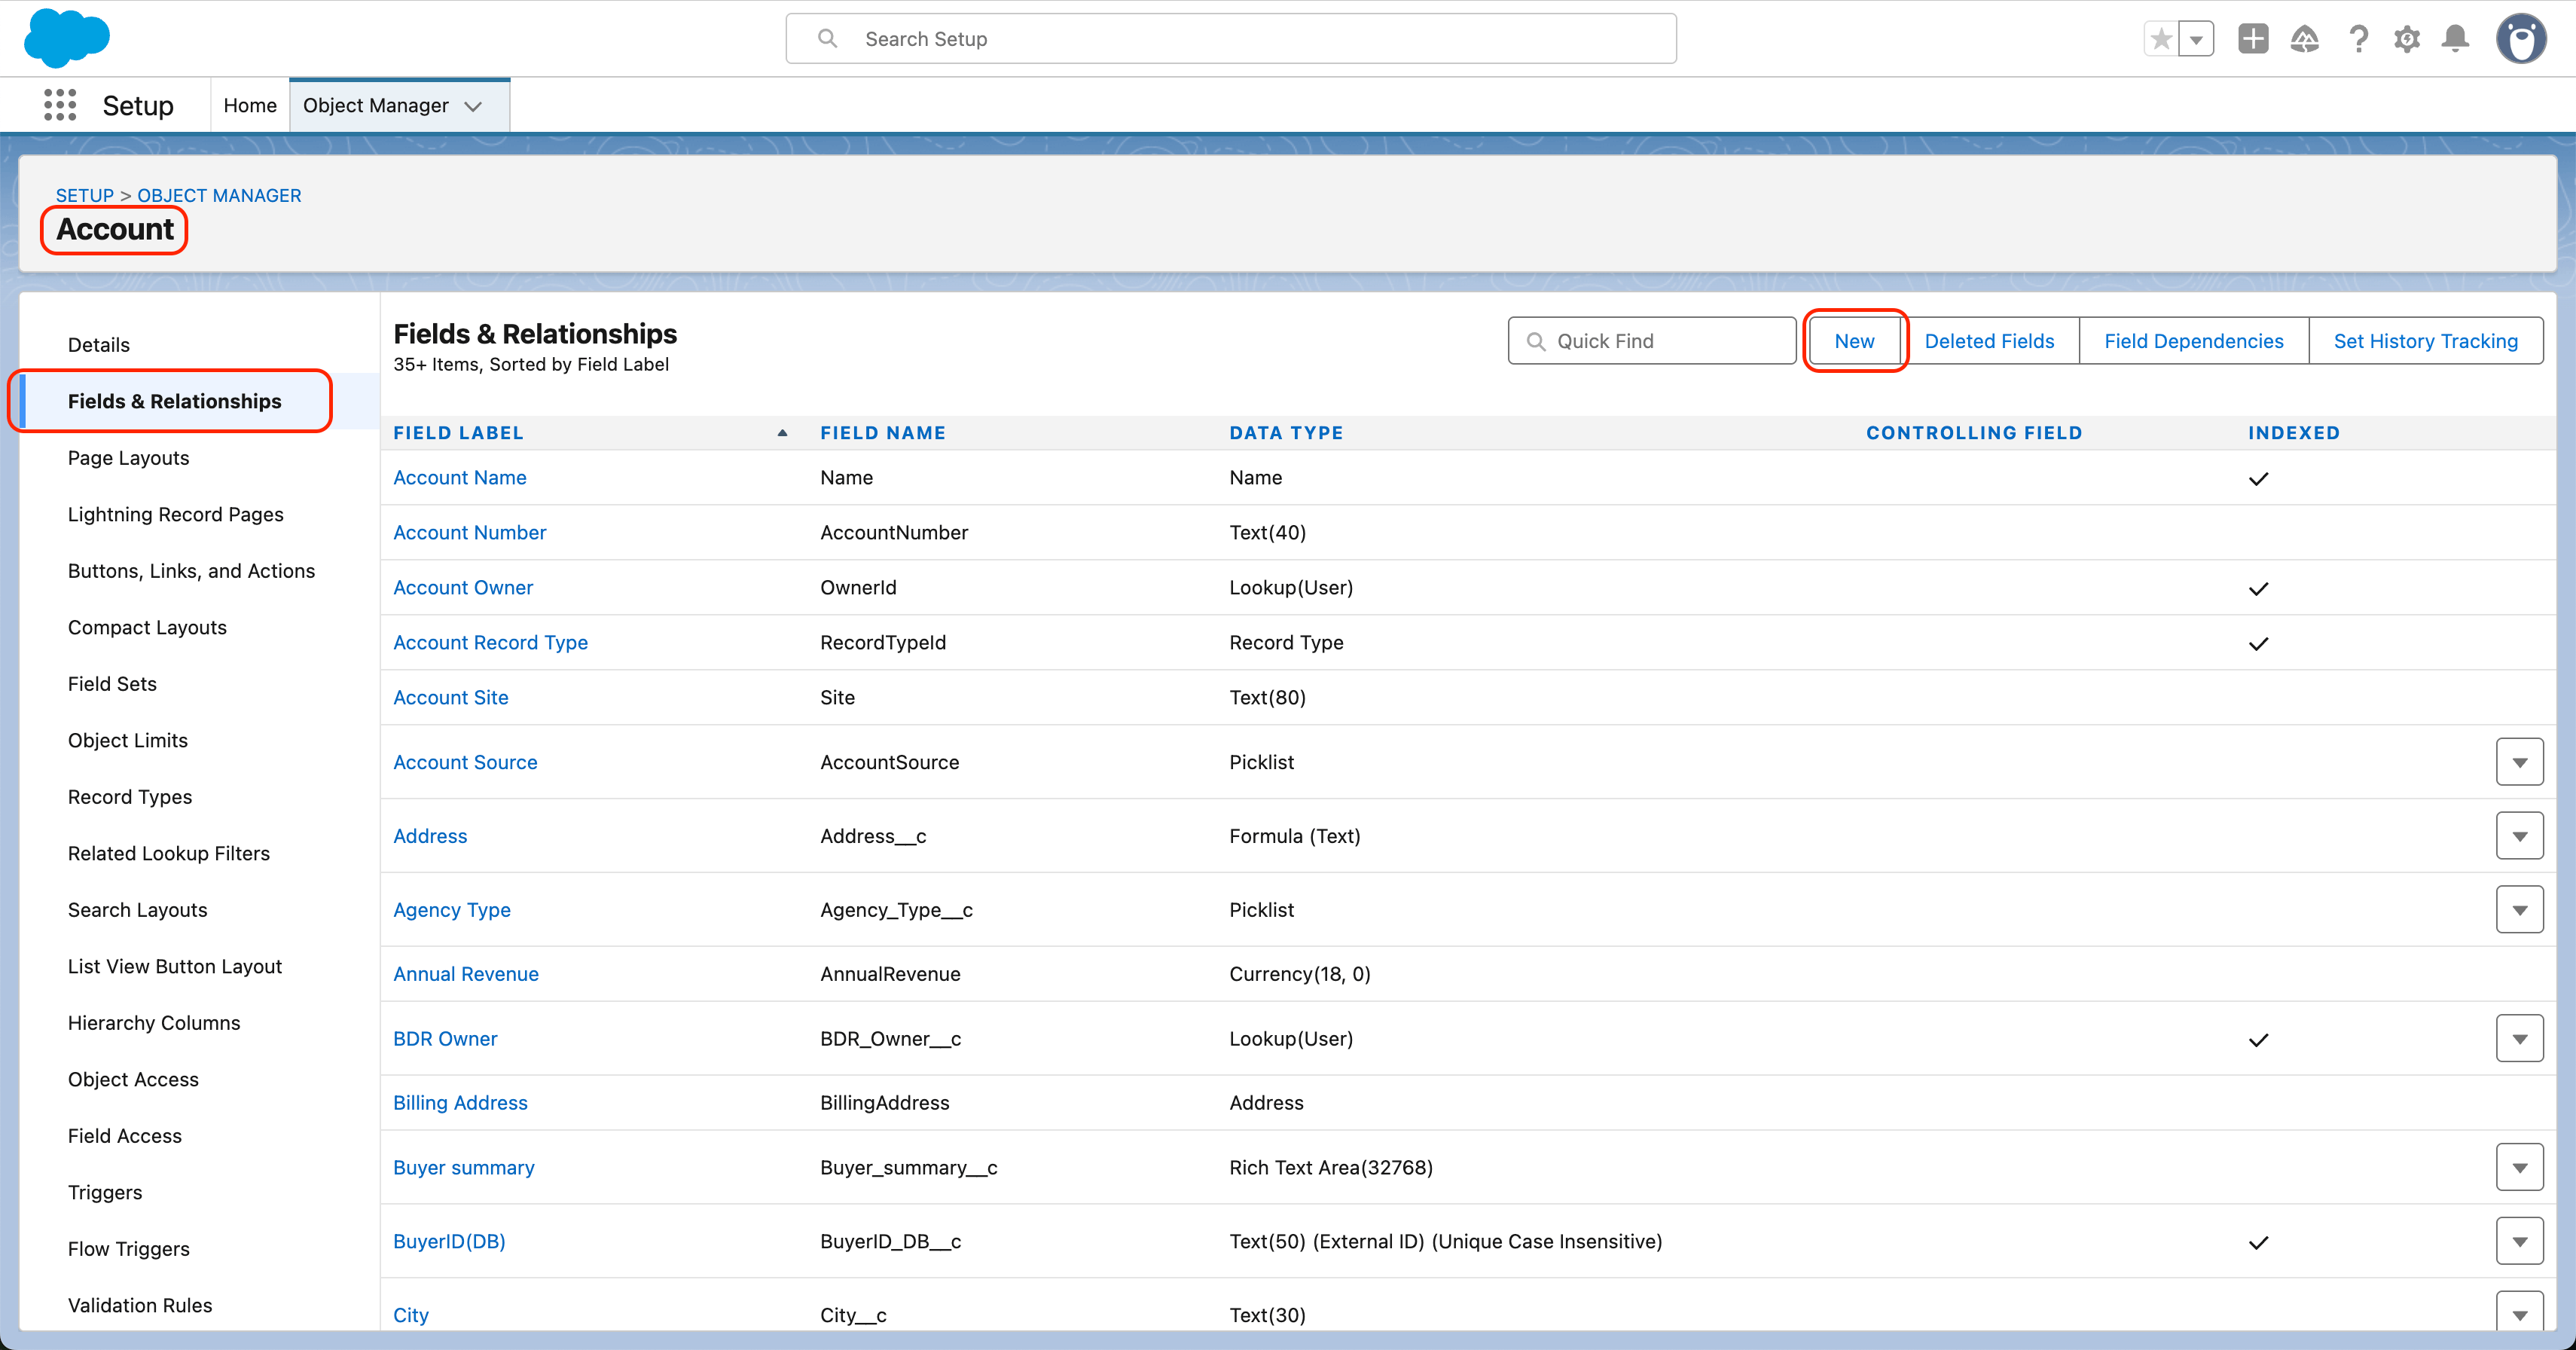 4. Create the field — **Starbridge Account ID**:
| Setting | Value |
| ---------------------- | ------------------------------------------------- |
| Field Type | Text |
| Field Label | `Starbridge Account ID` |
| Length | `25` |
| Description (optional) | `The unique ID for this account from Starbridge.` |
| Unique | ✓ Checked |
| External ID | ✓ Checked |
4. Create the field — **Starbridge Account ID**:
| Setting | Value |
| ---------------------- | ------------------------------------------------- |
| Field Type | Text |
| Field Label | `Starbridge Account ID` |
| Length | `25` |
| Description (optional) | `The unique ID for this account from Starbridge.` |
| Unique | ✓ Checked |
| External ID | ✓ Checked |
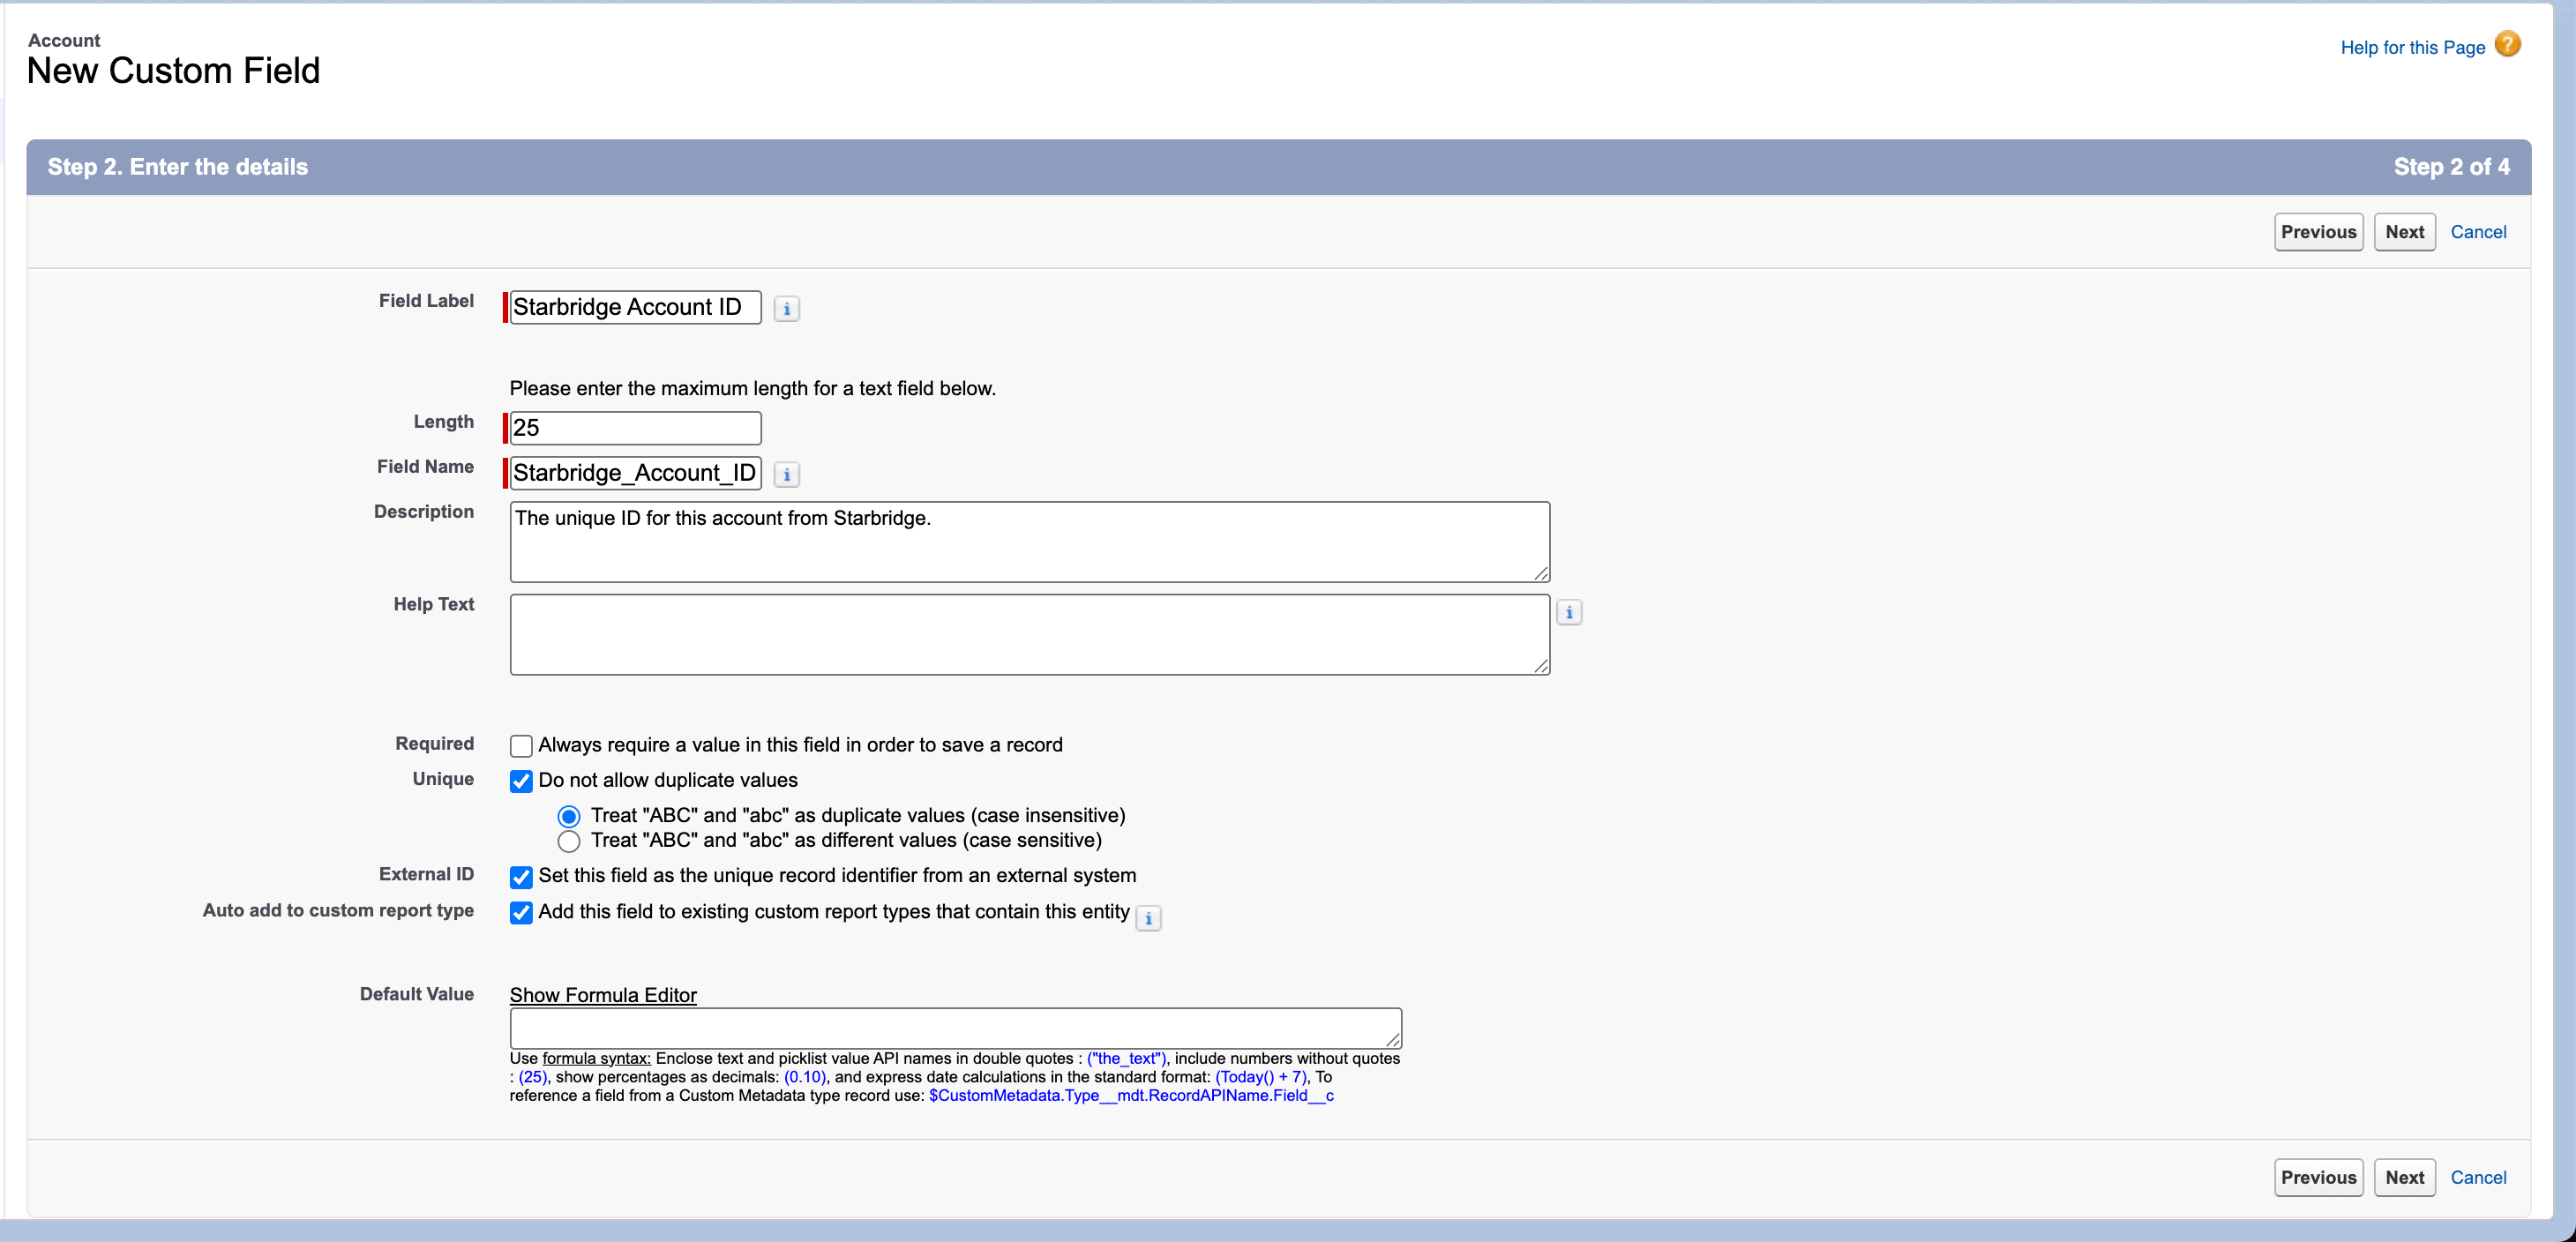 Click **Next** → **Next** → **Save**.
Salesforce automatically appends `__c` to custom field API names (e.g. `Starbridge_Account_ID__c`). This is expected.
Before connecting Starbridge to HubSpot, you need to create a custom property on the Company object to store Starbridge data.
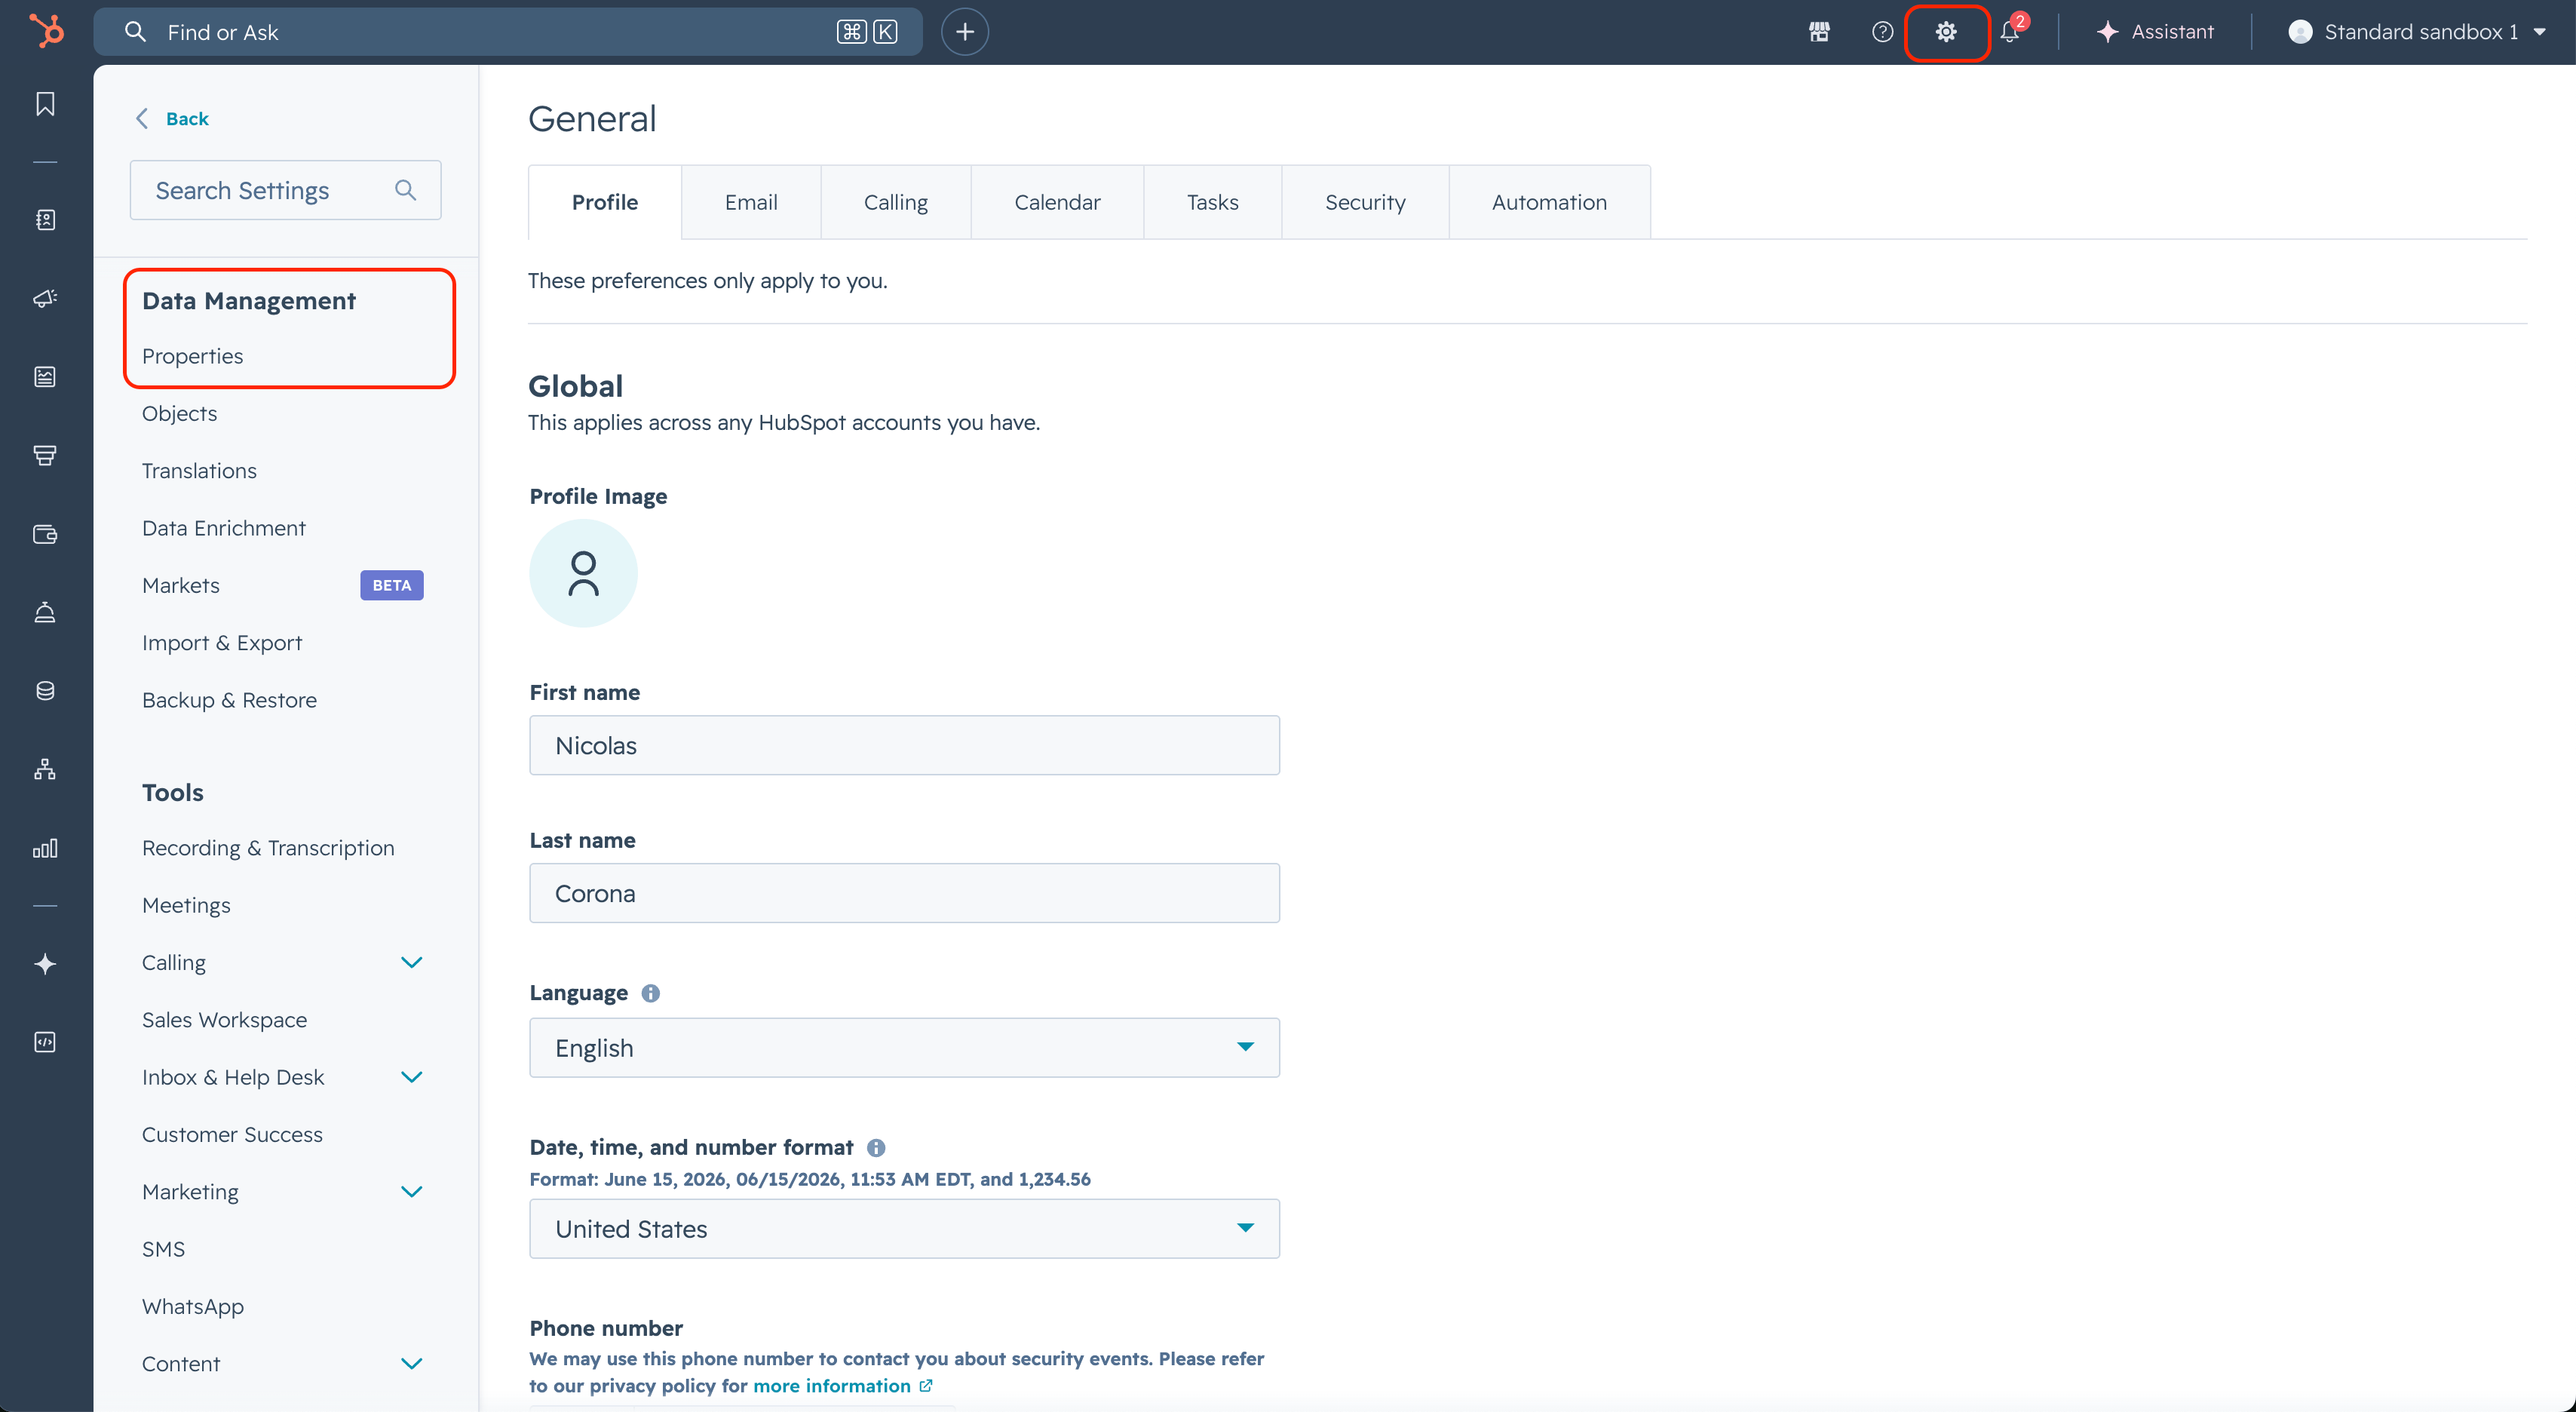
1. In HubSpot, go to **Settings (Gear icon ⚙)** → **Properties**
Click **Next** → **Next** → **Save**.
Salesforce automatically appends `__c` to custom field API names (e.g. `Starbridge_Account_ID__c`). This is expected.
Before connecting Starbridge to HubSpot, you need to create a custom property on the Company object to store Starbridge data.
1. In HubSpot, go to **Settings (Gear icon ⚙)** → **Properties**
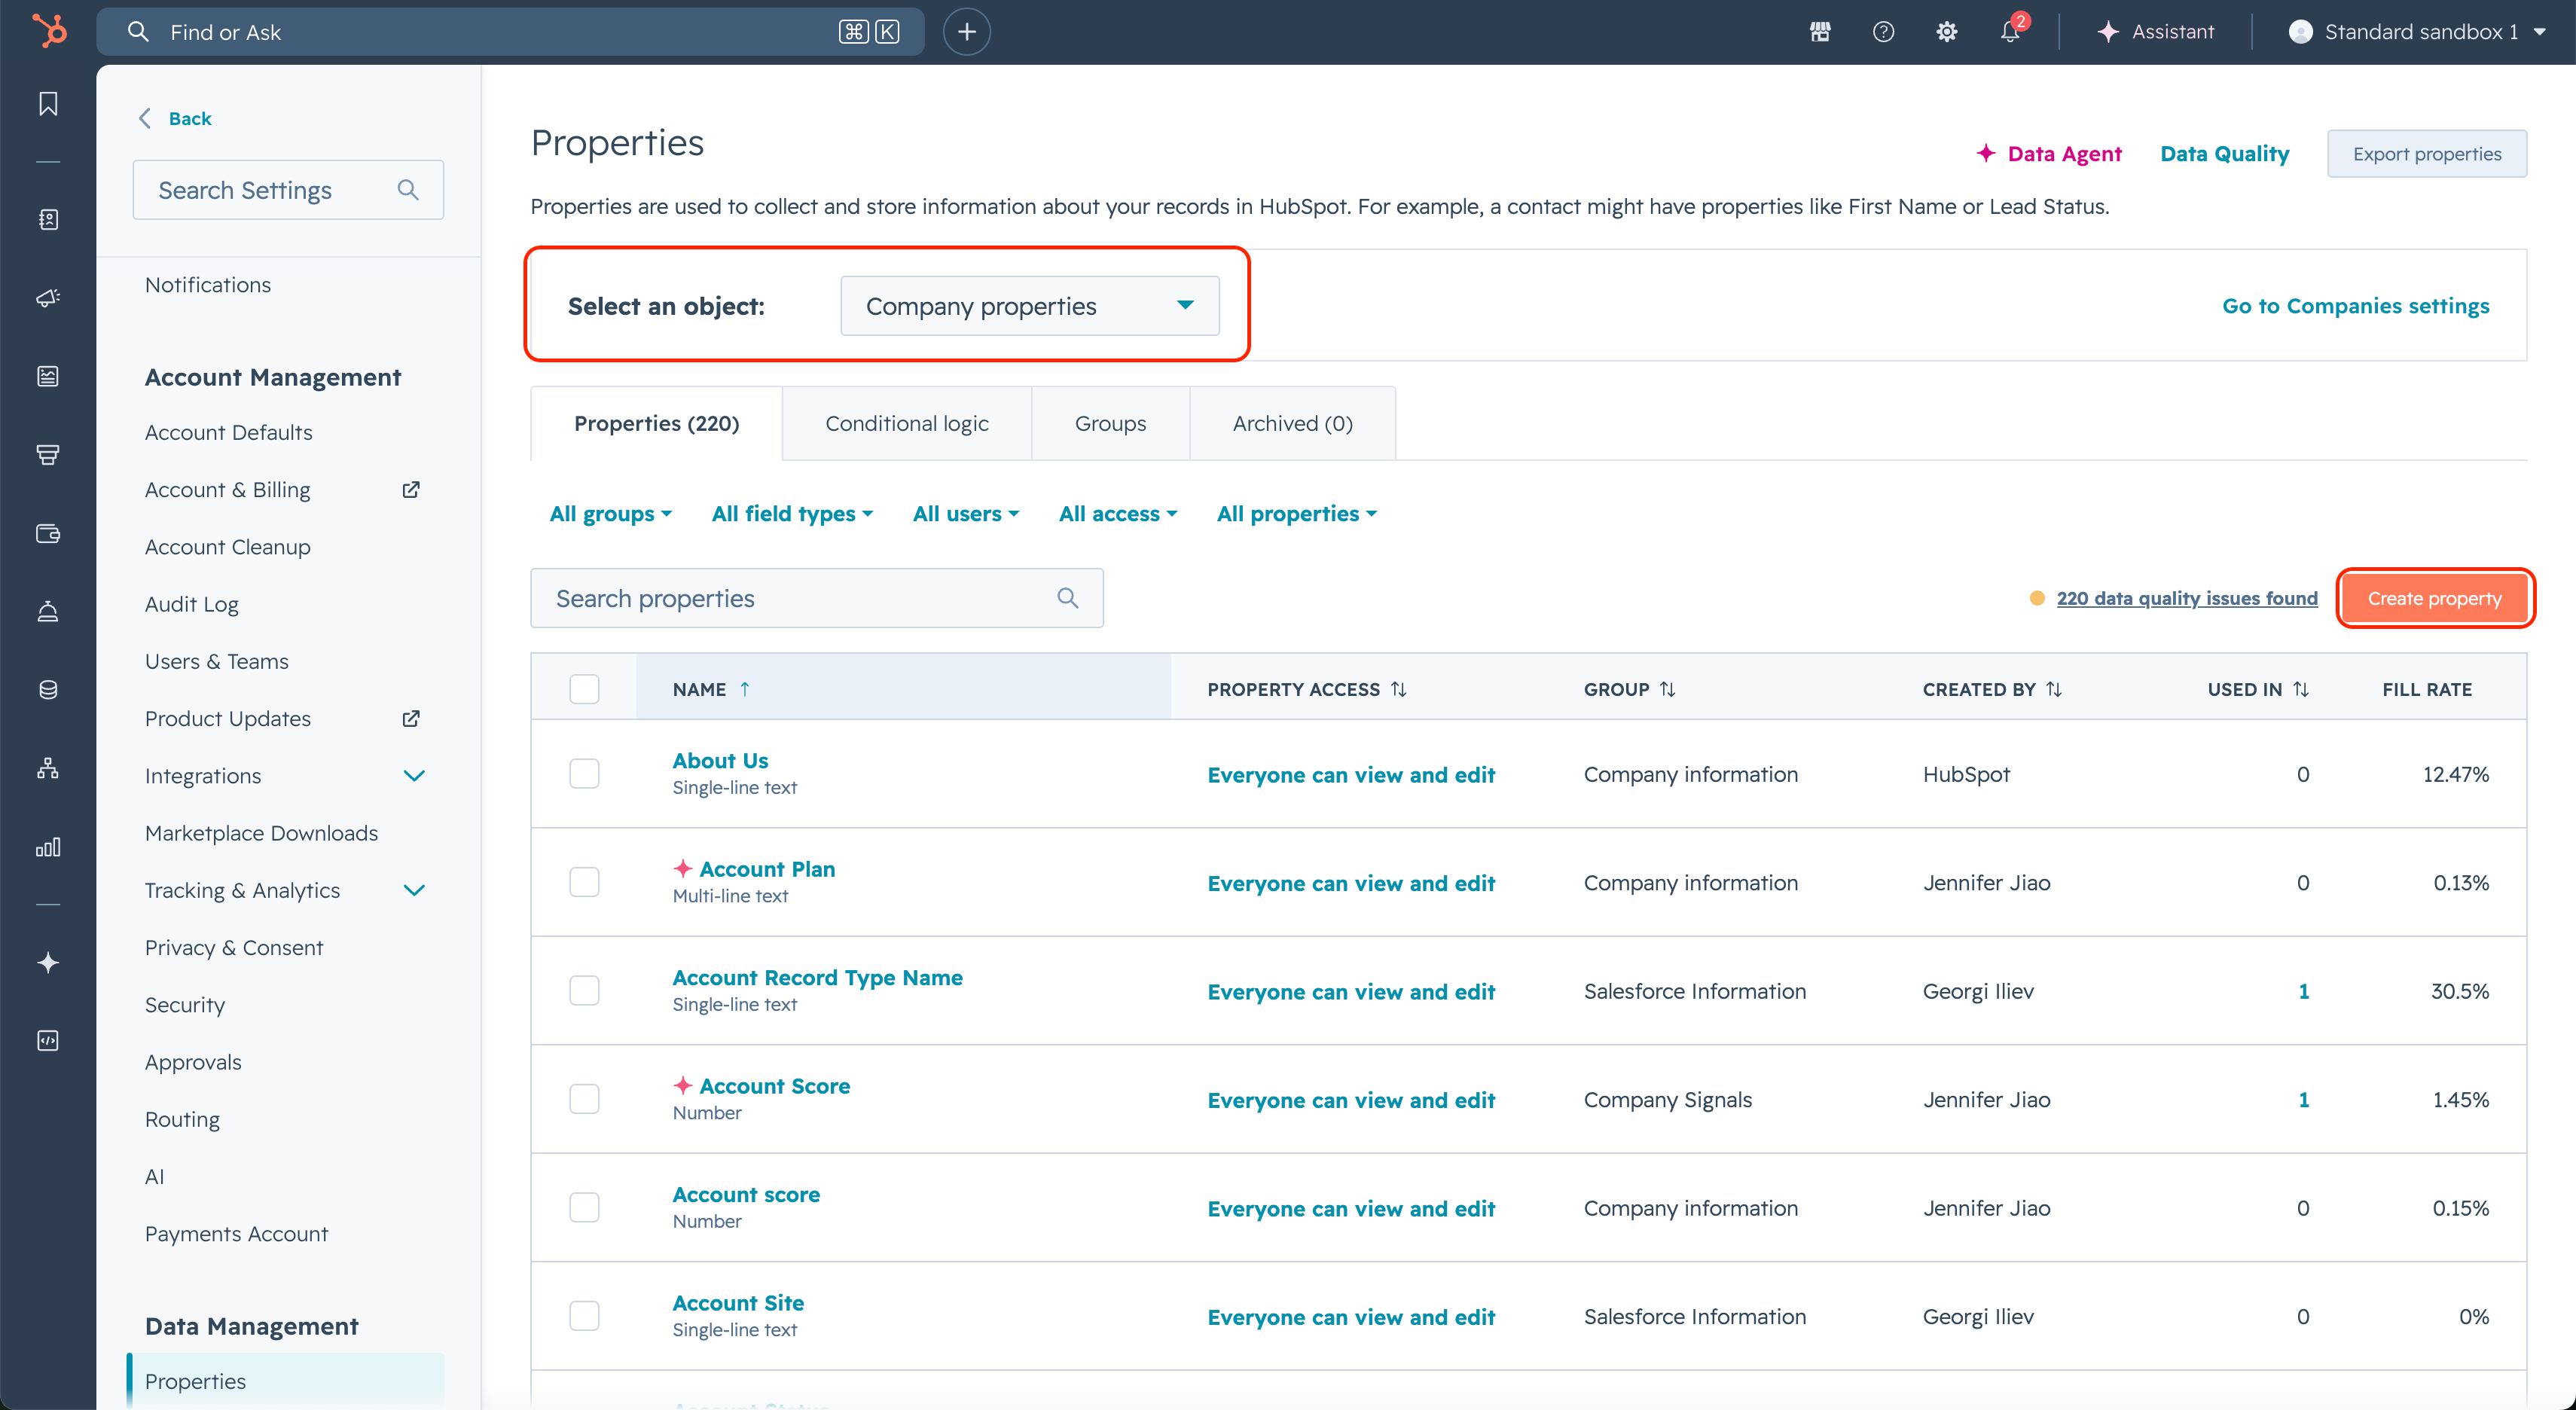
 2. In the **Select an object** dropdown, select **Company properties**, then click **Create property** (top right)\\
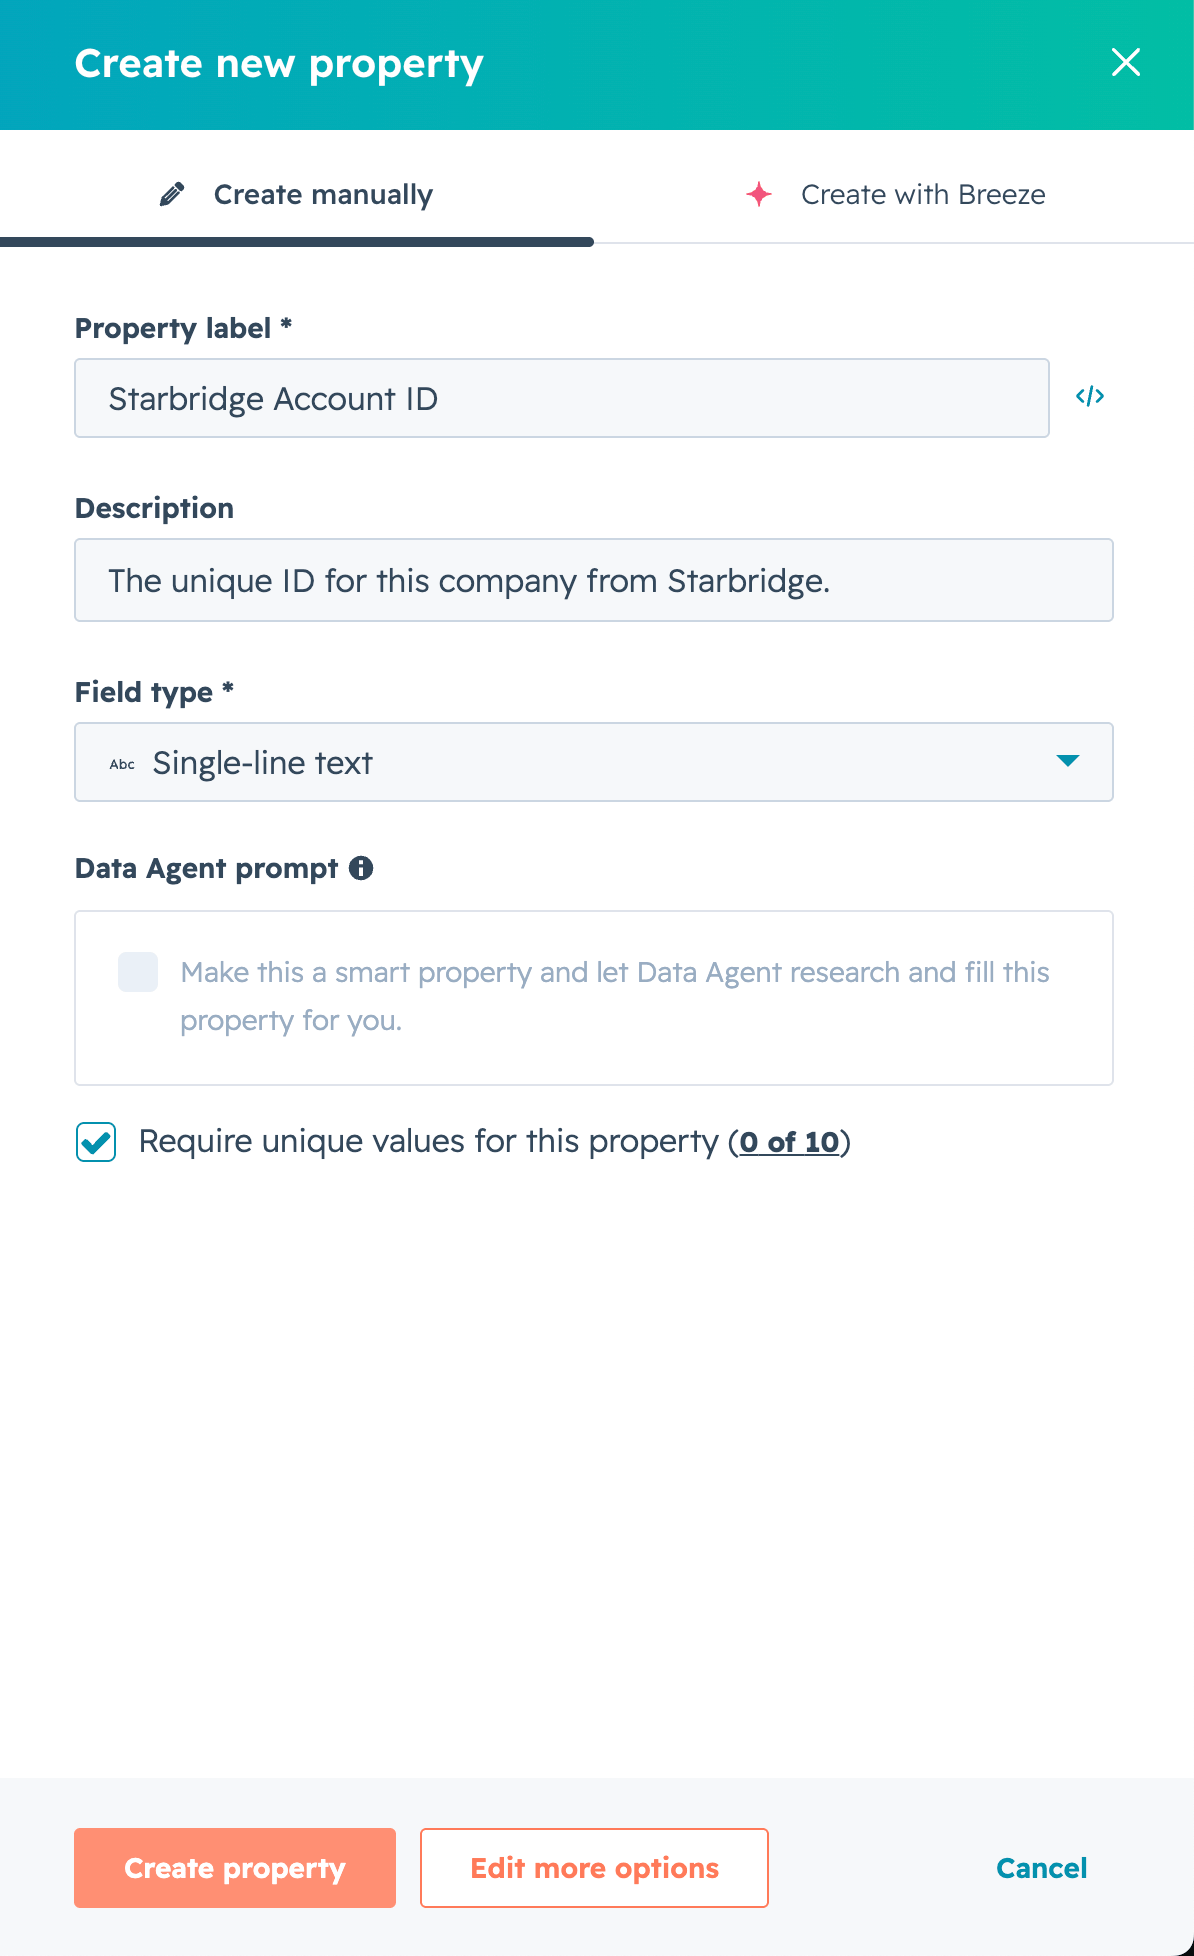
 3. Create the property — **Starbridge Account ID**:
| Setting | Value |
| ---------------------- | ------------------------------------------------- |
| Property label | `Starbridge Account ID` |
| Description (optional) | `The unique ID for this company from Starbridge.` |
| Field type | Single-line text |
| Unique | ✓ Require unique values for this property |
3. Create the property — **Starbridge Account ID**:
| Setting | Value |
| ---------------------- | ------------------------------------------------- |
| Property label | `Starbridge Account ID` |
| Description (optional) | `The unique ID for this company from Starbridge.` |
| Field type | Single-line text |
| Unique | ✓ Require unique values for this property |
 \
Click **Create**.
Do not delete this property after creation. HubSpot will not allow you to recreate it with the same configuration.
**Contact fields: Starbridge Contact ID and Starbridge Is Active**
Before connecting Starbridge to Salesforce, you need to create two custom fields on the Contact object to store Starbridge data.
1. In Salesforce, click the **Gear icon (⚙)** → **Setup**
2. In the left sidebar, search for **Object Manager** and open it, or directly click **Objects and Fields** → **Object Manager**
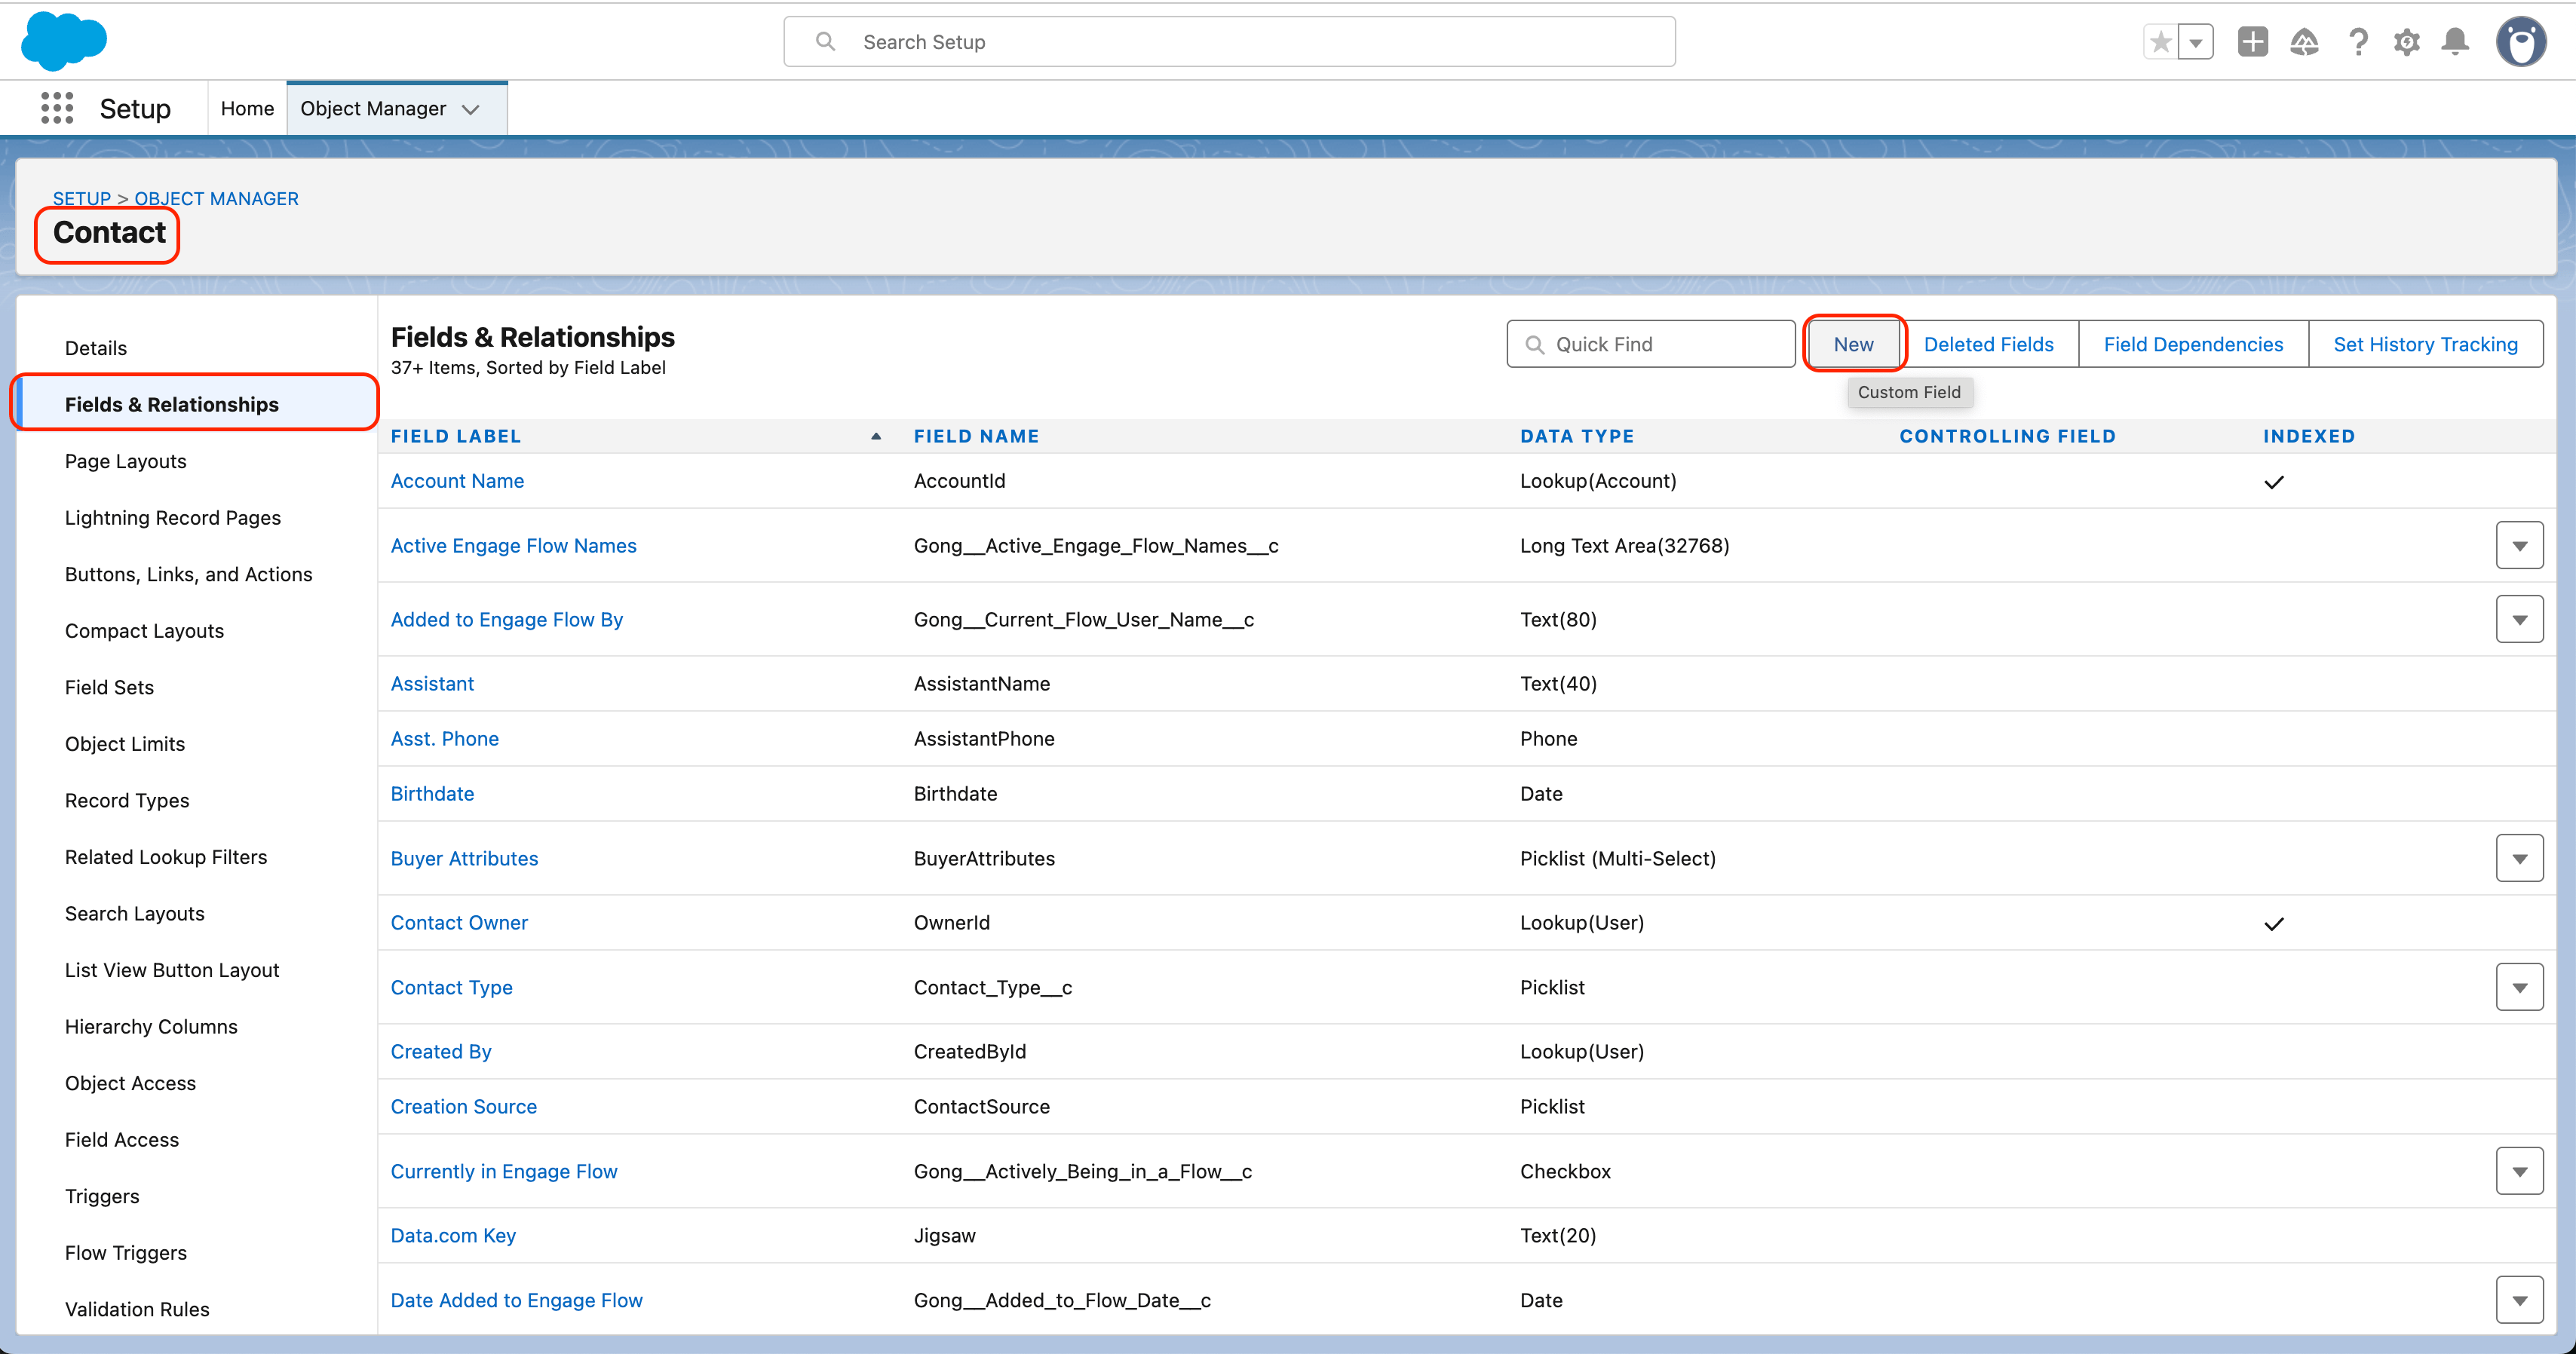
3. Click **Contact** → **Fields & Relationships** → **New**
\
Click **Create**.
Do not delete this property after creation. HubSpot will not allow you to recreate it with the same configuration.
**Contact fields: Starbridge Contact ID and Starbridge Is Active**
Before connecting Starbridge to Salesforce, you need to create two custom fields on the Contact object to store Starbridge data.
1. In Salesforce, click the **Gear icon (⚙)** → **Setup**
2. In the left sidebar, search for **Object Manager** and open it, or directly click **Objects and Fields** → **Object Manager**
3. Click **Contact** → **Fields & Relationships** → **New**
 4. Create the first field — **Starbridge Contact ID**:
| Setting | Value |
| ---------------------- | ------------------------------------------------- |
| Field Type | Text |
| Field Label | `Starbridge Contact ID` |
| Length | `25` |
| Description (optional) | `The unique ID for this contact from Starbridge.` |
| Unique | ✓ Checked |
| External ID | ✓ Checked |
4. Create the first field — **Starbridge Contact ID**:
| Setting | Value |
| ---------------------- | ------------------------------------------------- |
| Field Type | Text |
| Field Label | `Starbridge Contact ID` |
| Length | `25` |
| Description (optional) | `The unique ID for this contact from Starbridge.` |
| Unique | ✓ Checked |
| External ID | ✓ Checked |
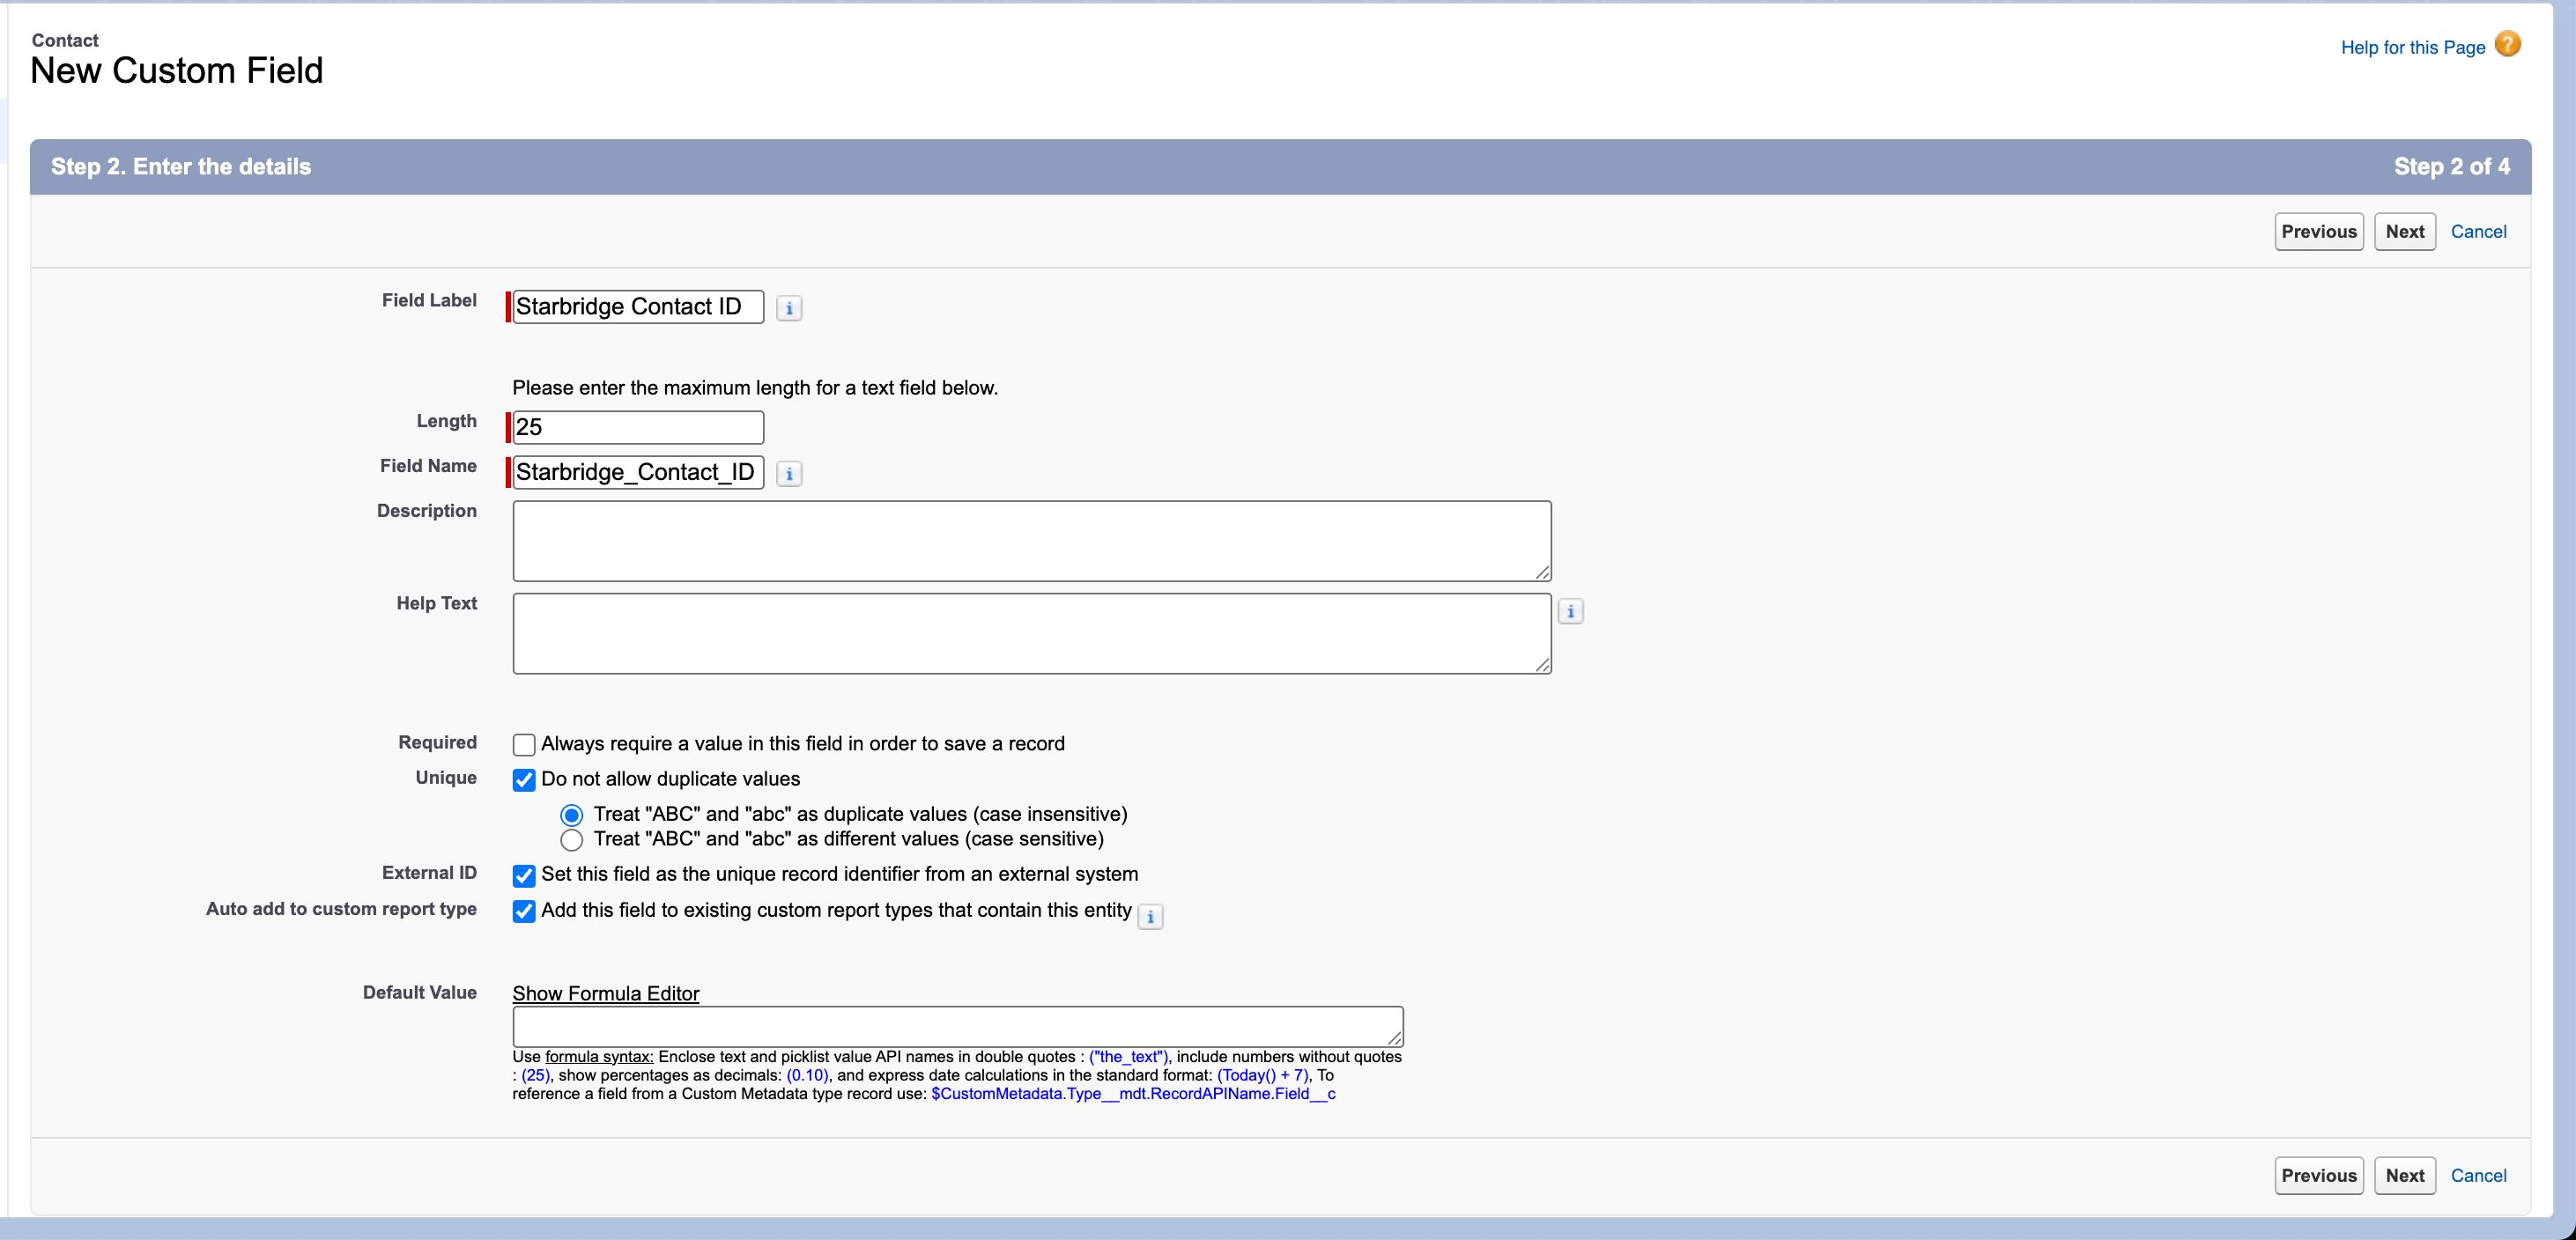 \
Click **Next** → **Next** → **Save & New**
5. Create the second field — **Starbridge Is Active**:
| Setting | Value |
| ---------------------- | ----------------------------------------------------------------------------- |
| Field Type | Checkbox |
| Field Label | `Starbridge Is Active` |
| Default Value | Unchecked |
| Description (optional) | `Whether this contact is actively employed at this account, from Starbridge.` |
\
Click **Next** → **Next** → **Save & New**
5. Create the second field — **Starbridge Is Active**:
| Setting | Value |
| ---------------------- | ----------------------------------------------------------------------------- |
| Field Type | Checkbox |
| Field Label | `Starbridge Is Active` |
| Default Value | Unchecked |
| Description (optional) | `Whether this contact is actively employed at this account, from Starbridge.` |
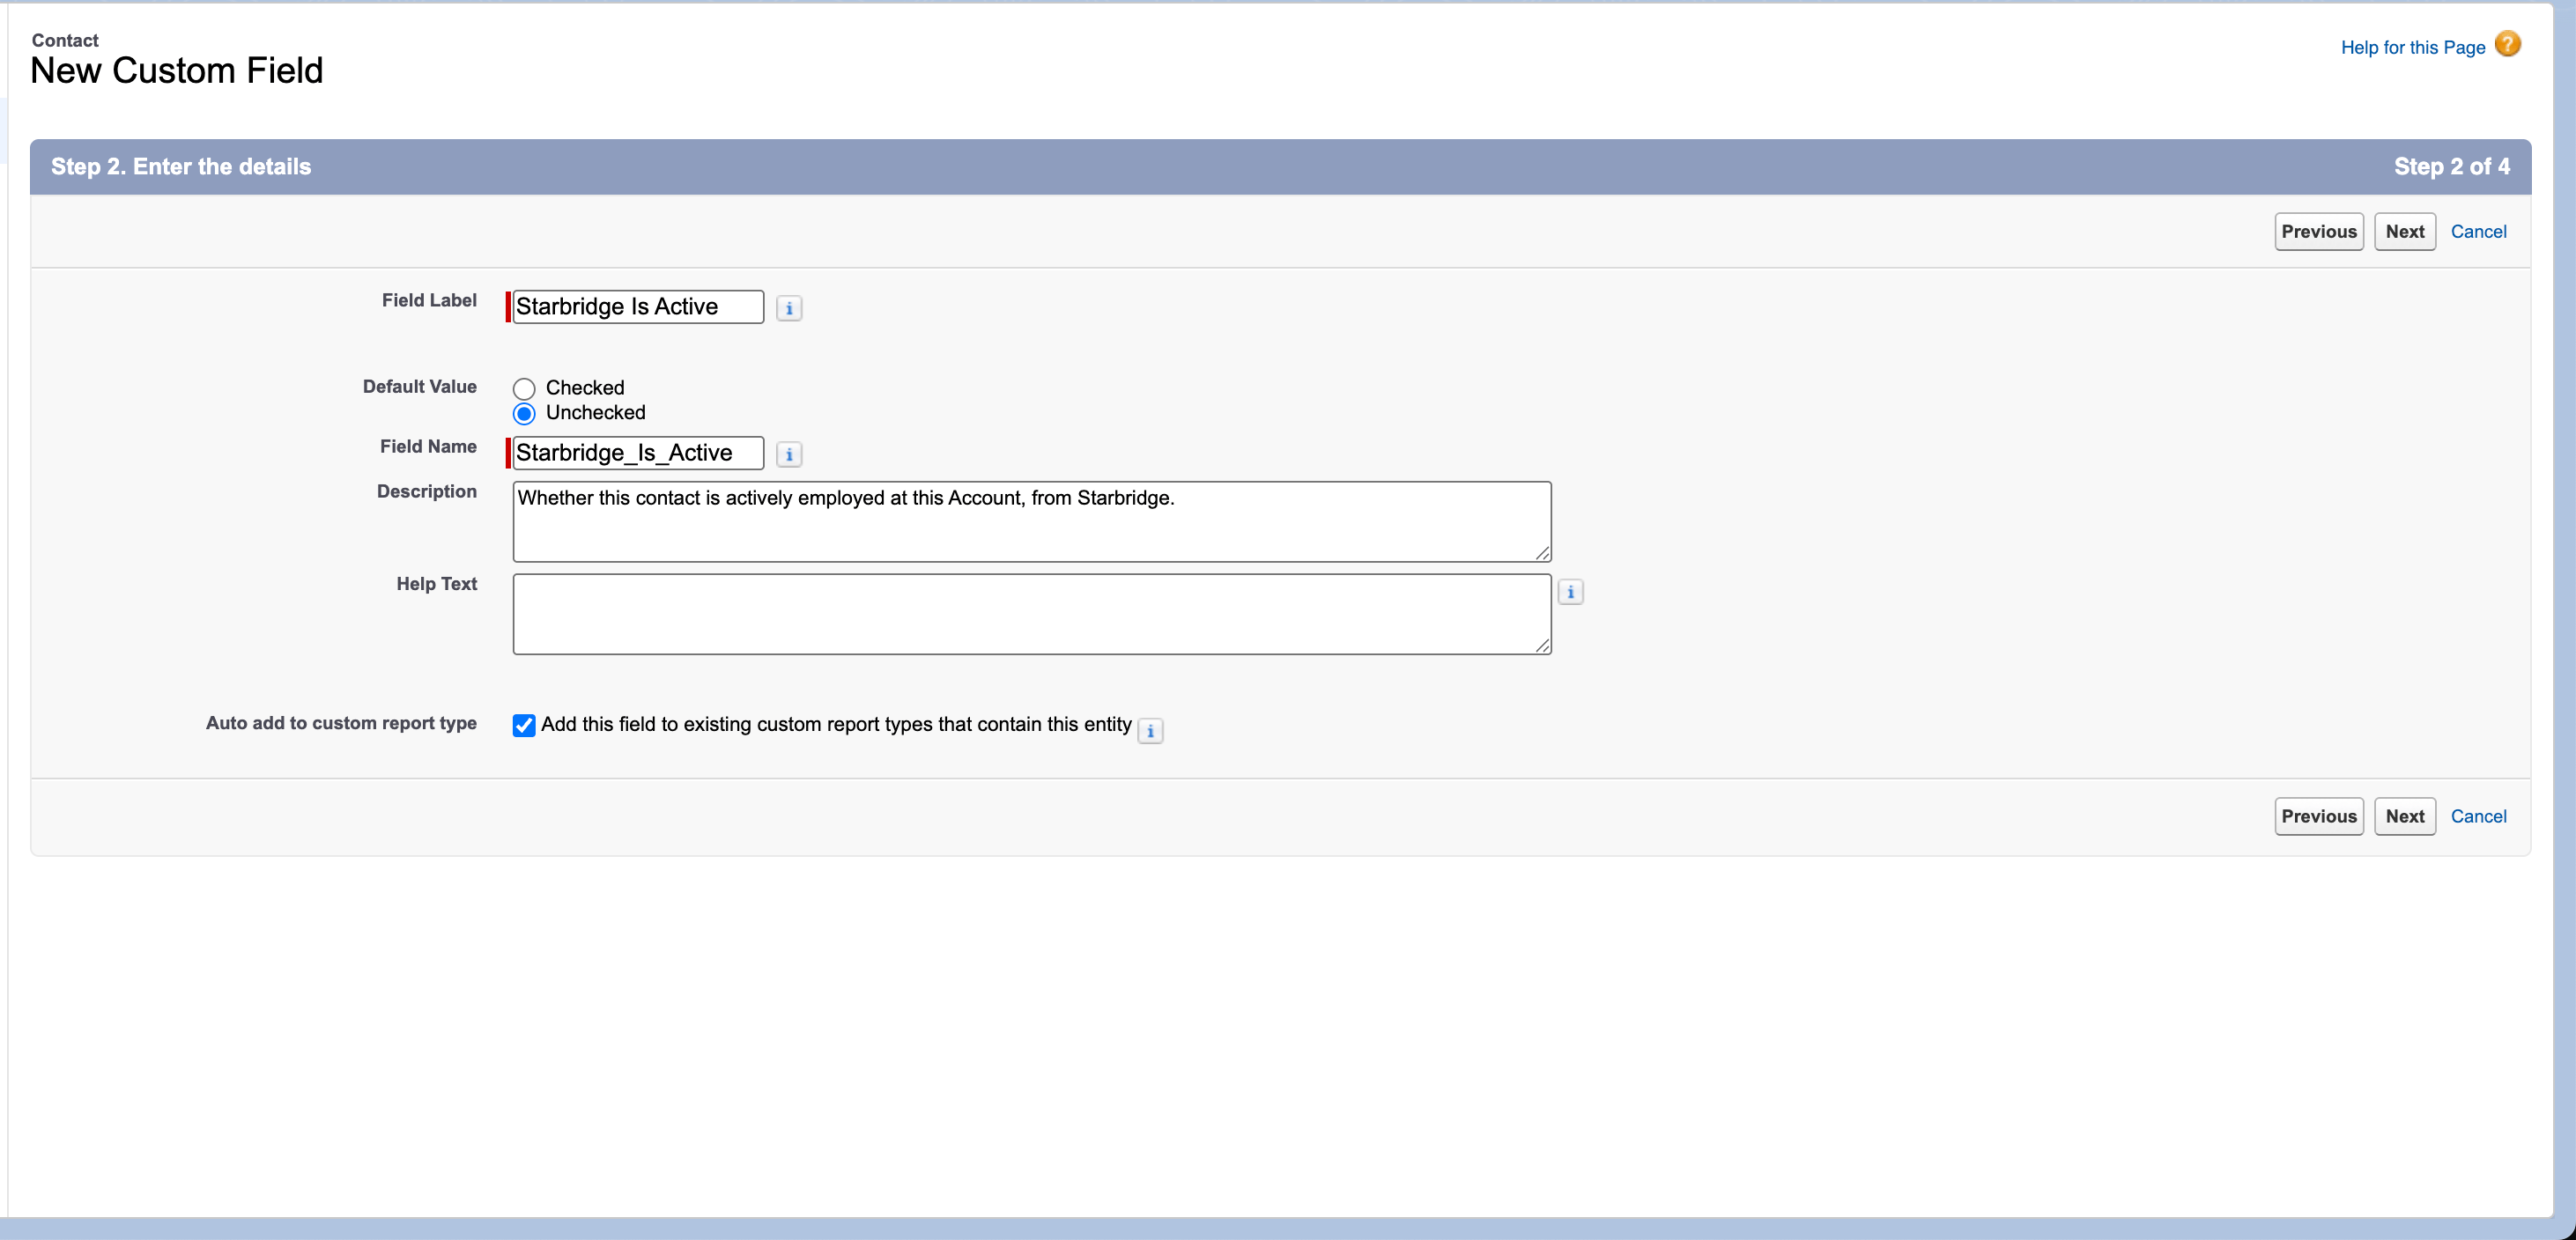 Click **Next** → **Next** → **Save**.
Salesforce automatically appends `__c` to custom field API names (e.g. `Starbridge_Contact_ID__c`). This is expected.
Before connecting Starbridge to HubSpot, you need to create two custom properties on the Contact object to store Starbridge data.
1. In HubSpot, go to **Settings (Gear icon ⚙)** → **Properties**
2. In the **Select an object** dropdown, select **Contact properties**, then click **Create property** (top right)
Click **Next** → **Next** → **Save**.
Salesforce automatically appends `__c` to custom field API names (e.g. `Starbridge_Contact_ID__c`). This is expected.
Before connecting Starbridge to HubSpot, you need to create two custom properties on the Contact object to store Starbridge data.
1. In HubSpot, go to **Settings (Gear icon ⚙)** → **Properties**
2. In the **Select an object** dropdown, select **Contact properties**, then click **Create property** (top right)
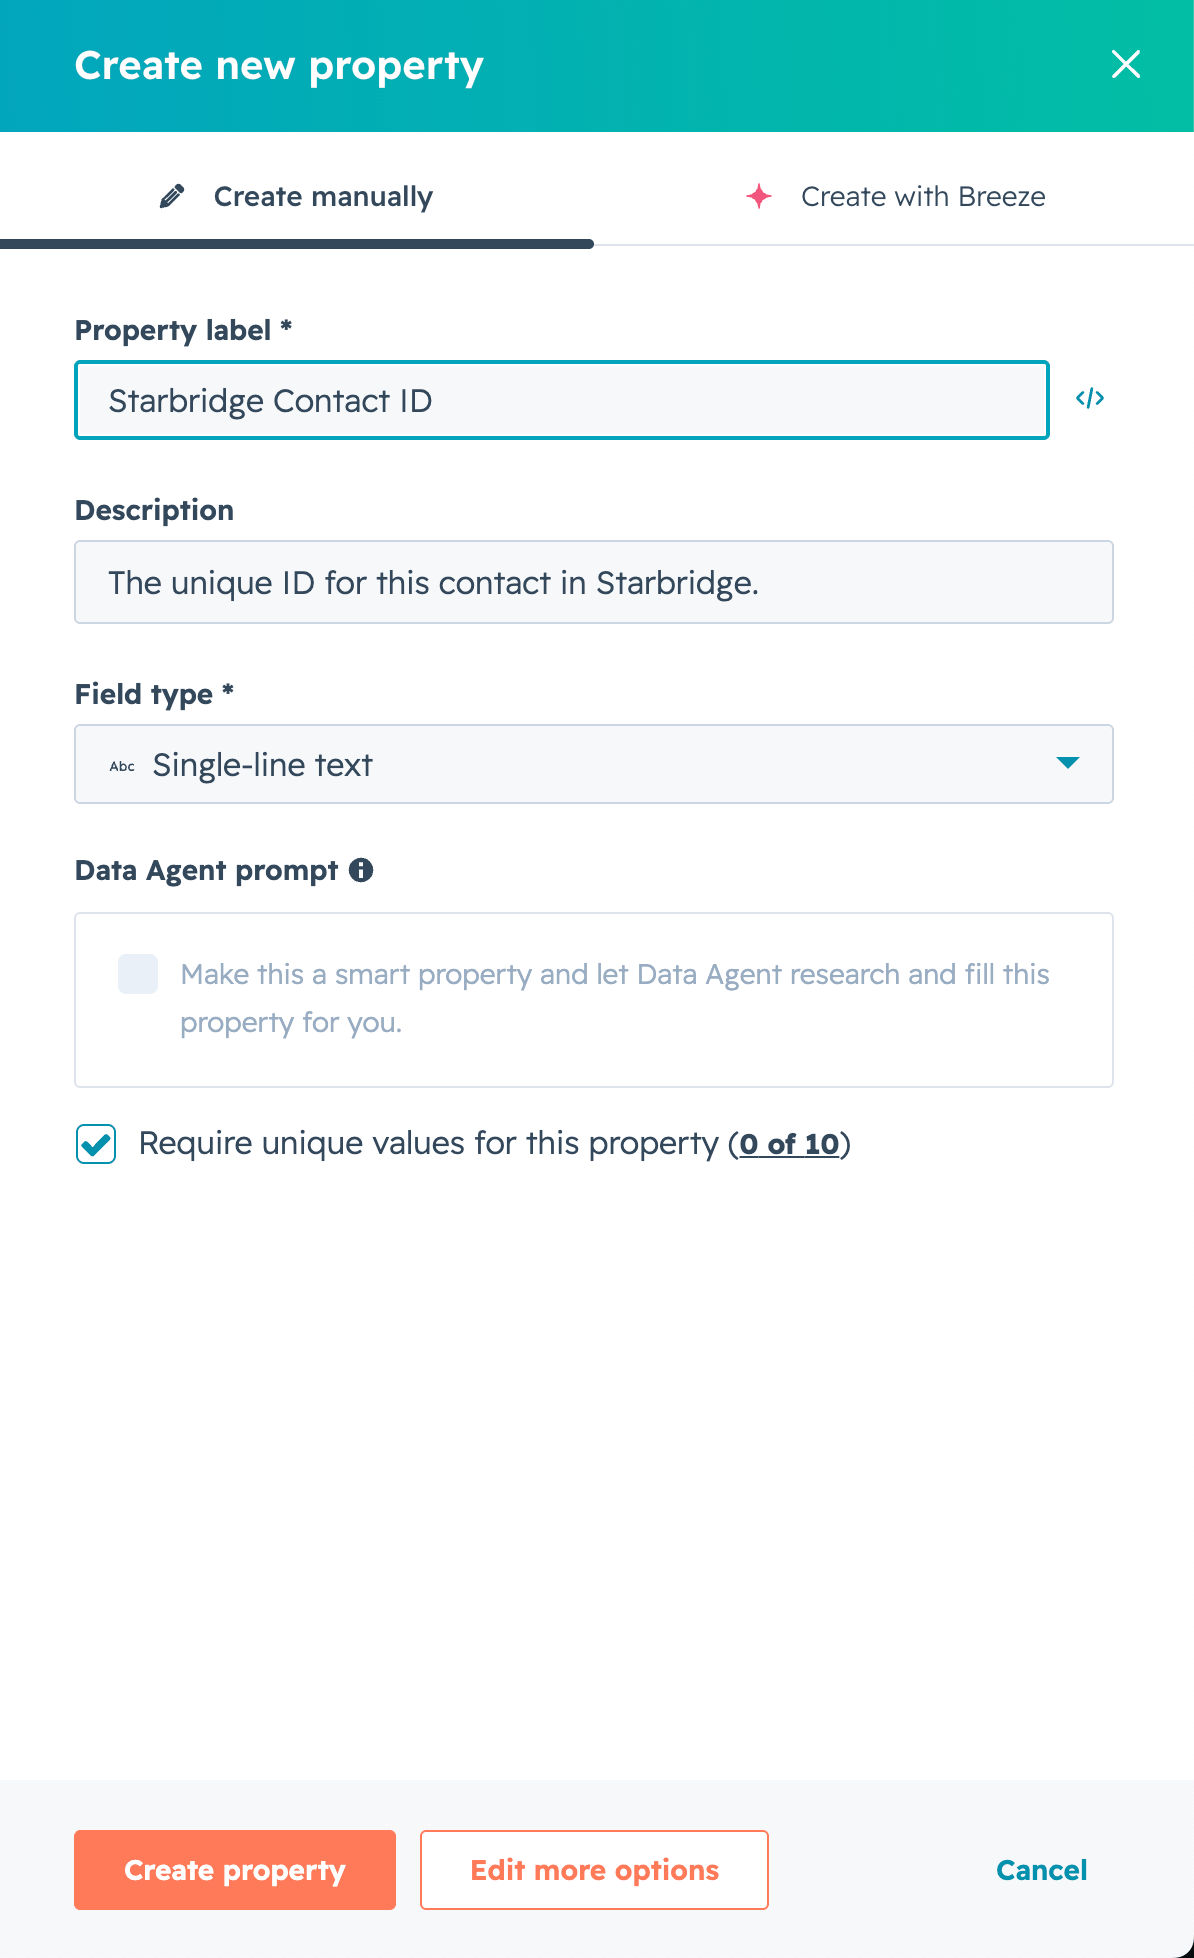
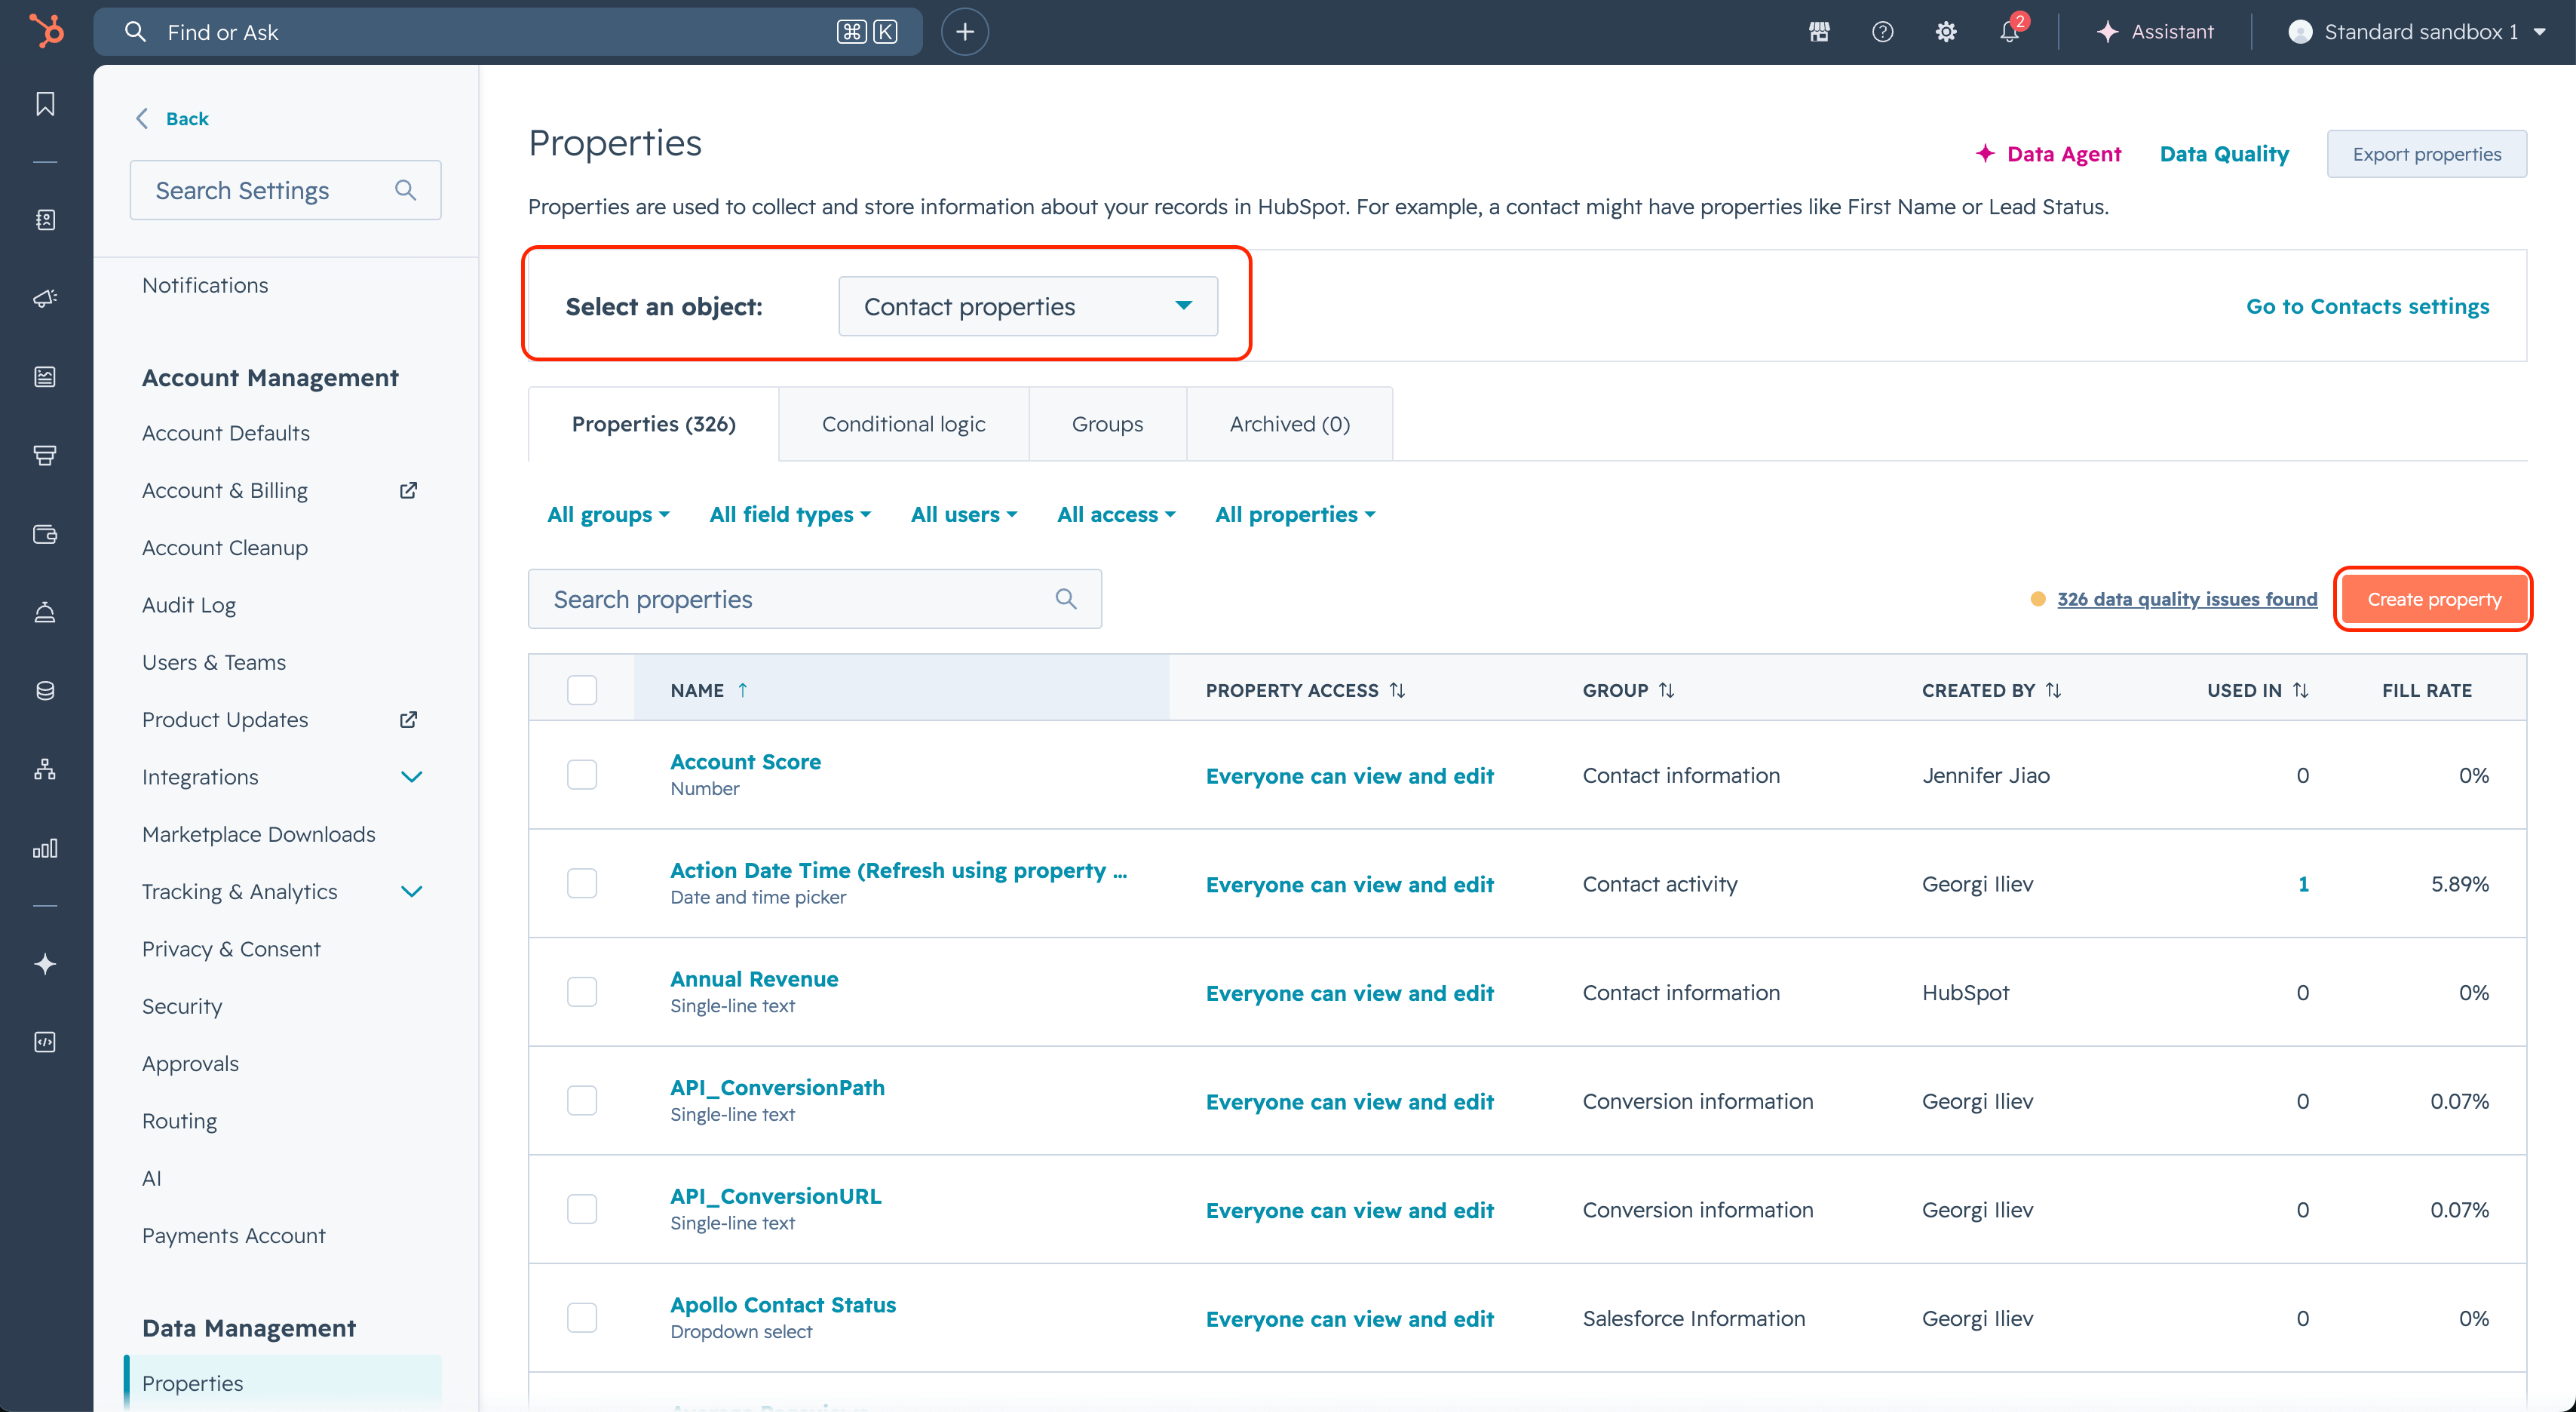 3. Create the first property — **Starbridge Contact ID**:
| Setting | Value |
| ---------------------- | ------------------------------------------------- |
| Property label | `Starbridge Contact ID` |
| Description (optional) | `The unique ID for this contact from Starbridge.` |
| Field type | Single-line text |
| Unique | ✓ Require unique values for this property |
| Click **Create** | |
3. Create the first property — **Starbridge Contact ID**:
| Setting | Value |
| ---------------------- | ------------------------------------------------- |
| Property label | `Starbridge Contact ID` |
| Description (optional) | `The unique ID for this contact from Starbridge.` |
| Field type | Single-line text |
| Unique | ✓ Require unique values for this property |
| Click **Create** | |
 4. Create the second property — **Starbridge Is Active**:
| Setting | Value |
| ------------------------- | ----------------------------------------------------------------------------- |
| Property label | `Starbridge Is Active` |
| Description (optional) | `Whether this contact is actively employed at this company, from Starbridge.` |
| Field type | Single checkbox |
| Click **Create property** | |
4. Create the second property — **Starbridge Is Active**:
| Setting | Value |
| ------------------------- | ----------------------------------------------------------------------------- |
| Property label | `Starbridge Is Active` |
| Description (optional) | `Whether this contact is actively employed at this company, from Starbridge.` |
| Field type | Single checkbox |
| Click **Create property** | |
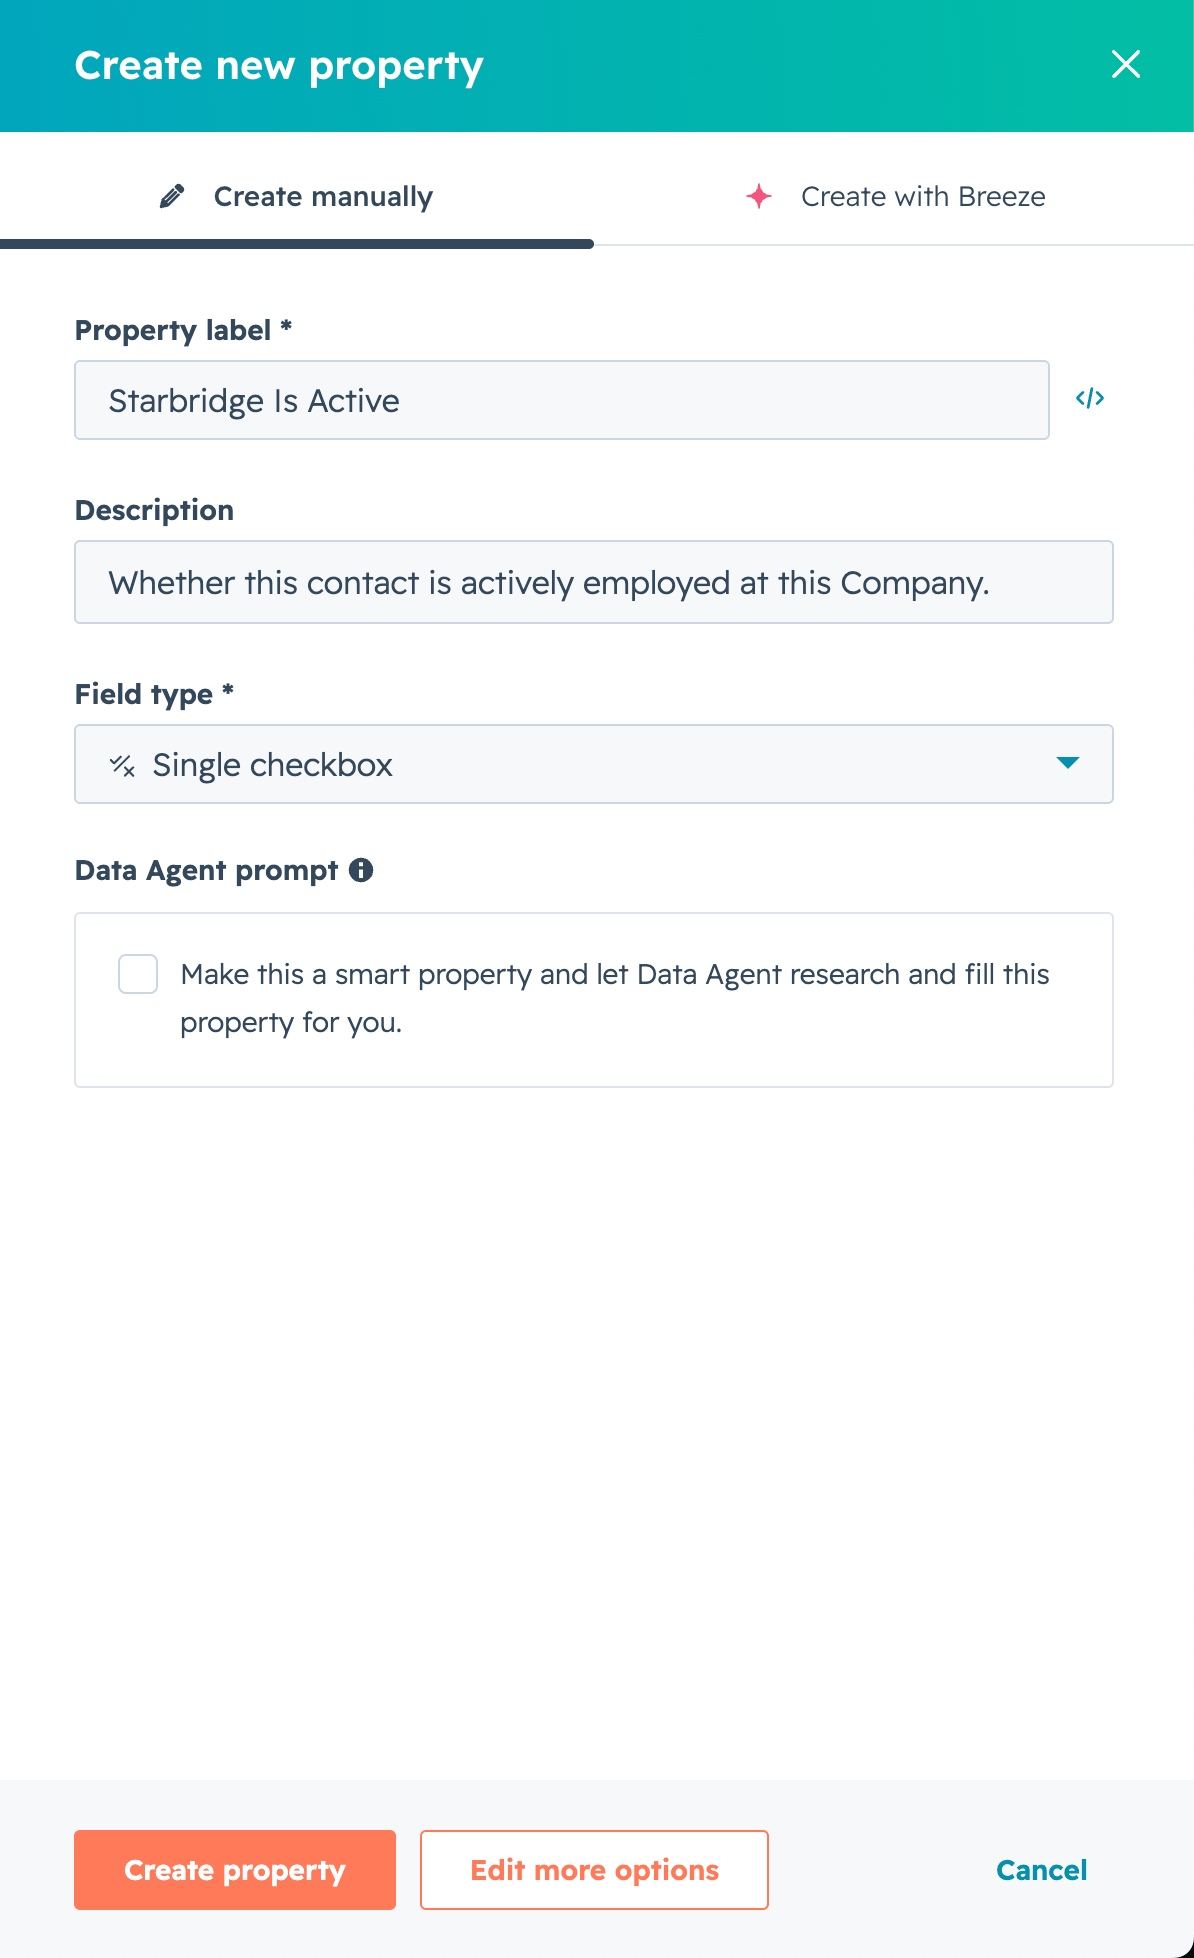 Do not delete these properties after creation. HubSpot will not allow you to recreate them with the same configuration.
The Salesforce or HubSpot account used to connect Starbridge to your CRM determines who owns the integration.
**Salesforce:** We strongly recommend creating a dedicated API-only integration user rather than connecting as a personal admin account. This keeps your audit trail clean (all Starbridge writes are attributed to one system user, not a person), limits permissions to only what Starbridge needs, and ensures the connection isn't disrupted by team changes.
**HubSpot:** HubSpot's OAuth model ties the connection to the account rather than an individual user, so there's no equivalent integration user setup.
We strongly recommend connecting Starbridge using a dedicated API-only integration user rather than a personal admin account. This allows you to easily track Starbridge's changes, retain the ability to roll back changes easily, and scope permissions to only what Starbridge needs. Most Salesforce Enterprise, Unlimited, and Performance orgs include up to 5 free Salesforce Integration user licenses.
1. In Salesforce, click the **Gear icon (⚙)** → **Setup**\\
Do not delete these properties after creation. HubSpot will not allow you to recreate them with the same configuration.
The Salesforce or HubSpot account used to connect Starbridge to your CRM determines who owns the integration.
**Salesforce:** We strongly recommend creating a dedicated API-only integration user rather than connecting as a personal admin account. This keeps your audit trail clean (all Starbridge writes are attributed to one system user, not a person), limits permissions to only what Starbridge needs, and ensures the connection isn't disrupted by team changes.
**HubSpot:** HubSpot's OAuth model ties the connection to the account rather than an individual user, so there's no equivalent integration user setup.
We strongly recommend connecting Starbridge using a dedicated API-only integration user rather than a personal admin account. This allows you to easily track Starbridge's changes, retain the ability to roll back changes easily, and scope permissions to only what Starbridge needs. Most Salesforce Enterprise, Unlimited, and Performance orgs include up to 5 free Salesforce Integration user licenses.
1. In Salesforce, click the **Gear icon (⚙)** → **Setup**\\
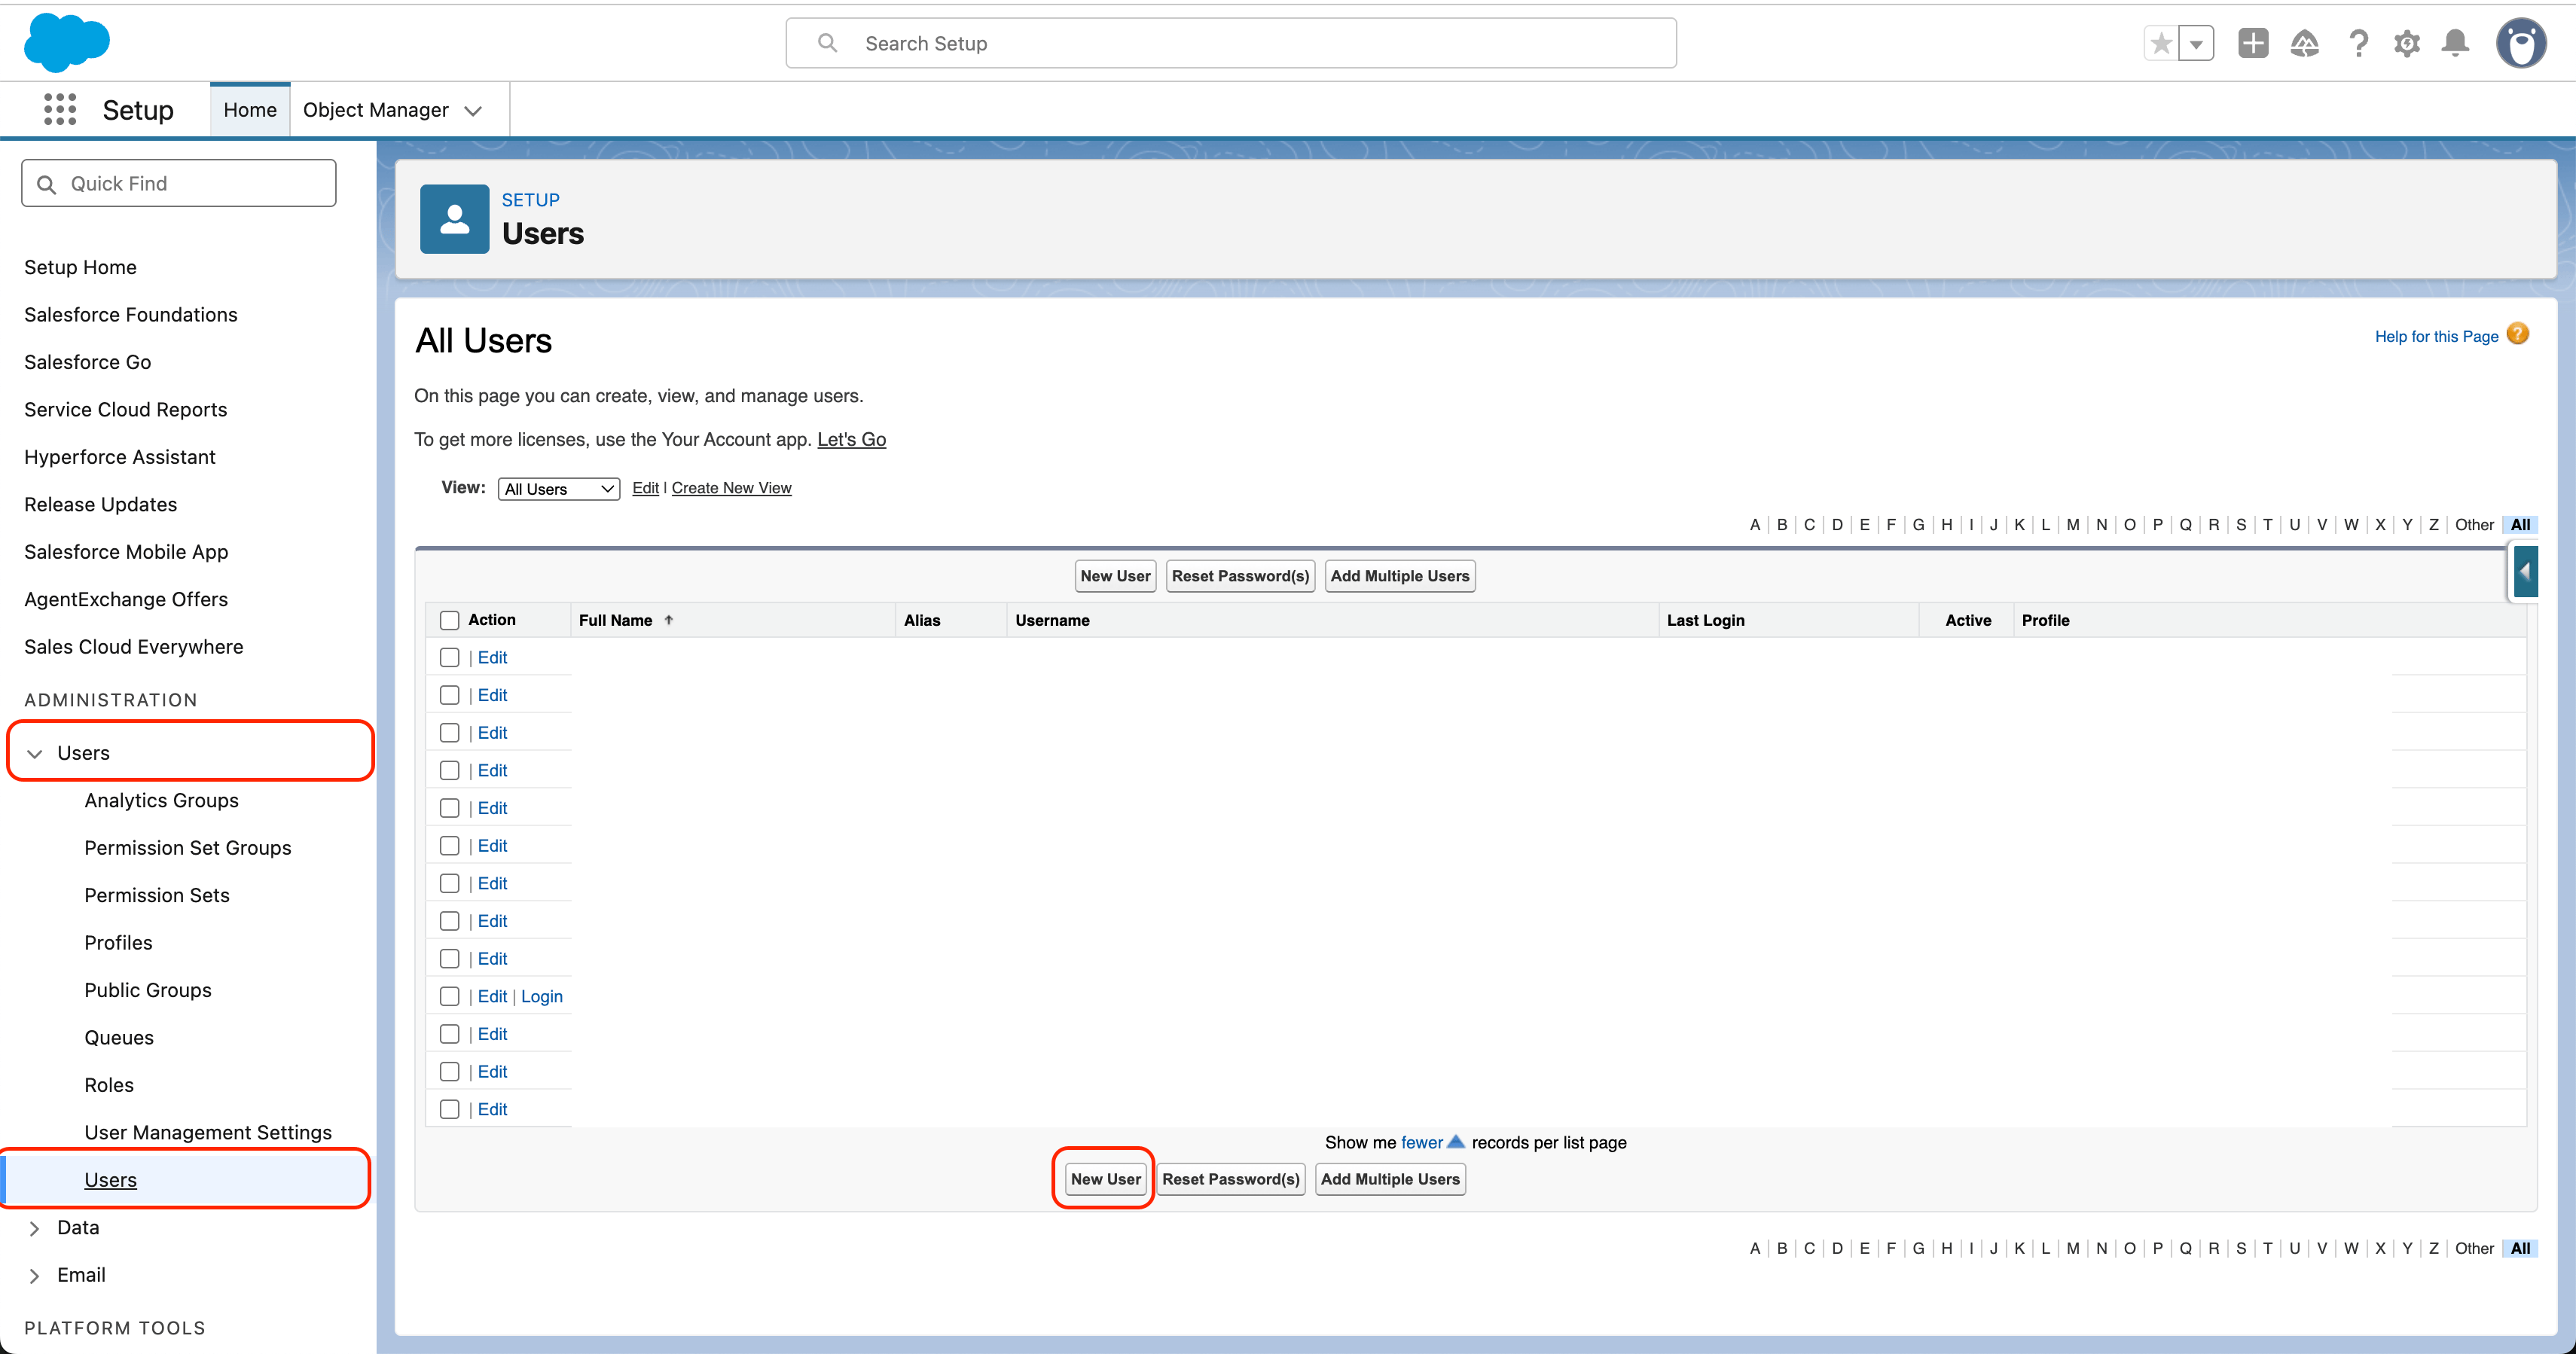
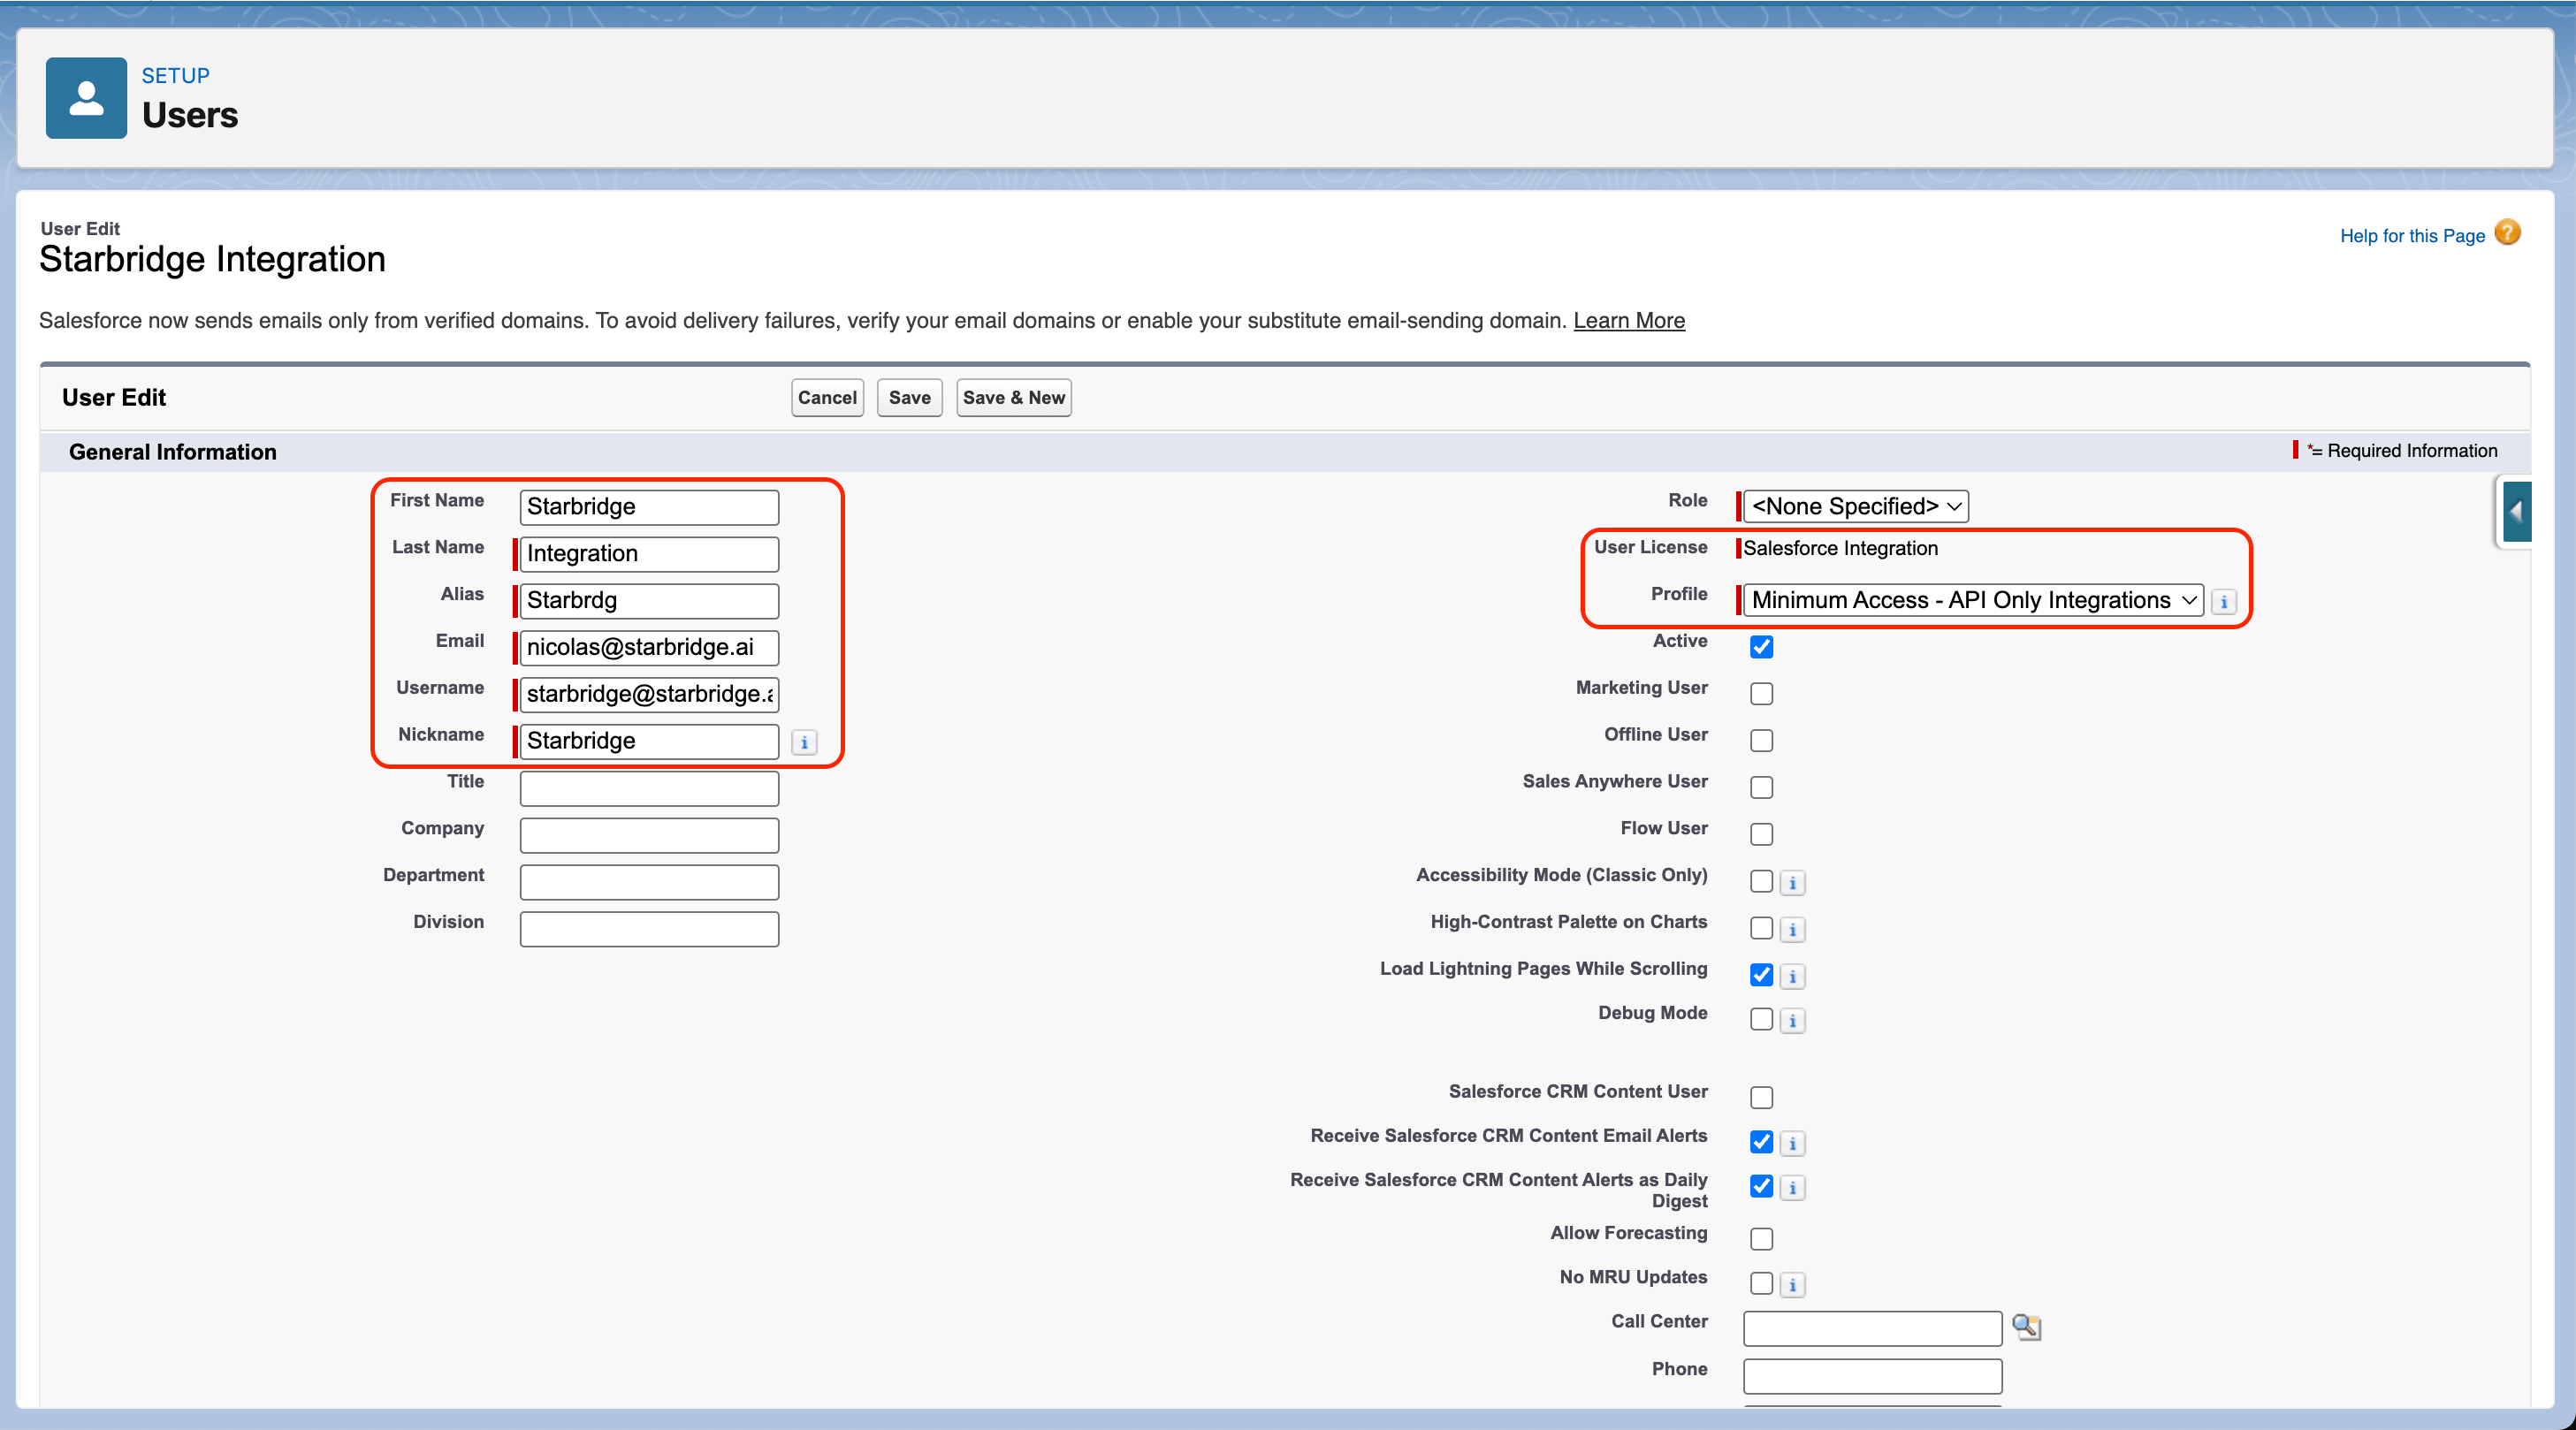
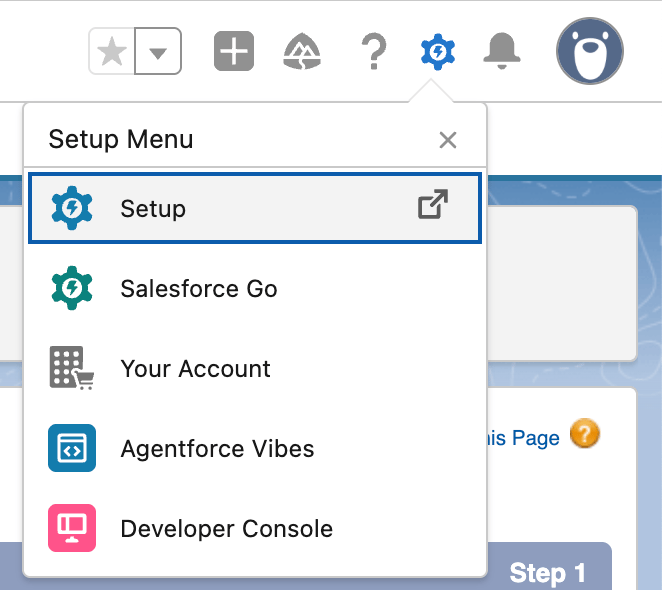 2. Navigate to **Users** → **Users** → click **New User** and fill in the required fields:\\
 | Field | Value |
| ------------------------ | ---------------------------------------------------------------------------------------- |
| First Name | `Starbridge` |
| Last Name | `Integration` |
| Alias | `Starbrdg` |
| Email | Your email address (used to receive the Salesforce verification email) |
| Username | `starbridge@yourcompany.com` (replace yourcompany.com with your organization's domain) |
| Nickname | `Starbridge` |
| User License (IMPORTANT) | Salesforce Integration |
| Profile (IMPORTANT) | Salesforce API Only System Integrations *(or "Minimum Access – API Only" in newer orgs)* |
| Field | Value |
| ------------------------ | ---------------------------------------------------------------------------------------- |
| First Name | `Starbridge` |
| Last Name | `Integration` |
| Alias | `Starbrdg` |
| Email | Your email address (used to receive the Salesforce verification email) |
| Username | `starbridge@yourcompany.com` (replace yourcompany.com with your organization's domain) |
| Nickname | `Starbridge` |
| User License (IMPORTANT) | Salesforce Integration |
| Profile (IMPORTANT) | Salesforce API Only System Integrations *(or "Minimum Access – API Only" in newer orgs)* |
 \
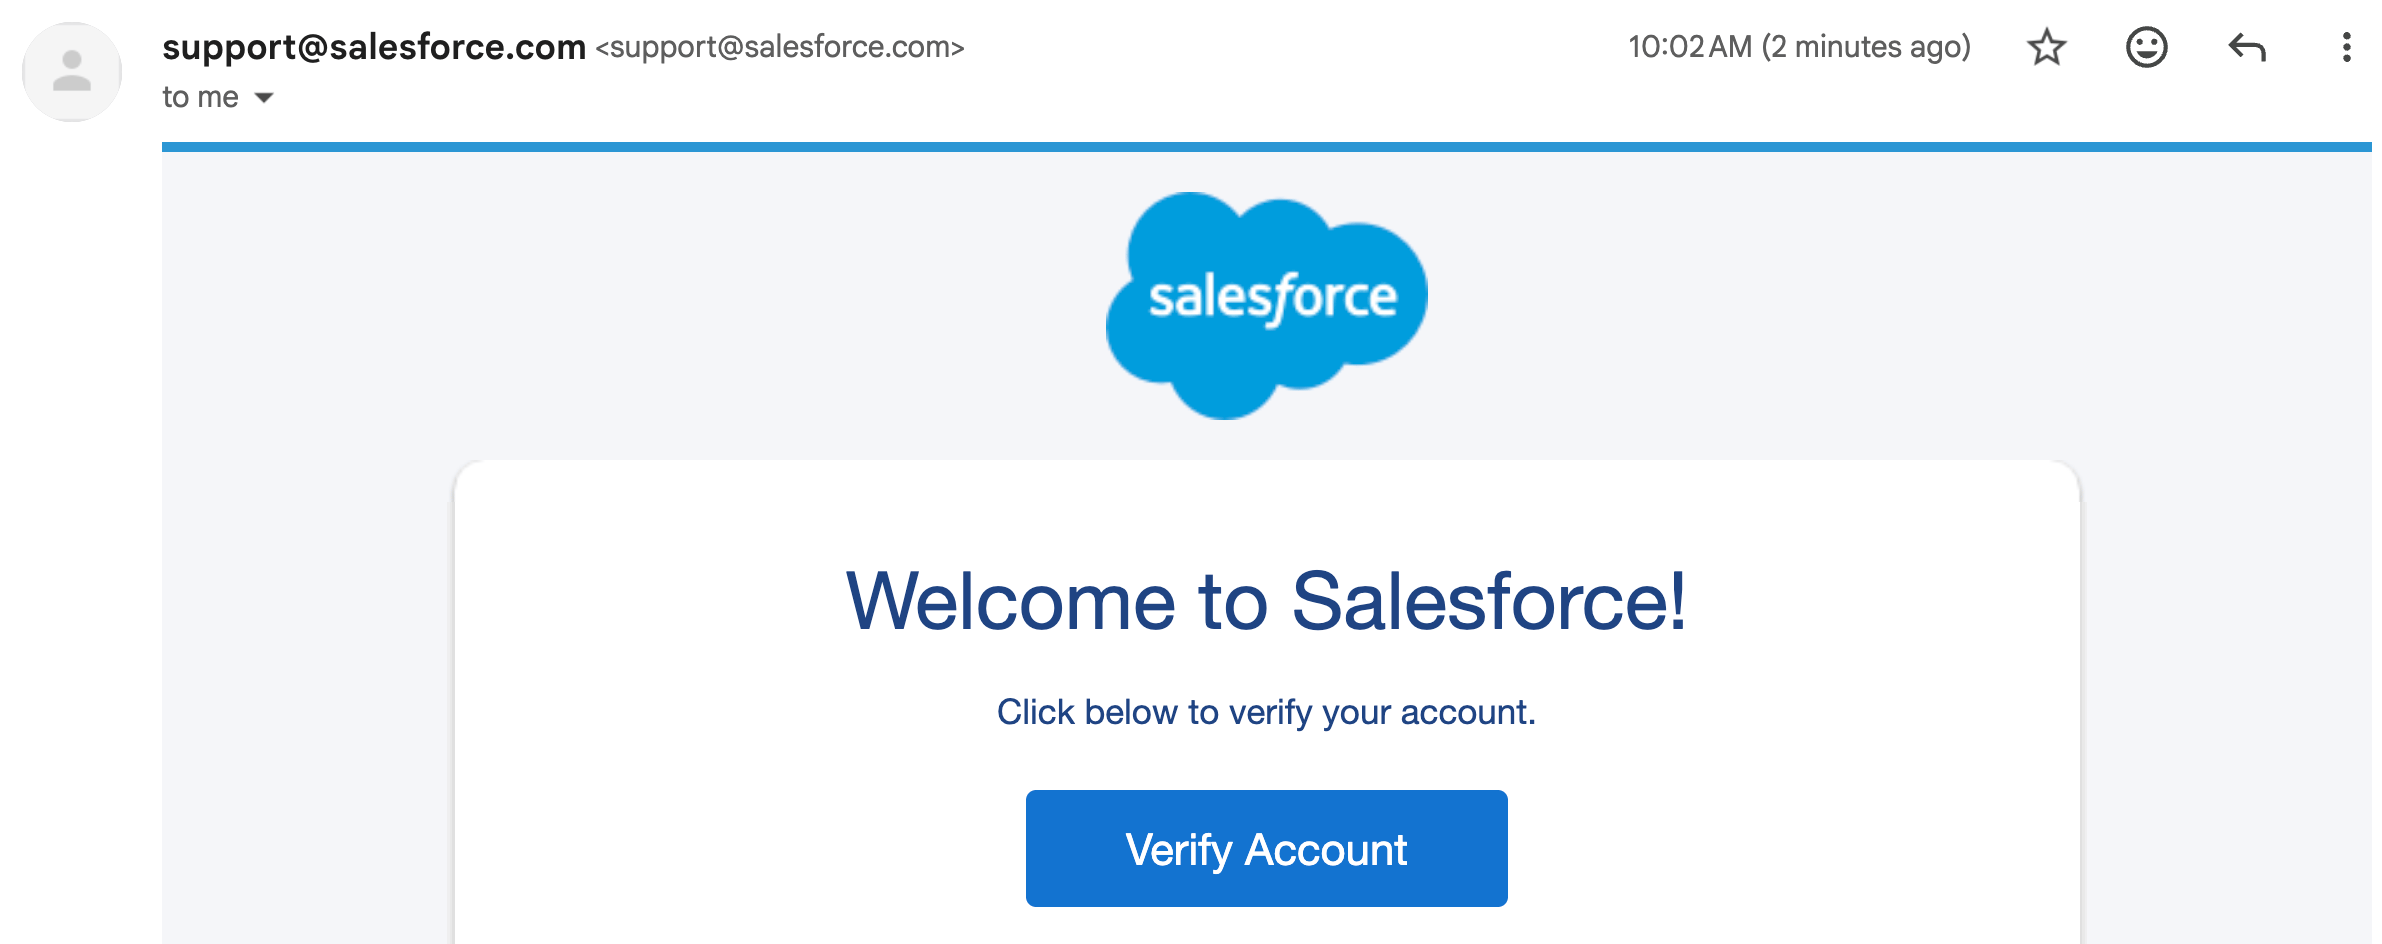
Click **Save**. Check your email and verify the new integration user account in the Salesforce verification email.
\
Click **Save**. Check your email and verify the new integration user account in the Salesforce verification email.
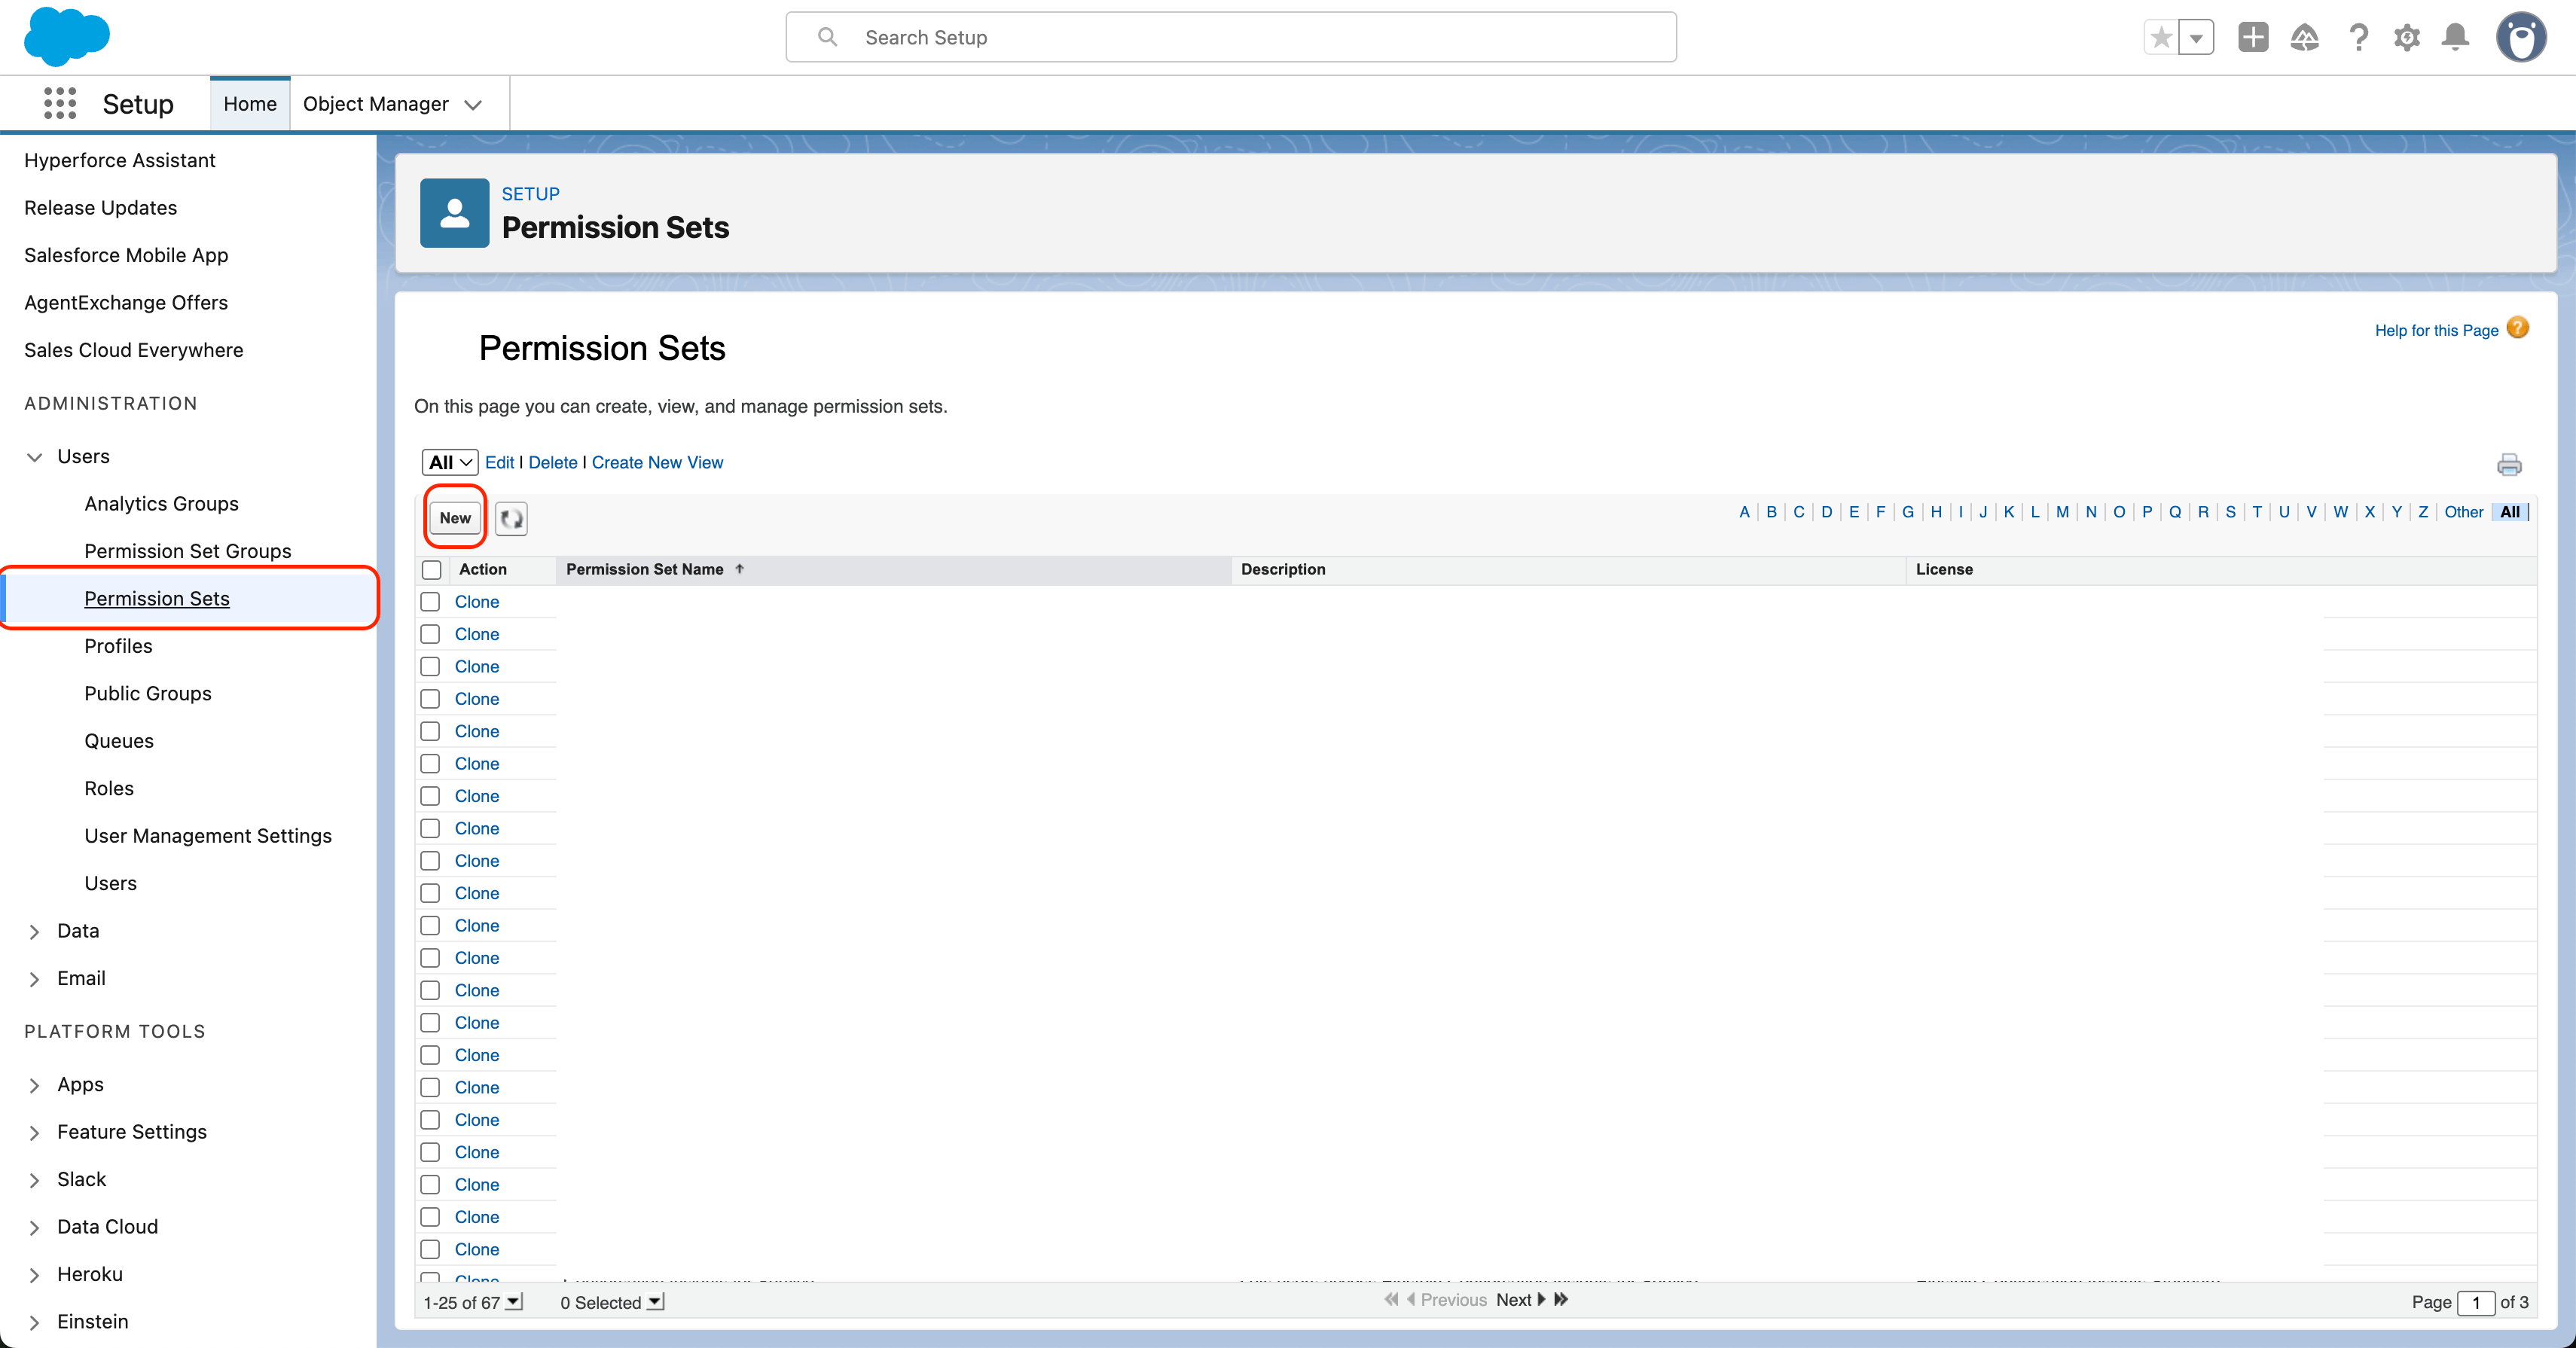
 3. Create a Permission Set for the integration user:
* Go to **Setup** → **Permission Sets** → **New**
3. Create a Permission Set for the integration user:
* Go to **Setup** → **Permission Sets** → **New**
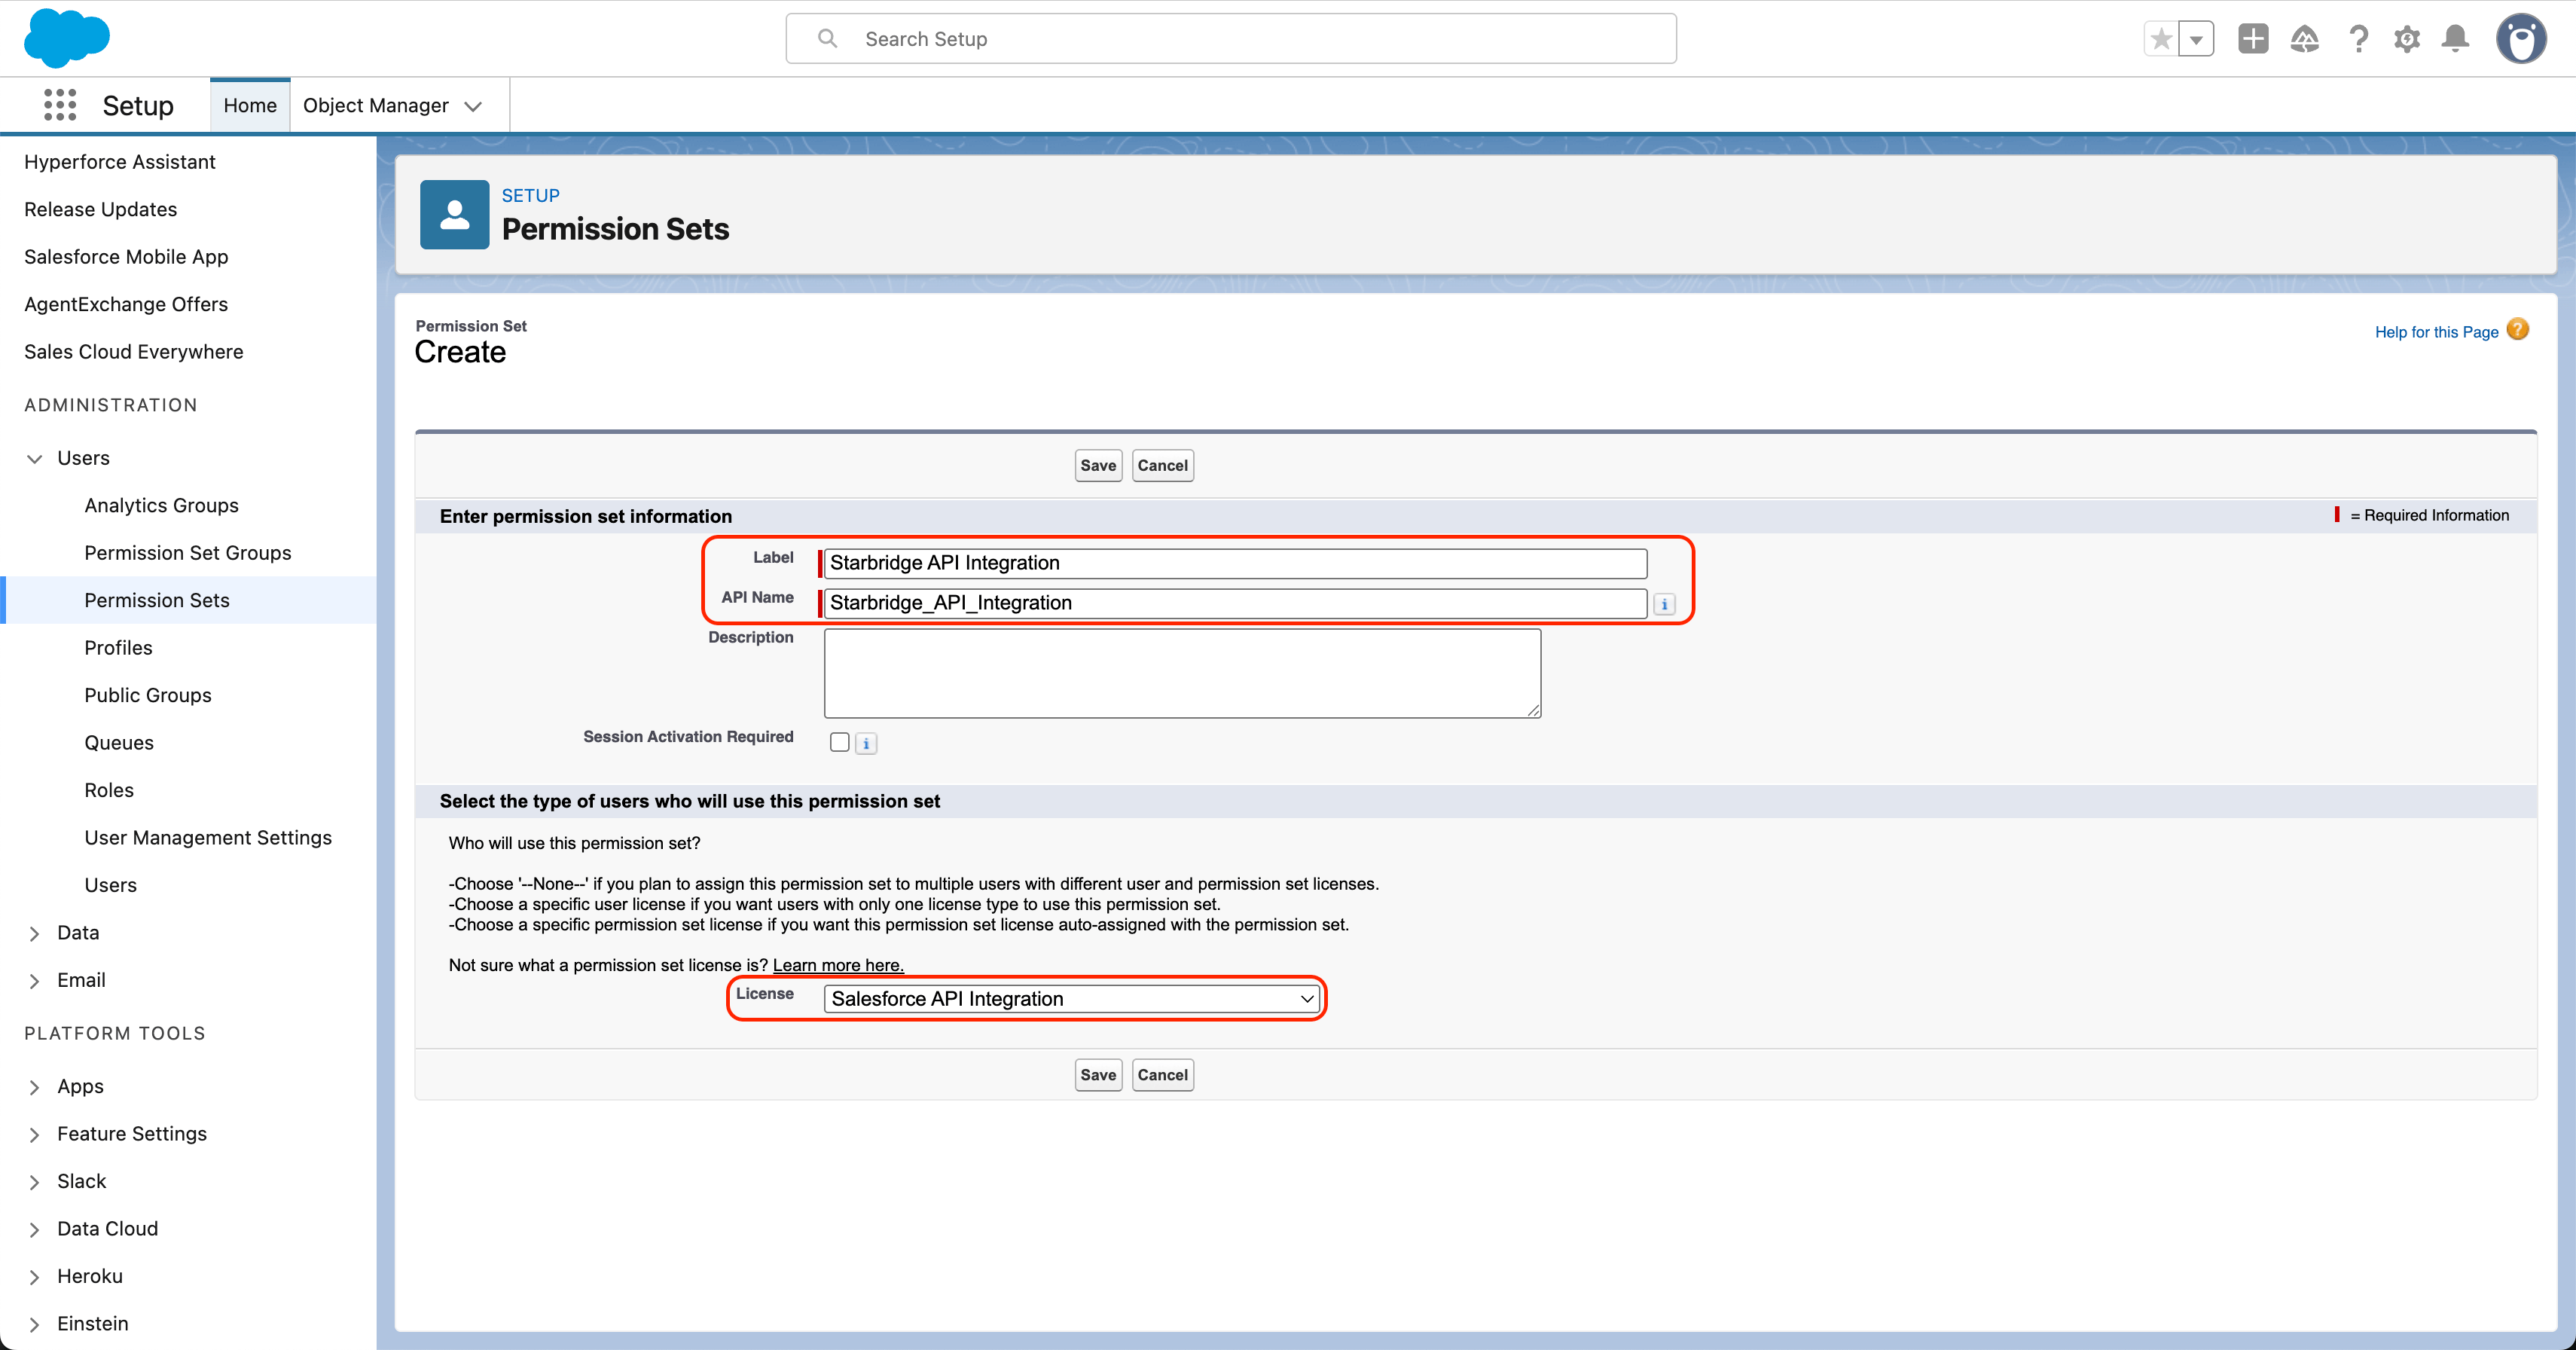
 * Label: Starbridge API Integration
* License: **Salesforce** API Integration
* Click **Save**
* Label: Starbridge API Integration
* License: **Salesforce** API Integration
* Click **Save**
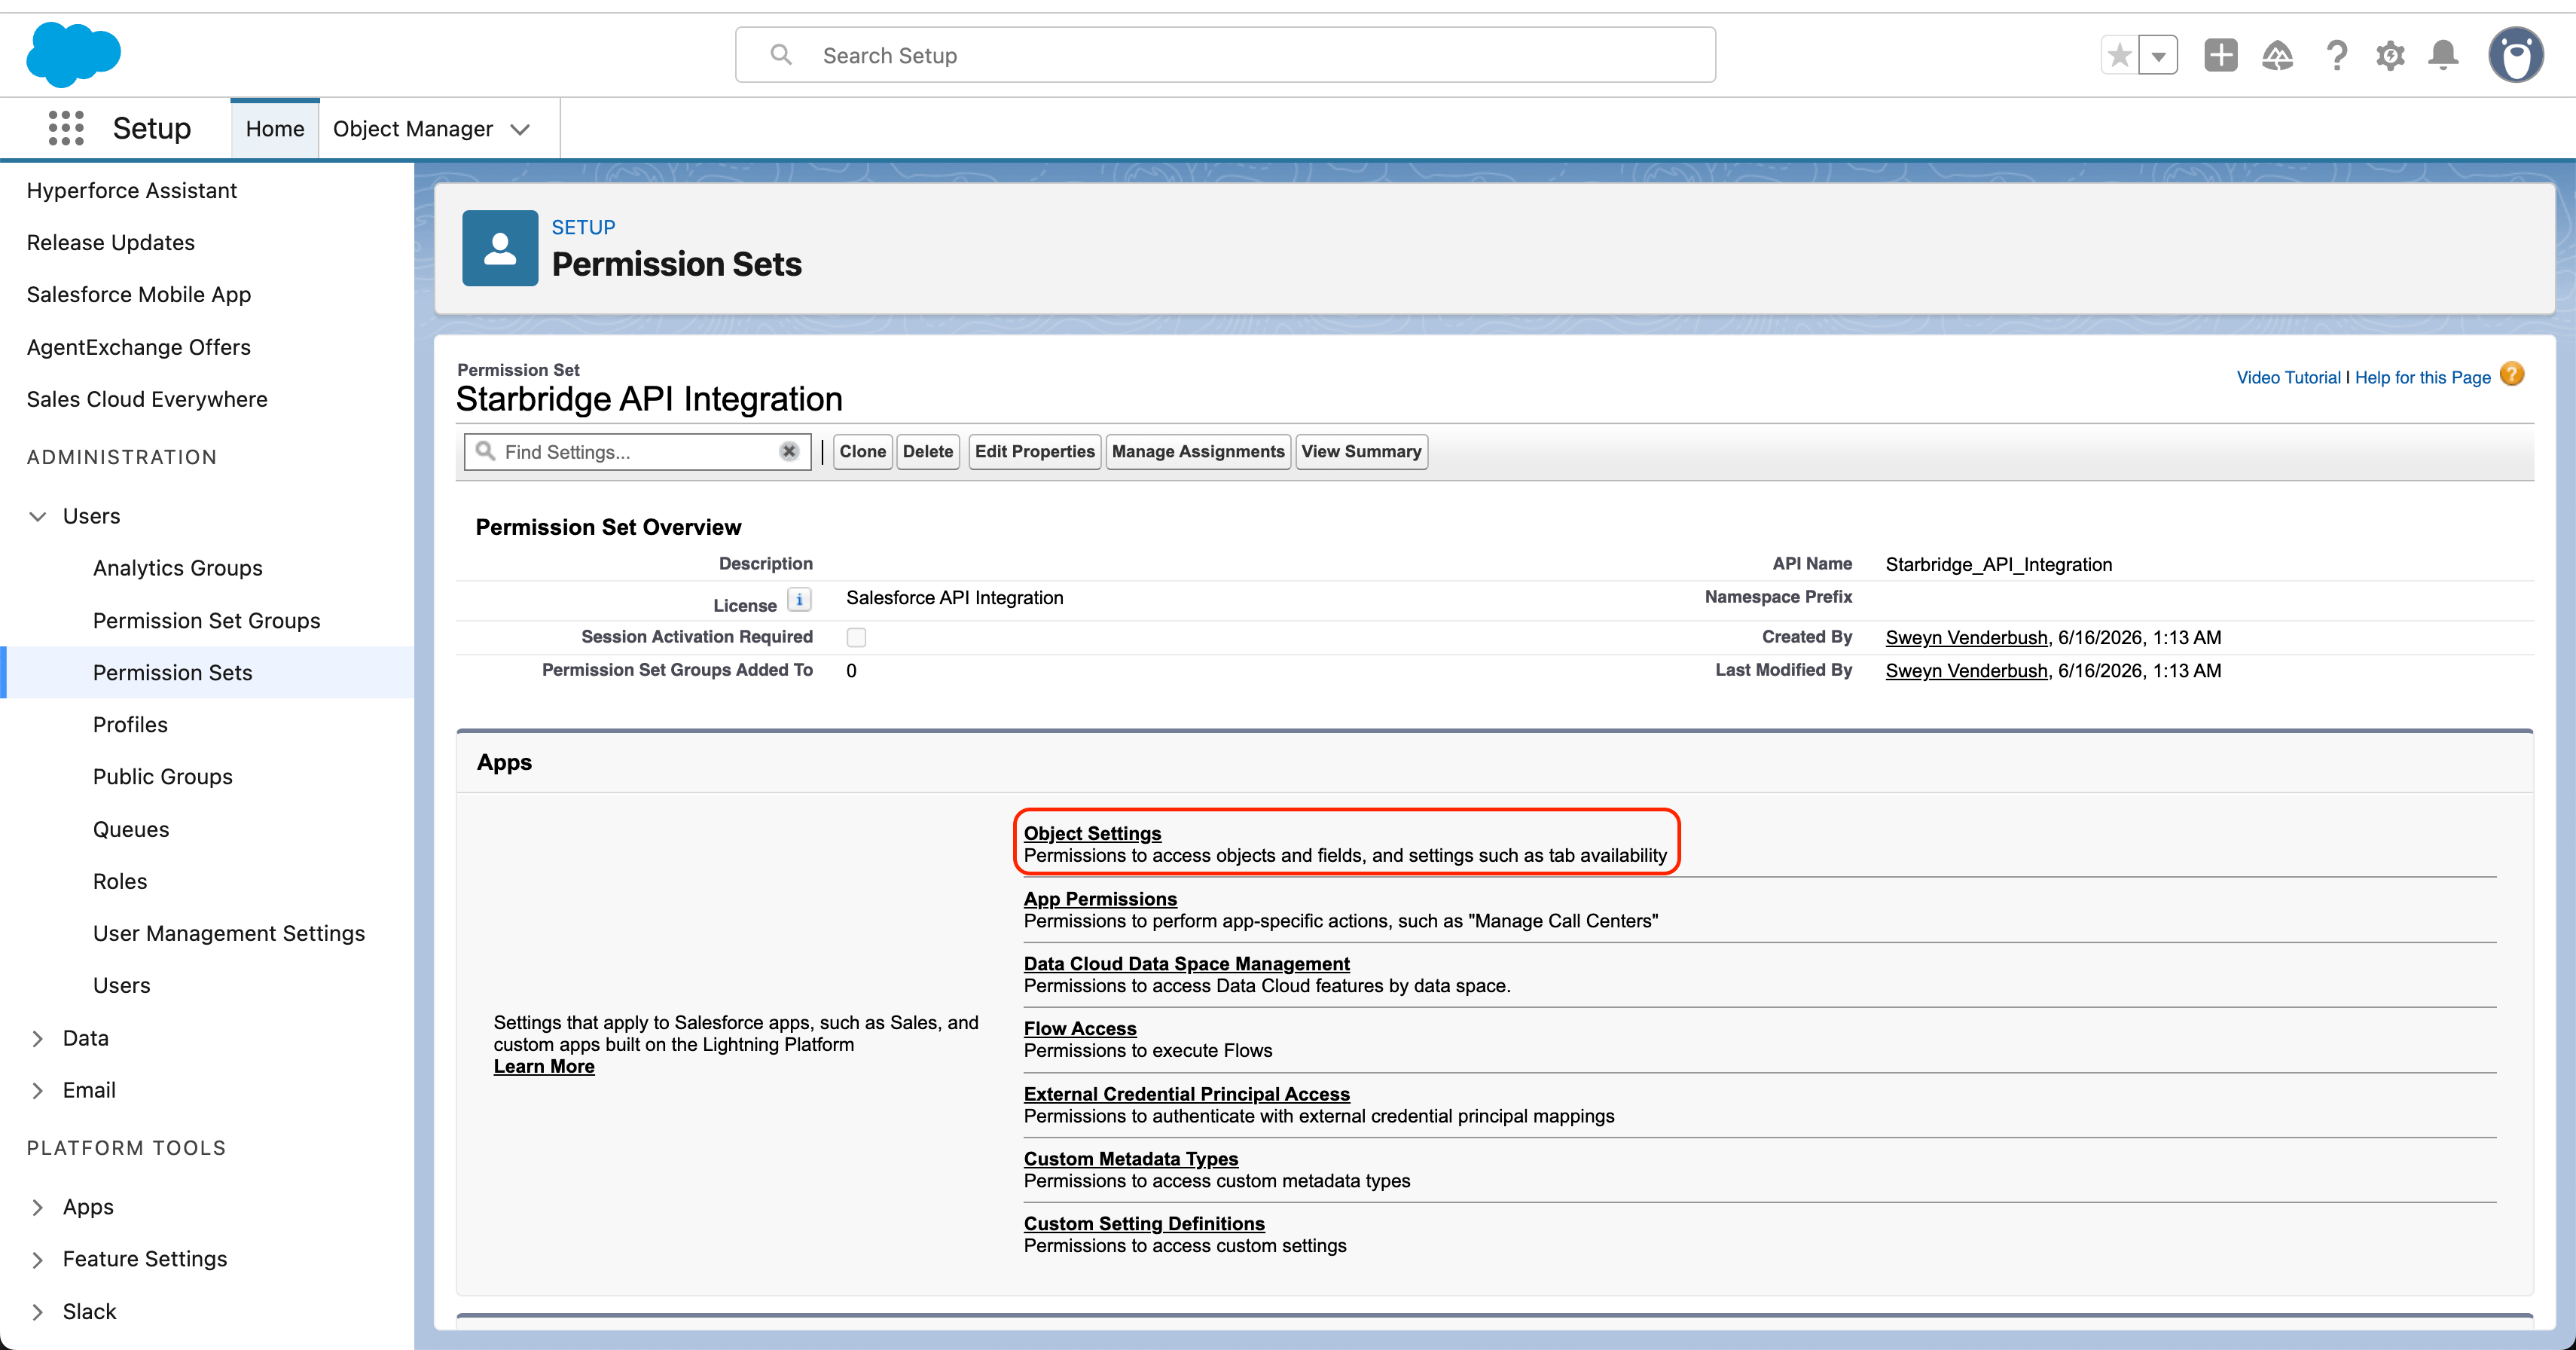
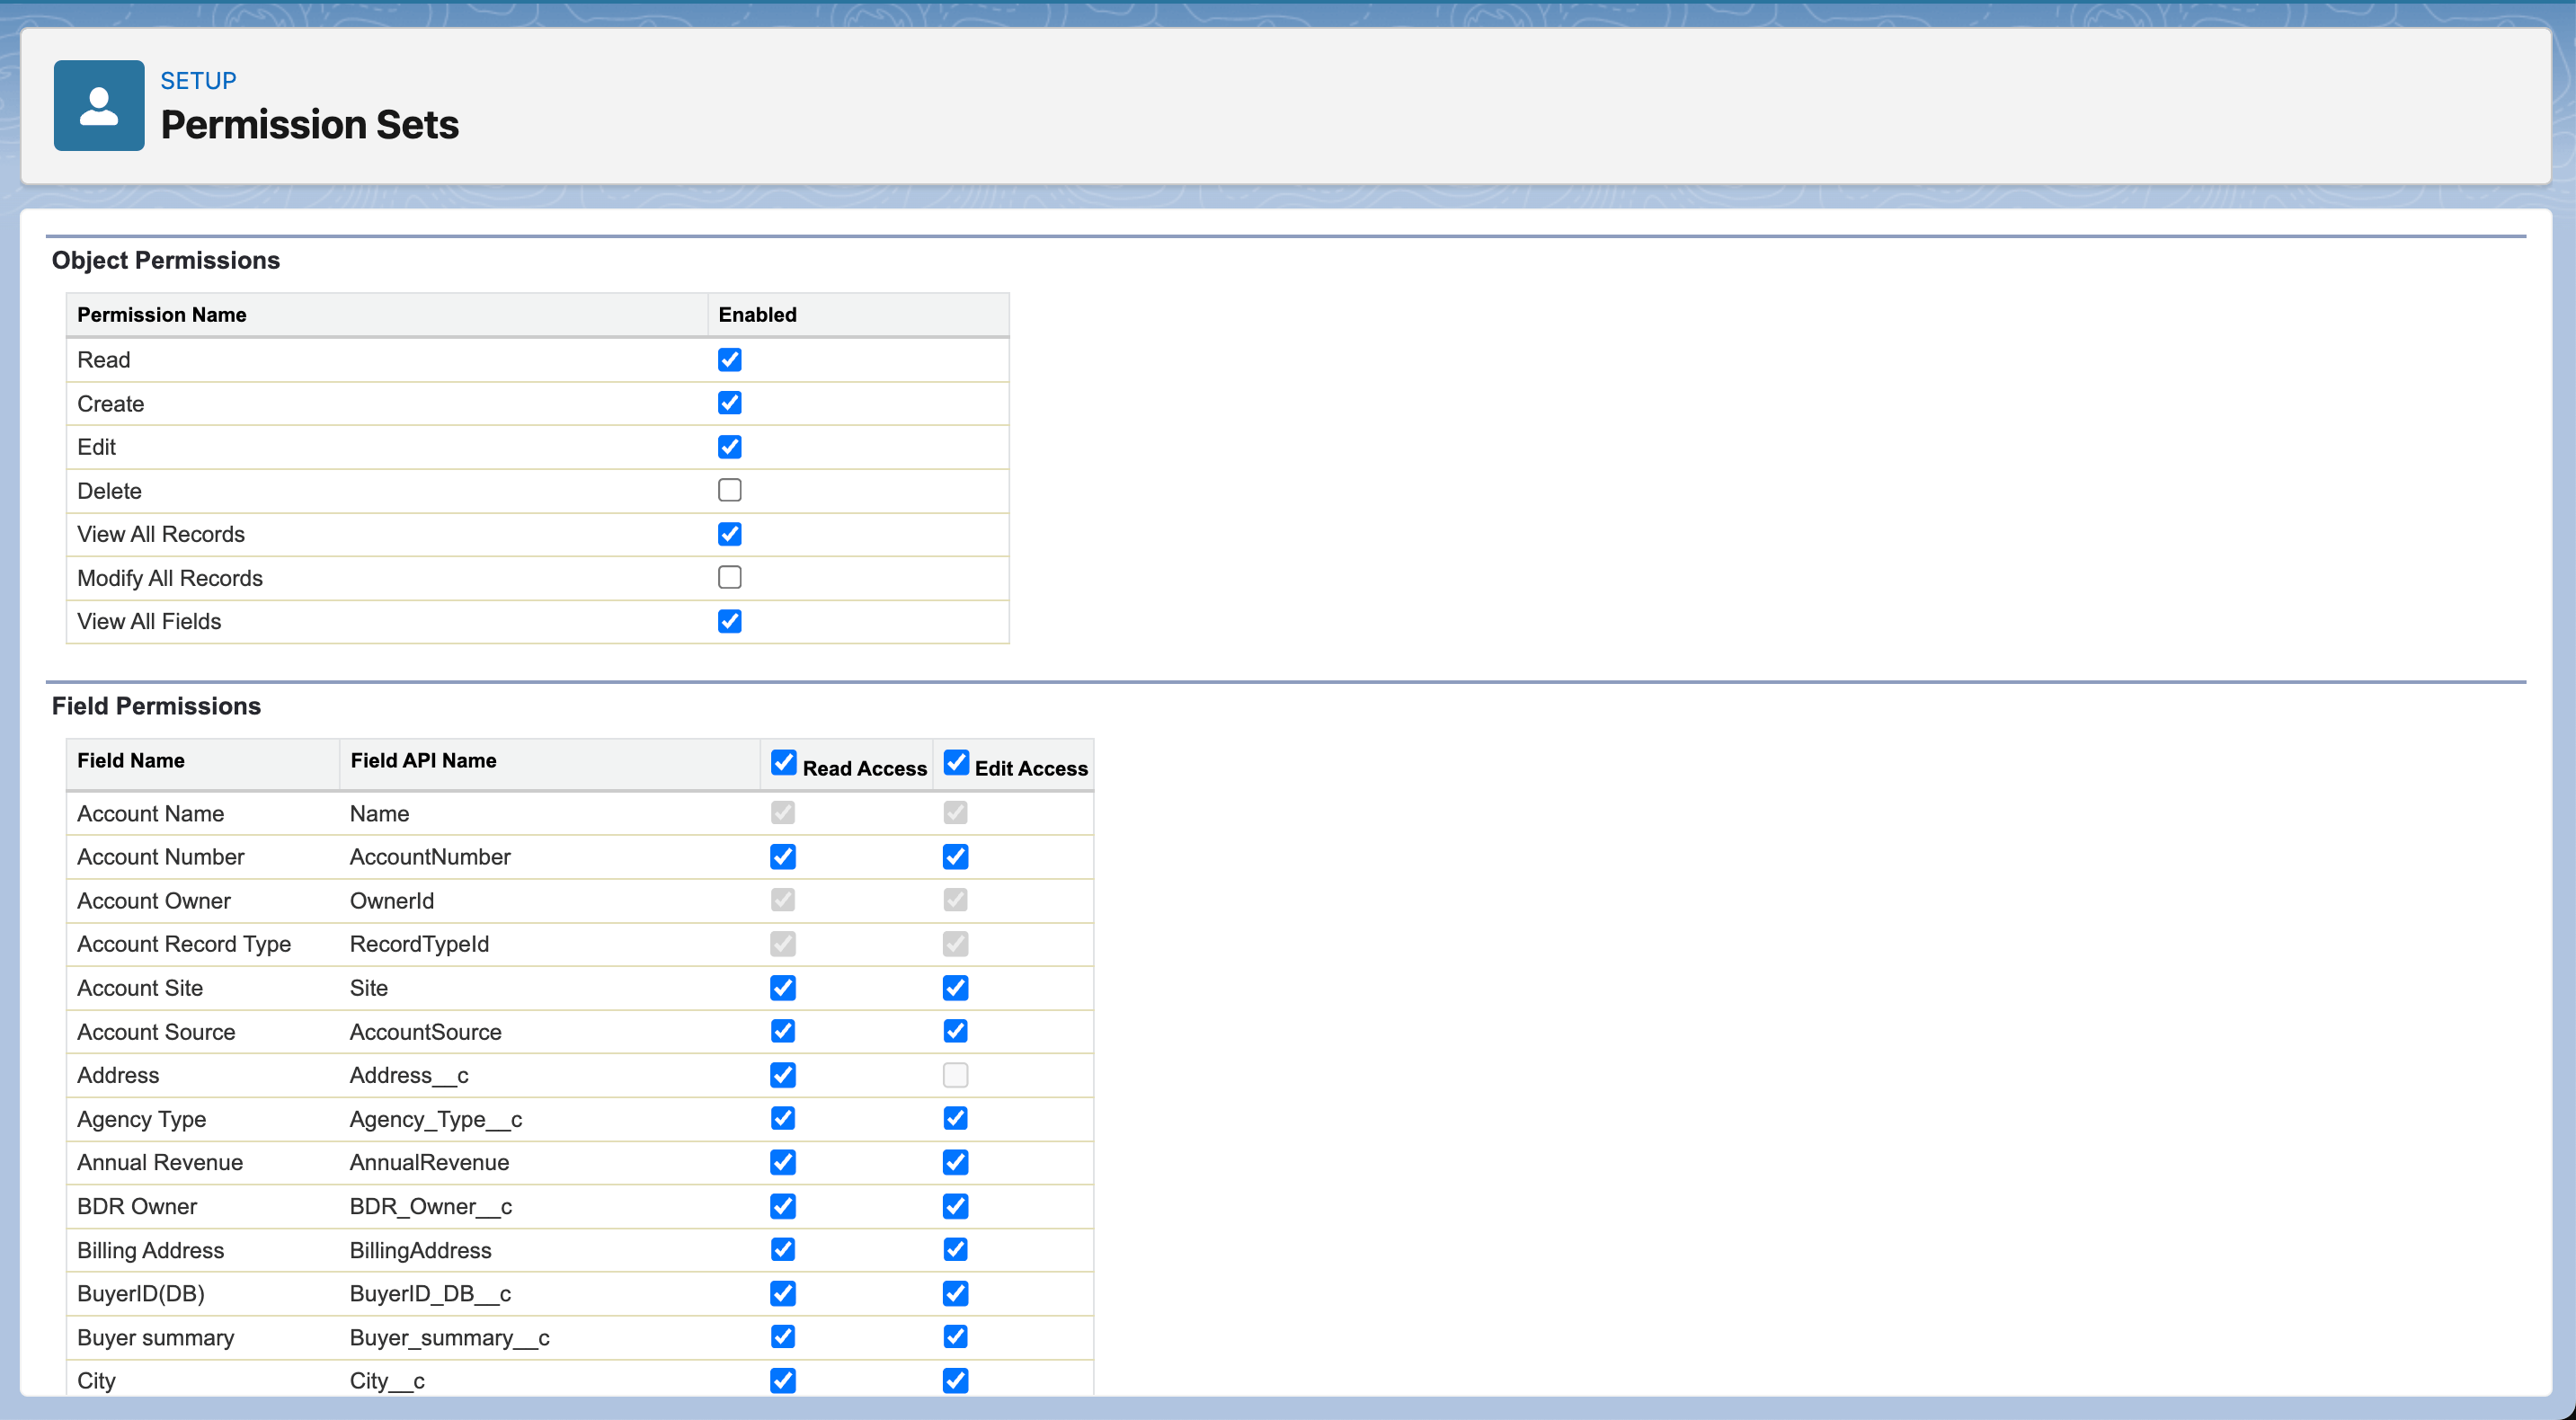
 4. In the Permission Set named Starbridge API Integration, open **Object Settings** and enable at minimum:
 | Object | Object Permissions | Field Permissions |
| ------------- | ------------------------------------ | ------------------------ |
| Accounts | Read, Create, Edit, View All Records | Read Access, Edit Access |
| Contacts | Read, Create, Edit, View All Records | Read Access, Edit Access |
| Leads | Read, Create, Edit, View All Records | Read Access, Edit Access |
| Opportunities | Read, Create, Edit, View All Records | Read Access, Edit Access |
| Users | Read, View All Records | Read Access |
| Object | Object Permissions | Field Permissions |
| ------------- | ------------------------------------ | ------------------------ |
| Accounts | Read, Create, Edit, View All Records | Read Access, Edit Access |
| Contacts | Read, Create, Edit, View All Records | Read Access, Edit Access |
| Leads | Read, Create, Edit, View All Records | Read Access, Edit Access |
| Opportunities | Read, Create, Edit, View All Records | Read Access, Edit Access |
| Users | Read, View All Records | Read Access |
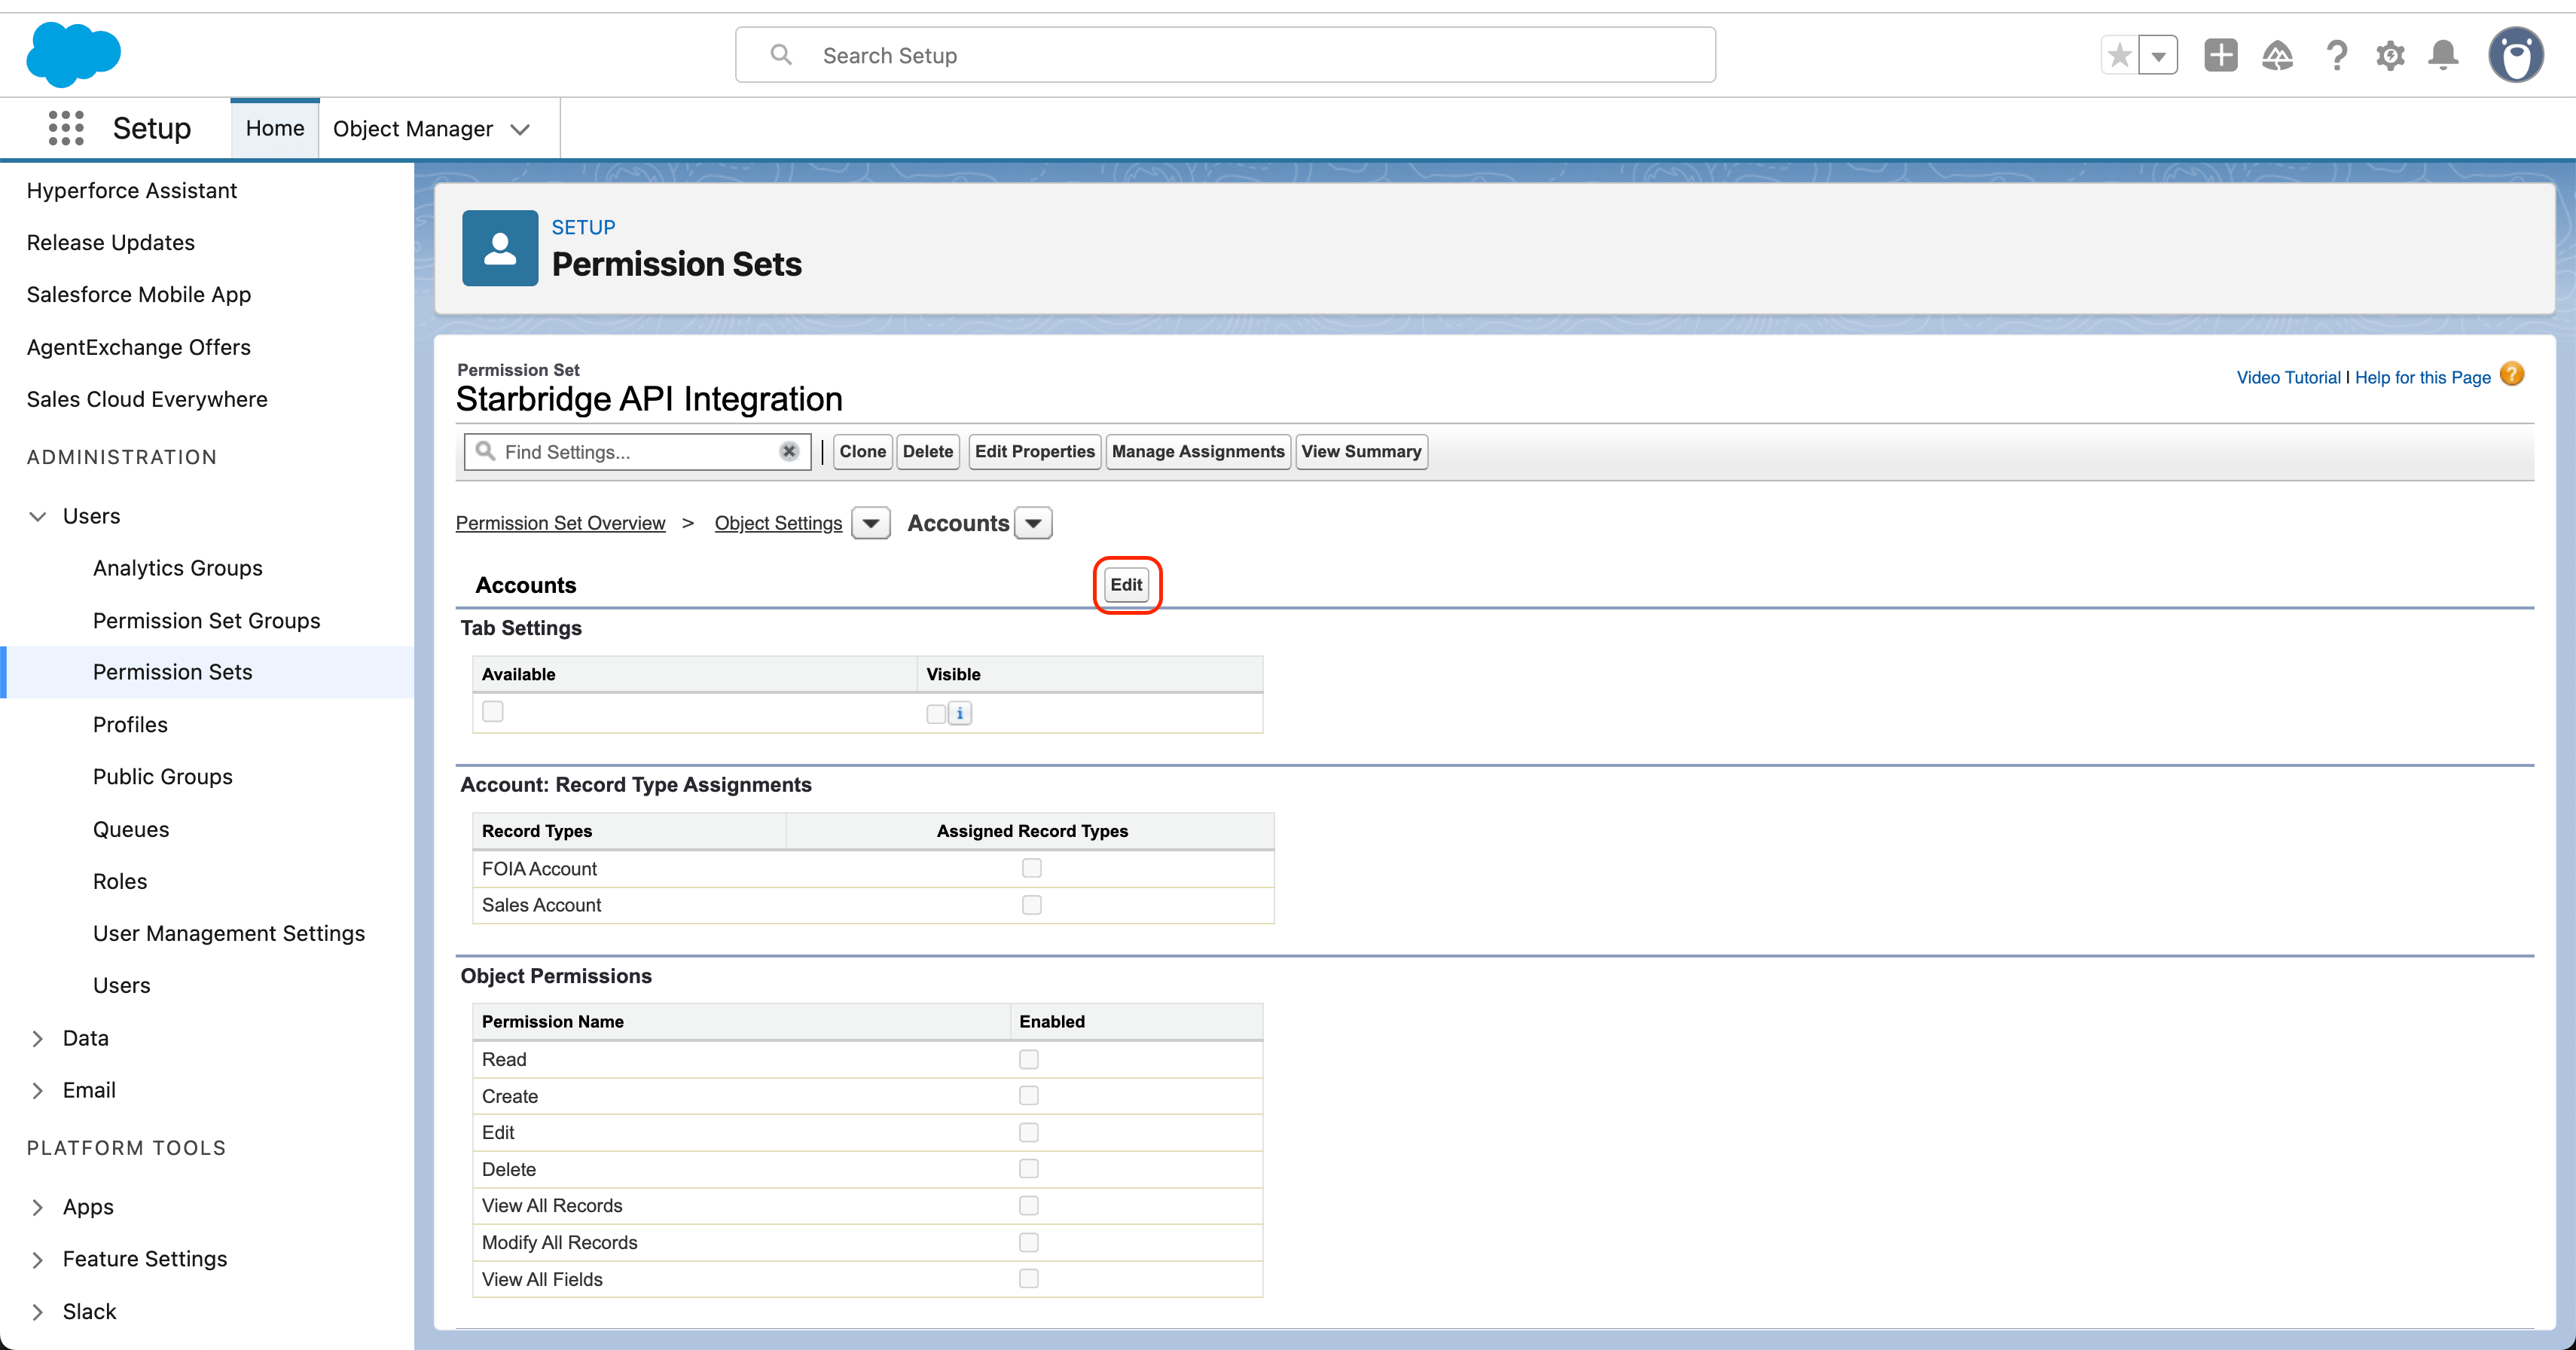
 * To grant object access, click **Edit** and check the checkboxes listed above under **Object Permissions**.
* To grant field access, check the **Read Access** and **Edit Access** checkboxes to select all fields at once under **Field Permissions**. In the Permission Set named Starbridge API Integration:
* Open **System Permissions**
* To grant object access, click **Edit** and check the checkboxes listed above under **Object Permissions**.
* To grant field access, check the **Read Access** and **Edit Access** checkboxes to select all fields at once under **Field Permissions**. In the Permission Set named Starbridge API Integration:
* Open **System Permissions**
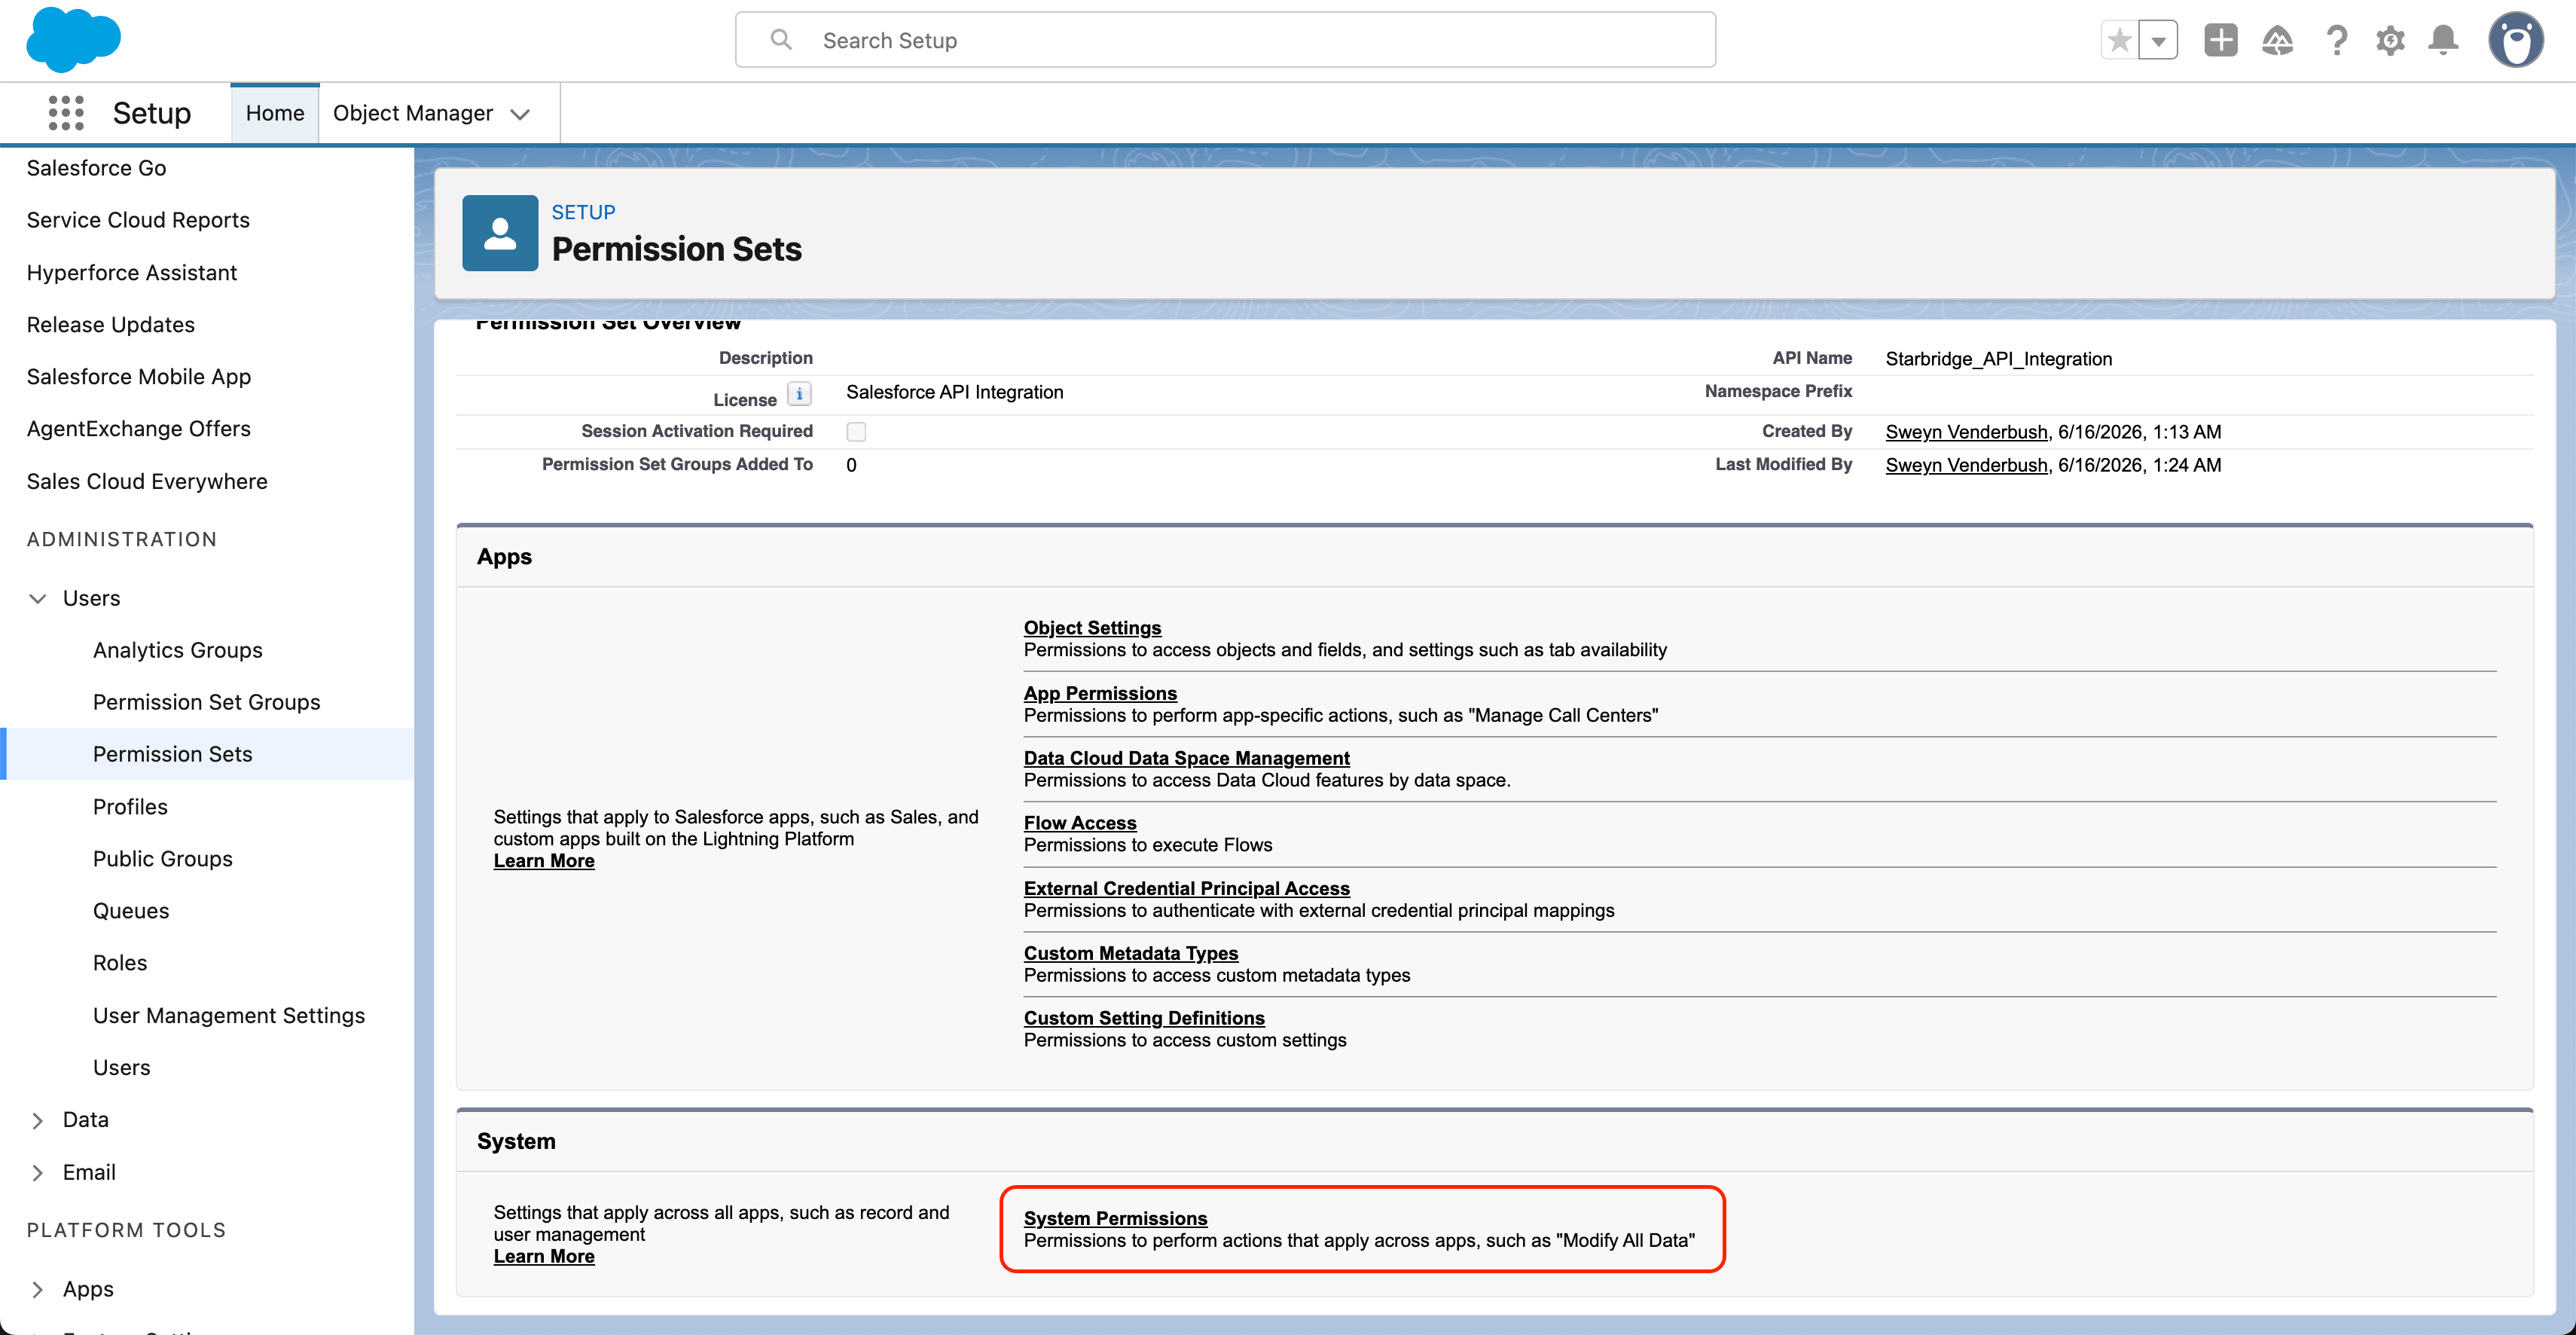 * Click **Edit**
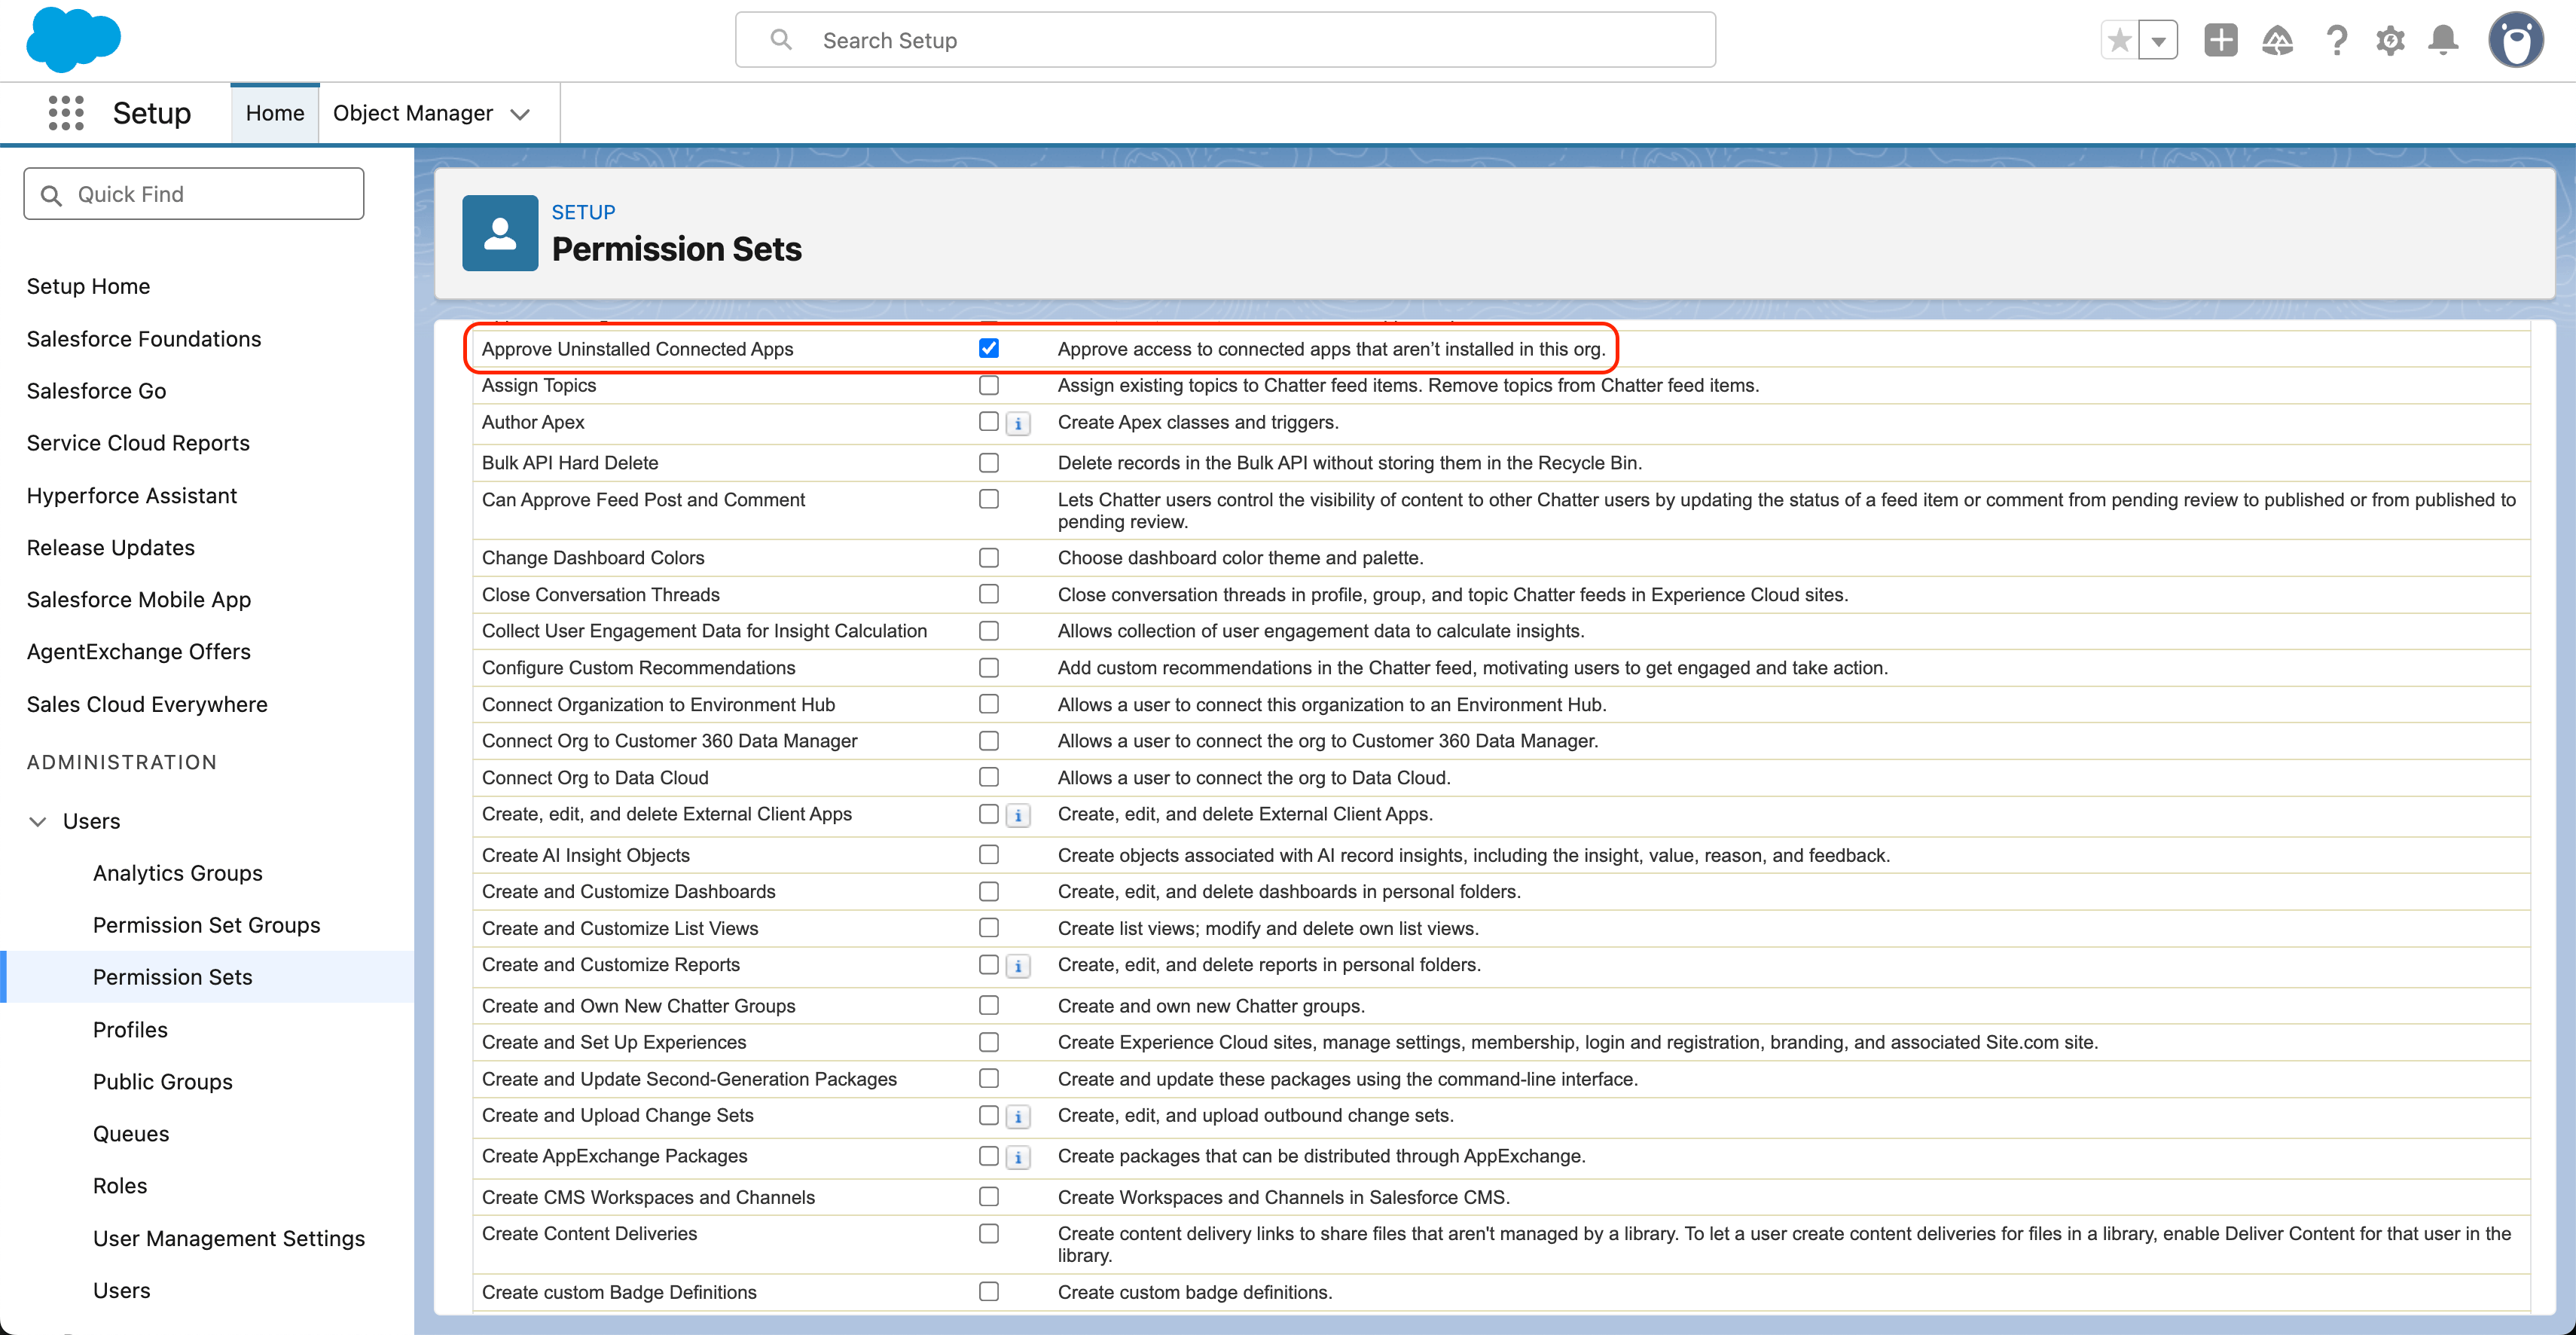
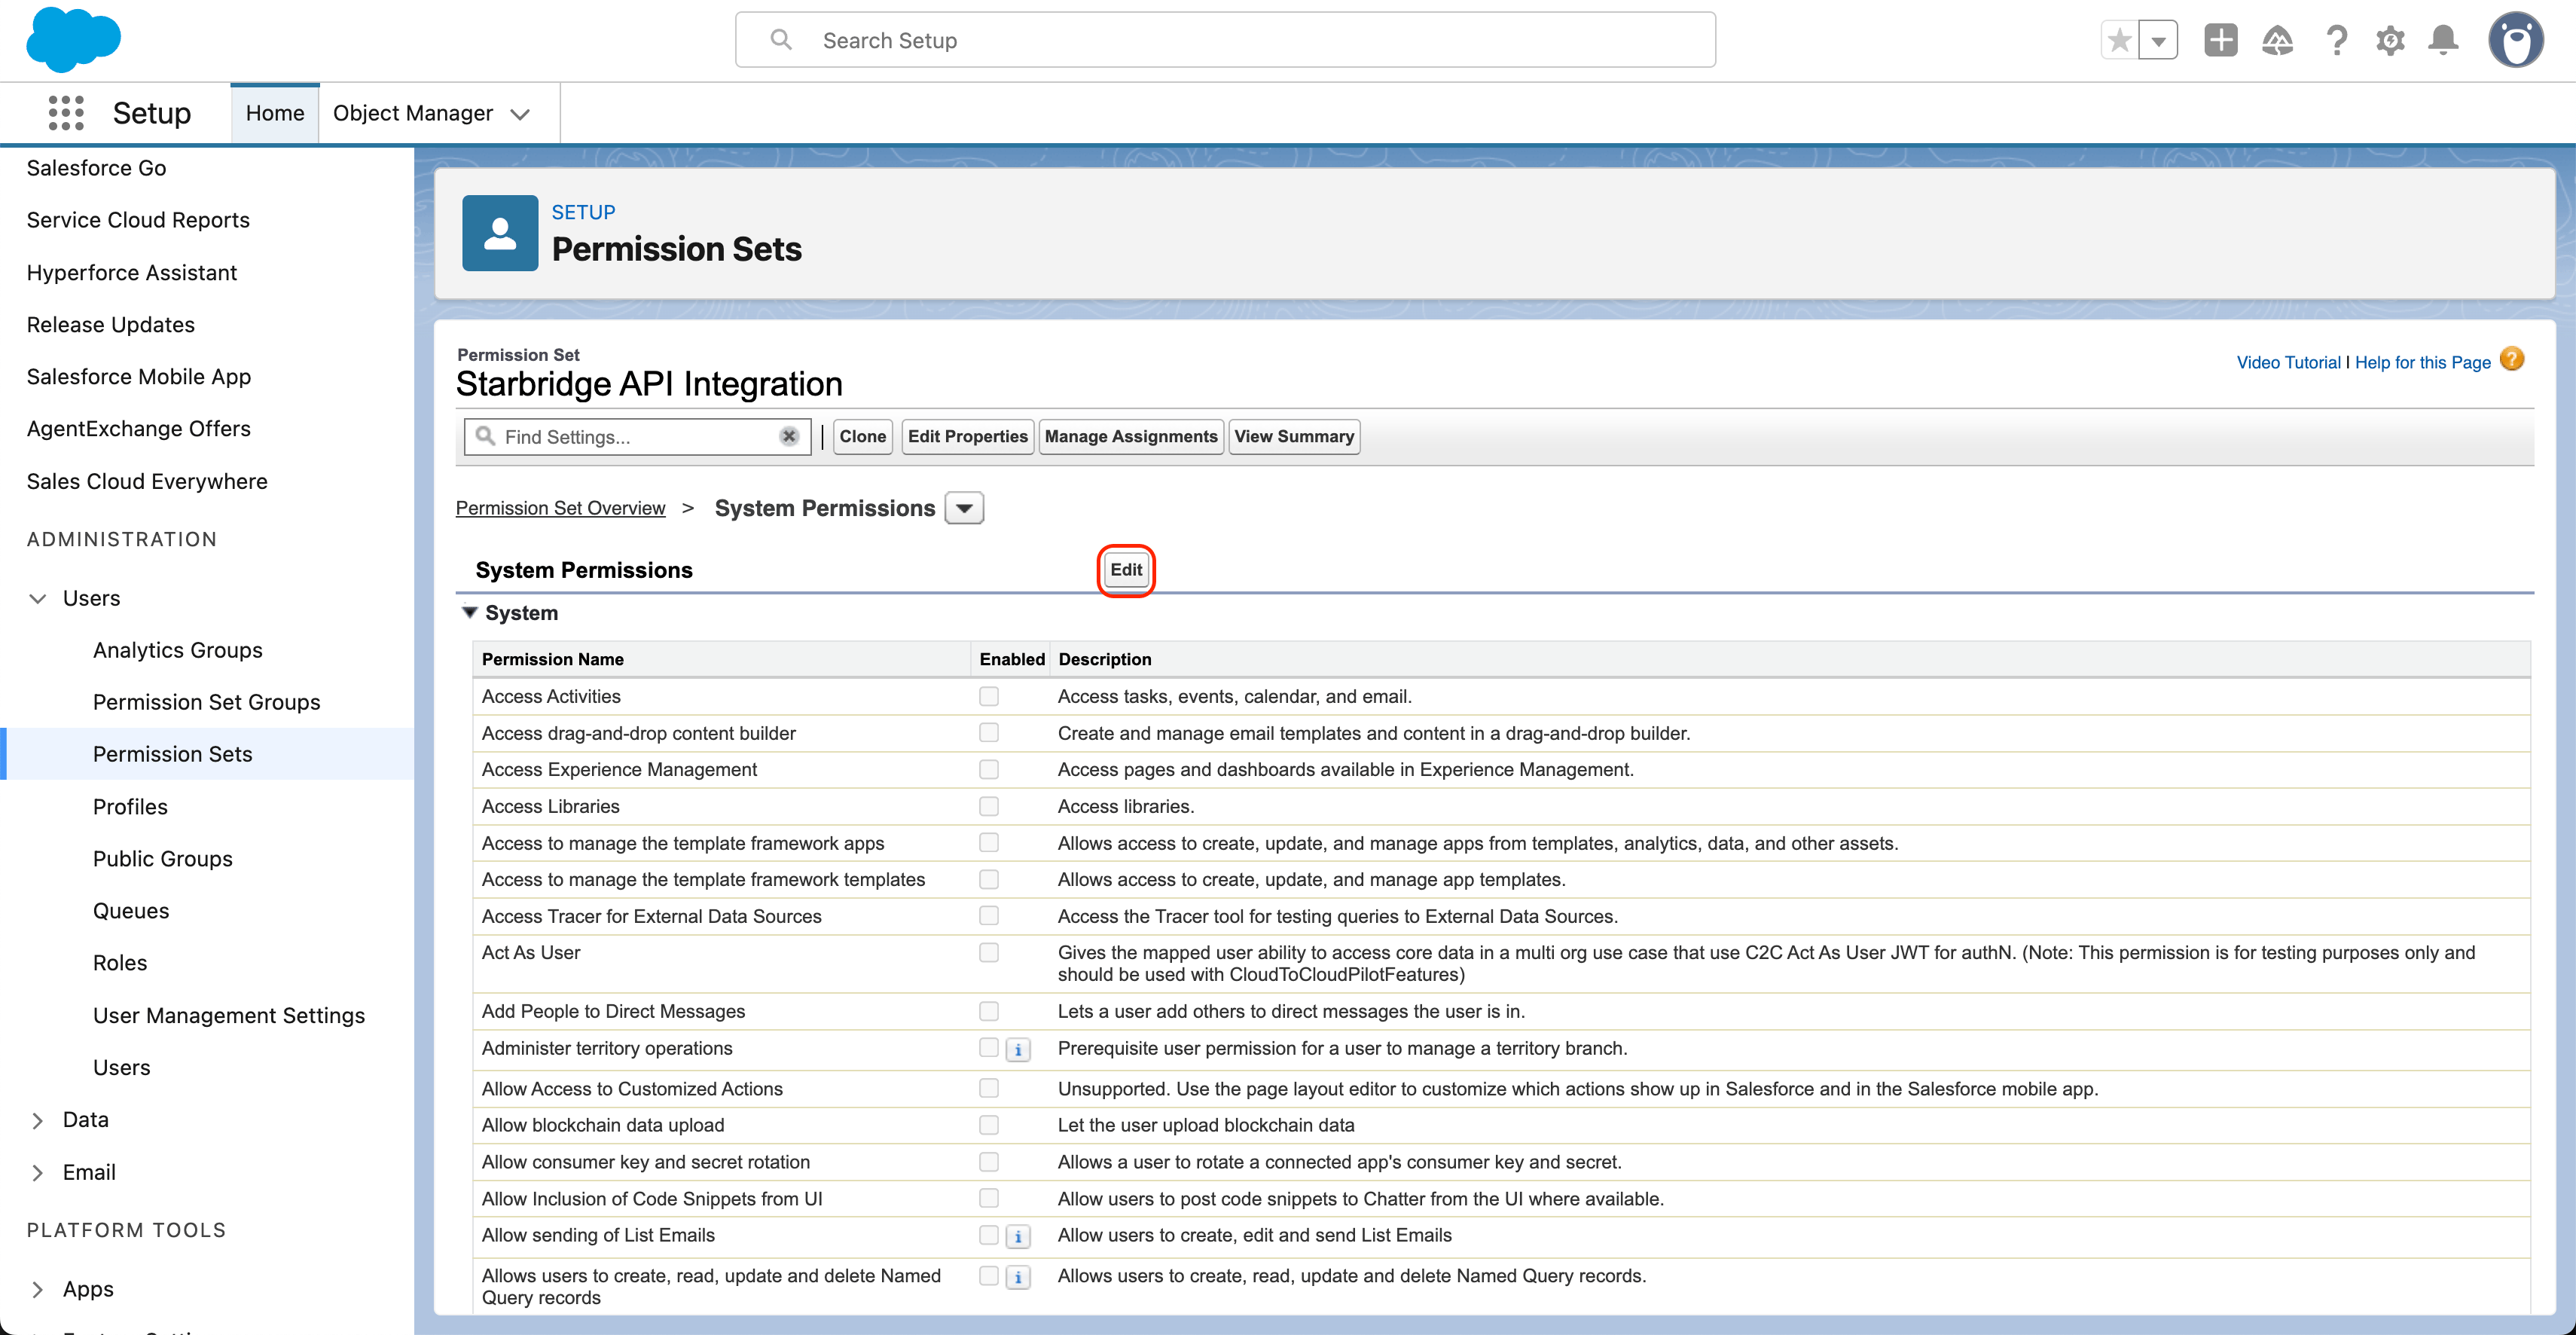 * Scroll down to **Approve Uninstalled Connected Apps** and check the checkbox
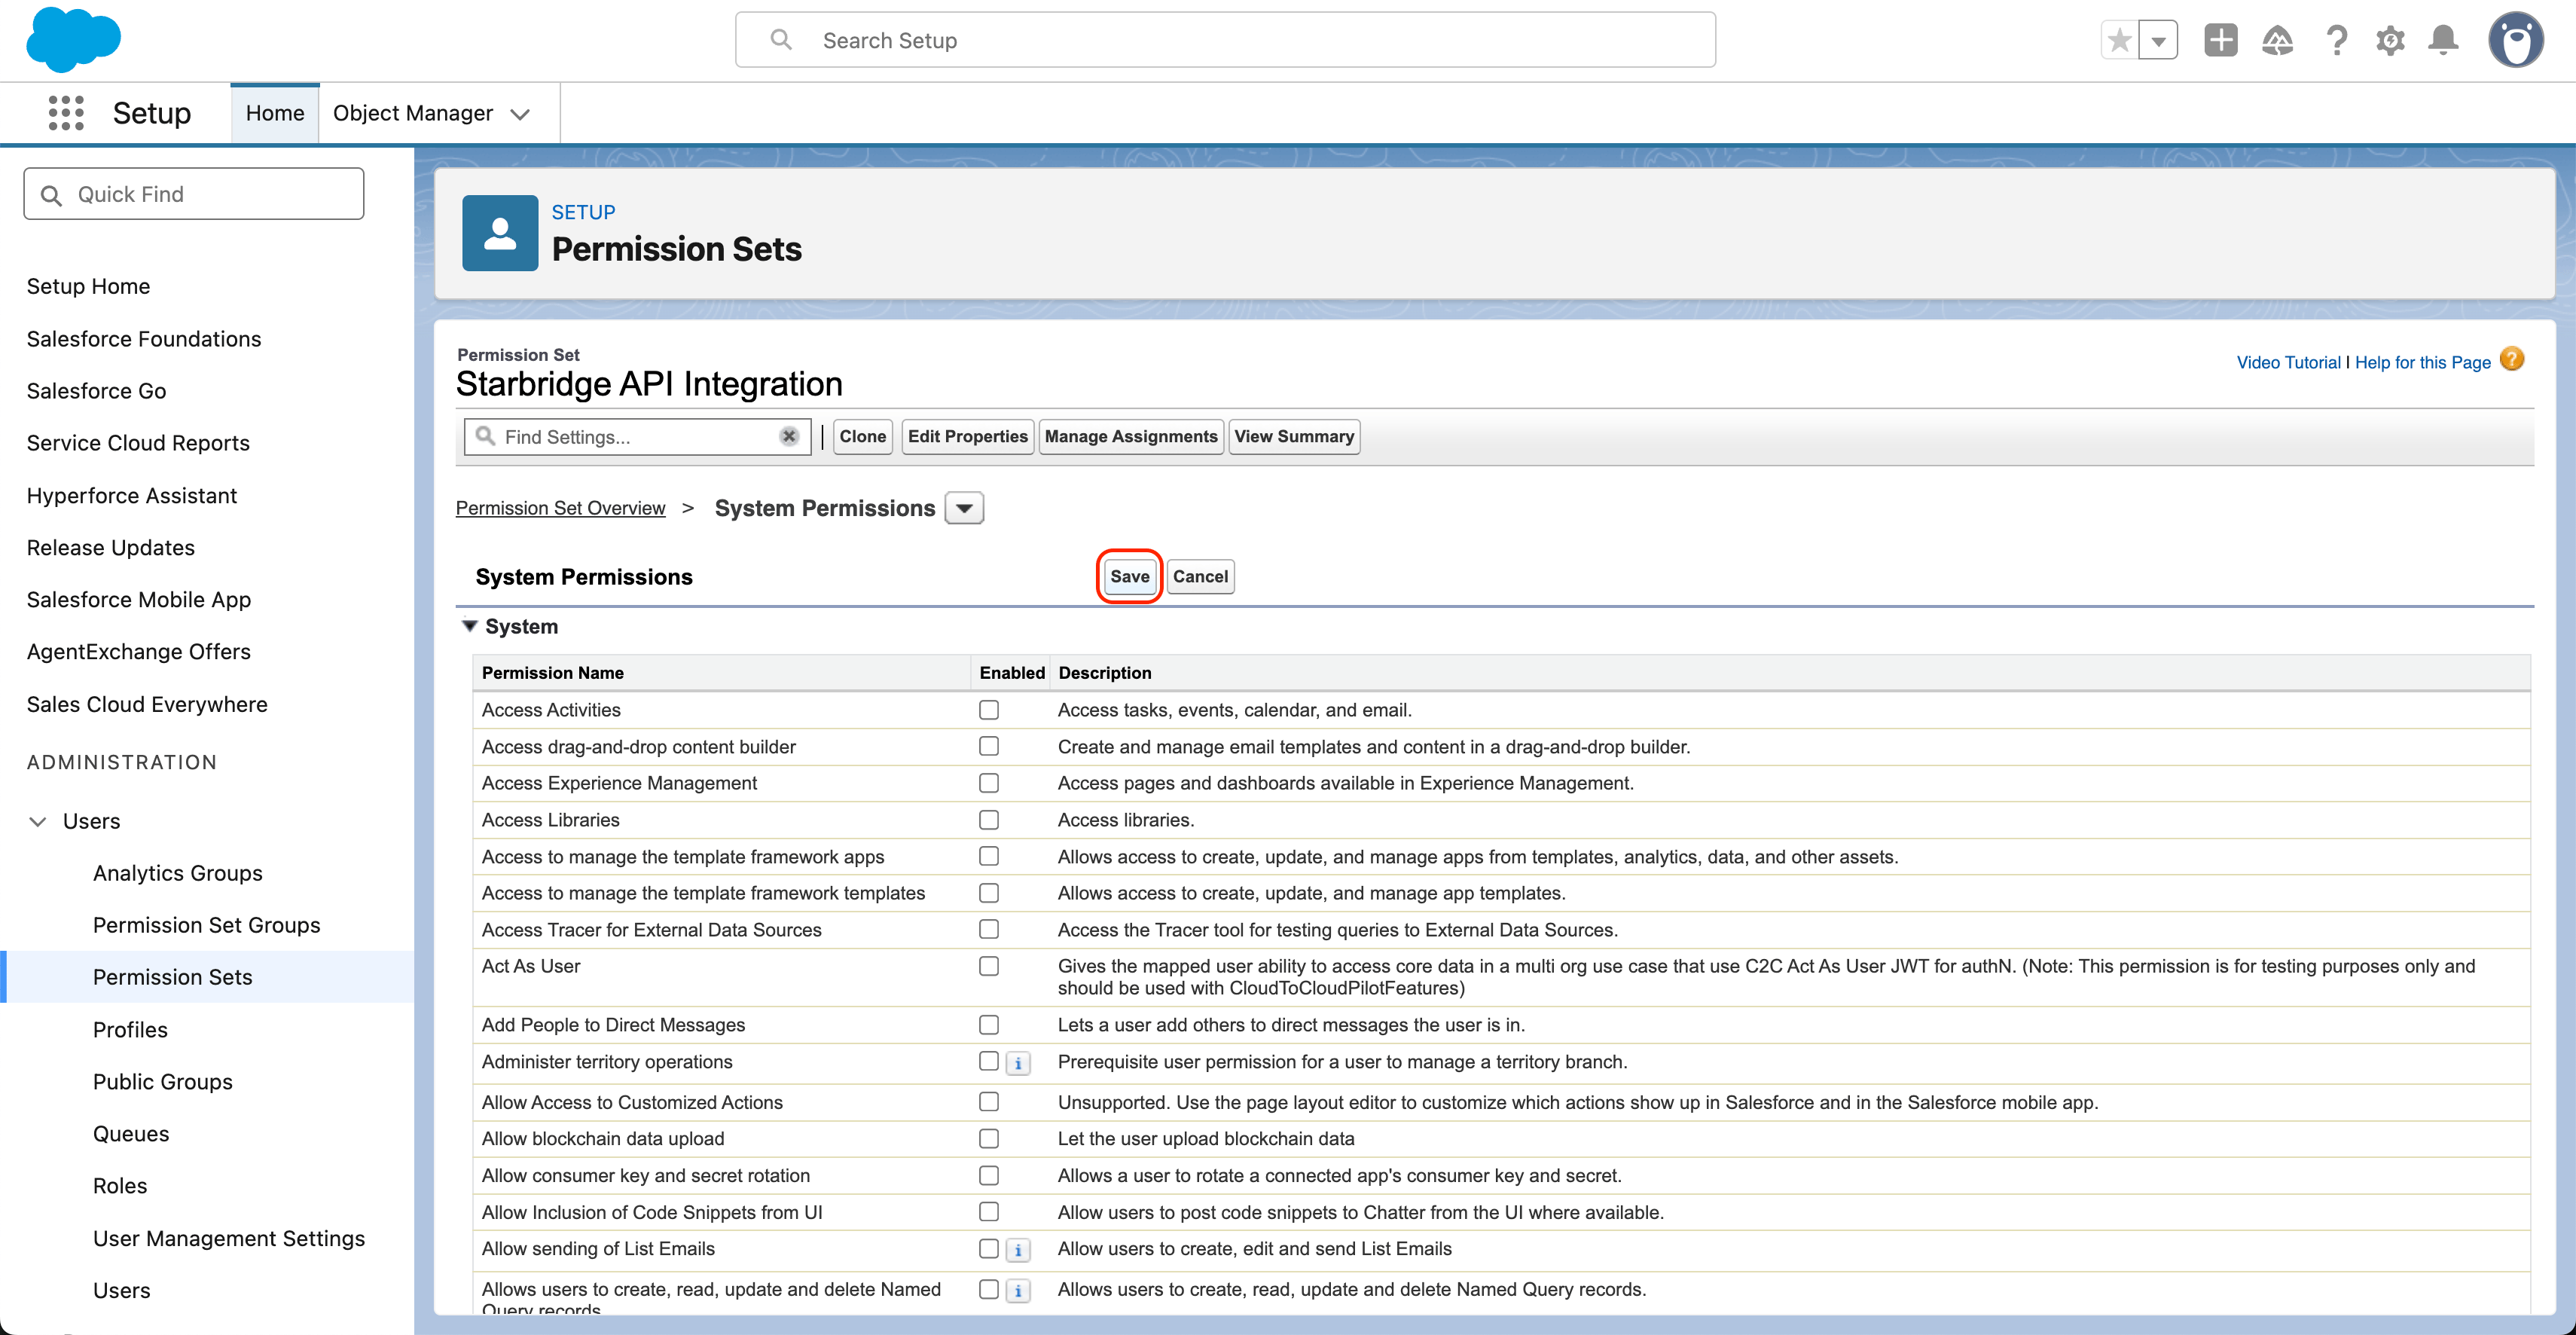
 * Scroll back up and click **Save**
 5. Assign the Permission Set to the integration user:
* Go to **Setup** → **Users**
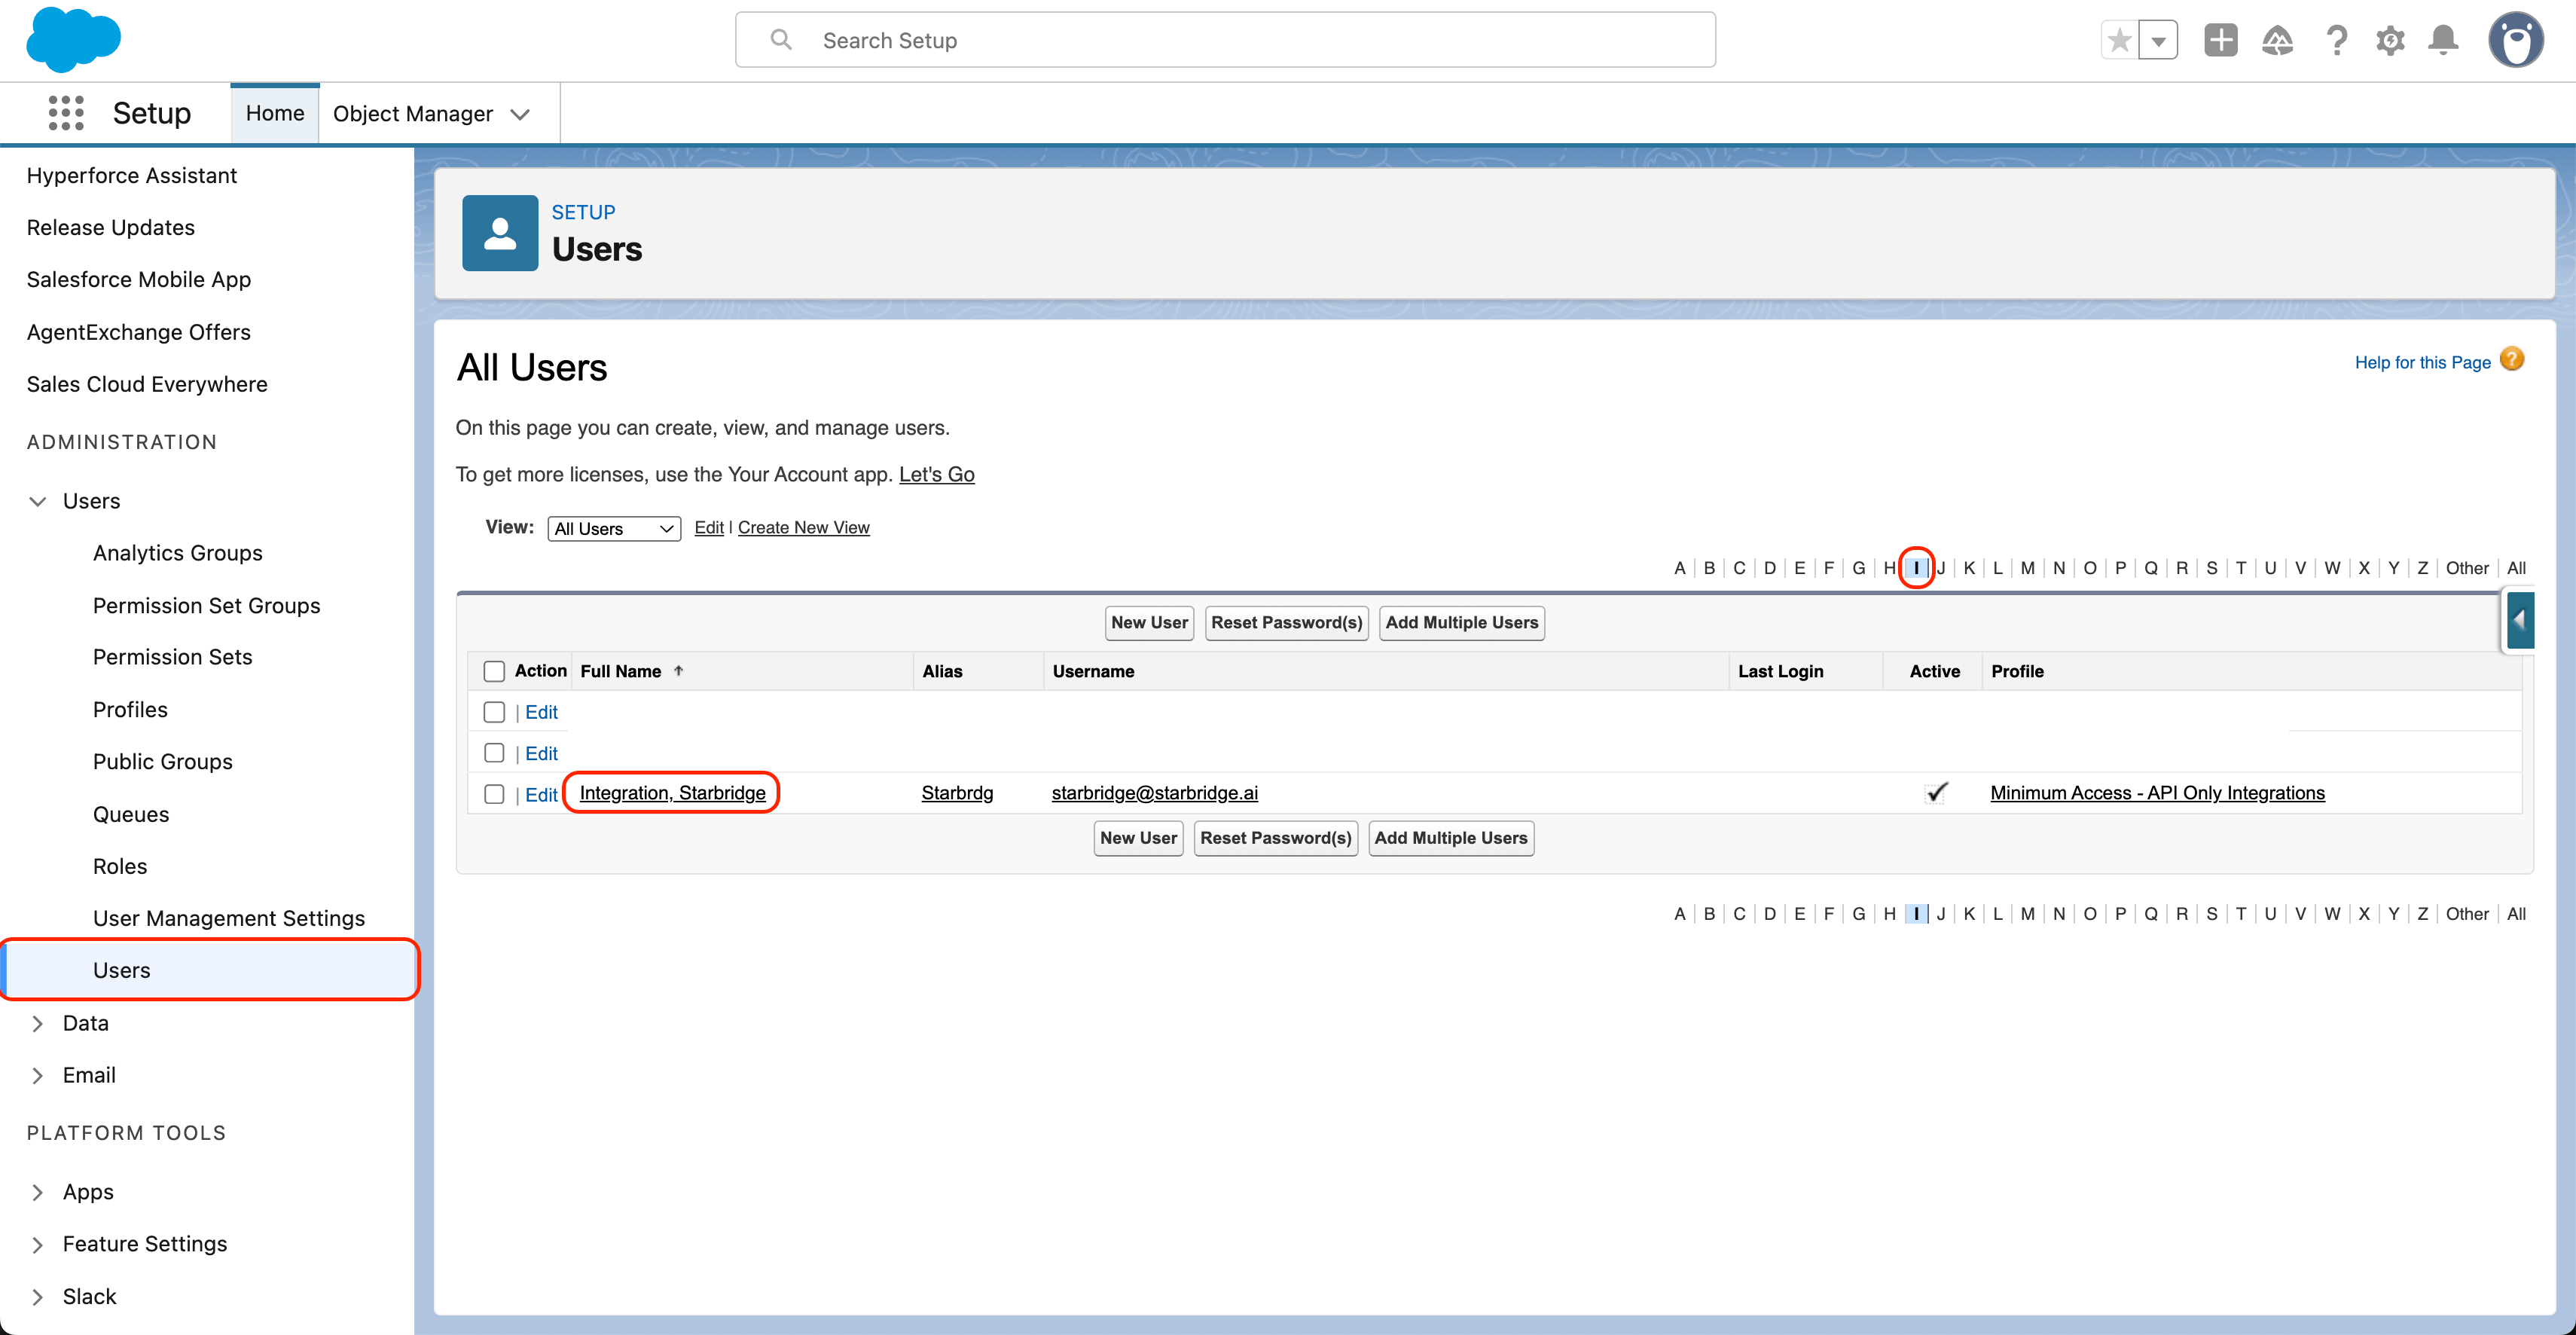
* Click the integration user's name (go to the letter 'I' for `Integration, Starbridge`)
5. Assign the Permission Set to the integration user:
* Go to **Setup** → **Users**
* Click the integration user's name (go to the letter 'I' for `Integration, Starbridge`)
 * Assign the **Starbridge API Integration** permission set:
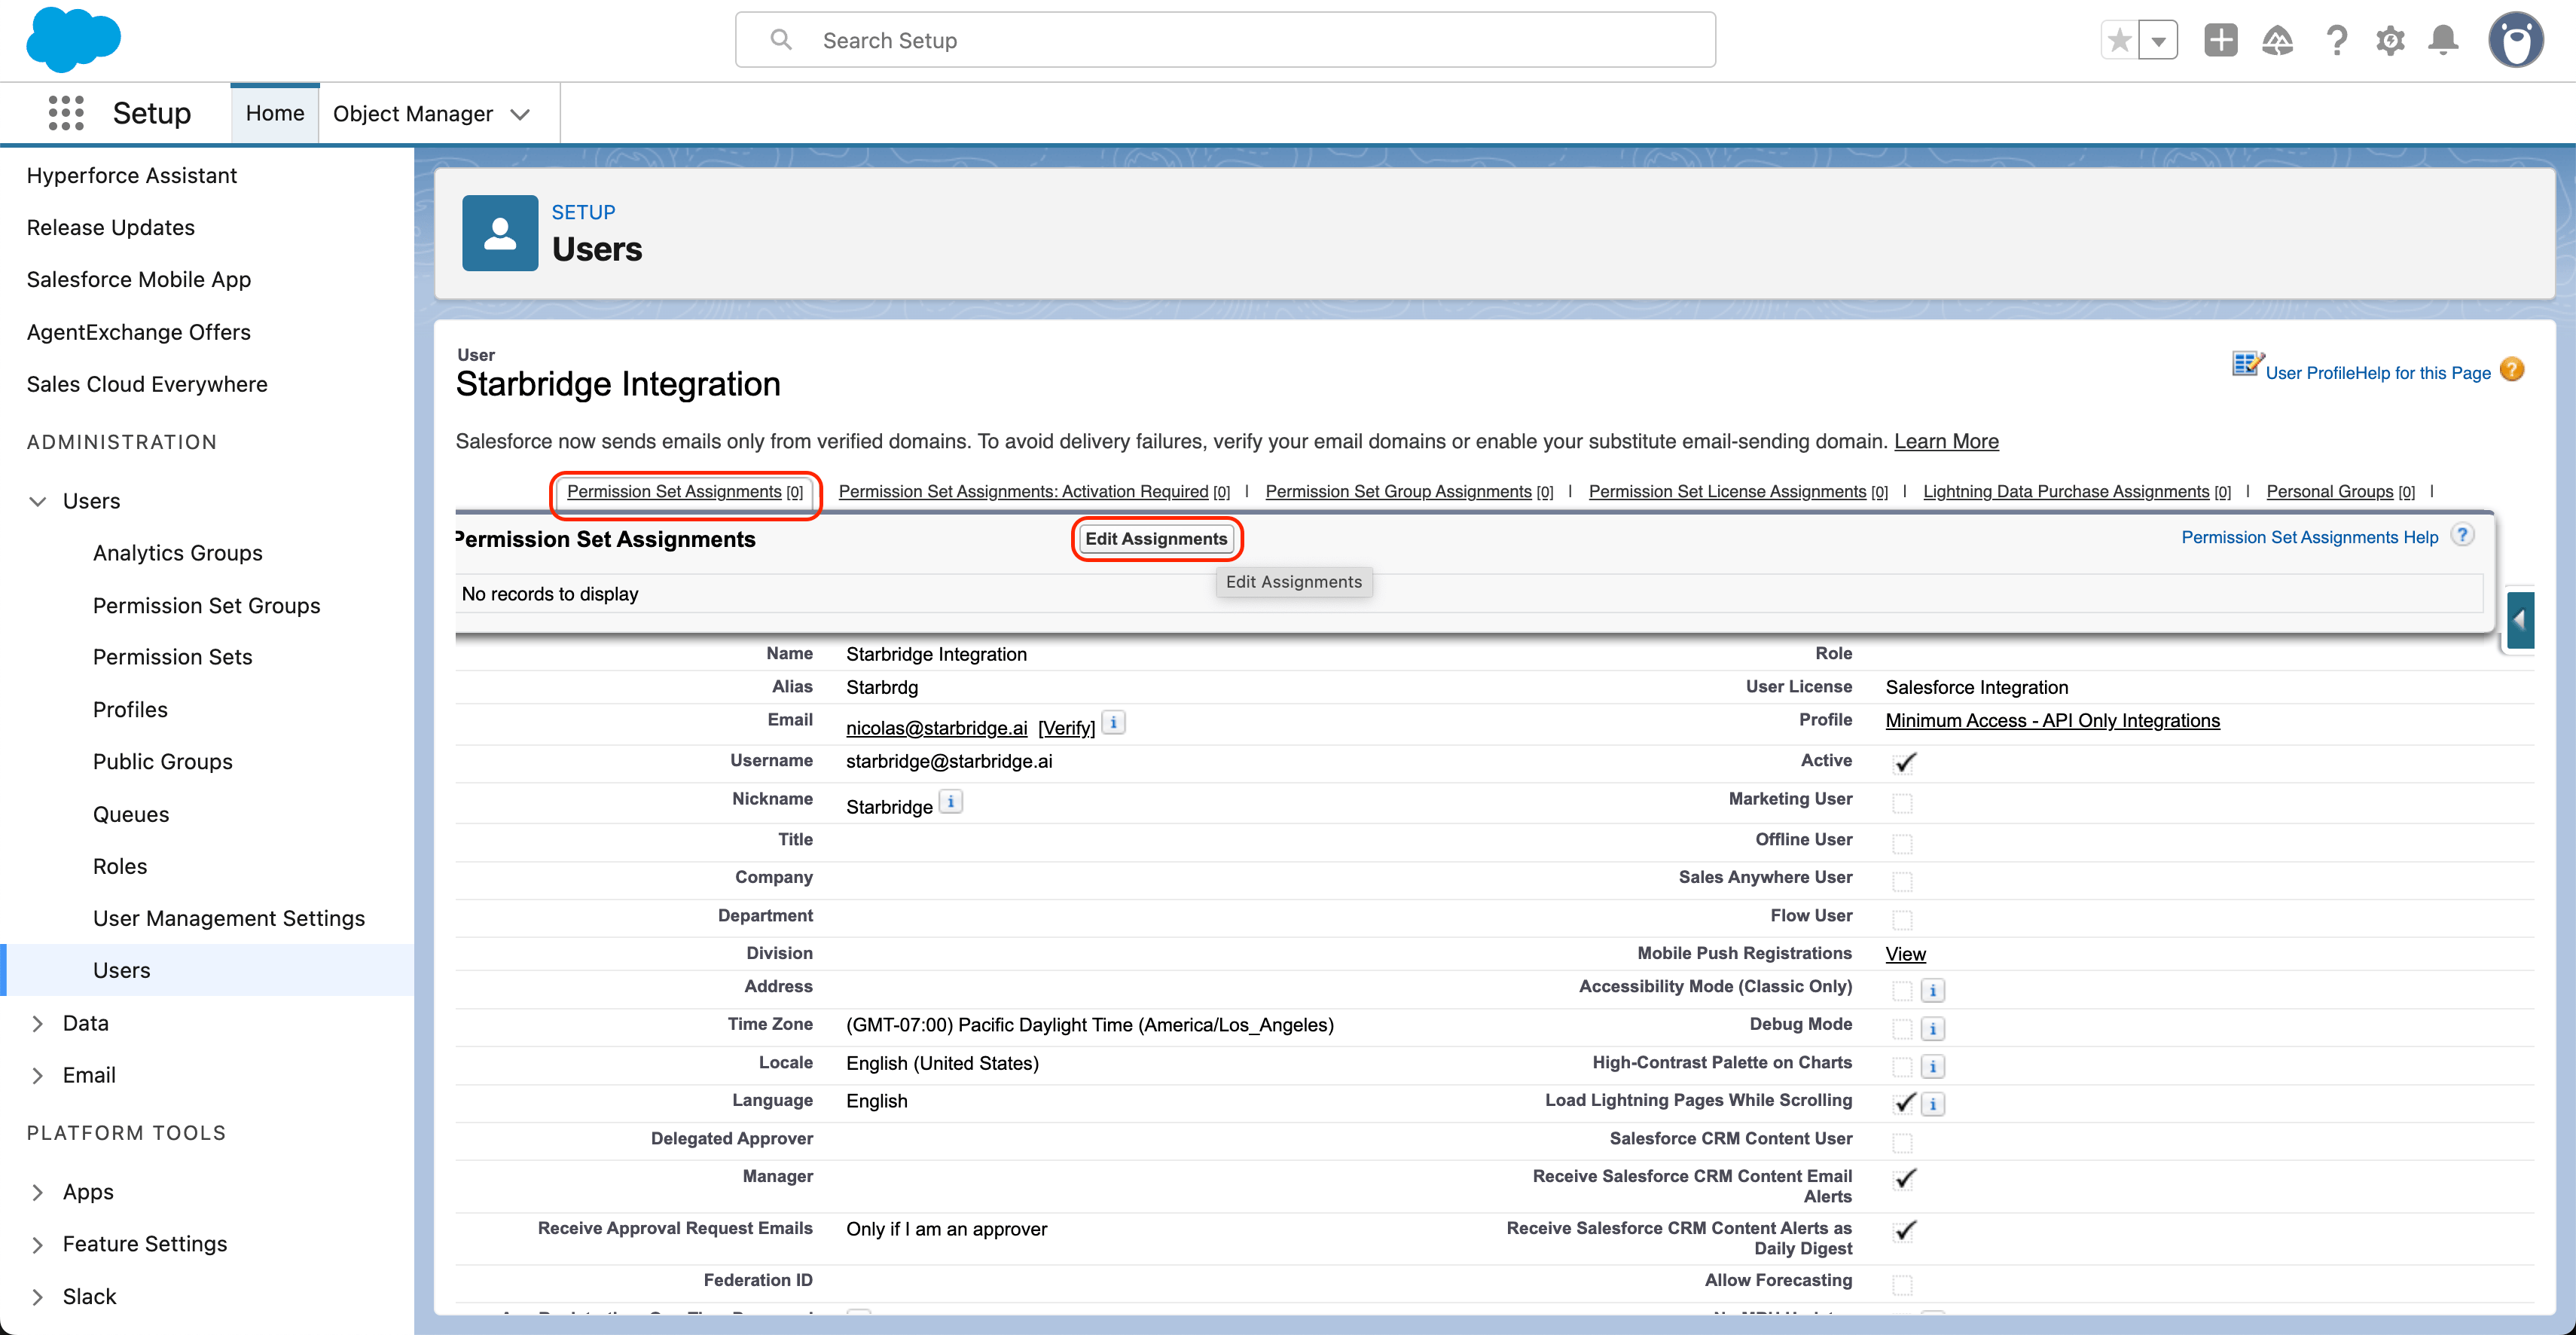
* Hover over **Permission Set Assignments**
* Click **Edit Assignments**
* Assign the **Starbridge API Integration** permission set:
* Hover over **Permission Set Assignments**
* Click **Edit Assignments**
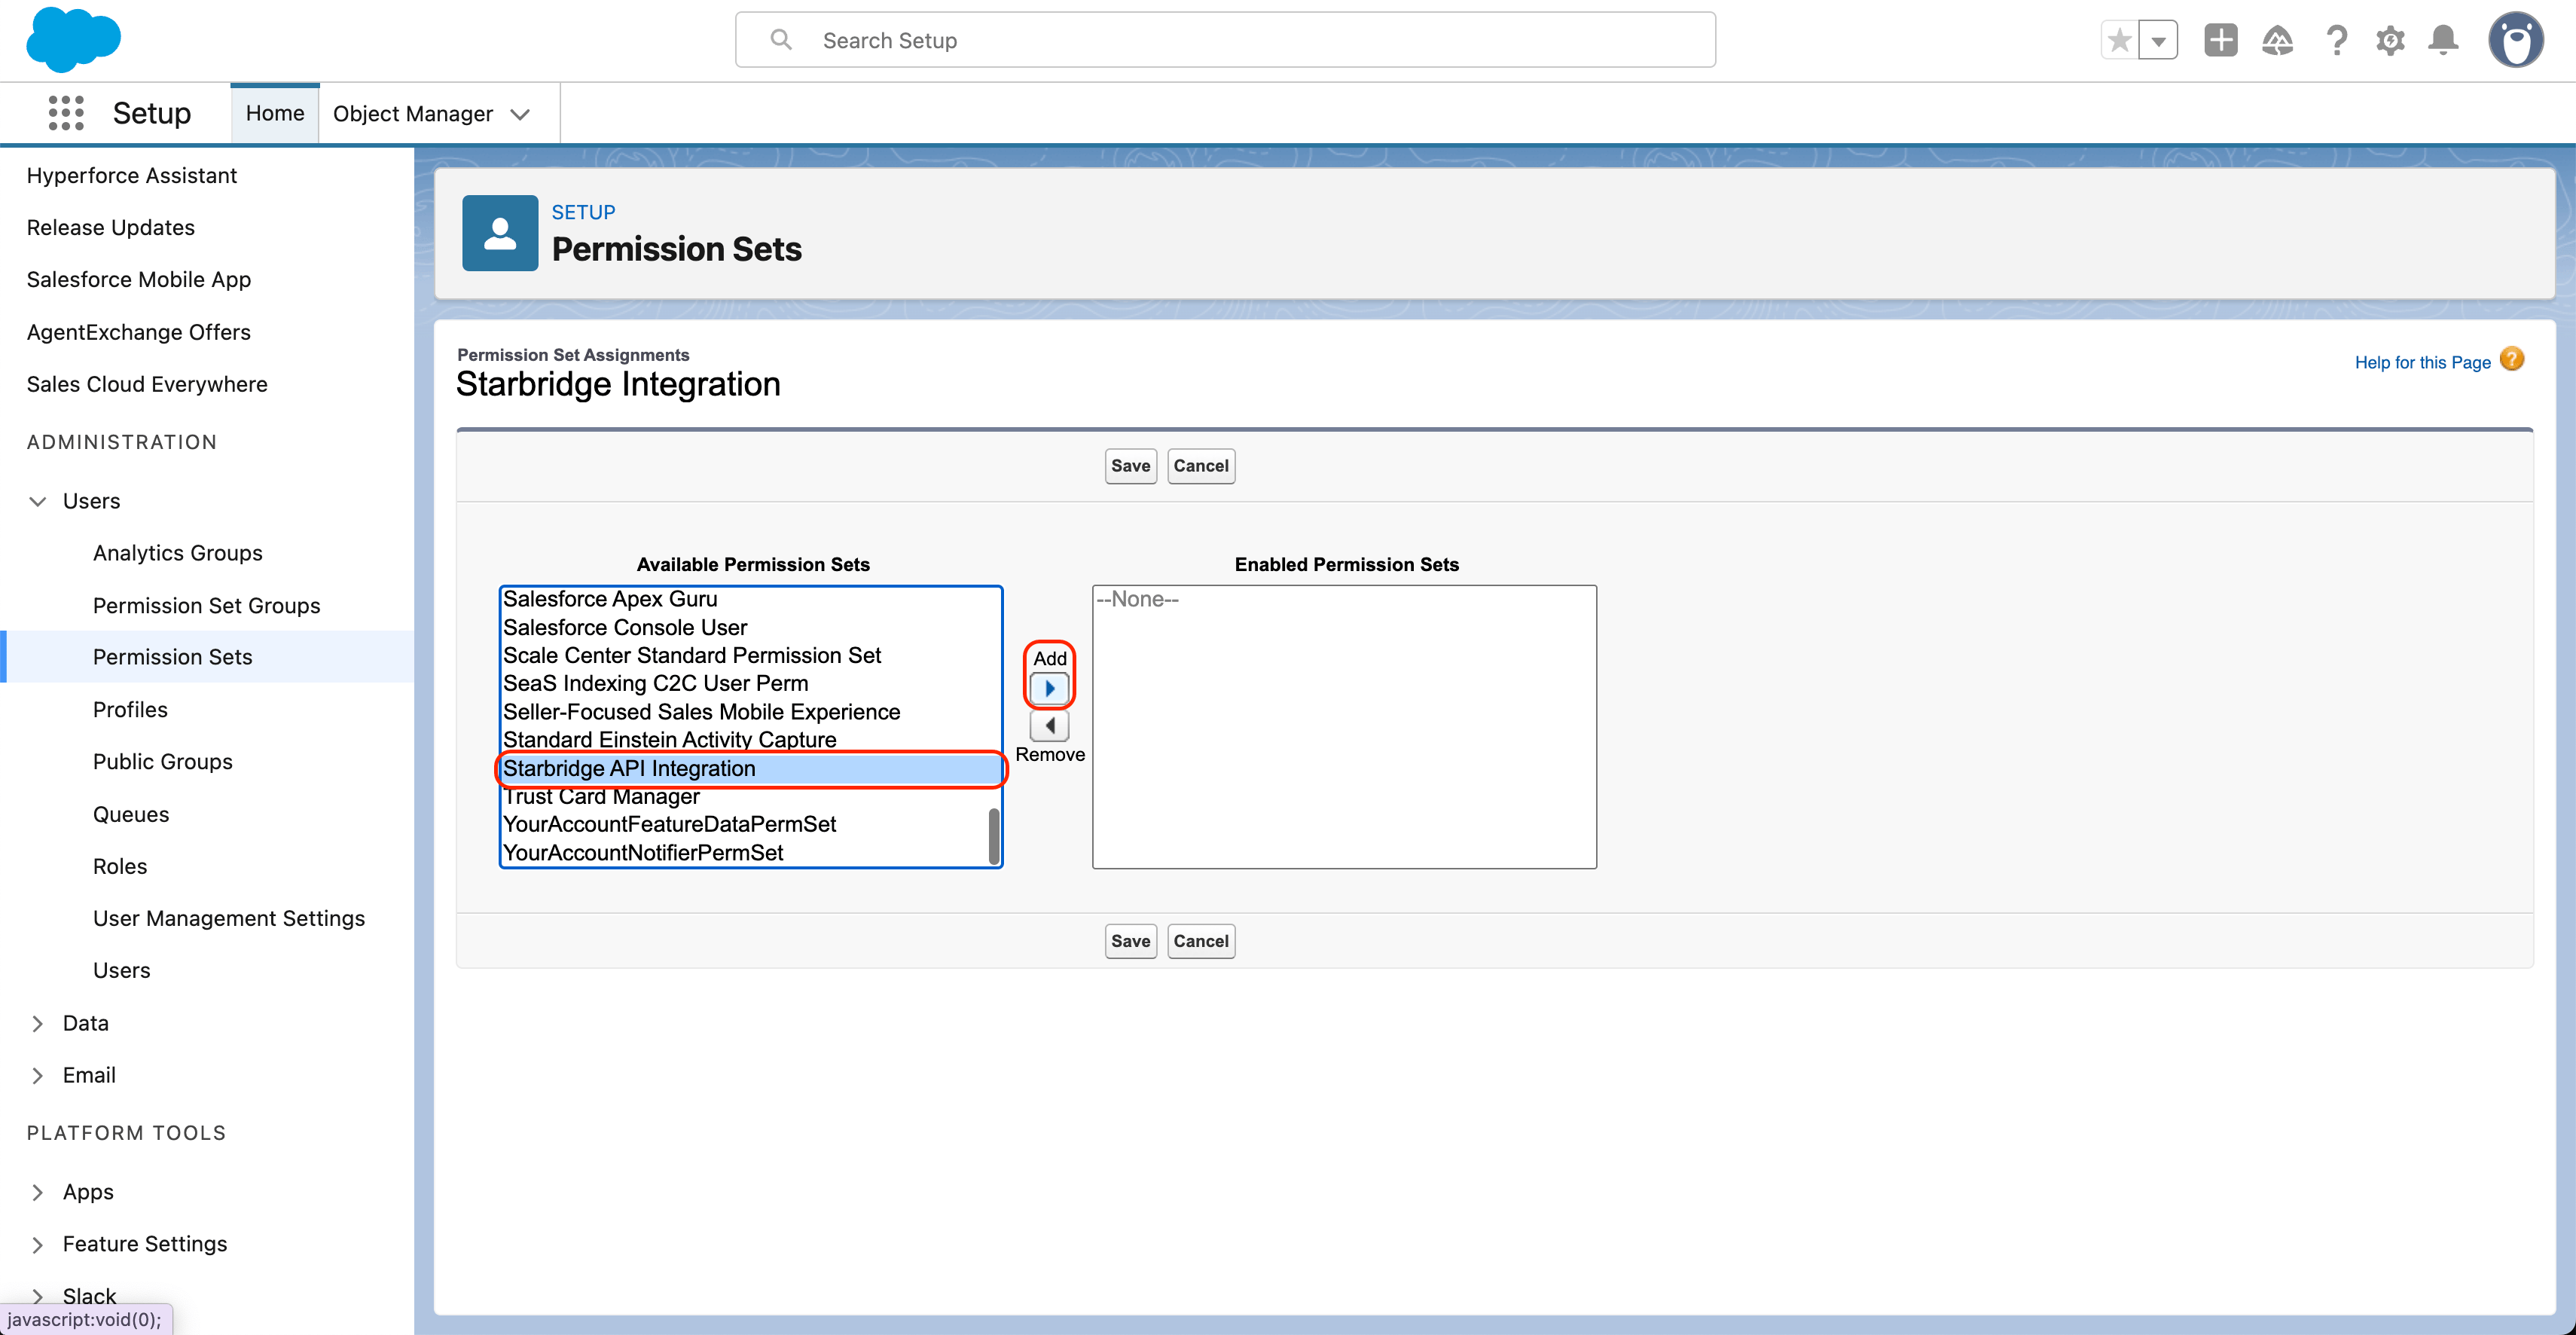
 * Scroll down and select **Starbridge API Integration** from the **Available Permission Sets**, then click **Add**
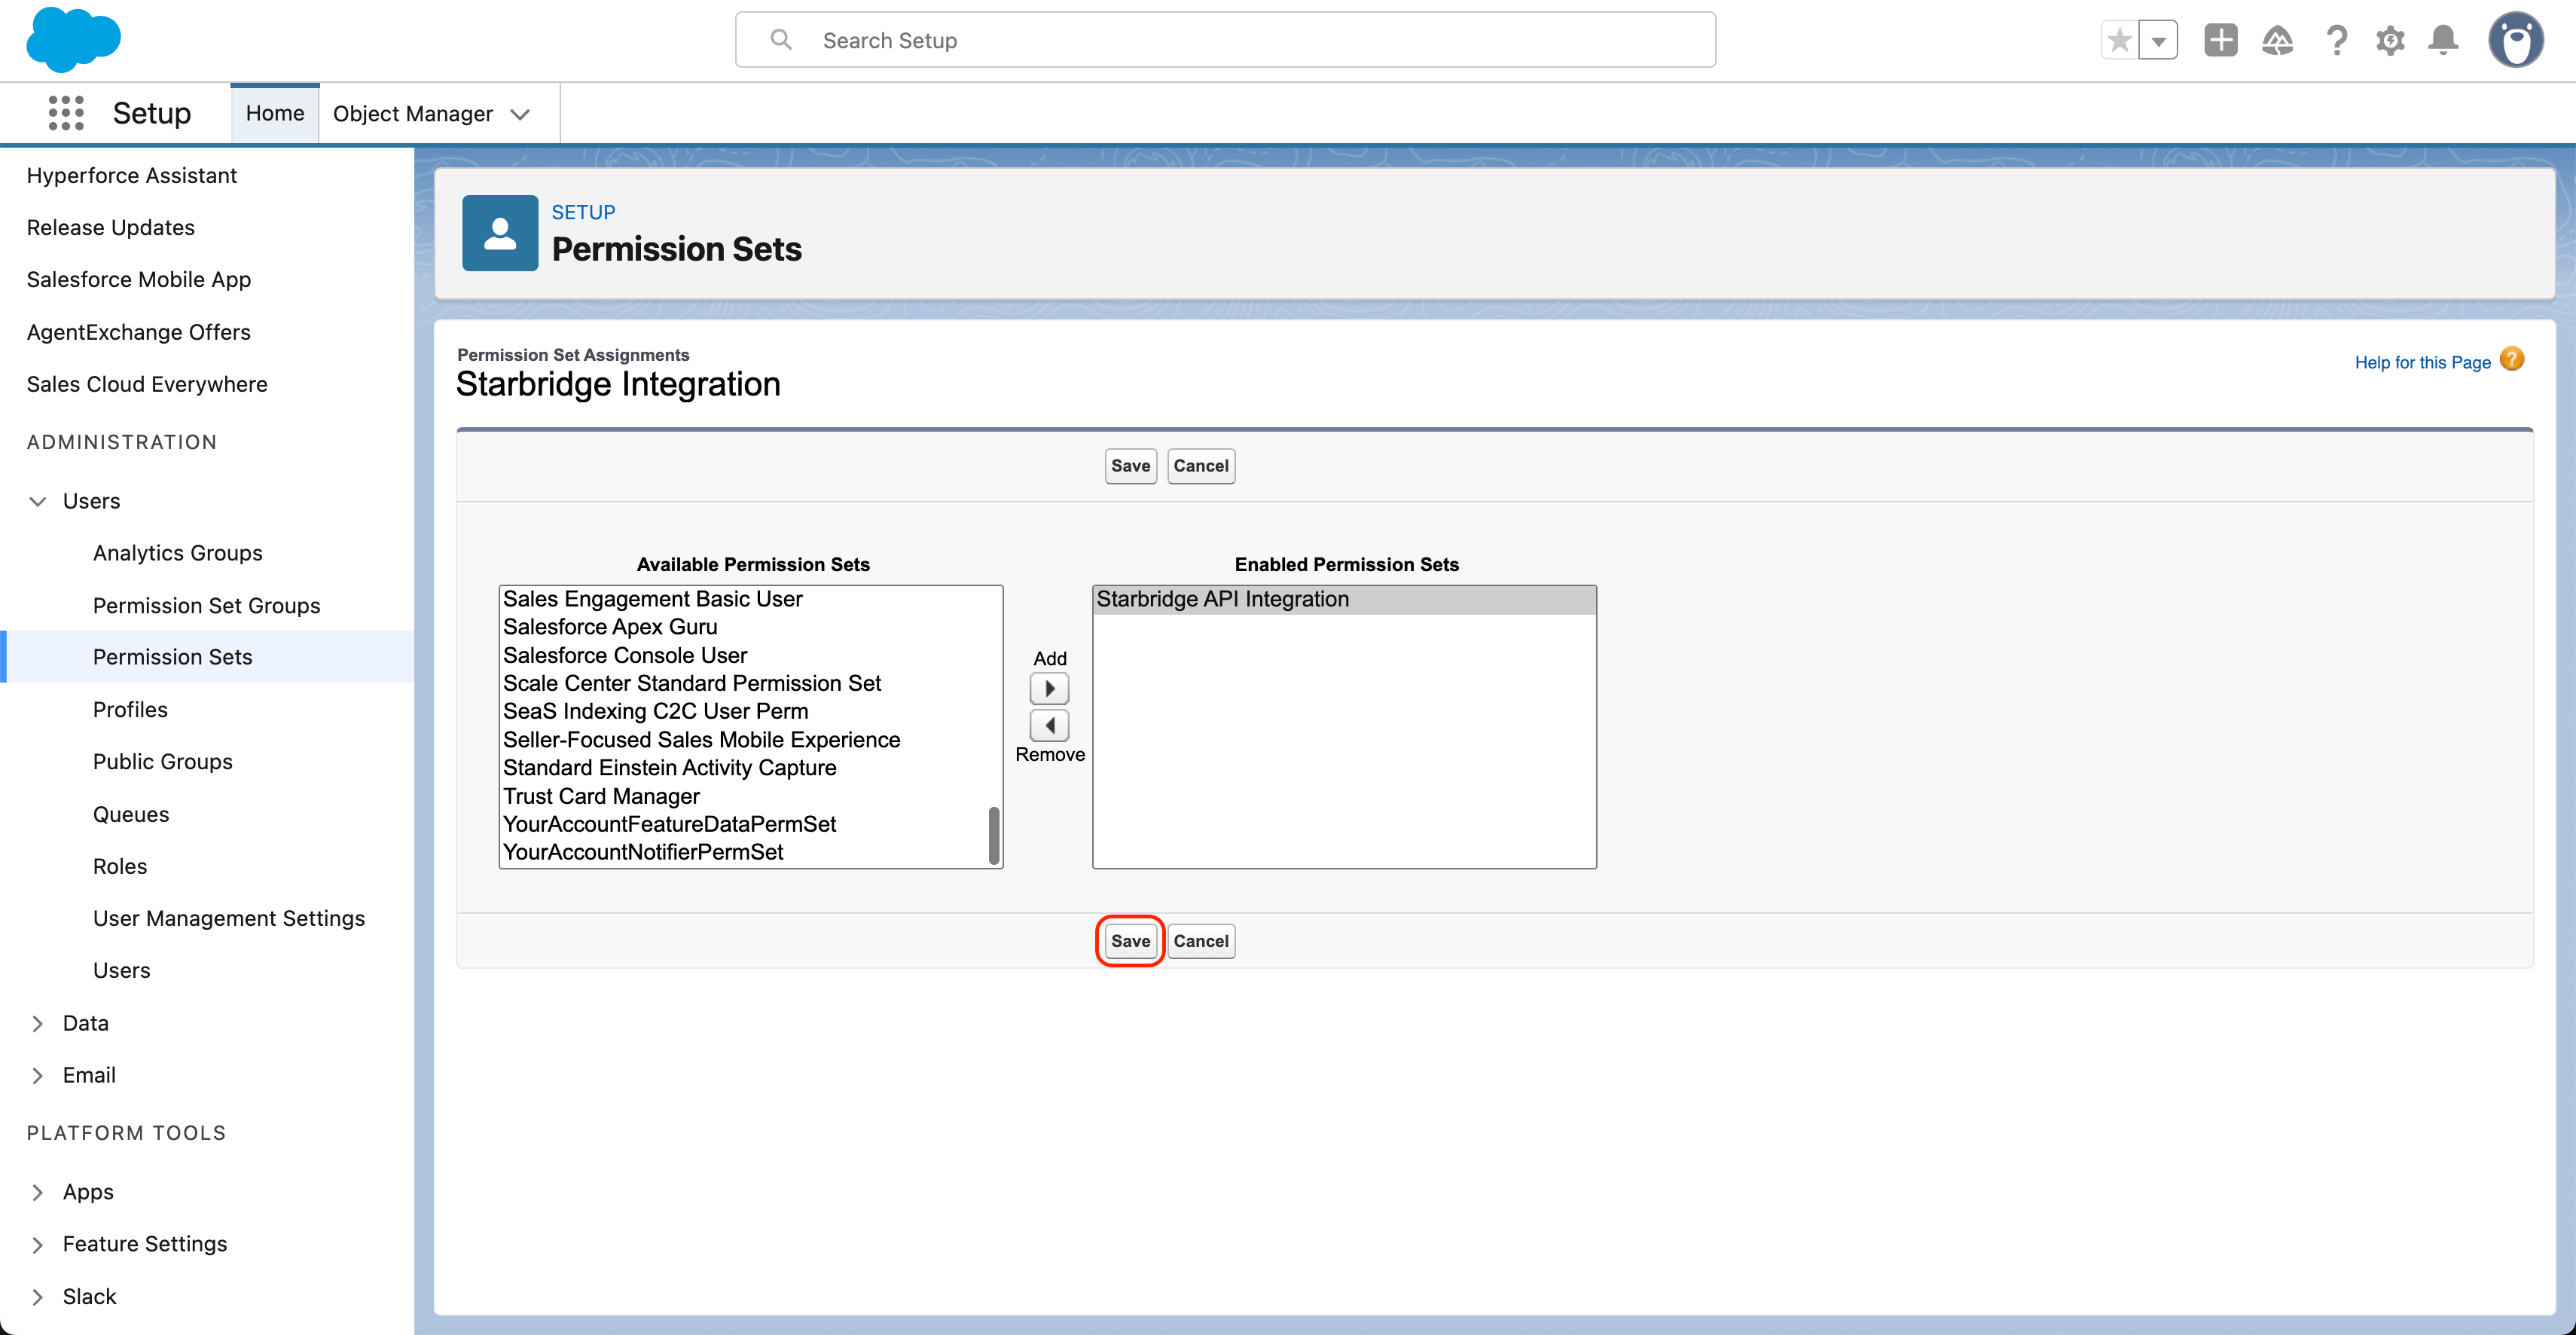
 * Click **Save**
 6. Log in as the integration user before connecting to Starbridge:
* Log out of your current account in Salesforce
* Log in to Salesforce using the Starbridge API Integration user username (**not** your personal email) and password
* Once you log in, you will not be able to access the Salesforce UI, since you are logged in as an API only integration user. This is expected.
**Don't have a password?** Check your email for a verification email from Salesforce. Verify your integration user account to create a password. Save this password in a secure place.
7. Proceed with the steps described below in Starbridge.
Starbridge uses OAuth and does not store your Salesforce username or password.
Unlike Salesforce, HubSpot doesn't have a dedicated integration user concept — the connection is made via OAuth and persists at the account level. Any admin with sufficient permissions can connect Starbridge. We recommend connecting as an admin or Super Admin with access to at minimum the **Company**, **Contact**, **Owner**, and **Deal** objects.
1. Log into HubSpot as an admin or Super Admin
2. Proceed with the steps below.
Starbridge uses OAuth and does not store your HubSpot username or password.
Go to [**Settings → Integrations**](https://dashboard.starbridge.ai/settings/integrations), click **Create**, and select **Salesforce** or **HubSpot**.
If you want to connect a sandbox before connecting production, connect to a sandbox instance first. Starbridge supports separate sandbox and production connections.
Log into your Salesforce or HubSpot account when prompted.
The user you connect must have permission to read and write the objects you want Starbridge to access. Most teams use an admin user or a dedicated integration user to keep audit trails clean. See the instructions above under **Choose who will connect your CRM > Step-by-step instructions for Salesforce**.
**Salesforce only:** Salesforce has introduced stricter controls on uninstalled connected apps. The authenticating user must have the **Approve Uninstalled Connected Apps** (or **Use Any API Client**) system permission to authorize Starbridge for the first time. After a successful OAuth, the app appears under Connected Apps OAuth Usage where you can manage policies and assign it to additional users. See the instructions above under **Choose who will connect your CRM > Step-by-step instructions for Salesforce**.
After connecting, open your CRM integration and click **Objects & fields**.
6. Log in as the integration user before connecting to Starbridge:
* Log out of your current account in Salesforce
* Log in to Salesforce using the Starbridge API Integration user username (**not** your personal email) and password
* Once you log in, you will not be able to access the Salesforce UI, since you are logged in as an API only integration user. This is expected.
**Don't have a password?** Check your email for a verification email from Salesforce. Verify your integration user account to create a password. Save this password in a secure place.
7. Proceed with the steps described below in Starbridge.
Starbridge uses OAuth and does not store your Salesforce username or password.
Unlike Salesforce, HubSpot doesn't have a dedicated integration user concept — the connection is made via OAuth and persists at the account level. Any admin with sufficient permissions can connect Starbridge. We recommend connecting as an admin or Super Admin with access to at minimum the **Company**, **Contact**, **Owner**, and **Deal** objects.
1. Log into HubSpot as an admin or Super Admin
2. Proceed with the steps below.
Starbridge uses OAuth and does not store your HubSpot username or password.
Go to [**Settings → Integrations**](https://dashboard.starbridge.ai/settings/integrations), click **Create**, and select **Salesforce** or **HubSpot**.
If you want to connect a sandbox before connecting production, connect to a sandbox instance first. Starbridge supports separate sandbox and production connections.
Log into your Salesforce or HubSpot account when prompted.
The user you connect must have permission to read and write the objects you want Starbridge to access. Most teams use an admin user or a dedicated integration user to keep audit trails clean. See the instructions above under **Choose who will connect your CRM > Step-by-step instructions for Salesforce**.
**Salesforce only:** Salesforce has introduced stricter controls on uninstalled connected apps. The authenticating user must have the **Approve Uninstalled Connected Apps** (or **Use Any API Client**) system permission to authorize Starbridge for the first time. After a successful OAuth, the app appears under Connected Apps OAuth Usage where you can manage policies and assign it to additional users. See the instructions above under **Choose who will connect your CRM > Step-by-step instructions for Salesforce**.
After connecting, open your CRM integration and click **Objects & fields**.
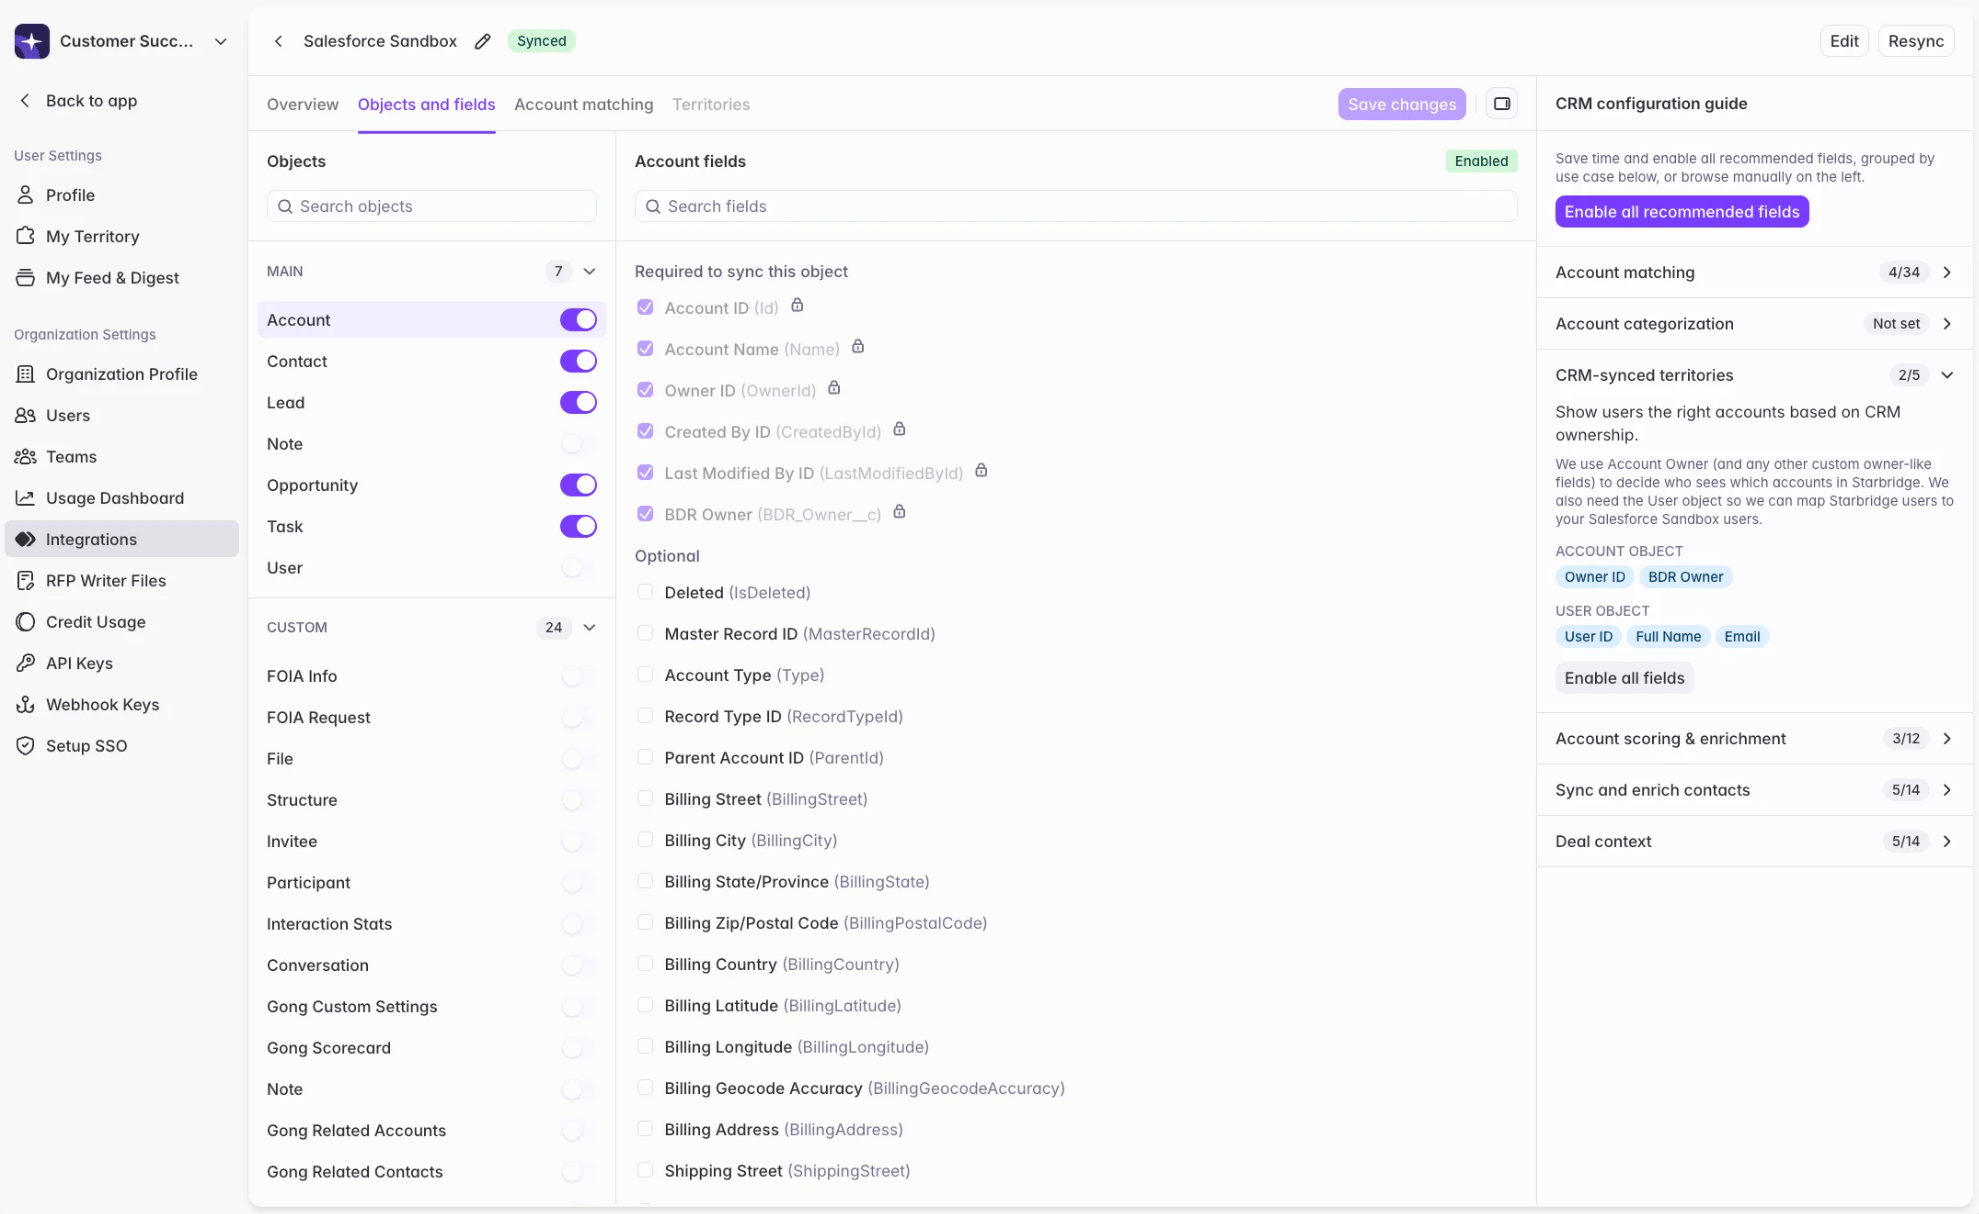 Use the **CRM Configuration Guide** panel on the right to review field recommendations by use case. For each use case you want to enable, click **Enable all recommended fields** — Starbridge selects the recommended objects and fields in one click.
Enable all the use cases you expect to need before saving. Each save triggers a resync, which can take a few minutes or a few hours depending on the amount of data being synced — selecting everything upfront means one resync instead of several as you add use cases over time.
Review the selected fields, adjust if needed, then click **Save changes**. Starbridge will only access, edit, or create data within the objects and fields you explicitly select here.
Starbridge will never modify or overwrite data in your CRM without your explicit approval. This step does **not** modify or overwrite any data in your CRM; it only connects your CRM to Starbridge so Starbridge can access its data moving forward.
You'll see a **Syncing** status while the sync runs — duration depends on the size of your CRM. When complete, the status updates to **Synced**.
## Next steps
With your CRM connected, the next step is account matching — mapping your CRM accounts to Starbridge buyers. This is required before territories, CRM-synced buyer lists, and lookup and sync columns will work.
Map your CRM accounts to Starbridge buyers.
Use the **CRM Configuration Guide** panel on the right to review field recommendations by use case. For each use case you want to enable, click **Enable all recommended fields** — Starbridge selects the recommended objects and fields in one click.
Enable all the use cases you expect to need before saving. Each save triggers a resync, which can take a few minutes or a few hours depending on the amount of data being synced — selecting everything upfront means one resync instead of several as you add use cases over time.
Review the selected fields, adjust if needed, then click **Save changes**. Starbridge will only access, edit, or create data within the objects and fields you explicitly select here.
Starbridge will never modify or overwrite data in your CRM without your explicit approval. This step does **not** modify or overwrite any data in your CRM; it only connects your CRM to Starbridge so Starbridge can access its data moving forward.
You'll see a **Syncing** status while the sync runs — duration depends on the size of your CRM. When complete, the status updates to **Synced**.
## Next steps
With your CRM connected, the next step is account matching — mapping your CRM accounts to Starbridge buyers. This is required before territories, CRM-synced buyer lists, and lookup and sync columns will work.
Map your CRM accounts to Starbridge buyers.