> ## Documentation Index
> Fetch the complete documentation index at: https://hc.starbridge.ai/llms.txt
> Use this file to discover all available pages before exploring further.
# Webhooks Overview
> Receive real-time notifications when bridge rows are created or updated in Starbridge.
Starbridge webhooks let you receive real-time notifications when bridge rows are created or updated. Instead of polling for changes, Starbridge sends an HTTP POST request to your endpoint with the row data as soon as processing completes.
## Setting up a webhook column
To start receiving webhooks, add a **Webhook column** to your bridge.
Open the bridge you want to receive webhooks for in the Starbridge dashboard.
Click **Add Column** (or edit an existing column) and select **Configure Integration → Trigger Webhook** as the column type.
Enter your **Webhook URL** — this is the endpoint where Starbridge will send HTTP POST requests.
Select when the webhook is triggered:
* **Row Addition** — triggers only when a new row is added
* **Row Addition and Each Update** — triggers on both new rows and updates
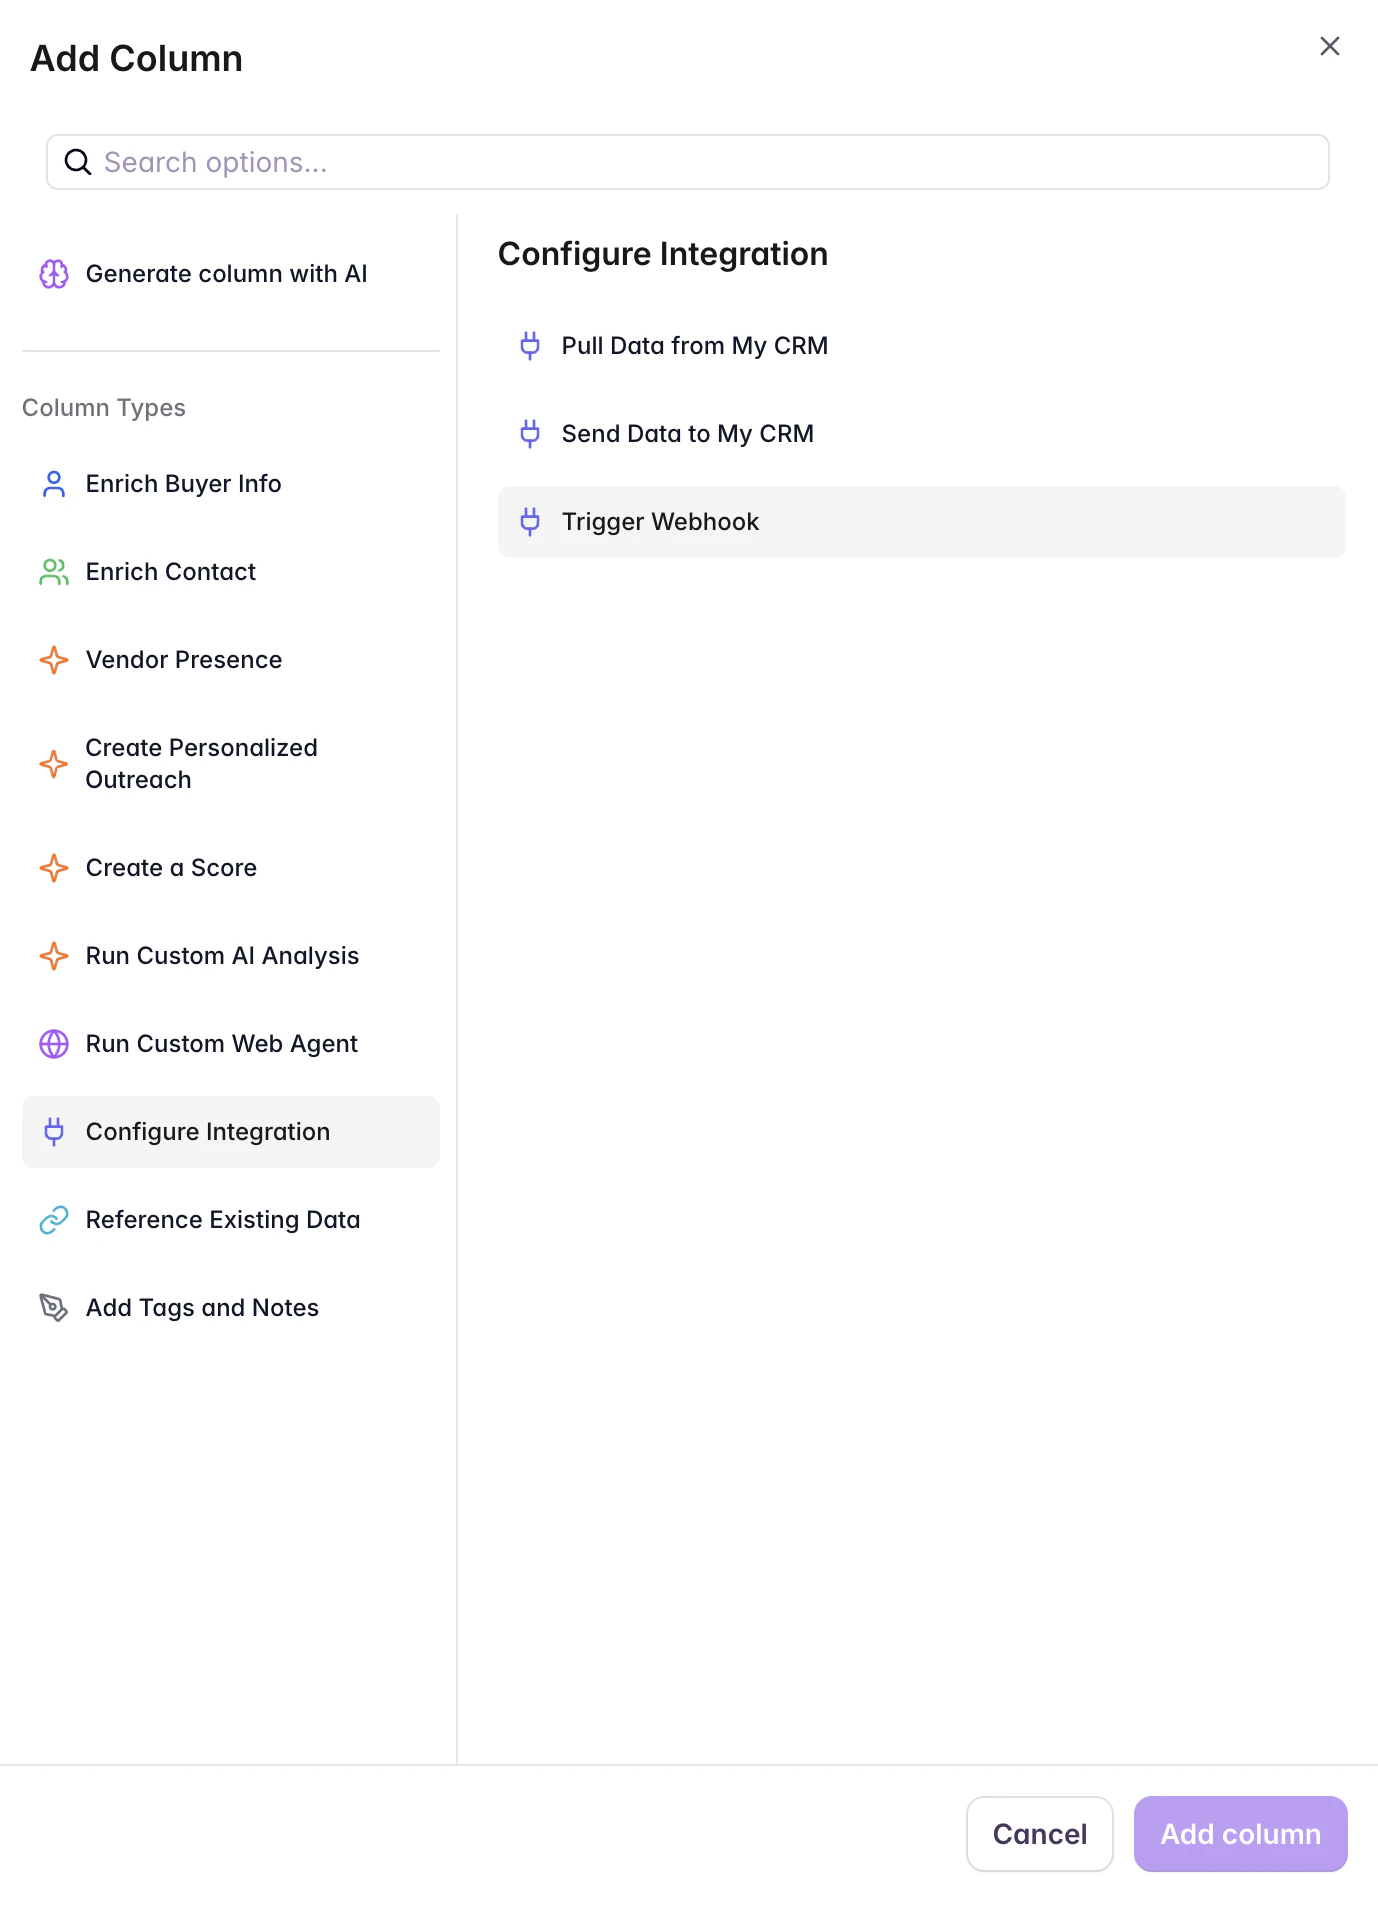
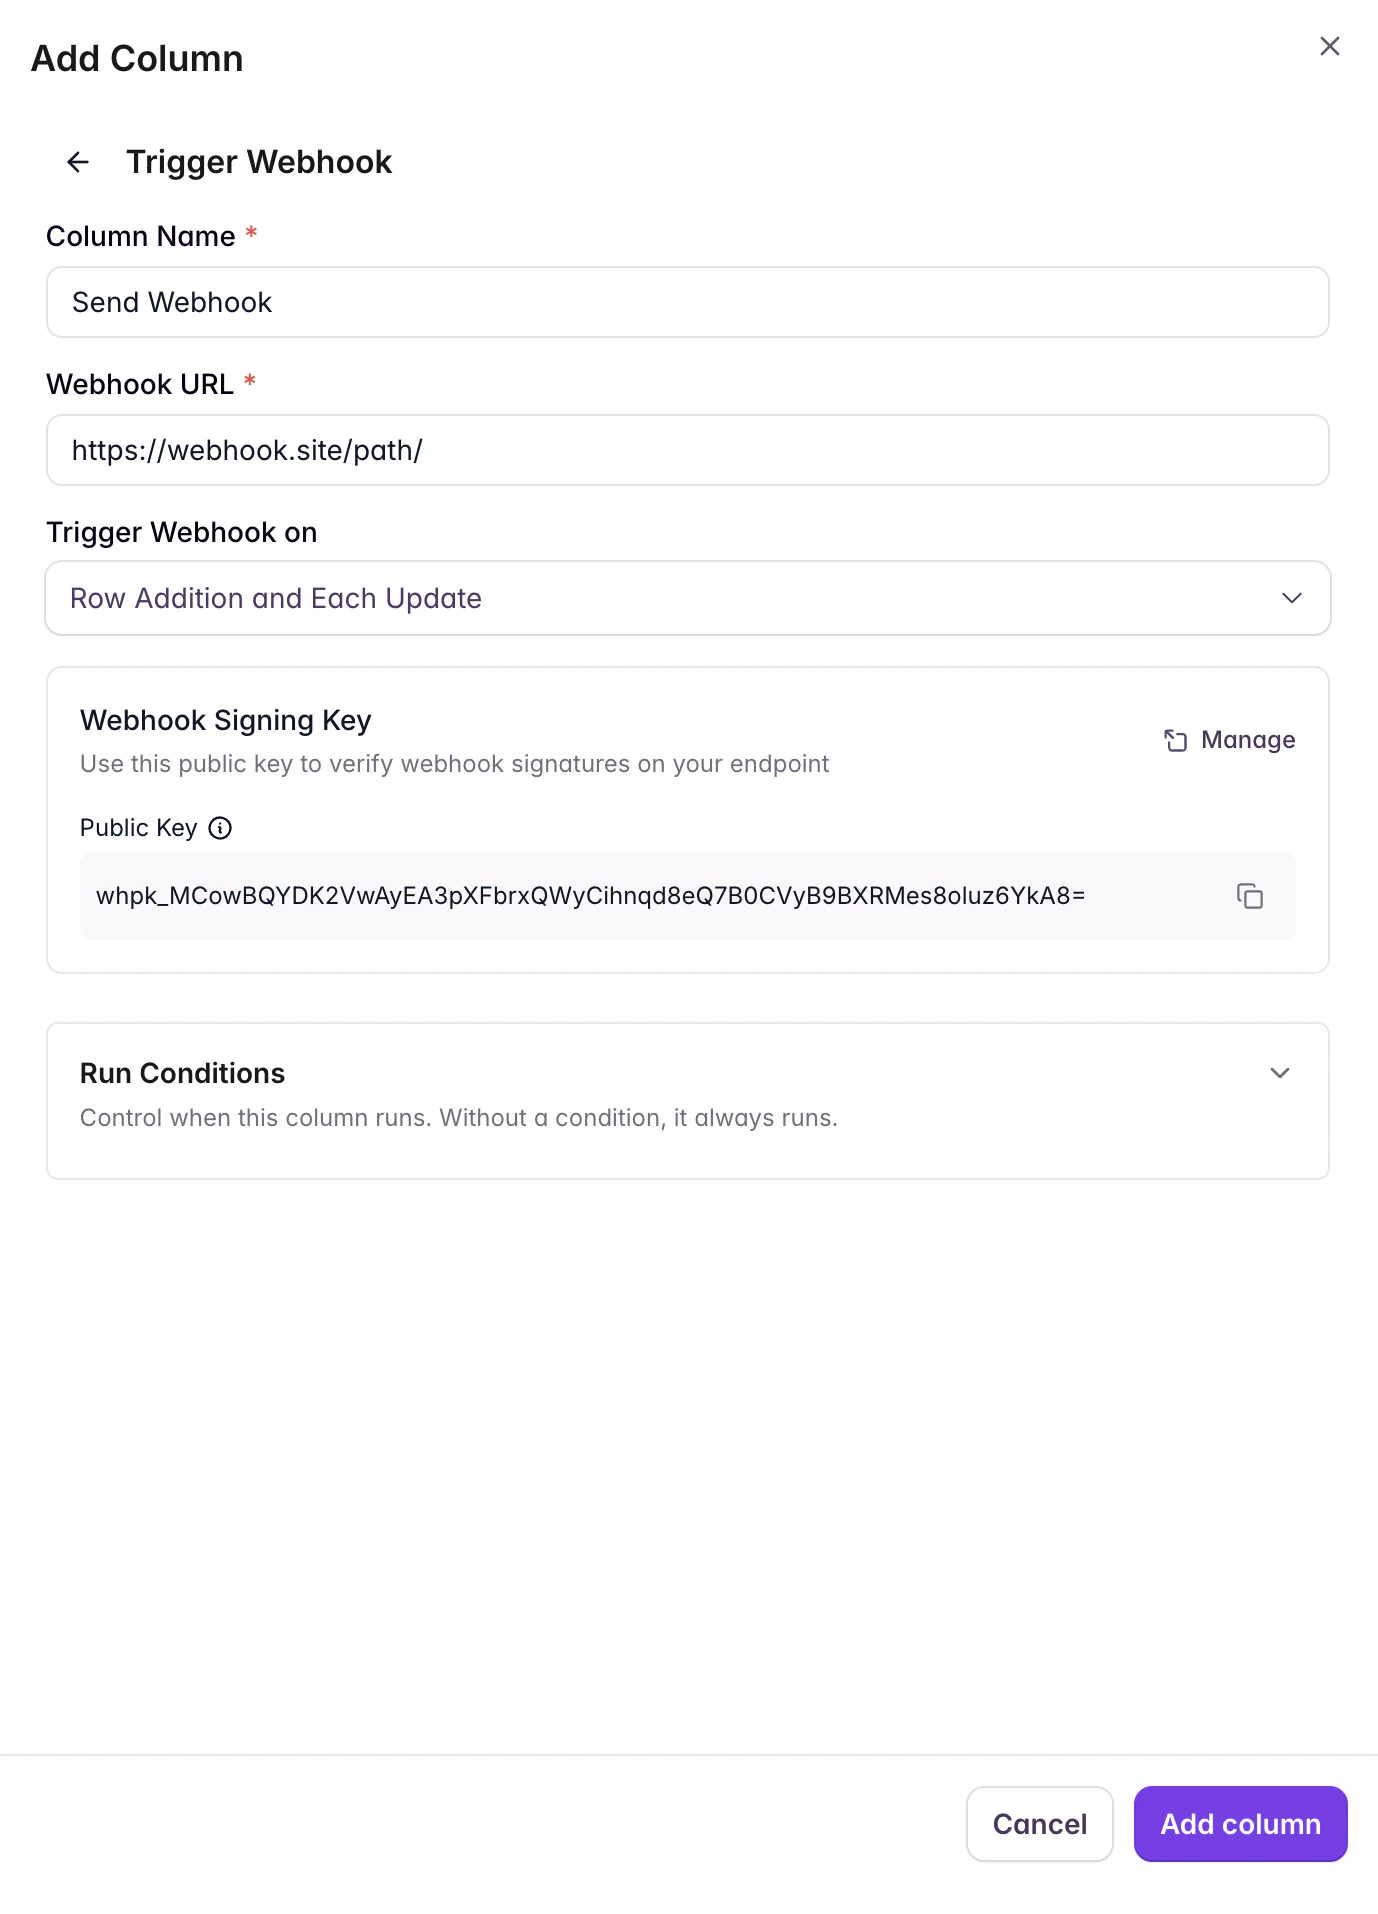 Save the column. Starbridge will send a webhook to your URL every time a bridge row is created or updated and all preceding columns have finished processing.
## Getting your signing key
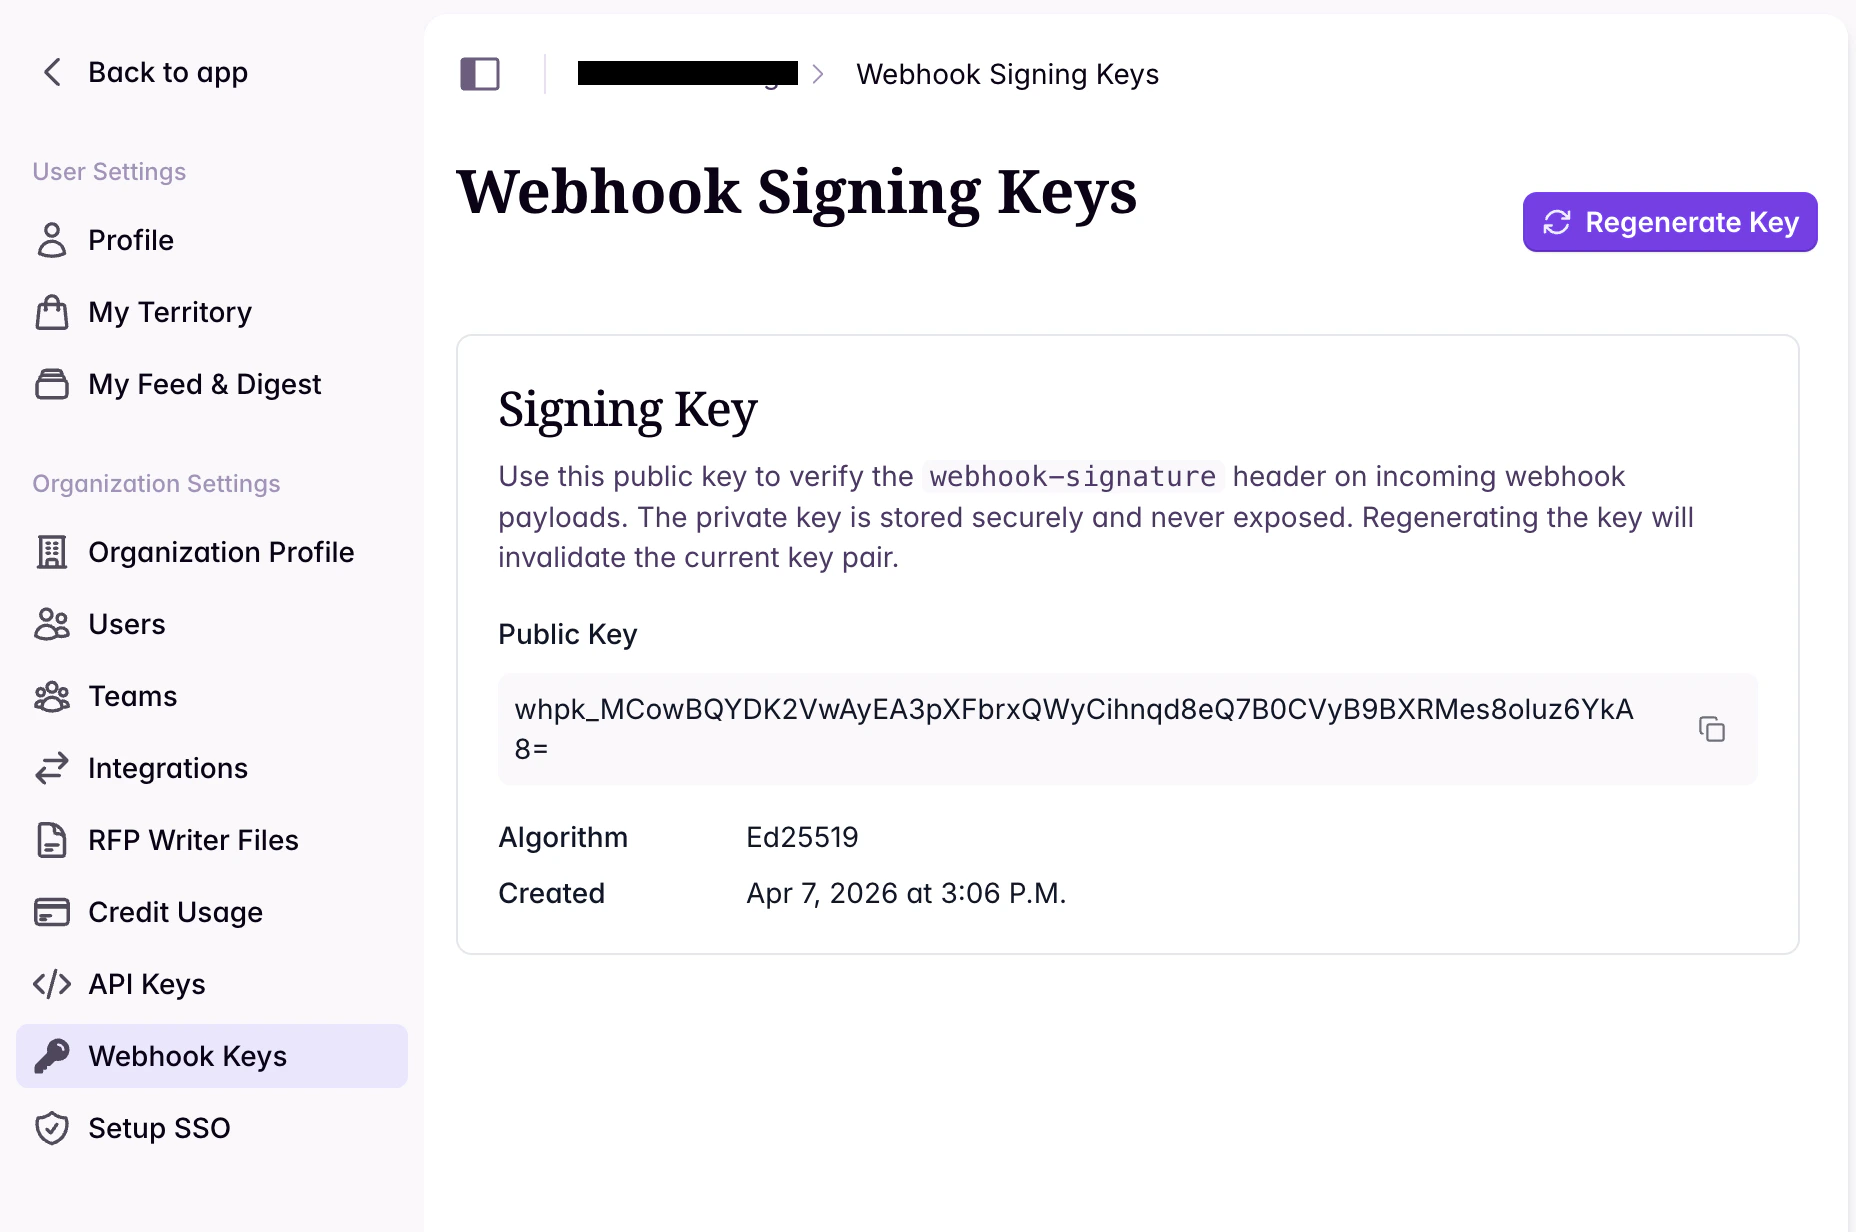
Every webhook request from Starbridge is cryptographically signed so you can verify it is authentic. To verify signatures, you need your organization's **public signing key**.
You can find your public key in two places:
Go to **Settings → Webhook Keys** (`/settings/webhook-signing-keys`) and copy your public key.
Save the column. Starbridge will send a webhook to your URL every time a bridge row is created or updated and all preceding columns have finished processing.
## Getting your signing key
Every webhook request from Starbridge is cryptographically signed so you can verify it is authentic. To verify signatures, you need your organization's **public signing key**.
You can find your public key in two places:
Go to **Settings → Webhook Keys** (`/settings/webhook-signing-keys`) and copy your public key.
 Open the Webhook column configuration. Your public key is displayed there.
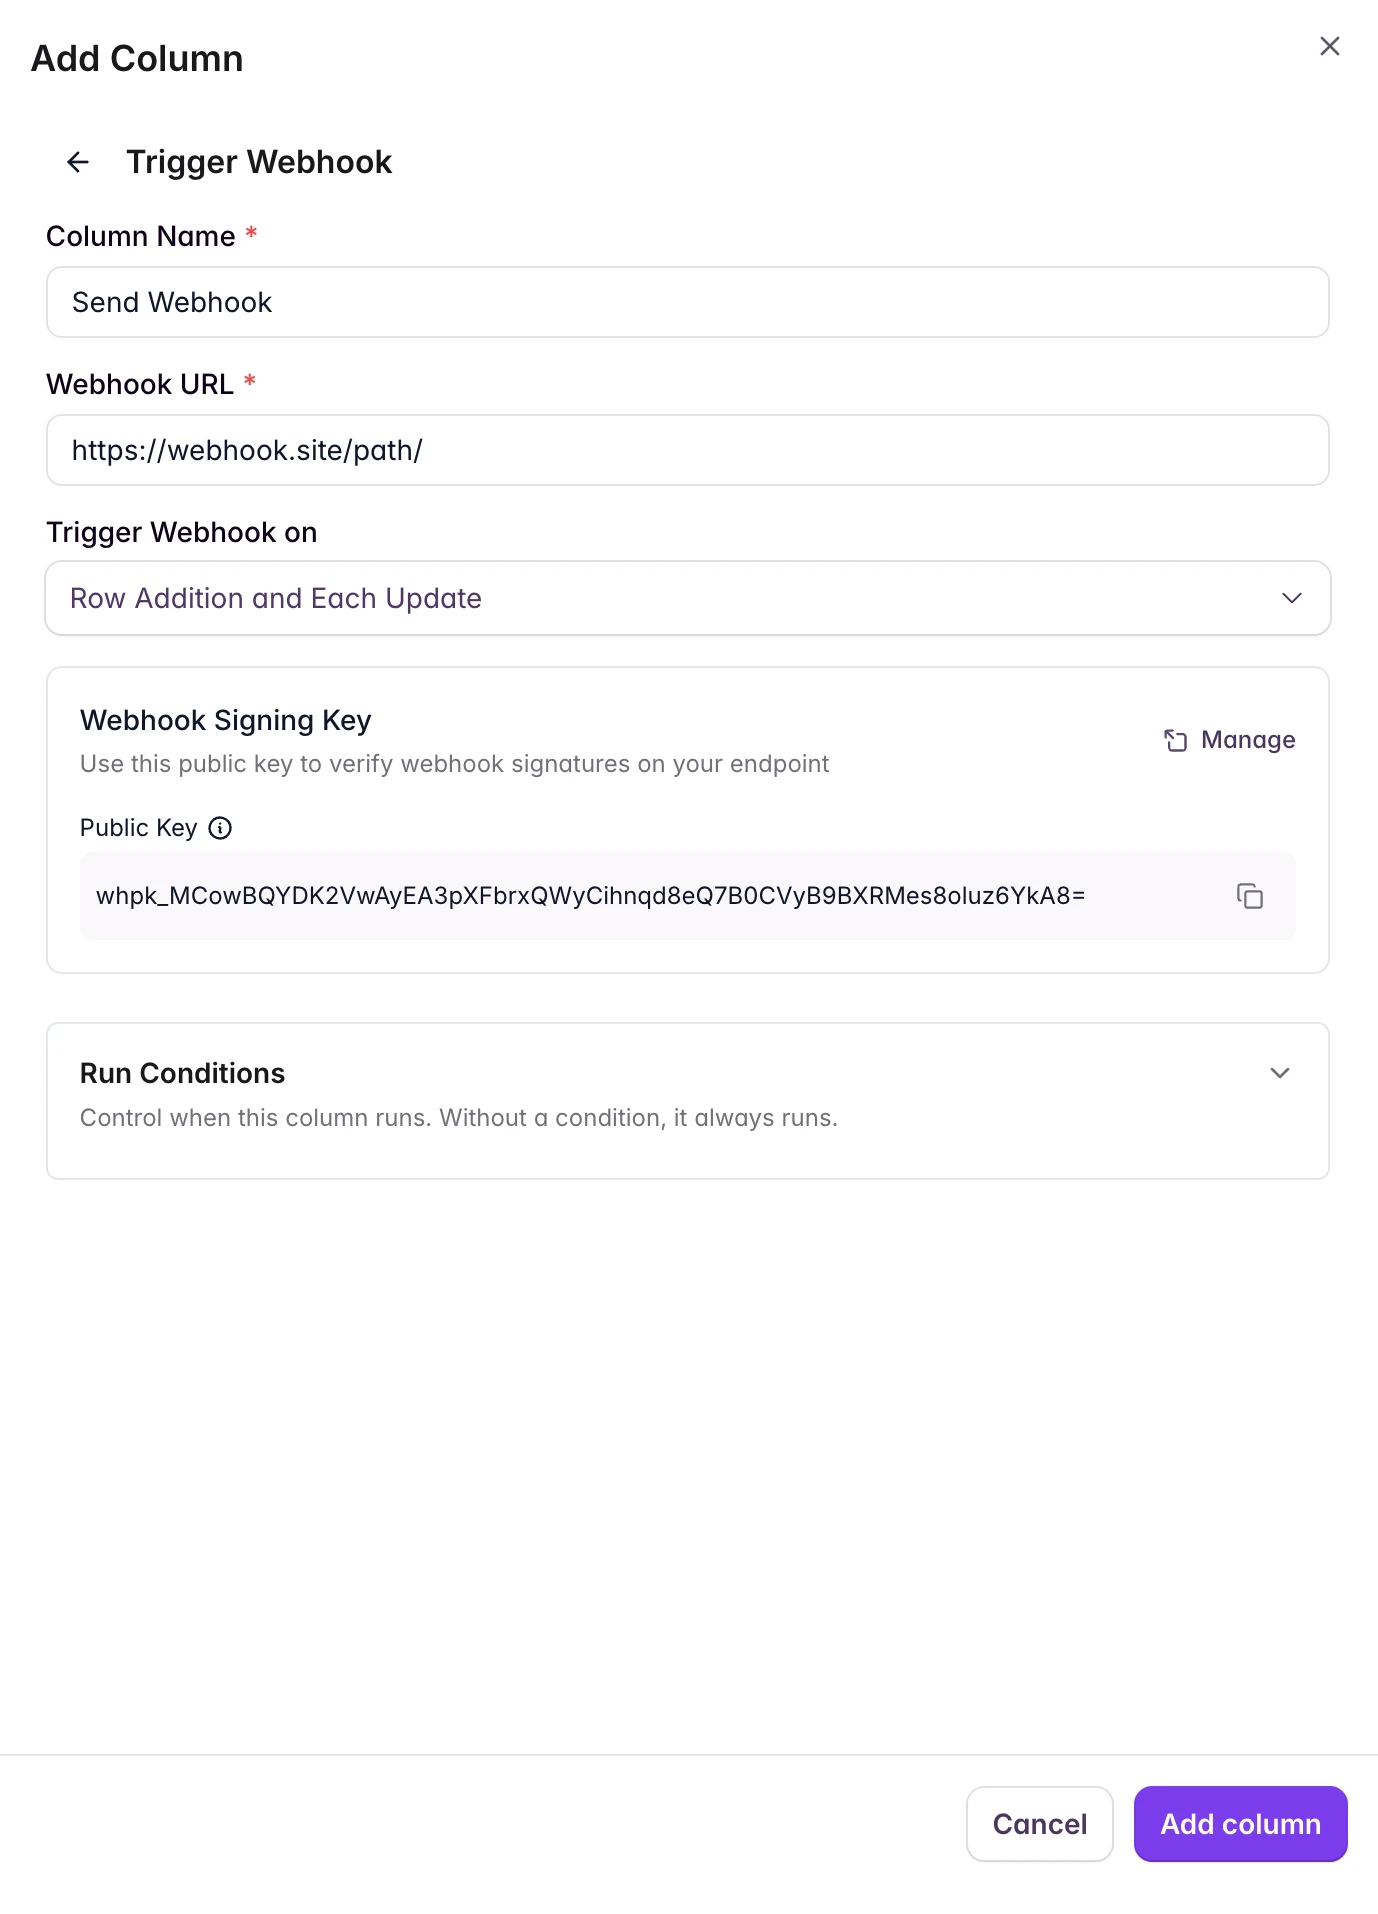 Your public key looks like this:
```text theme={null}
whpk_MCowBQYDK2VwAyEA3pXFbrxQWyCihnqd8eQ7B0CVyB9BXRMes8oluz6YkA8=
```
The `whpk_` prefix identifies this as a webhook public key. You need to strip this prefix before using the key for verification (see [Signature Verification](/api-reference/webhooks/verification)).
Your public key is safe to share — it can only be used to **verify** signatures, not create them.
## Using webhooks with automation tools
You can receive Starbridge webhooks in workflow automation tools without writing code.
1. Create a new Zap and choose **Webhooks by Zapier** as the trigger.
2. Select **Catch Hook**.
3. Copy the webhook URL provided by Zapier.
4. Paste it as the URL in your Starbridge Webhook column.
5. Test the trigger — Zapier will receive the payload and let you map fields in subsequent steps.
1. Add a **Webhook** node to your workflow.
2. Set the HTTP method to **POST**.
3. Copy the generated webhook URL (use the production URL).
4. Paste it as the URL in your Starbridge Webhook column.
5. Activate your workflow — n8n will receive incoming webhooks.
Any tool that can receive incoming HTTP POST requests works with Starbridge webhooks. Look for a "Webhook" or "HTTP Trigger" option in your tool, get the URL, and set it as the Webhook column URL.
Signature verification in workflow tools is optional but recommended for production use. Consider adding a verification step if your tool supports custom code (e.g., a Code node in n8n or a Code by Zapier step).
## Error handling and retries
Your endpoint should return an HTTP **2xx** status code (200-299) to confirm receipt.
| Response | Behavior |
| -------------------------- | ----------------------------------------- |
| **2xx** (e.g., 200, 201) | Success — delivery complete |
| **3xx** (redirects) | Failure — redirects are not followed |
| **410 Gone** | Failure — endpoint is considered disabled |
| **429+** (429 and above) | Failure — delivery will be retried |
| **Timeout** (> 30 seconds) | Failure — delivery will be retried |
| **Connection error** | Failure — delivery will be retried |
When delivery fails with a status code of **429 or above**, Starbridge retries the request up to **3 times**. Requests that fail with status codes below 429 (e.g., 400, 404) are not retried.
Make sure your endpoint responds within 30 seconds. If you need to do heavy processing, accept the webhook with a `200` response immediately and process the data asynchronously.
## Best practices
* **Use the raw body for verification.** Do not parse and re-serialize the JSON body before verifying the signature. Even minor differences in whitespace or key ordering will cause verification to fail.
* **Validate the timestamp.** Reject webhooks where `webhook-timestamp` is more than 5 minutes old to prevent replay attacks.
* **Use `webhook-id` for idempotency.** Store recently processed webhook IDs and skip duplicates to protect against duplicate deliveries.
* **Respond quickly.** Return a `2xx` response as soon as you receive the webhook. Process the data asynchronously if needed.
* **Use HTTPS.** Always use an HTTPS URL for your webhook endpoint to ensure payloads are encrypted in transit.
* **Keep your public key up to date.** If you regenerate your signing key in Starbridge settings, update it in your verification code.
Your public key looks like this:
```text theme={null}
whpk_MCowBQYDK2VwAyEA3pXFbrxQWyCihnqd8eQ7B0CVyB9BXRMes8oluz6YkA8=
```
The `whpk_` prefix identifies this as a webhook public key. You need to strip this prefix before using the key for verification (see [Signature Verification](/api-reference/webhooks/verification)).
Your public key is safe to share — it can only be used to **verify** signatures, not create them.
## Using webhooks with automation tools
You can receive Starbridge webhooks in workflow automation tools without writing code.
1. Create a new Zap and choose **Webhooks by Zapier** as the trigger.
2. Select **Catch Hook**.
3. Copy the webhook URL provided by Zapier.
4. Paste it as the URL in your Starbridge Webhook column.
5. Test the trigger — Zapier will receive the payload and let you map fields in subsequent steps.
1. Add a **Webhook** node to your workflow.
2. Set the HTTP method to **POST**.
3. Copy the generated webhook URL (use the production URL).
4. Paste it as the URL in your Starbridge Webhook column.
5. Activate your workflow — n8n will receive incoming webhooks.
Any tool that can receive incoming HTTP POST requests works with Starbridge webhooks. Look for a "Webhook" or "HTTP Trigger" option in your tool, get the URL, and set it as the Webhook column URL.
Signature verification in workflow tools is optional but recommended for production use. Consider adding a verification step if your tool supports custom code (e.g., a Code node in n8n or a Code by Zapier step).
## Error handling and retries
Your endpoint should return an HTTP **2xx** status code (200-299) to confirm receipt.
| Response | Behavior |
| -------------------------- | ----------------------------------------- |
| **2xx** (e.g., 200, 201) | Success — delivery complete |
| **3xx** (redirects) | Failure — redirects are not followed |
| **410 Gone** | Failure — endpoint is considered disabled |
| **429+** (429 and above) | Failure — delivery will be retried |
| **Timeout** (> 30 seconds) | Failure — delivery will be retried |
| **Connection error** | Failure — delivery will be retried |
When delivery fails with a status code of **429 or above**, Starbridge retries the request up to **3 times**. Requests that fail with status codes below 429 (e.g., 400, 404) are not retried.
Make sure your endpoint responds within 30 seconds. If you need to do heavy processing, accept the webhook with a `200` response immediately and process the data asynchronously.
## Best practices
* **Use the raw body for verification.** Do not parse and re-serialize the JSON body before verifying the signature. Even minor differences in whitespace or key ordering will cause verification to fail.
* **Validate the timestamp.** Reject webhooks where `webhook-timestamp` is more than 5 minutes old to prevent replay attacks.
* **Use `webhook-id` for idempotency.** Store recently processed webhook IDs and skip duplicates to protect against duplicate deliveries.
* **Respond quickly.** Return a `2xx` response as soon as you receive the webhook. Process the data asynchronously if needed.
* **Use HTTPS.** Always use an HTTPS URL for your webhook endpoint to ensure payloads are encrypted in transit.
* **Keep your public key up to date.** If you regenerate your signing key in Starbridge settings, update it in your verification code.