> ## Documentation Index
> Fetch the complete documentation index at: https://hc.starbridge.ai/llms.txt
> Use this file to discover all available pages before exploring further.
# Email logging
> Log Sequences activity to Salesforce or Hubspot
 Your CRM is your system of record for outbound activity. If you're using [Starbridge Sequences](/sequences/overview), Starbridge makes sure your CRM stays up to date with all outbound activity driven by Starbridge:
* **Email logging** writes each sequence email — and any direct reply — into your CRM as a native email activity record, so emails sent via Starbridge show up alongside every other touch your team logs, instead of living only in Starbridge.
* **Sequence activity on contacts** tracks which sequence first and most recently touched a contact, so you can see Starbridge's influence on meetings booked and measure how a specific sequence or campaign is performing over time — directly from your CRM.
## Prerequisites
Both toggles are off by default. They can be toggled on or off independently. Each has the following prerequisites.
| Capability | Requires |
| ----------------------------- | ------------------------------------------------------------------------------------------------------------------------------------------------------------------------------------------------------------------------------------------------------------------------------------------------------------------------------------------------------------------------------------------------------------------------------- |
| Email logging |
Your CRM is your system of record for outbound activity. If you're using [Starbridge Sequences](/sequences/overview), Starbridge makes sure your CRM stays up to date with all outbound activity driven by Starbridge:
* **Email logging** writes each sequence email — and any direct reply — into your CRM as a native email activity record, so emails sent via Starbridge show up alongside every other touch your team logs, instead of living only in Starbridge.
* **Sequence activity on contacts** tracks which sequence first and most recently touched a contact, so you can see Starbridge's influence on meetings booked and measure how a specific sequence or campaign is performing over time — directly from your CRM.
## Prerequisites
Both toggles are off by default. They can be toggled on or off independently. Each has the following prerequisites.
| Capability | Requires |
| ----------------------------- | ------------------------------------------------------------------------------------------------------------------------------------------------------------------------------------------------------------------------------------------------------------------------------------------------------------------------------------------------------------------------------------------------------------------------------- |
| Email logging | - The EmailMessage object (Salesforce) or Email object (HubSpot) connected in [Objects & fields](/admins/connecting-your-crm#configure-objects-and-fields)
- Your Starbridge users matched to CRM users in the [Territories tab](/integrations/crm-territories#step-1-match-crm-users-to-starbridge-users)
- The Contact object connected and synced via [Contact sync](/integrations/contact-sync)
|
| Sequence activity on contacts | - The Contact object connected and synced via [Contact sync](/integrations/contact-sync)
- Custom fields to store the logged sequence activity
|
## Turning it on
Go to **[Settings → Integrations](https://dashboard.starbridge.ai/settings/integrations) → \[your CRM] → Sequences.**
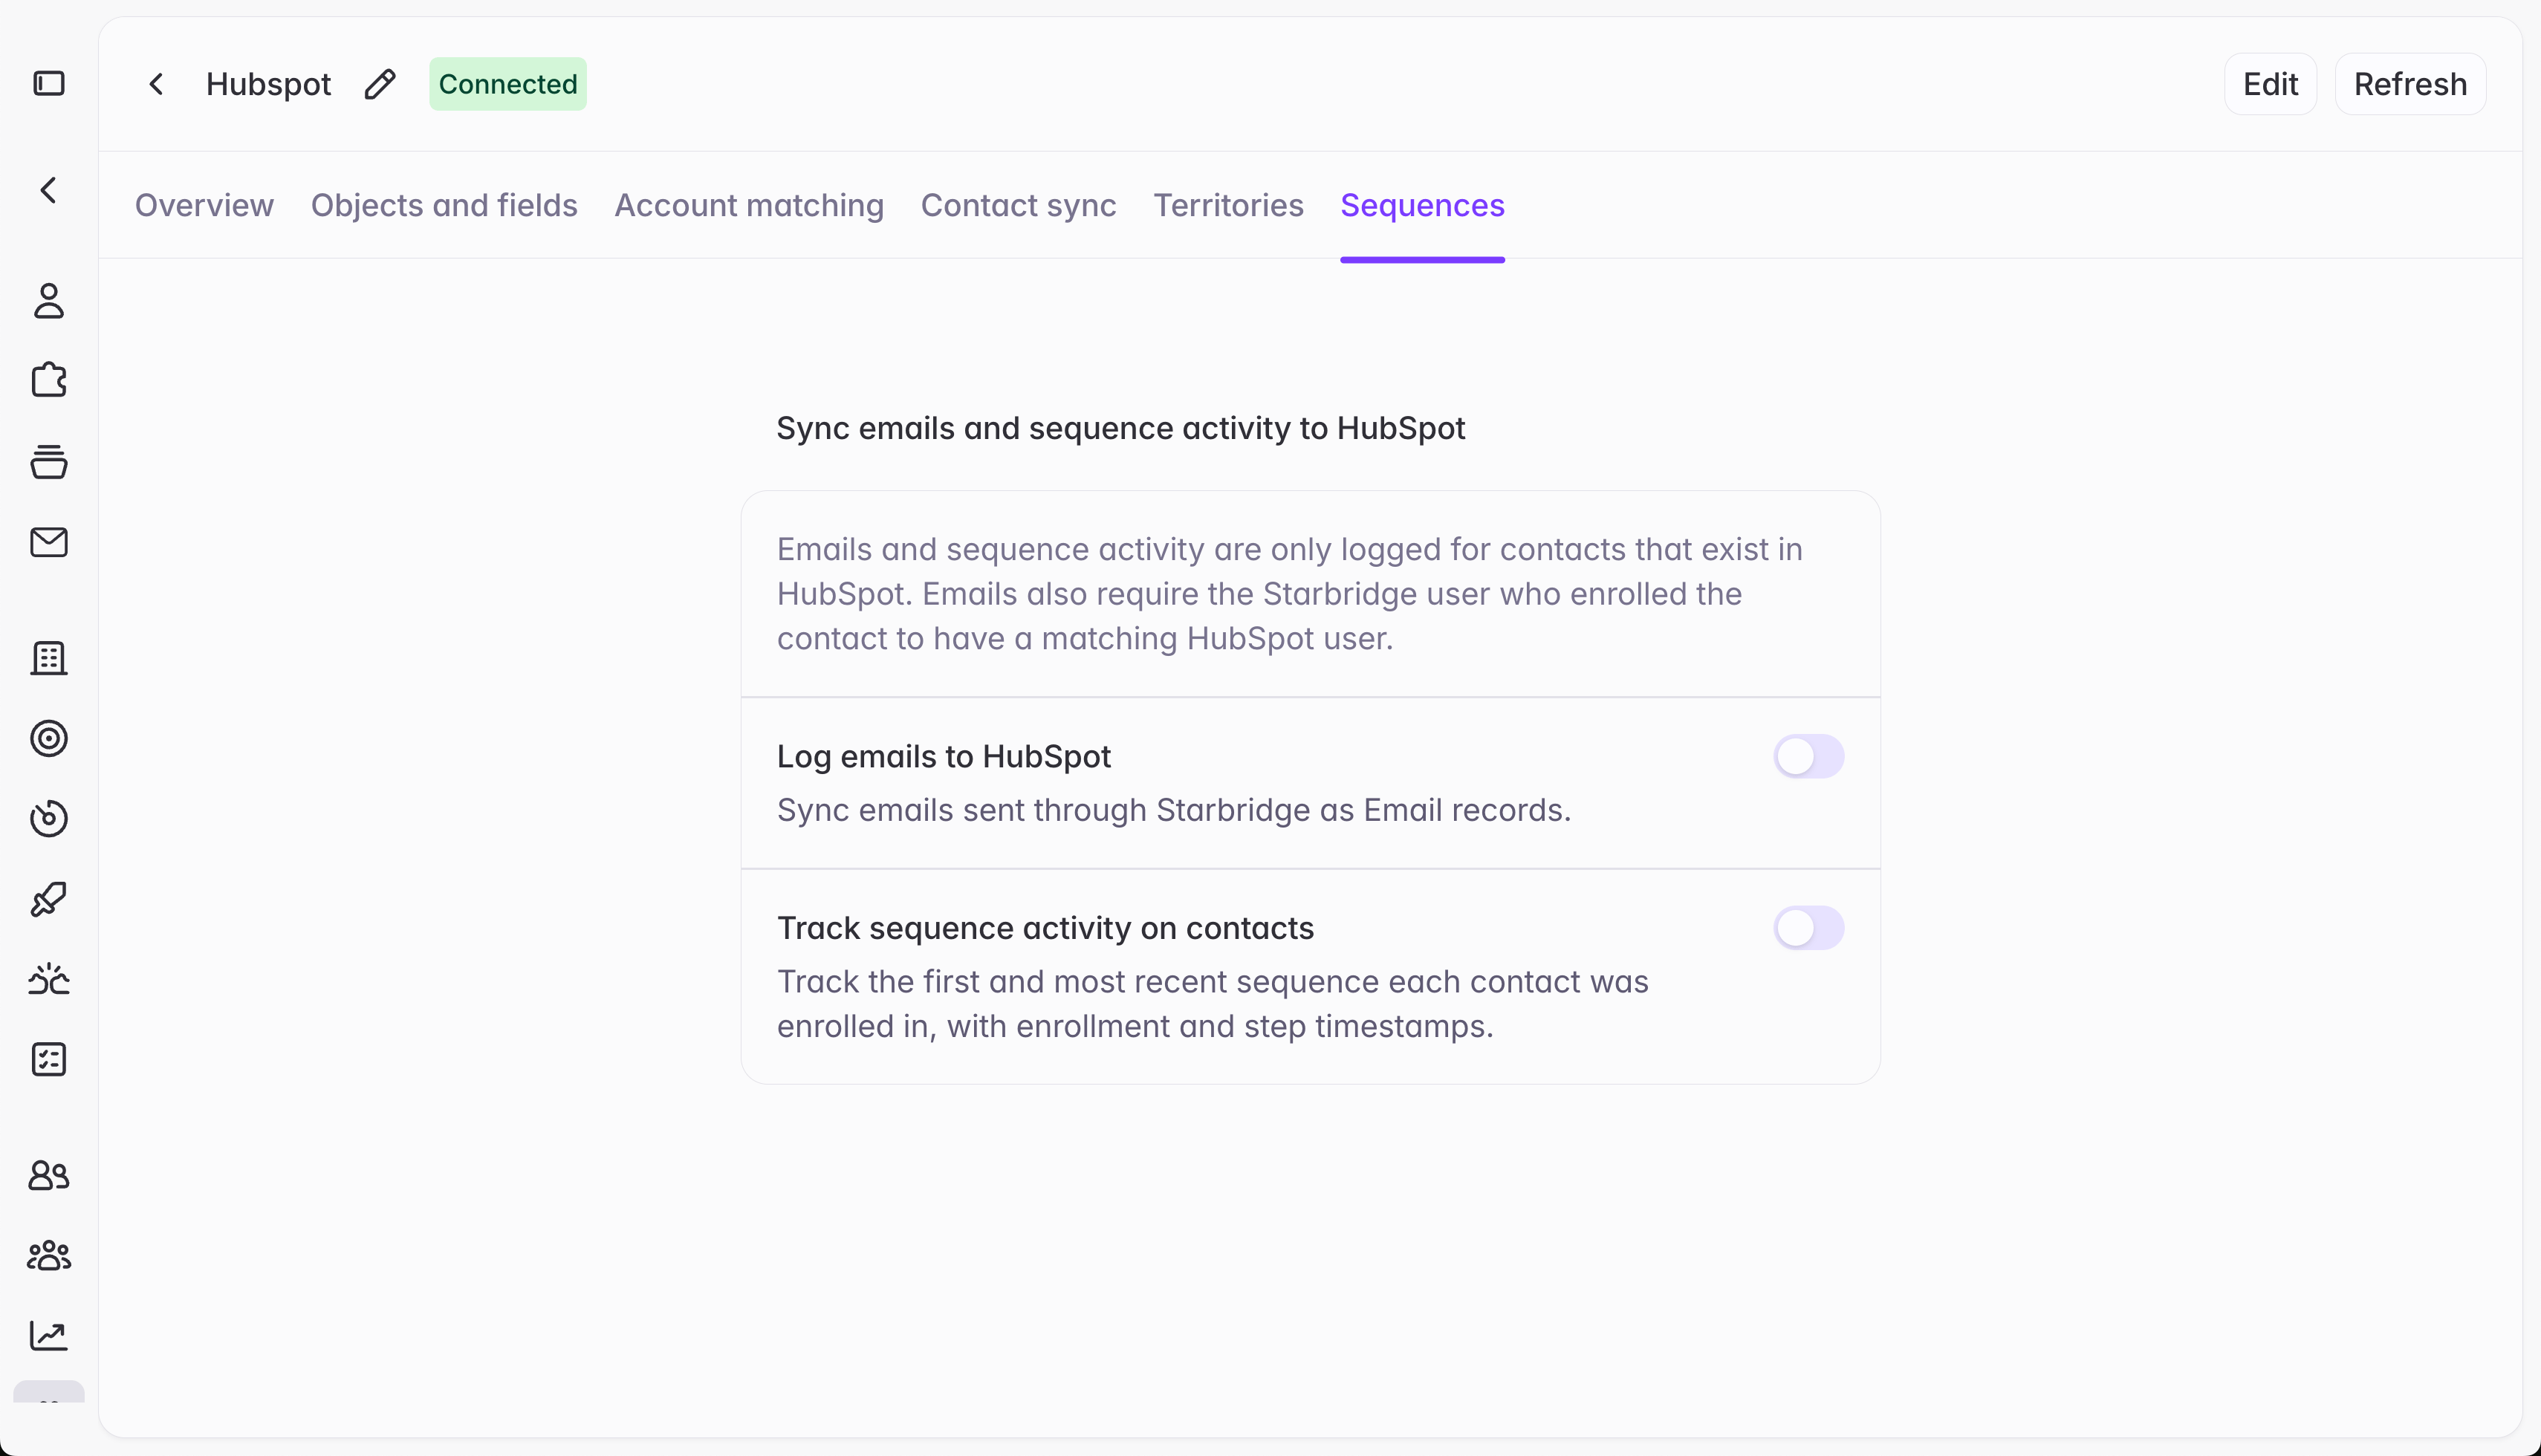 Then, turn on one or both of **Email logging** and **Sequence activity on contacts**.
## Email logging
When **Email logging** is toggled on, Starbridge writes every email a rep sends through a sequence, plus the contact's direct reply to that email, as a native email activity record associated to the contact.
In Salesforce, this is an EmailMessage record with a matching Task record, so existing activity reports and list views pick up sequence sends automatically. In HubSpot, this is an Email record.
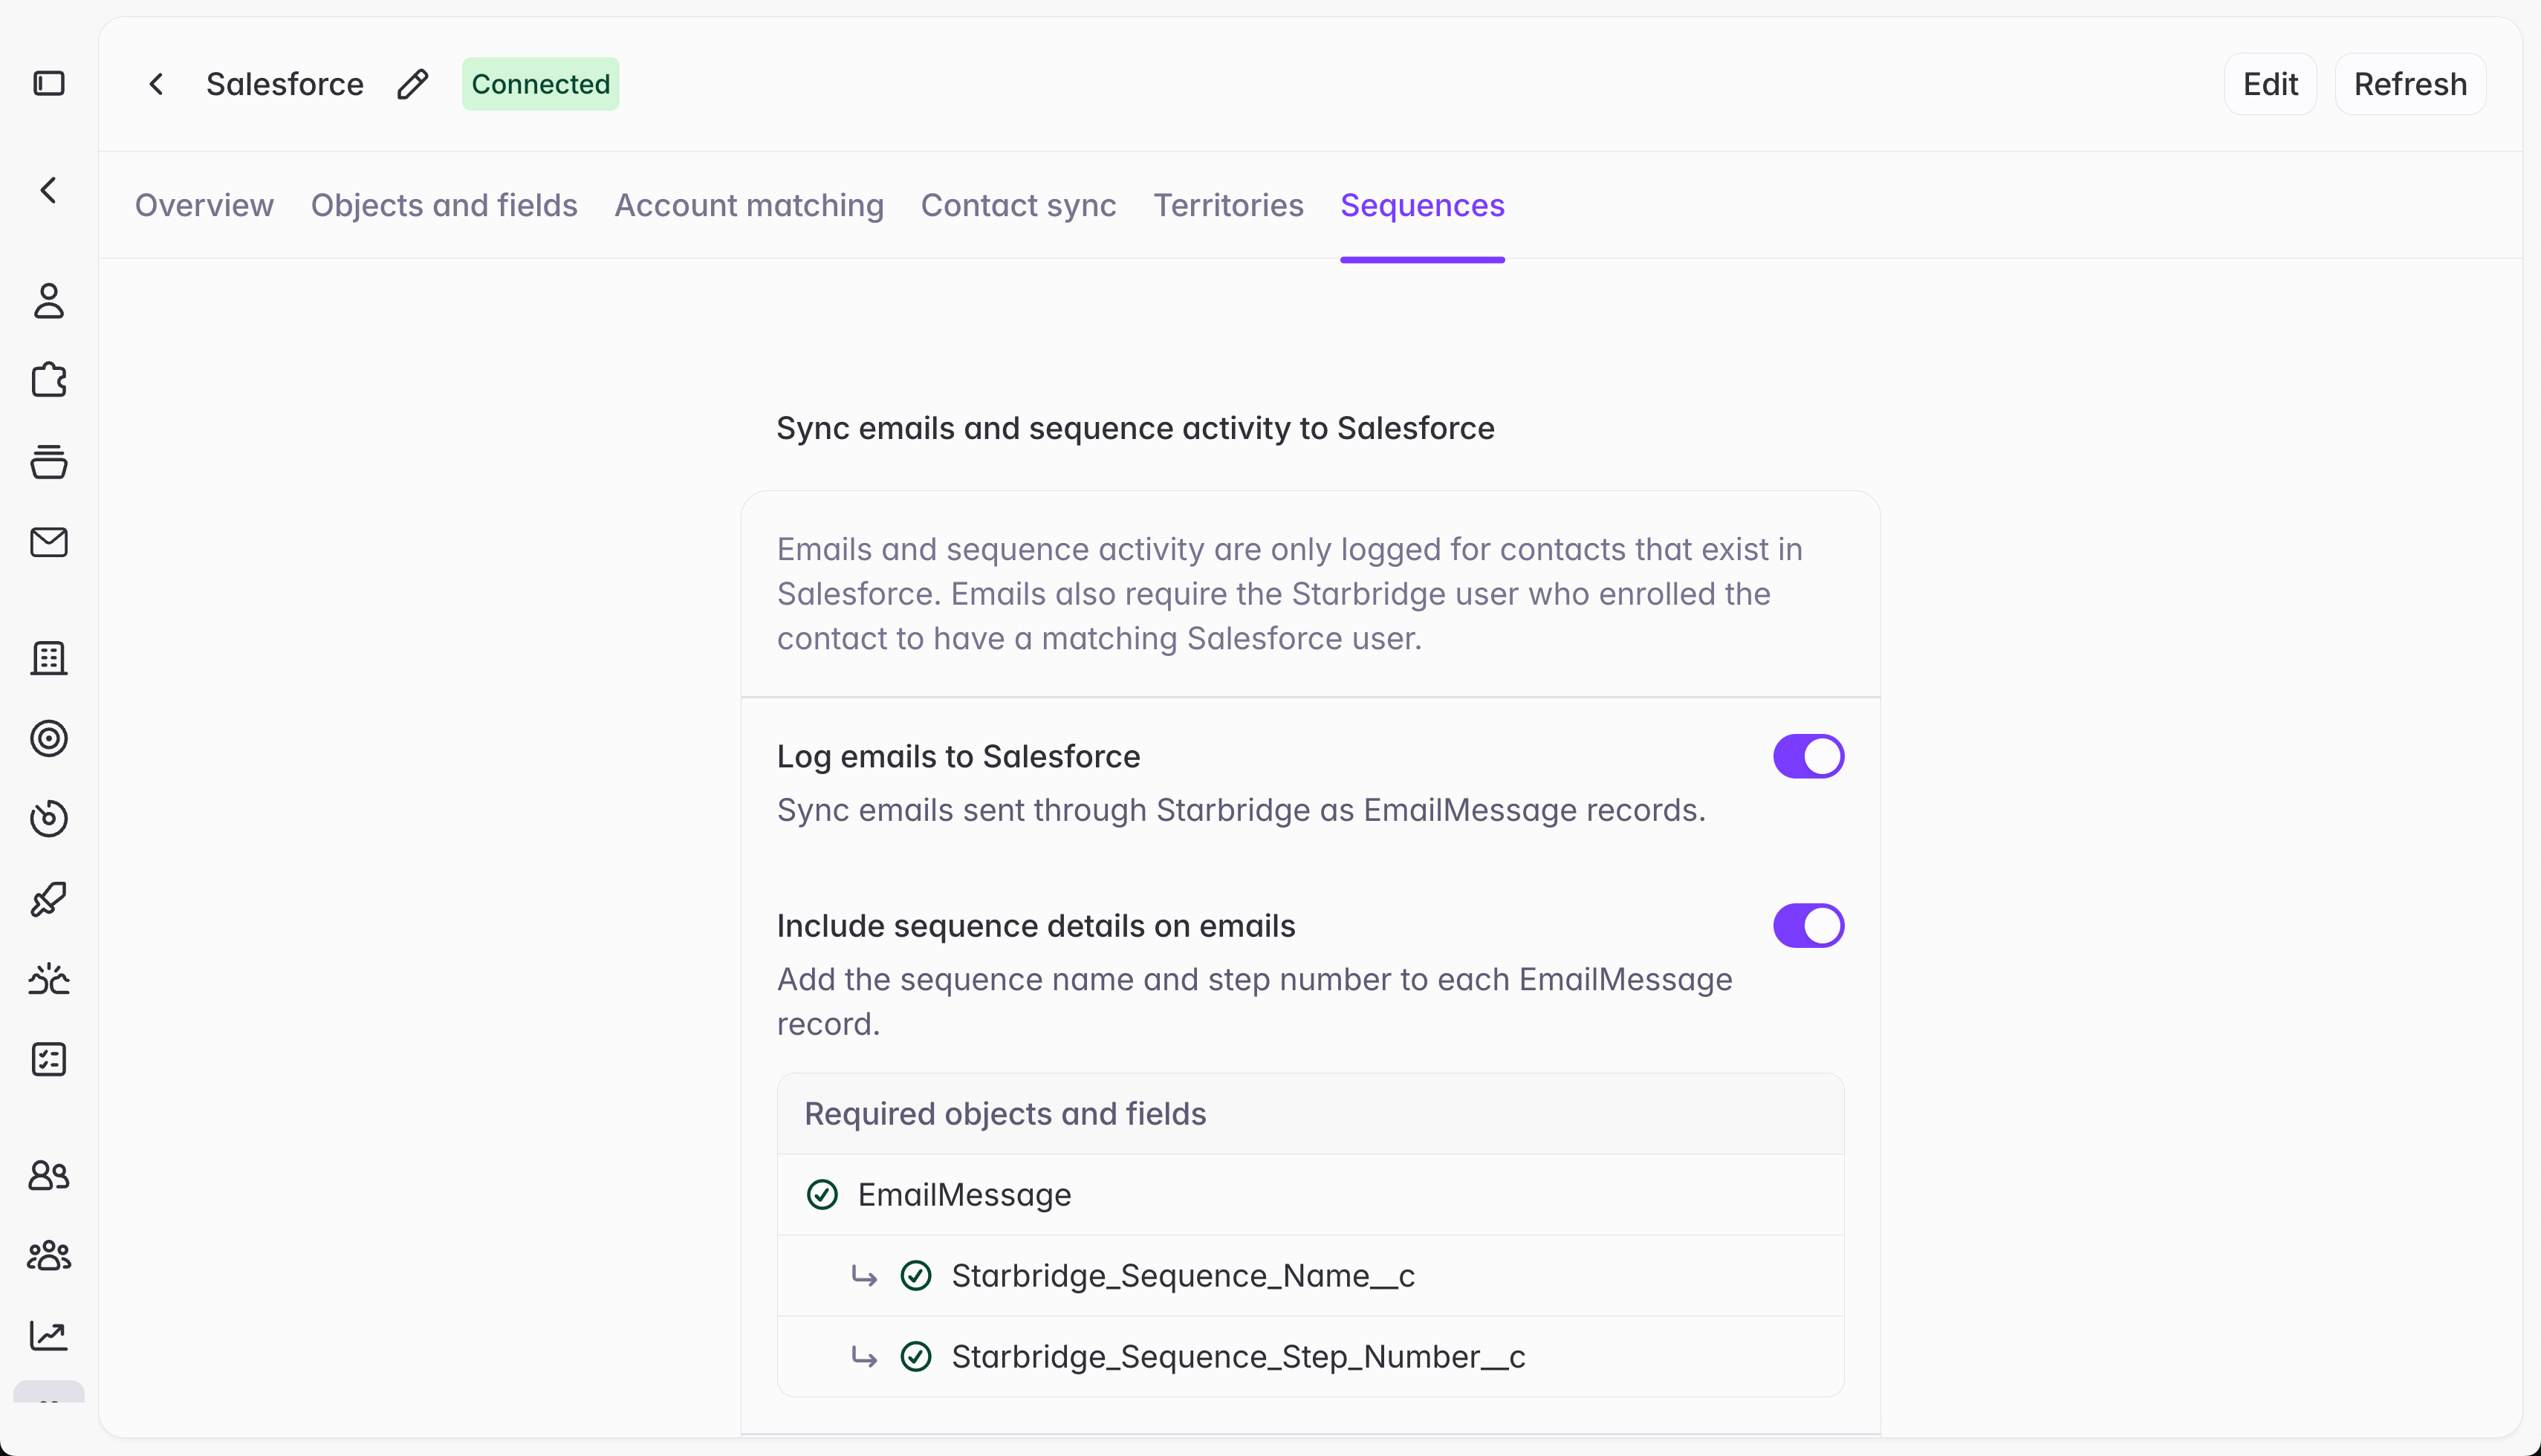
If you are logging emails to Salesforce, you can also optionally include sequence details on your emails to enable more powerful reporting:
**Including sequence details on emails requires two custom fields on EmailMessage.** See the step-by-step instructions to add them below.
When **Include sequence details on emails** is toggled on, Starbridge writes the sequence name and step number to custom fields on the EmailMessage record for every email it logs. This lets you filter, segment, and report on logged activity by sequence directly in Salesforce, using standard reports or list views.
HubSpot doesn't support custom fields on its Email object, so this option isn't available for HubSpot; sequence-level detail on HubSpot lives on the Contact record instead, as described below.
Before turning this on, create two custom fields on the **Email Message** object following these step-by-step instructions:
Create two custom fields on the **Email Message** object.
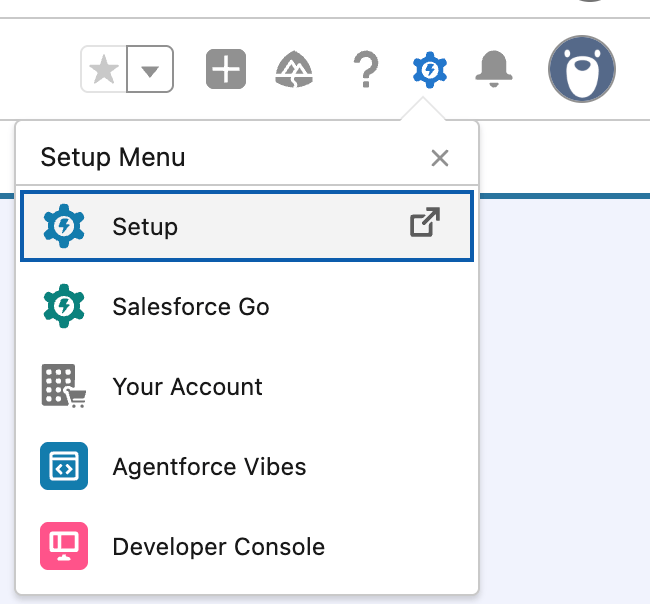
1. In Salesforce, click the **Gear icon (⚙)** → **Setup**
Then, turn on one or both of **Email logging** and **Sequence activity on contacts**.
## Email logging
When **Email logging** is toggled on, Starbridge writes every email a rep sends through a sequence, plus the contact's direct reply to that email, as a native email activity record associated to the contact.
In Salesforce, this is an EmailMessage record with a matching Task record, so existing activity reports and list views pick up sequence sends automatically. In HubSpot, this is an Email record.
If you are logging emails to Salesforce, you can also optionally include sequence details on your emails to enable more powerful reporting:
**Including sequence details on emails requires two custom fields on EmailMessage.** See the step-by-step instructions to add them below.
When **Include sequence details on emails** is toggled on, Starbridge writes the sequence name and step number to custom fields on the EmailMessage record for every email it logs. This lets you filter, segment, and report on logged activity by sequence directly in Salesforce, using standard reports or list views.
HubSpot doesn't support custom fields on its Email object, so this option isn't available for HubSpot; sequence-level detail on HubSpot lives on the Contact record instead, as described below.
Before turning this on, create two custom fields on the **Email Message** object following these step-by-step instructions:
Create two custom fields on the **Email Message** object.
1. In Salesforce, click the **Gear icon (⚙)** → **Setup**
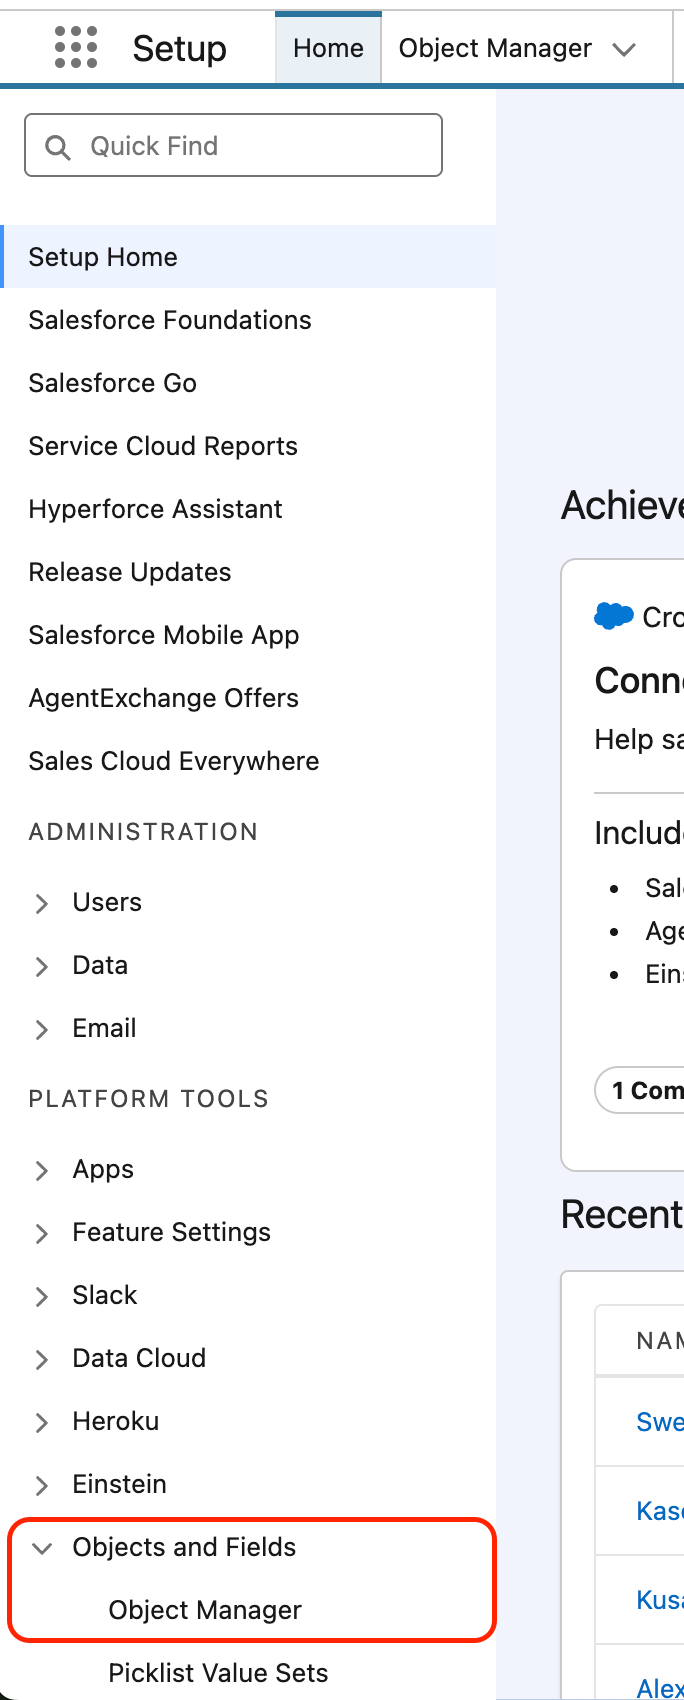
 2. In the left sidebar, search for **Object Manager** and open it, or directly click **Objects and Fields** → **Object Manager**
 3. Click **Email Message** → **Fields & Relationships** → **New**
4. Create the first field — **Starbridge Sequence Name**:
**Enter the field label exactly as provided.** Starbridge connects to these fields using their exact API name. Entering the field label exactly as shown below ensures Salesforce auto-generates the API name Starbridge expects.
| Setting | Value |
| ------------------------------------------- | ------------------------------------------------------------ |
| Field Type | Text |
| Field Label | `Starbridge Sequence Name` |
| Length | `255` |
| Description (optional) | `The name of the Starbridge sequence this email belongs to.` |
| Expected API Name | `Starbridge_Sequence_Name__c` |
| Click **Next** → **Next** → **Save & New**. | |
5. Create the second field — **Starbridge Sequence Step Number**:
**Enter the field label exactly as provided.** Starbridge connects to these fields using their exact API name. Entering the field label exactly as shown below ensures Salesforce auto-generates the API name Starbridge expects.
| Setting | Value |
| ------------------------------------- | --------------------------------------------------------------- |
| Field Type | Number |
| Field Label | `Starbridge Sequence Step Number` |
| Length | `2` |
| Decimal Places | `0` |
| Description (optional) | `The step number of this email within its Starbridge sequence.` |
| Expected API Name | `Starbridge_Sequence_Step_Number__c` |
| Click **Next** → **Next** → **Save**. | |
Salesforce automatically appends `__c` to custom field API names (e.g. `Starbridge_Sequence_Name__c`). This is expected.
6. Return to **Starbridge** → **Settings** → [**Integrations**](https://dashboard.starbridge.ai/settings/integrations) → **\[your CRM integration] → Sequences**. Click **Refresh** in the top right corner and wait for the connection to finish refreshing, then toggle on **Include sequence details on emails**. All done!
## Sequence activity on contacts
**Tracking sequence activity on contacts requires custom fields on the Contact object.** Read the step-by-step instructions to add them below.
When **Sequence activity on contacts** is toggled on, Starbridge writes the fields below to your Contact records, so you can see Starbridge's influence on meetings booked and measure how a specific sequence or campaign is performing over time — directly from your CRM.
| Field | Type | Description |
| --------------------------------------- | ---- | ------------------------------------------------------- |
| Starbridge Initial Sequence | Text | Name of the first sequence this contact was enrolled in |
| Starbridge Initial Sequence At | Date | When they were first enrolled |
| Starbridge Initial Sequence Step At | Date | When they first completed a step |
| Starbridge Most Recent Sequence | Text | Name of the most recent sequence |
| Starbridge Most Recent Sequence At | Date | When they were most recently enrolled |
| Starbridge Most Recent Sequence Step At | Date | When they most recently completed a step |
Add these as custom fields on the Contact object in Salesforce or HubSpot before turning this on. This runs independently of email logging.
1. In Salesforce, click the **Gear icon (⚙)** → **Setup**
2. In the left sidebar, search for **Object Manager** and open it, or directly click **Objects and Fields** → **Object Manager**
3. Click **Contact** → **Fields & Relationships** → **New**
3. Click **Email Message** → **Fields & Relationships** → **New**
4. Create the first field — **Starbridge Sequence Name**:
**Enter the field label exactly as provided.** Starbridge connects to these fields using their exact API name. Entering the field label exactly as shown below ensures Salesforce auto-generates the API name Starbridge expects.
| Setting | Value |
| ------------------------------------------- | ------------------------------------------------------------ |
| Field Type | Text |
| Field Label | `Starbridge Sequence Name` |
| Length | `255` |
| Description (optional) | `The name of the Starbridge sequence this email belongs to.` |
| Expected API Name | `Starbridge_Sequence_Name__c` |
| Click **Next** → **Next** → **Save & New**. | |
5. Create the second field — **Starbridge Sequence Step Number**:
**Enter the field label exactly as provided.** Starbridge connects to these fields using their exact API name. Entering the field label exactly as shown below ensures Salesforce auto-generates the API name Starbridge expects.
| Setting | Value |
| ------------------------------------- | --------------------------------------------------------------- |
| Field Type | Number |
| Field Label | `Starbridge Sequence Step Number` |
| Length | `2` |
| Decimal Places | `0` |
| Description (optional) | `The step number of this email within its Starbridge sequence.` |
| Expected API Name | `Starbridge_Sequence_Step_Number__c` |
| Click **Next** → **Next** → **Save**. | |
Salesforce automatically appends `__c` to custom field API names (e.g. `Starbridge_Sequence_Name__c`). This is expected.
6. Return to **Starbridge** → **Settings** → [**Integrations**](https://dashboard.starbridge.ai/settings/integrations) → **\[your CRM integration] → Sequences**. Click **Refresh** in the top right corner and wait for the connection to finish refreshing, then toggle on **Include sequence details on emails**. All done!
## Sequence activity on contacts
**Tracking sequence activity on contacts requires custom fields on the Contact object.** Read the step-by-step instructions to add them below.
When **Sequence activity on contacts** is toggled on, Starbridge writes the fields below to your Contact records, so you can see Starbridge's influence on meetings booked and measure how a specific sequence or campaign is performing over time — directly from your CRM.
| Field | Type | Description |
| --------------------------------------- | ---- | ------------------------------------------------------- |
| Starbridge Initial Sequence | Text | Name of the first sequence this contact was enrolled in |
| Starbridge Initial Sequence At | Date | When they were first enrolled |
| Starbridge Initial Sequence Step At | Date | When they first completed a step |
| Starbridge Most Recent Sequence | Text | Name of the most recent sequence |
| Starbridge Most Recent Sequence At | Date | When they were most recently enrolled |
| Starbridge Most Recent Sequence Step At | Date | When they most recently completed a step |
Add these as custom fields on the Contact object in Salesforce or HubSpot before turning this on. This runs independently of email logging.
1. In Salesforce, click the **Gear icon (⚙)** → **Setup**
2. In the left sidebar, search for **Object Manager** and open it, or directly click **Objects and Fields** → **Object Manager**
3. Click **Contact** → **Fields & Relationships** → **New**
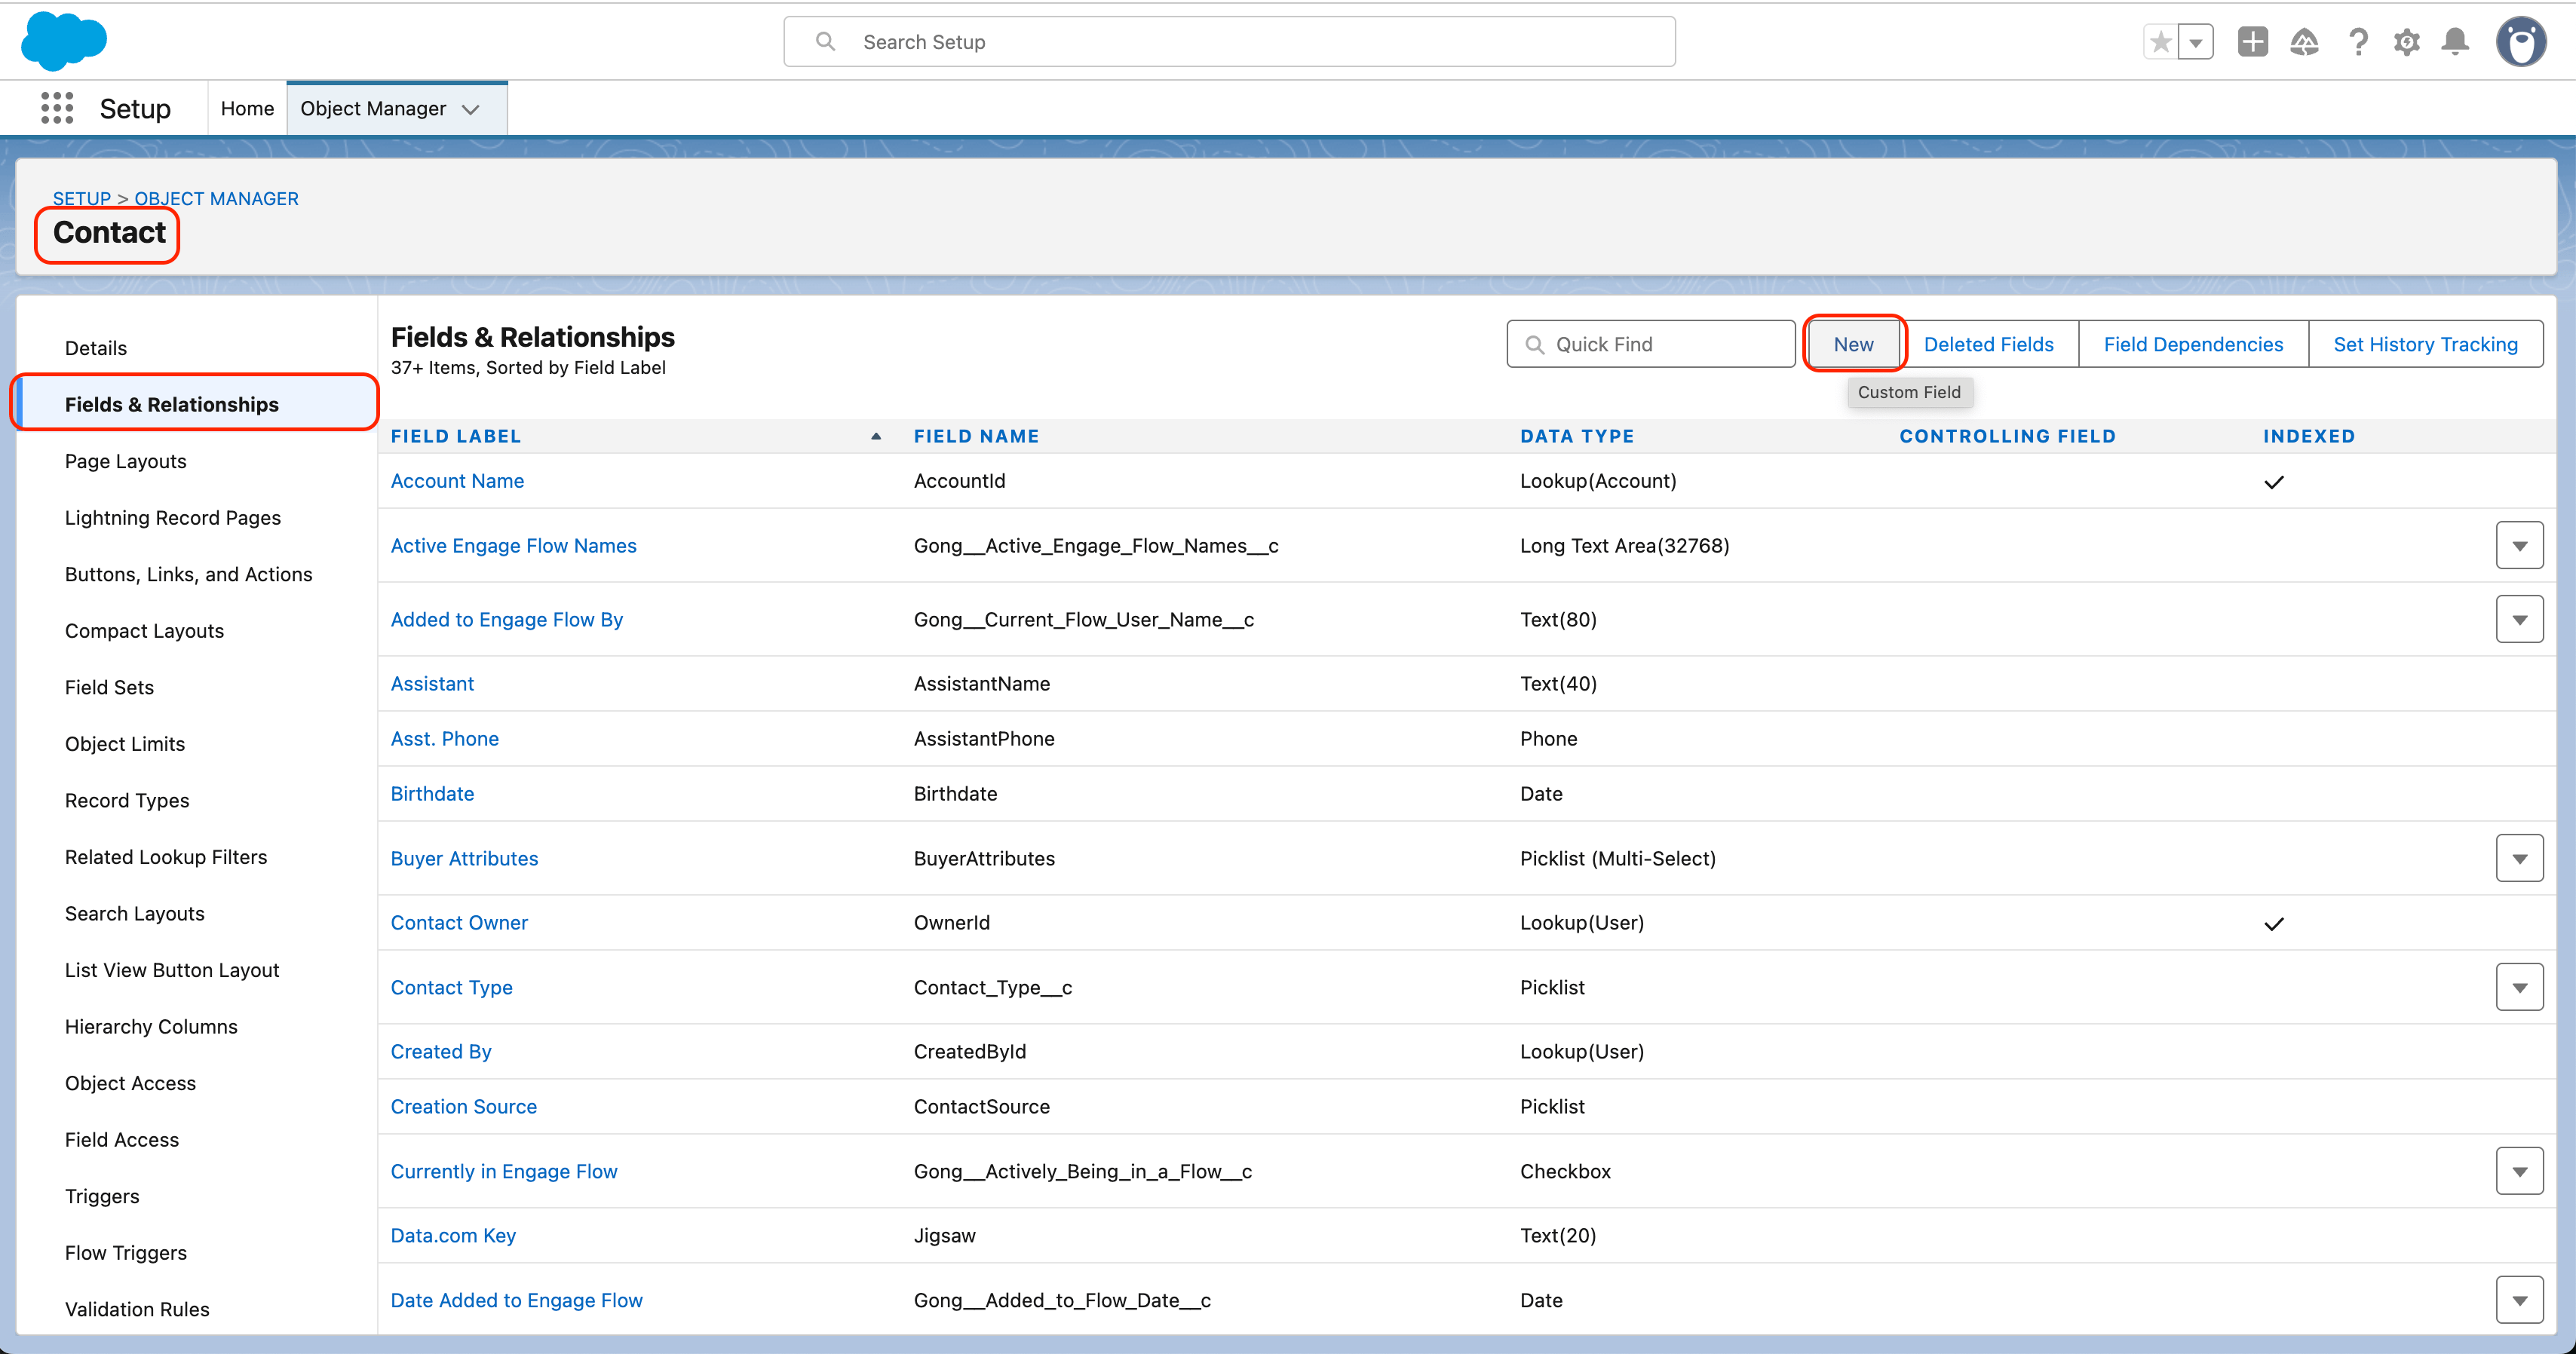 4. Create each field below, one at a time — click **Save & New** after each, and **Save** on the last one:
**Enter these field labels exactly as provided.** Starbridge connects to these fields using their exact API name. Entering the field label exactly as shown below ensures Salesforce auto-generates the API name Starbridge expects.
| Field Label | Field Type | Length | Expected API Name |
| --------------------------------------- | ---------- | ------ | -------------------------------------------- |
| Starbridge Initial Sequence | Text | 255 | `Starbridge_Initial_Sequence__c` |
| Starbridge Initial Sequence At | Date/Time | — | `Starbridge_Initial_Sequence_At__c` |
| Starbridge Initial Sequence Step At | Date/Time | — | `Starbridge_Initial_Sequence_Step_At__c` |
| Starbridge Most Recent Sequence | Text | 255 | `Starbridge_Most_Recent_Sequence__c` |
| Starbridge Most Recent Sequence At | Date/Time | — | `Starbridge_Most_Recent_Sequence_At__c` |
| Starbridge Most Recent Sequence Step At | Date/Time | — | `Starbridge_Most_Recent_Sequence_Step_At__c` |
4. Create each field below, one at a time — click **Save & New** after each, and **Save** on the last one:
**Enter these field labels exactly as provided.** Starbridge connects to these fields using their exact API name. Entering the field label exactly as shown below ensures Salesforce auto-generates the API name Starbridge expects.
| Field Label | Field Type | Length | Expected API Name |
| --------------------------------------- | ---------- | ------ | -------------------------------------------- |
| Starbridge Initial Sequence | Text | 255 | `Starbridge_Initial_Sequence__c` |
| Starbridge Initial Sequence At | Date/Time | — | `Starbridge_Initial_Sequence_At__c` |
| Starbridge Initial Sequence Step At | Date/Time | — | `Starbridge_Initial_Sequence_Step_At__c` |
| Starbridge Most Recent Sequence | Text | 255 | `Starbridge_Most_Recent_Sequence__c` |
| Starbridge Most Recent Sequence At | Date/Time | — | `Starbridge_Most_Recent_Sequence_At__c` |
| Starbridge Most Recent Sequence Step At | Date/Time | — | `Starbridge_Most_Recent_Sequence_Step_At__c` |
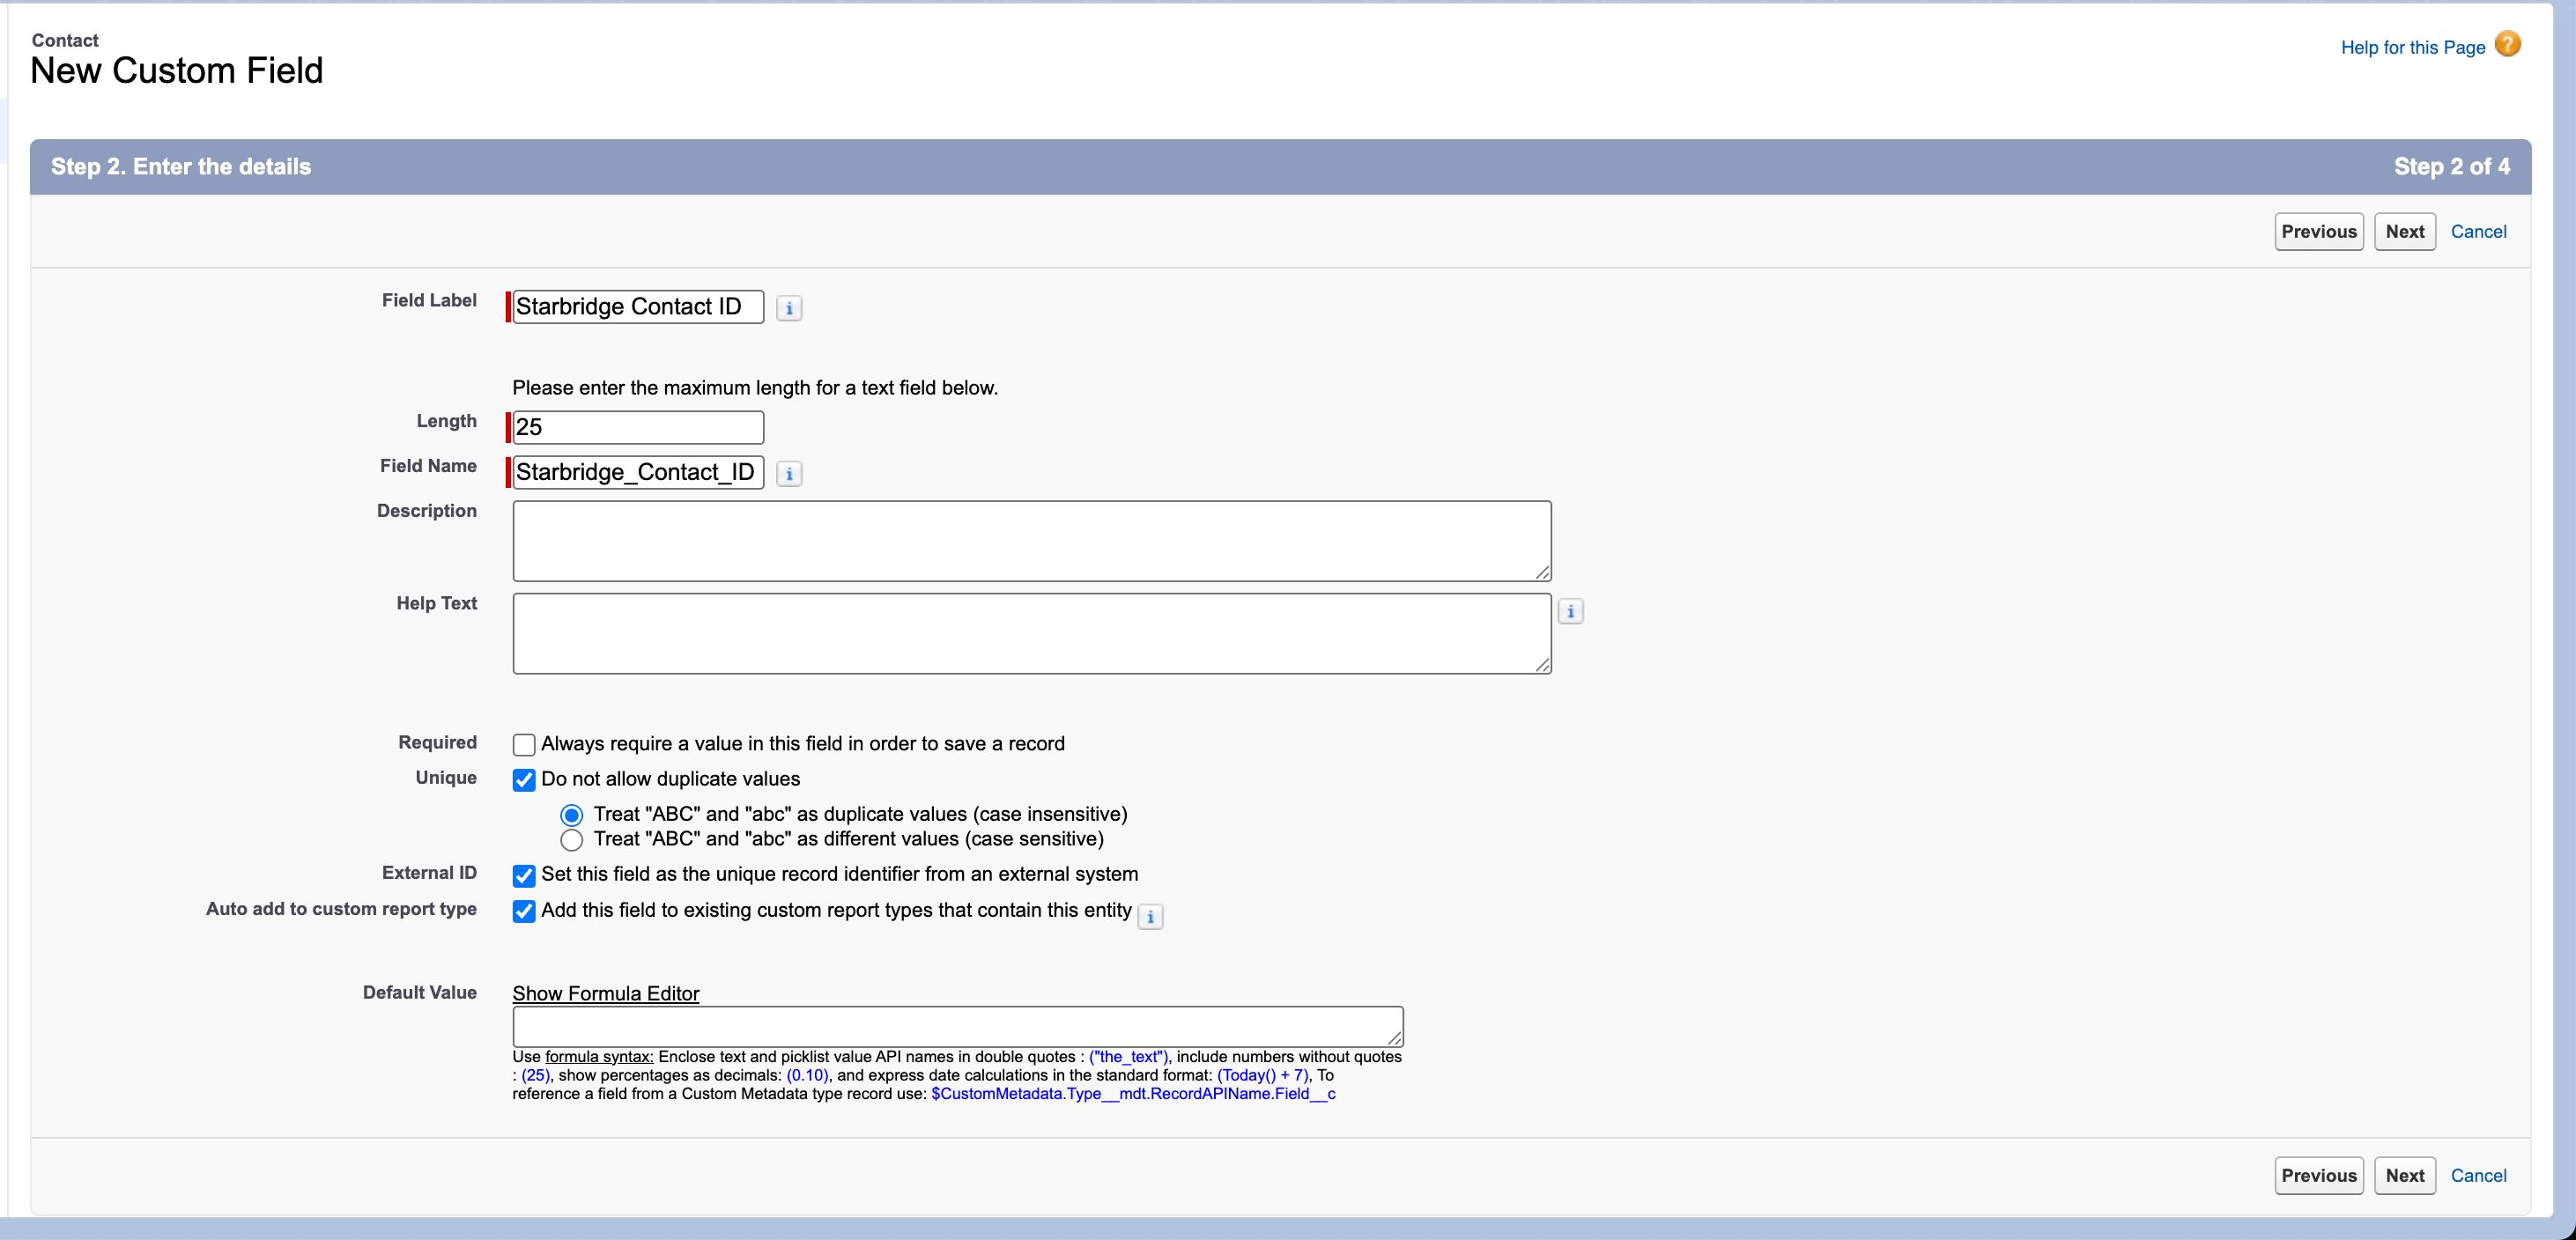 Click **Next** → **Next** after entering each field's settings.
Salesforce automatically appends `__c` to custom field API names (e.g. `Starbridge_Initial_Sequence__c`). This is expected.
5. Return to **Starbridge** → **Settings** → [**Integrations**](https://dashboard.starbridge.ai/settings/integrations) → **\[your CRM integration] → Sequences**. Click **Refresh** in the top right corner and wait for the connection to finish refreshing, then toggle on **Track sequence activity on contacts**. All done!
1. In HubSpot, go to **Settings (Gear icon ⚙)** → **Properties**
Click **Next** → **Next** after entering each field's settings.
Salesforce automatically appends `__c` to custom field API names (e.g. `Starbridge_Initial_Sequence__c`). This is expected.
5. Return to **Starbridge** → **Settings** → [**Integrations**](https://dashboard.starbridge.ai/settings/integrations) → **\[your CRM integration] → Sequences**. Click **Refresh** in the top right corner and wait for the connection to finish refreshing, then toggle on **Track sequence activity on contacts**. All done!
1. In HubSpot, go to **Settings (Gear icon ⚙)** → **Properties**
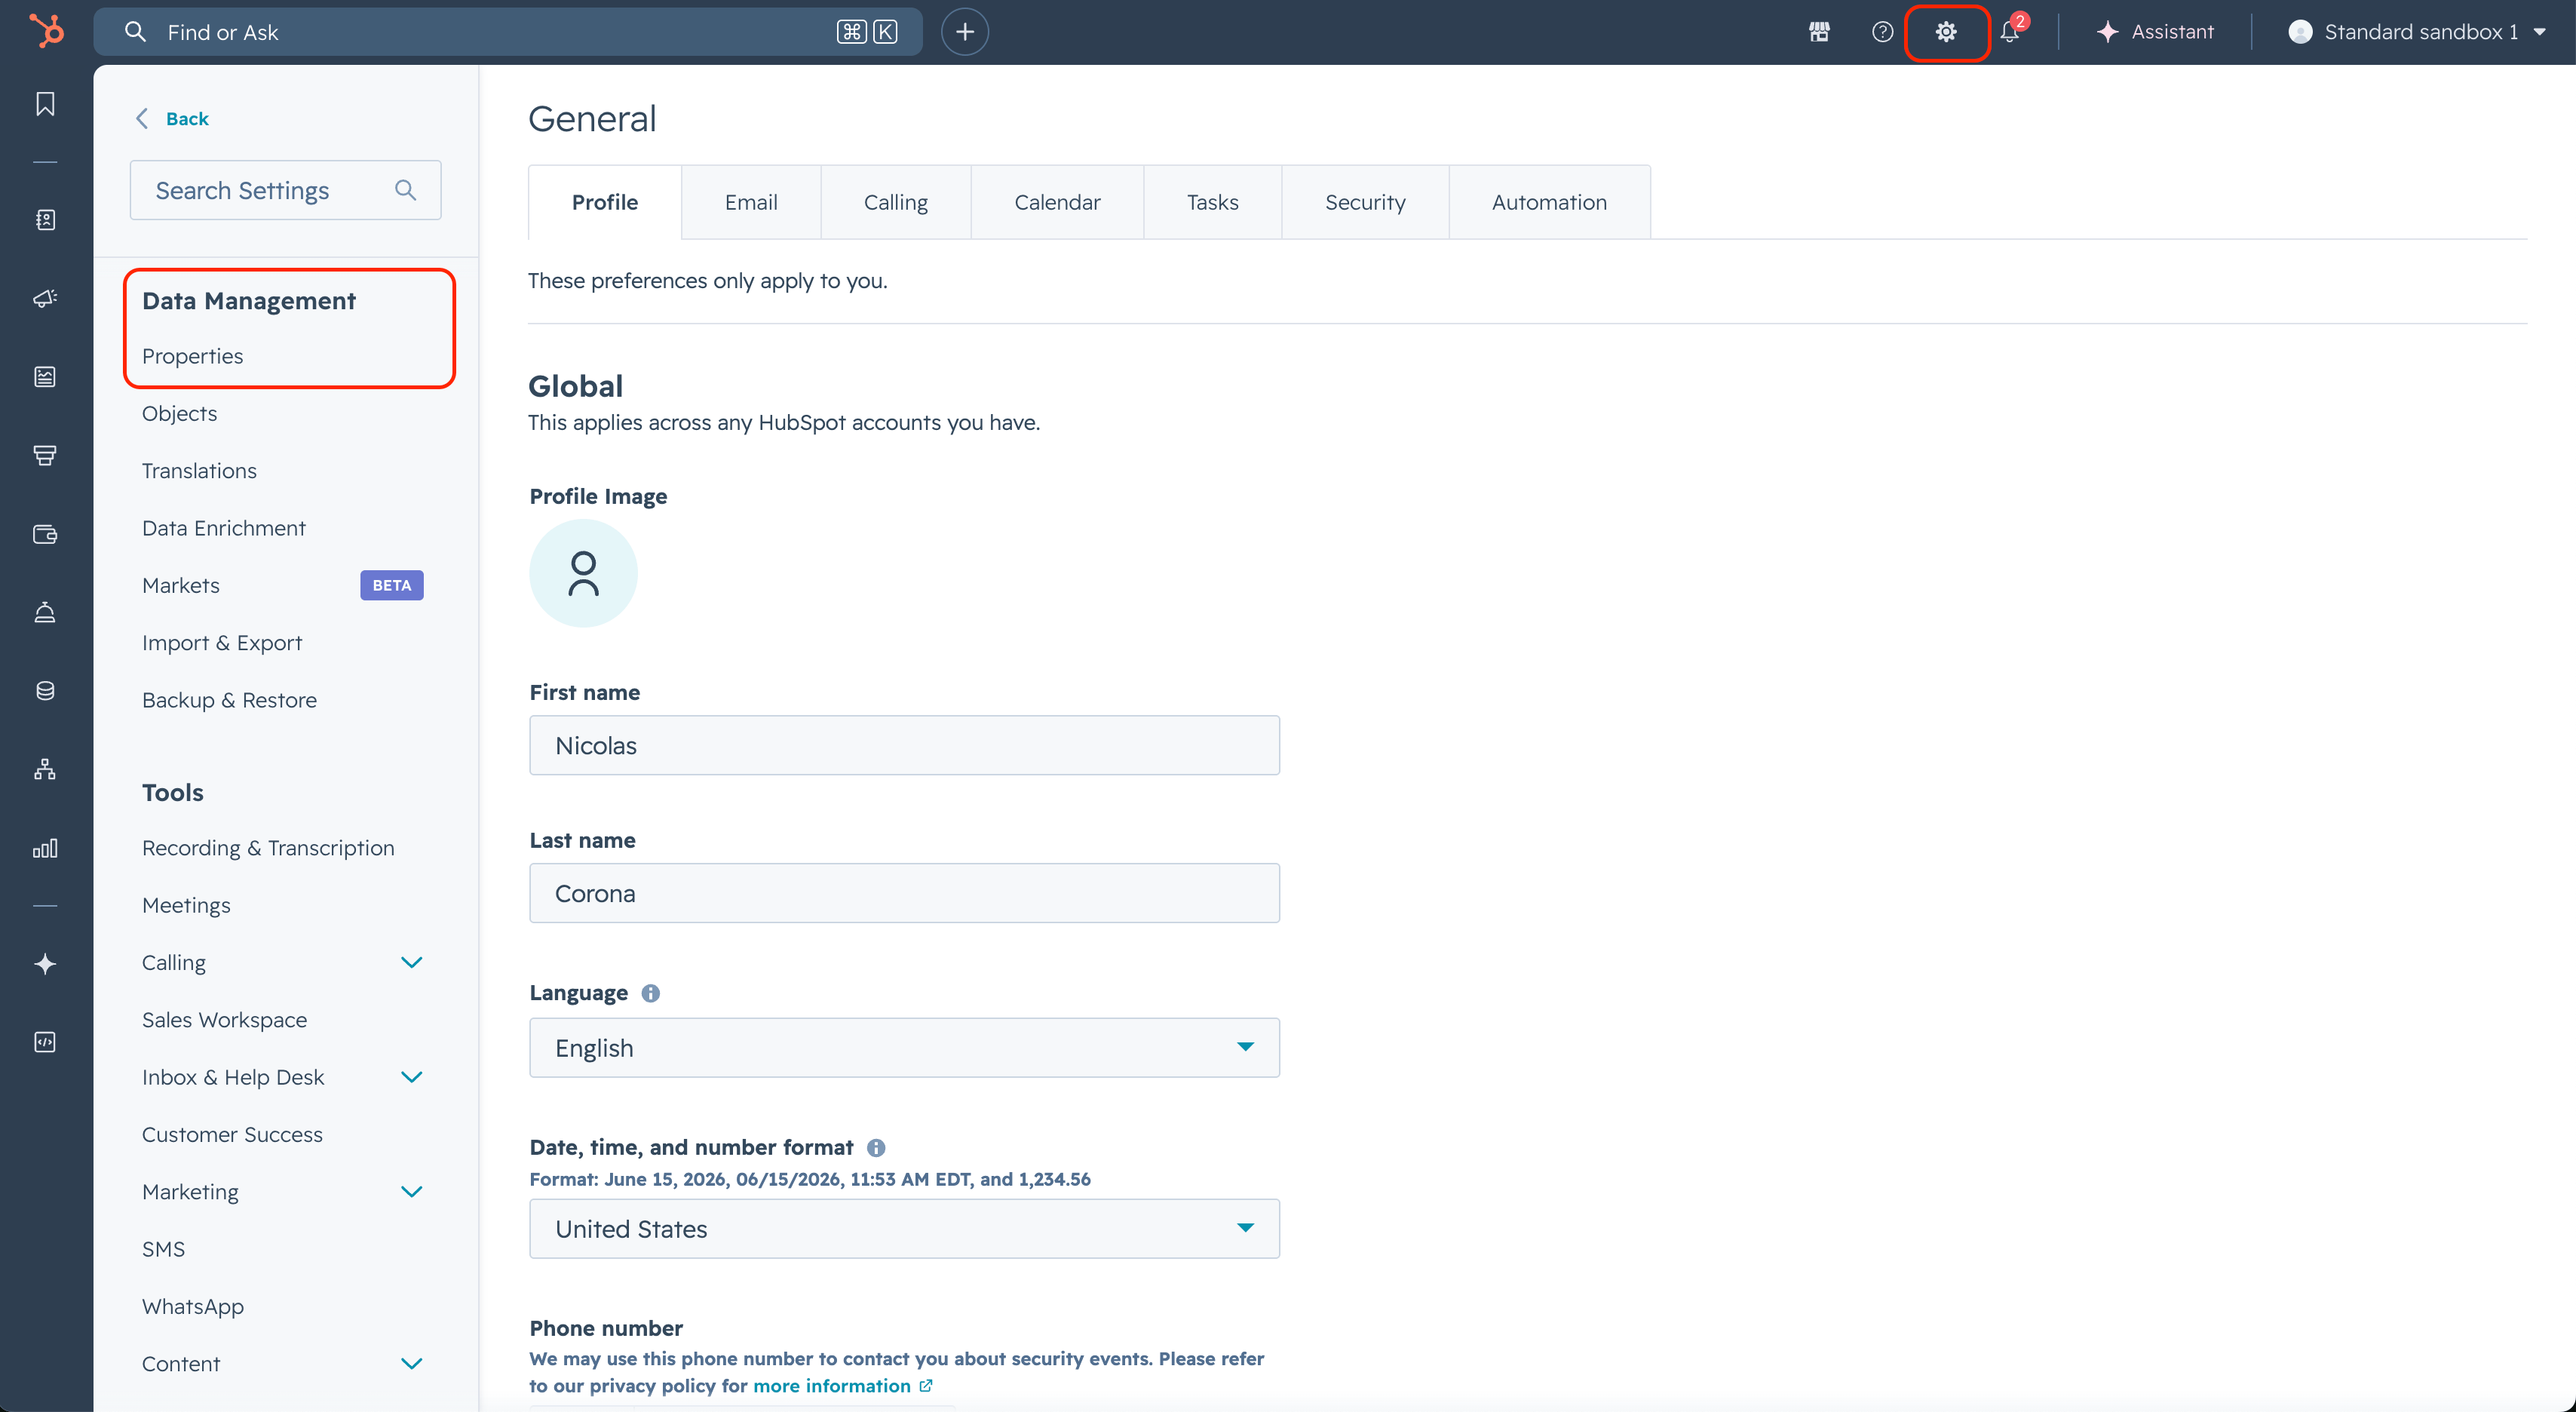 2. In the **Select an object** dropdown, select **Contact properties**, then click **Create property** (top right) for each field below:
**Enter these property labels exactly as provided.** Starbridge connects to these fields using their exact internal name. Entering the property label exactly as shown below ensures HubSpot auto-generates the internal name Starbridge expects.
| Property Label | Field Type | Expected Internal Name |
| --------------------------------------- | ---------------- | ----------------------------------------- |
| Starbridge Initial Sequence | Single-line text | `starbridge_initial_sequence` |
| Starbridge Initial Sequence At | Date picker | `starbridge_initial_sequence_at` |
| Starbridge Initial Sequence Step At | Date picker | `starbridge_initial_sequence_step_at` |
| Starbridge Most Recent Sequence | Single-line text | `starbridge_most_recent_sequence` |
| Starbridge Most Recent Sequence At | Date picker | `starbridge_most_recent_sequence_at` |
| Starbridge Most Recent Sequence Step At | Date picker | `starbridge_most_recent_sequence_step_at` |
2. In the **Select an object** dropdown, select **Contact properties**, then click **Create property** (top right) for each field below:
**Enter these property labels exactly as provided.** Starbridge connects to these fields using their exact internal name. Entering the property label exactly as shown below ensures HubSpot auto-generates the internal name Starbridge expects.
| Property Label | Field Type | Expected Internal Name |
| --------------------------------------- | ---------------- | ----------------------------------------- |
| Starbridge Initial Sequence | Single-line text | `starbridge_initial_sequence` |
| Starbridge Initial Sequence At | Date picker | `starbridge_initial_sequence_at` |
| Starbridge Initial Sequence Step At | Date picker | `starbridge_initial_sequence_step_at` |
| Starbridge Most Recent Sequence | Single-line text | `starbridge_most_recent_sequence` |
| Starbridge Most Recent Sequence At | Date picker | `starbridge_most_recent_sequence_at` |
| Starbridge Most Recent Sequence Step At | Date picker | `starbridge_most_recent_sequence_step_at` |
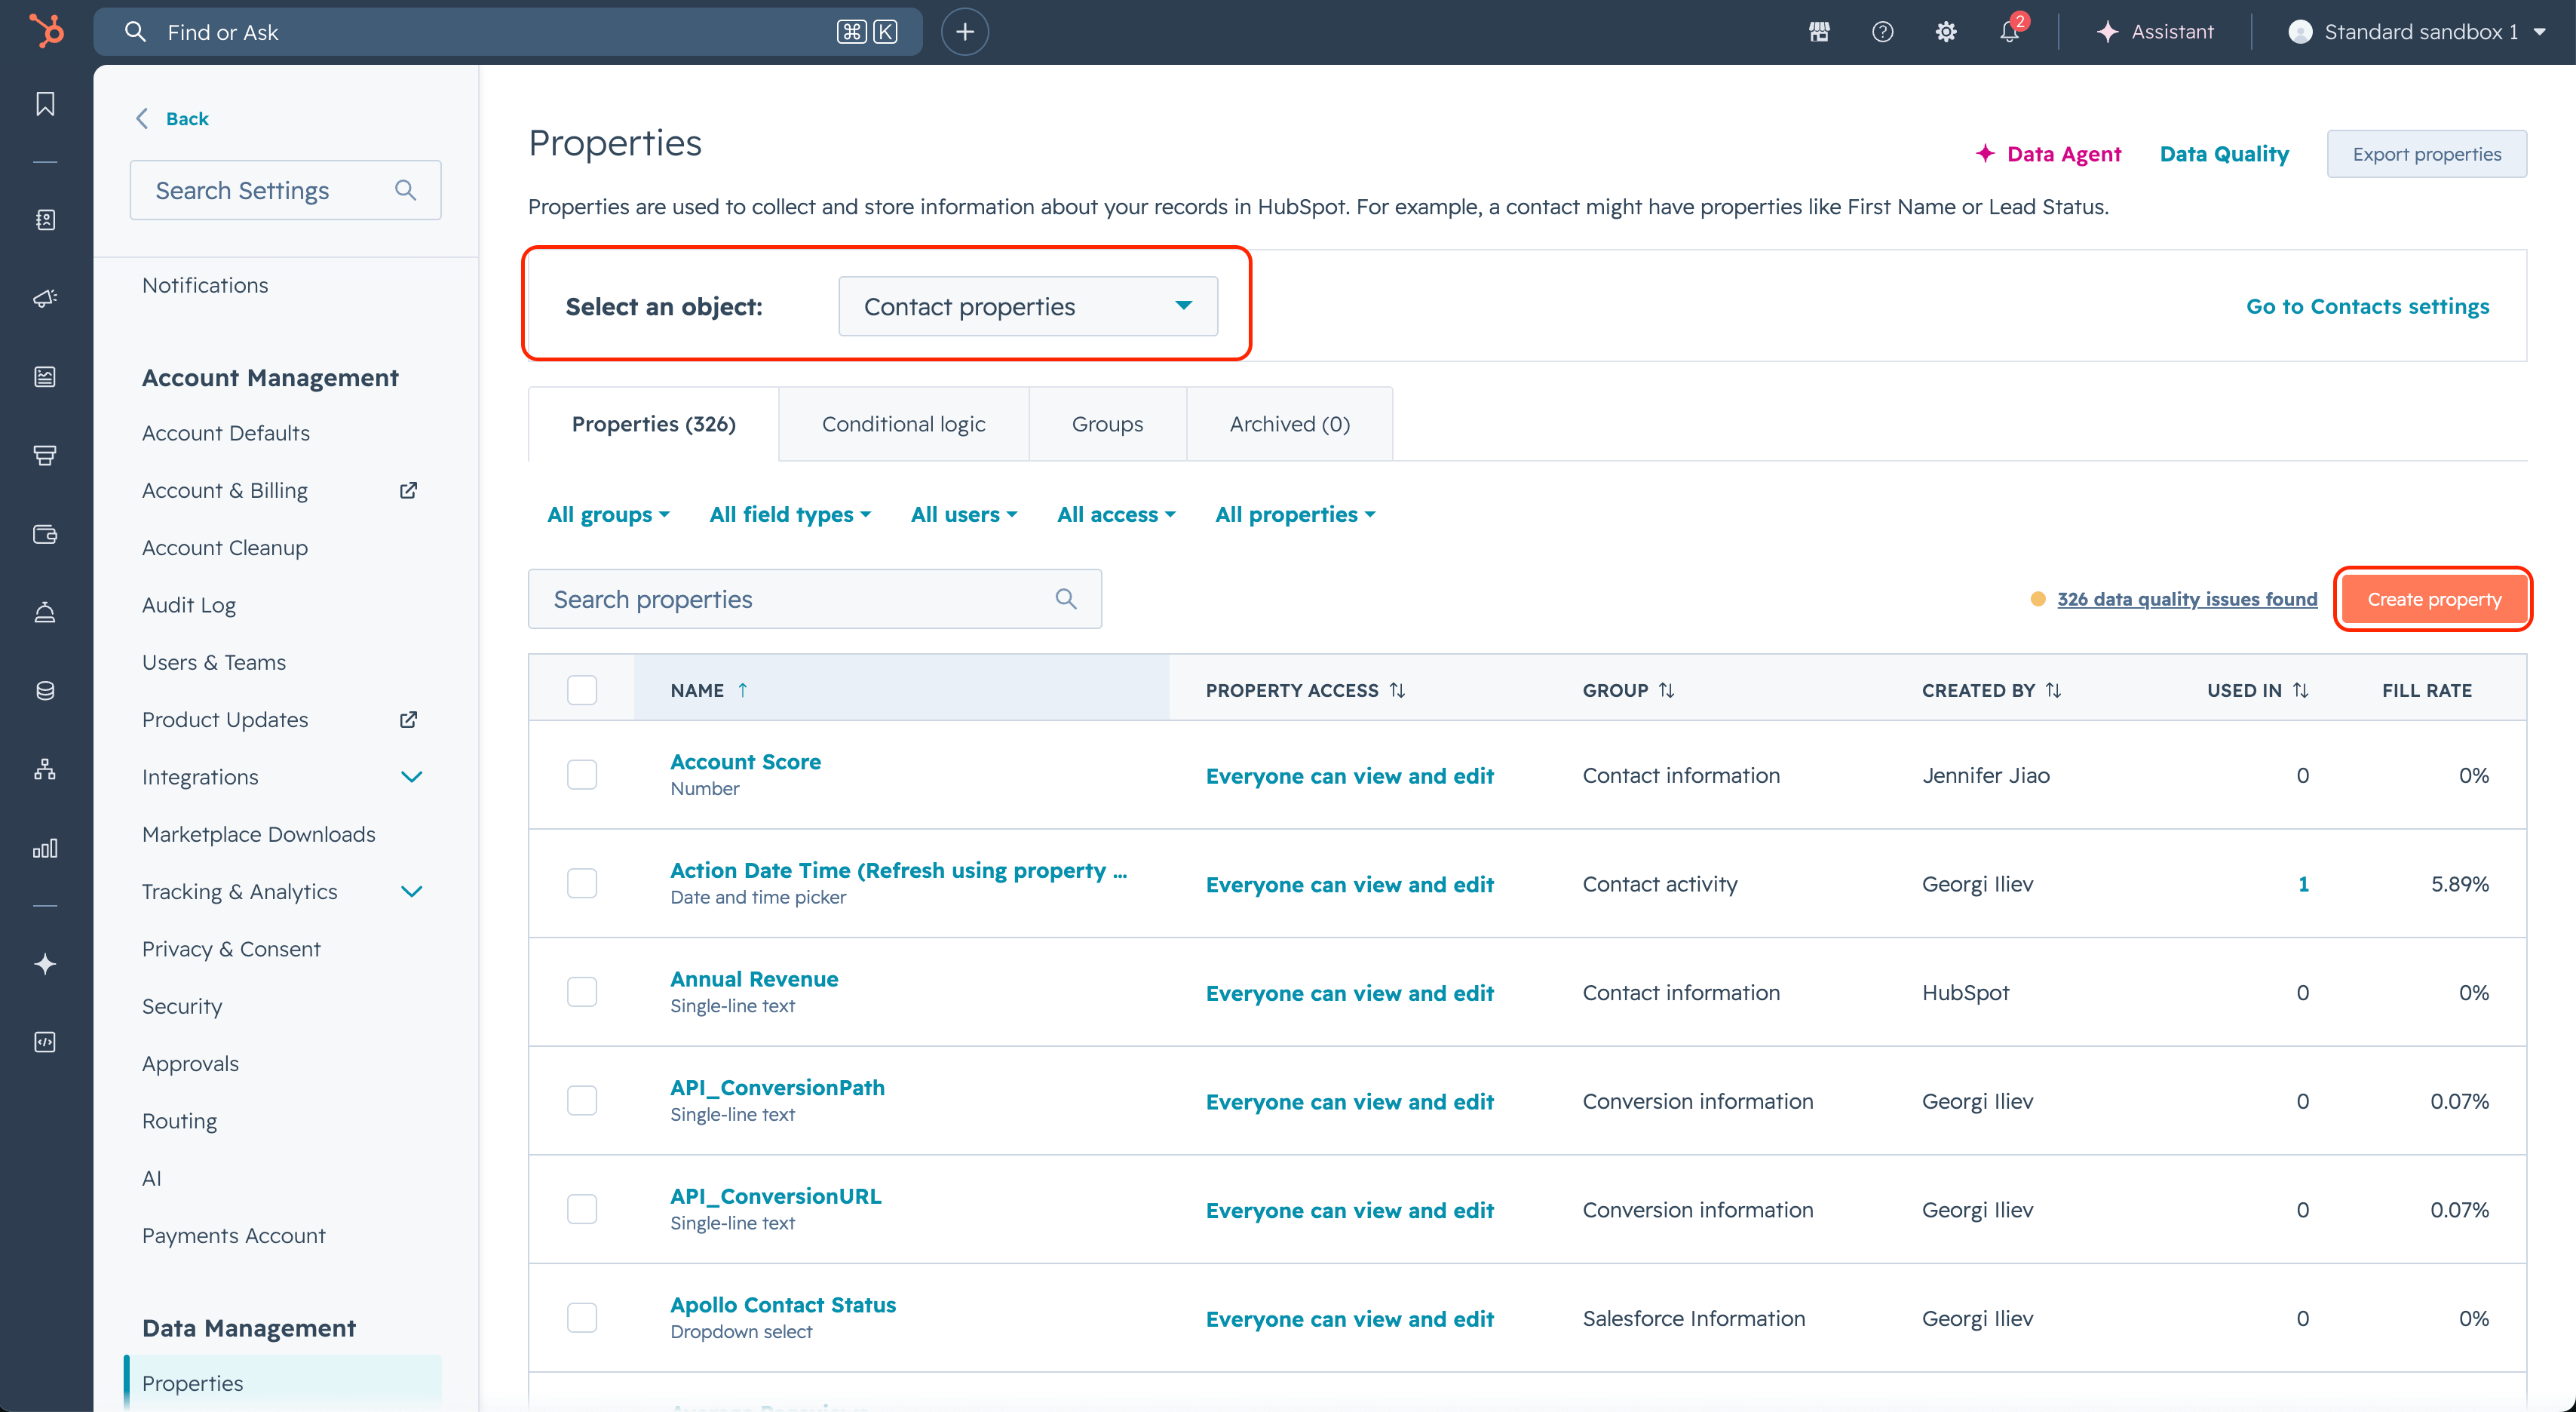 3. Click **Create** after each property.
4. Return to **Starbridge** → **Settings** → [**Integrations**](https://dashboard.starbridge.ai/settings/integrations) → **\[your CRM integration] → Sequences**. Click **Refresh** in the top right corner and wait for the connection to finish refreshing, then toggle on **Track sequence activity on contacts**. All done!
## What's next
Turn a Bridge into a scaled sequence.
Required before email logging or sequence activity on contacts can run.
3. Click **Create** after each property.
4. Return to **Starbridge** → **Settings** → [**Integrations**](https://dashboard.starbridge.ai/settings/integrations) → **\[your CRM integration] → Sequences**. Click **Refresh** in the top right corner and wait for the connection to finish refreshing, then toggle on **Track sequence activity on contacts**. All done!
## What's next
Turn a Bridge into a scaled sequence.
Required before email logging or sequence activity on contacts can run.