

This step requires Starbridge Admin access.
1
Add required fields to your CRM objects
To integrate your CRM to Starbridge, you must first add the following custom fields to your CRM Account and Contact objects:
Contact fields: Starbridge Contact ID and Starbridge Is Active
- Starbridge Buyer ID (text) — Starbridge’s unique identifier for every buyer. Enables lookups by Starbridge Buyer ID and helps admins identify which accounts were created or modified by Starbridge.
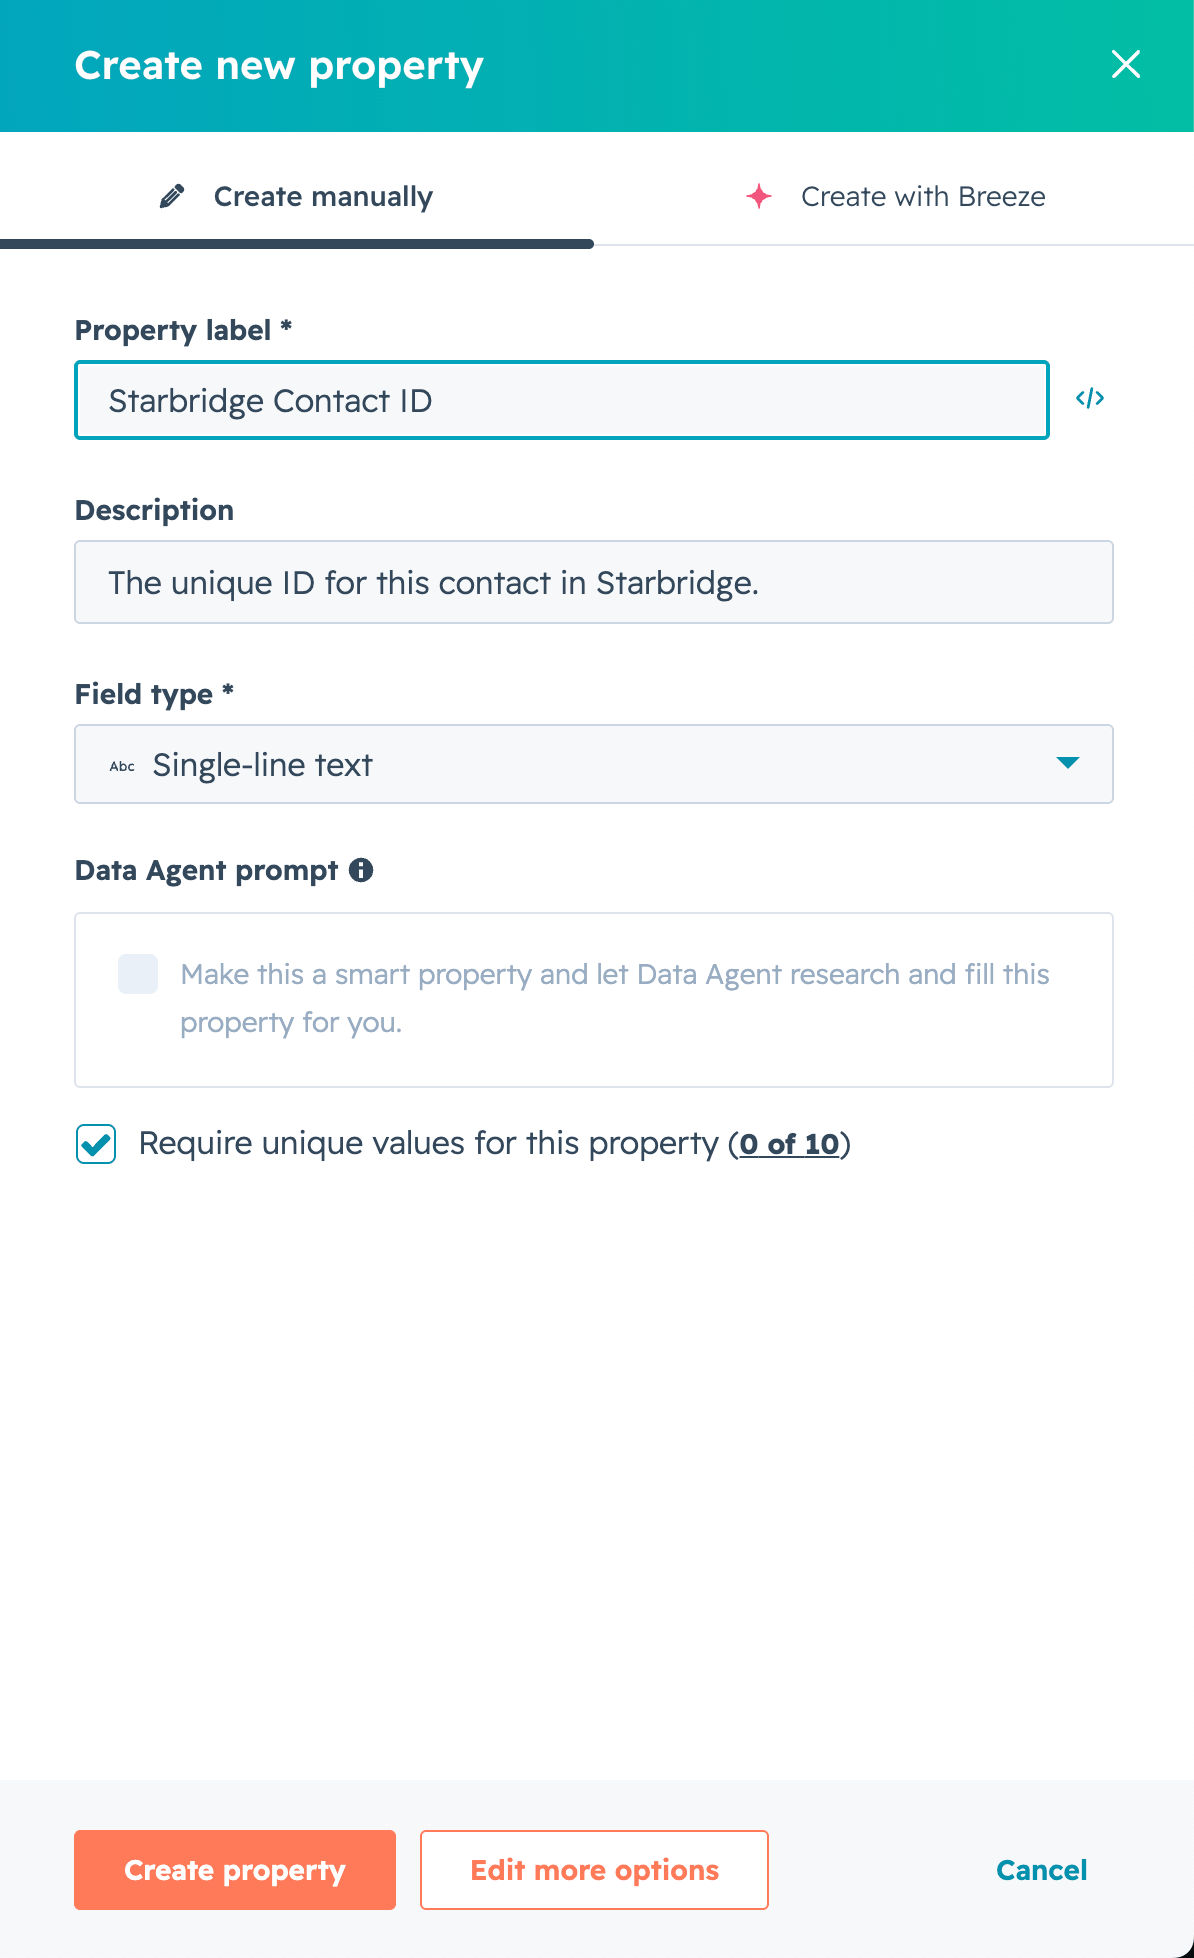
- Starbridge Contact ID (text) — Starbridge’s unique identifier for every contact. Enables lookups by Starbridge contact identifier and helps admins identify which contacts were created or modified by Starbridge.
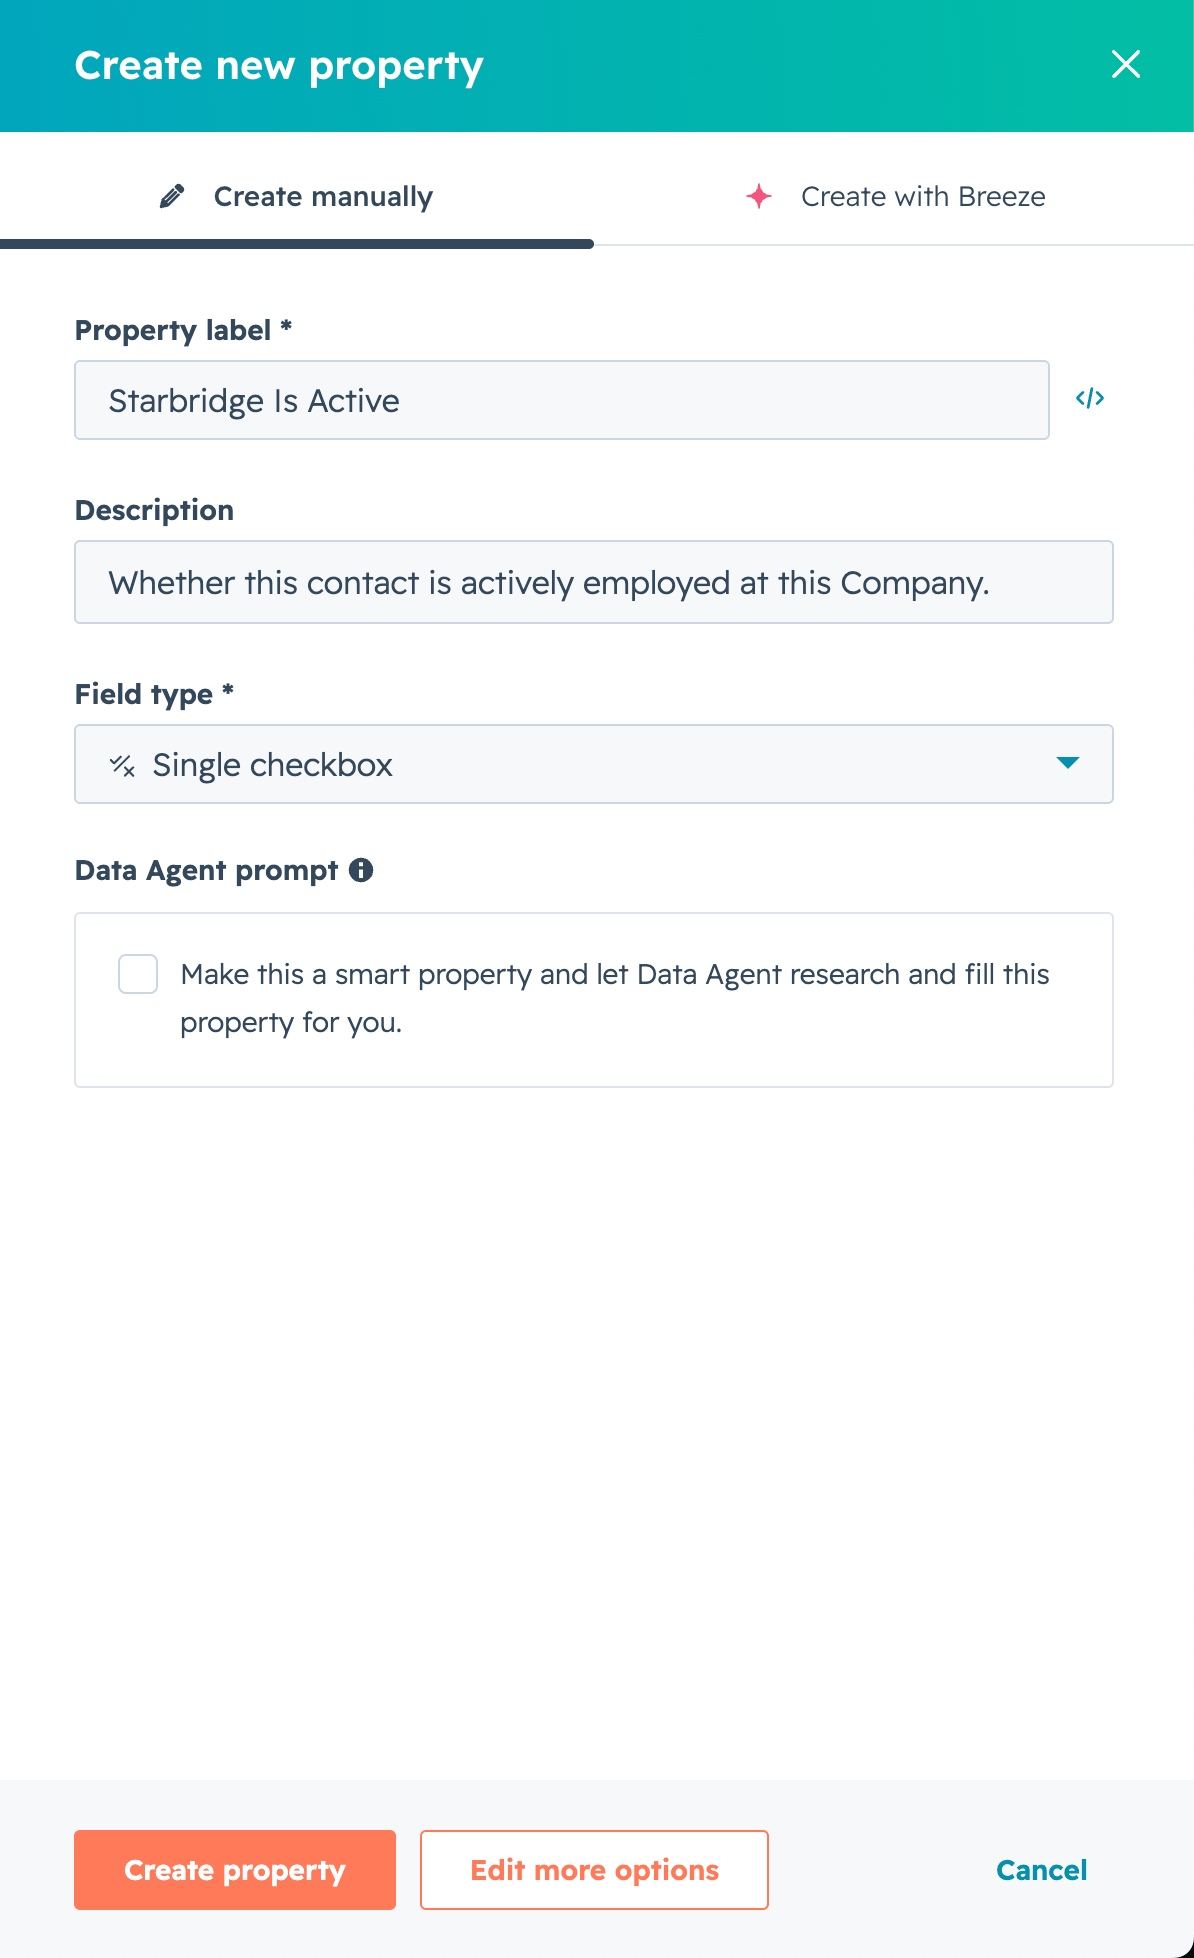
- Starbridge Is Active (boolean) — whether Starbridge considers the contact currently active. Defaults to
truefor active contacts; set tofalsewhen Starbridge detects the contact is no longer employed at the account.
Step-by-step instructions for Salesforce
Step-by-step instructions for Salesforce
Before connecting Starbridge to Salesforce, you need to create a custom field on the Account object to store Starbridge data.
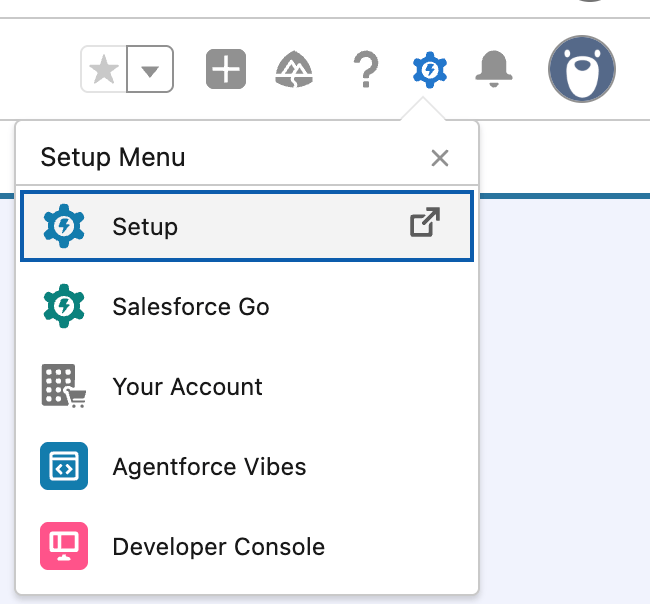
- In Salesforce, click the Gear icon (⚙) → Setup
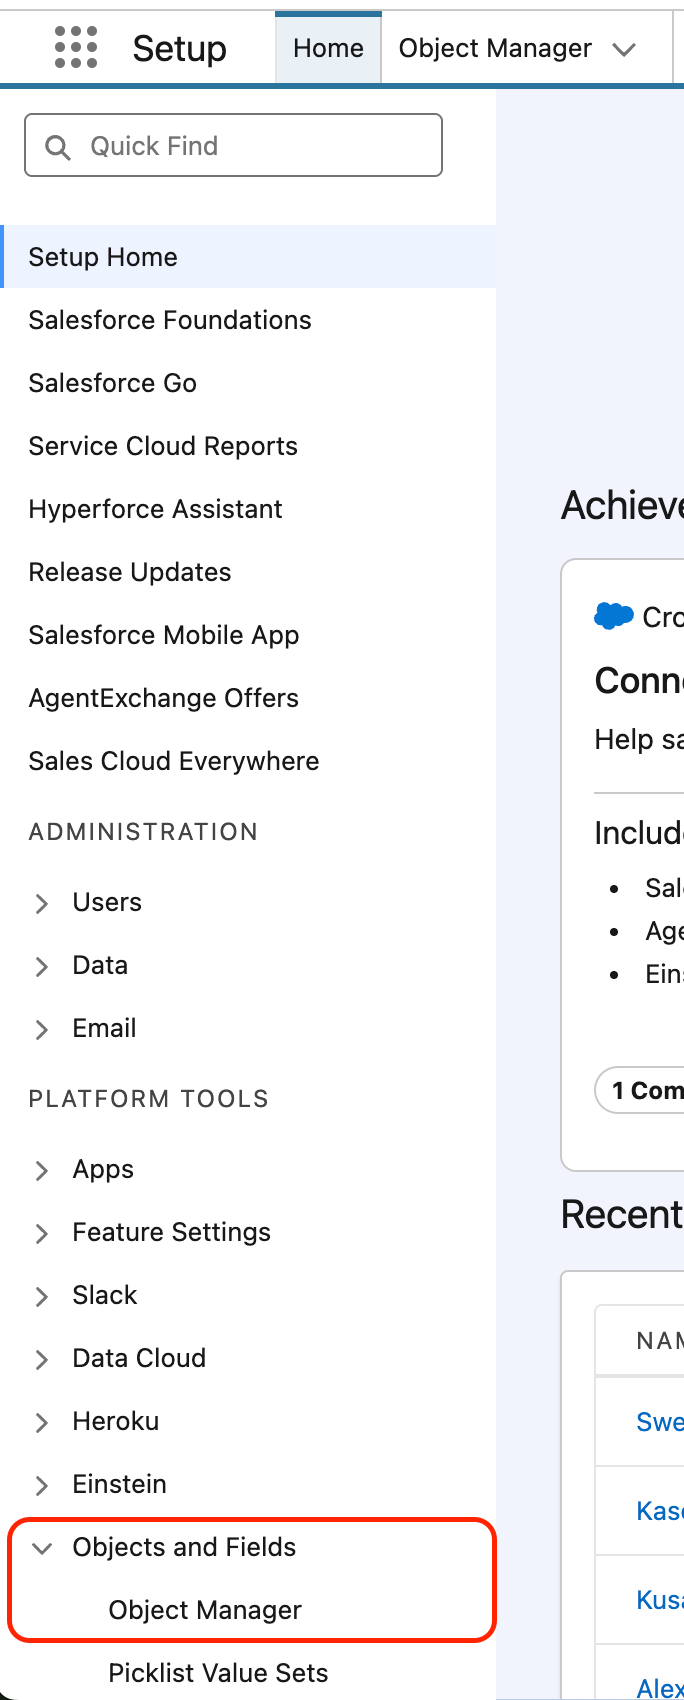
- In the left sidebar, search for Object Manager and open it, or directly click Objects and Fields → Object Manager
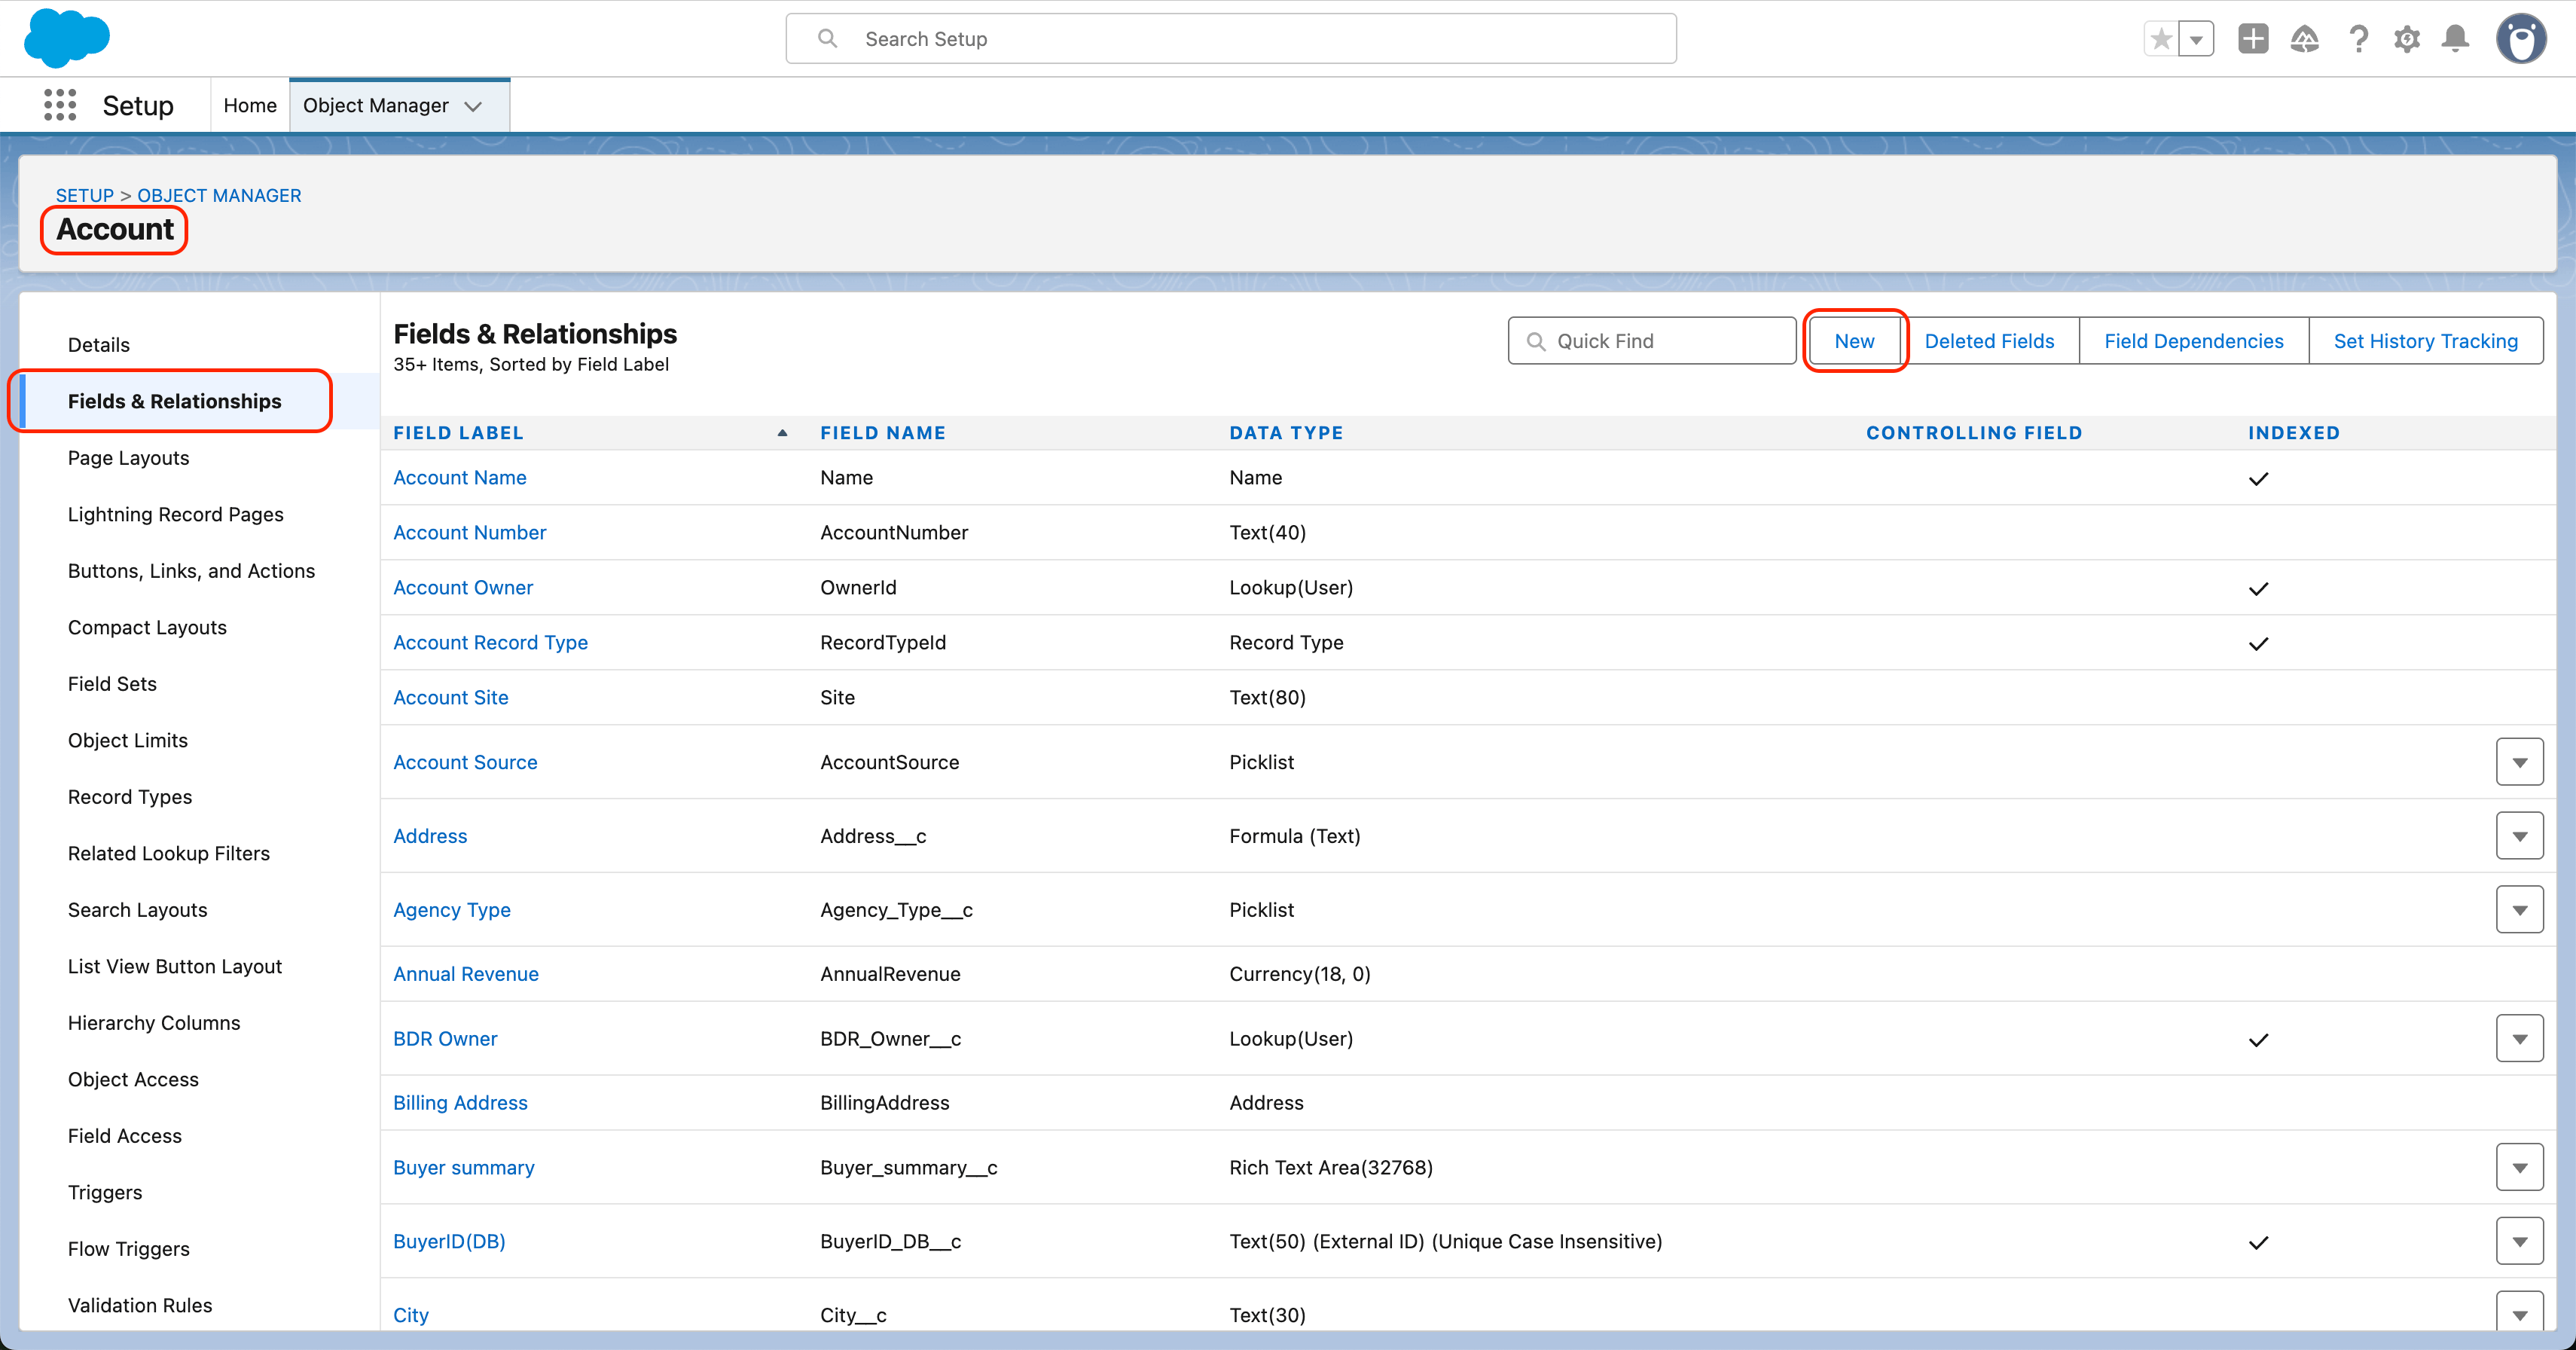
- Click Account → Fields & Relationships → New
- Create the field — Starbridge Buyer ID:
Click Next → Next → Save.
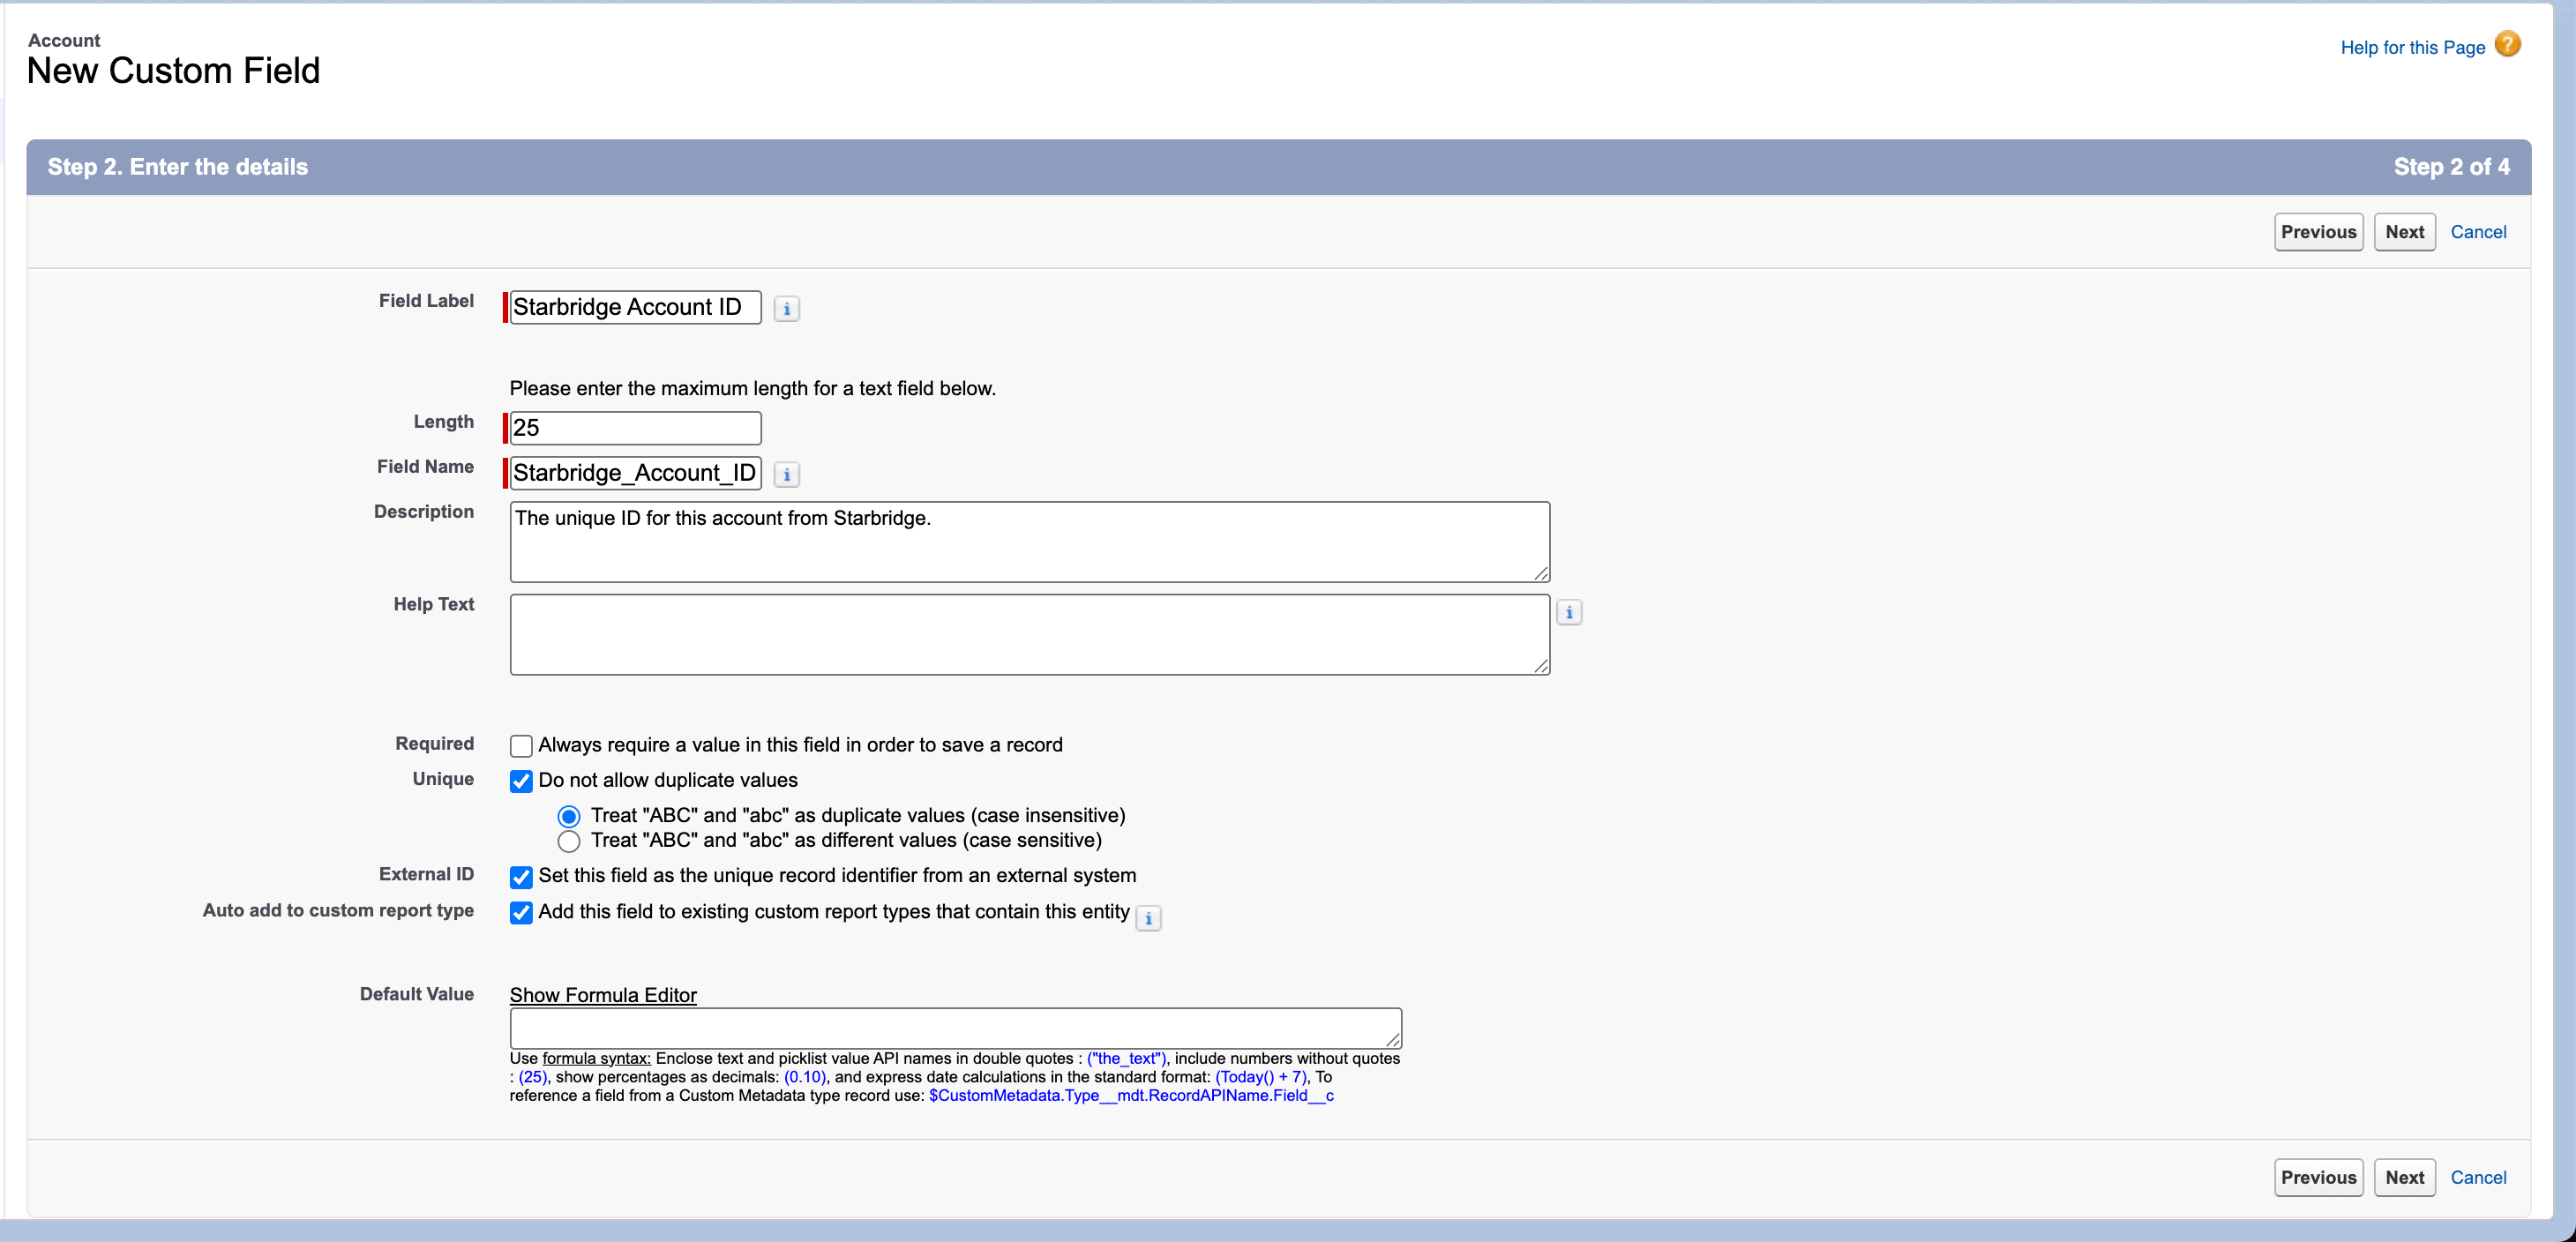
Salesforce automatically appends
__c to custom field API names (e.g. Starbridge_Buyer_ID__c). This is expected.Step-by-step instructions for HubSpot
Step-by-step instructions for HubSpot
Before connecting Starbridge to HubSpot, you need to create a custom property on the Company object to store Starbridge data.
- In HubSpot, go to Settings (Gear icon ⚙) → Properties
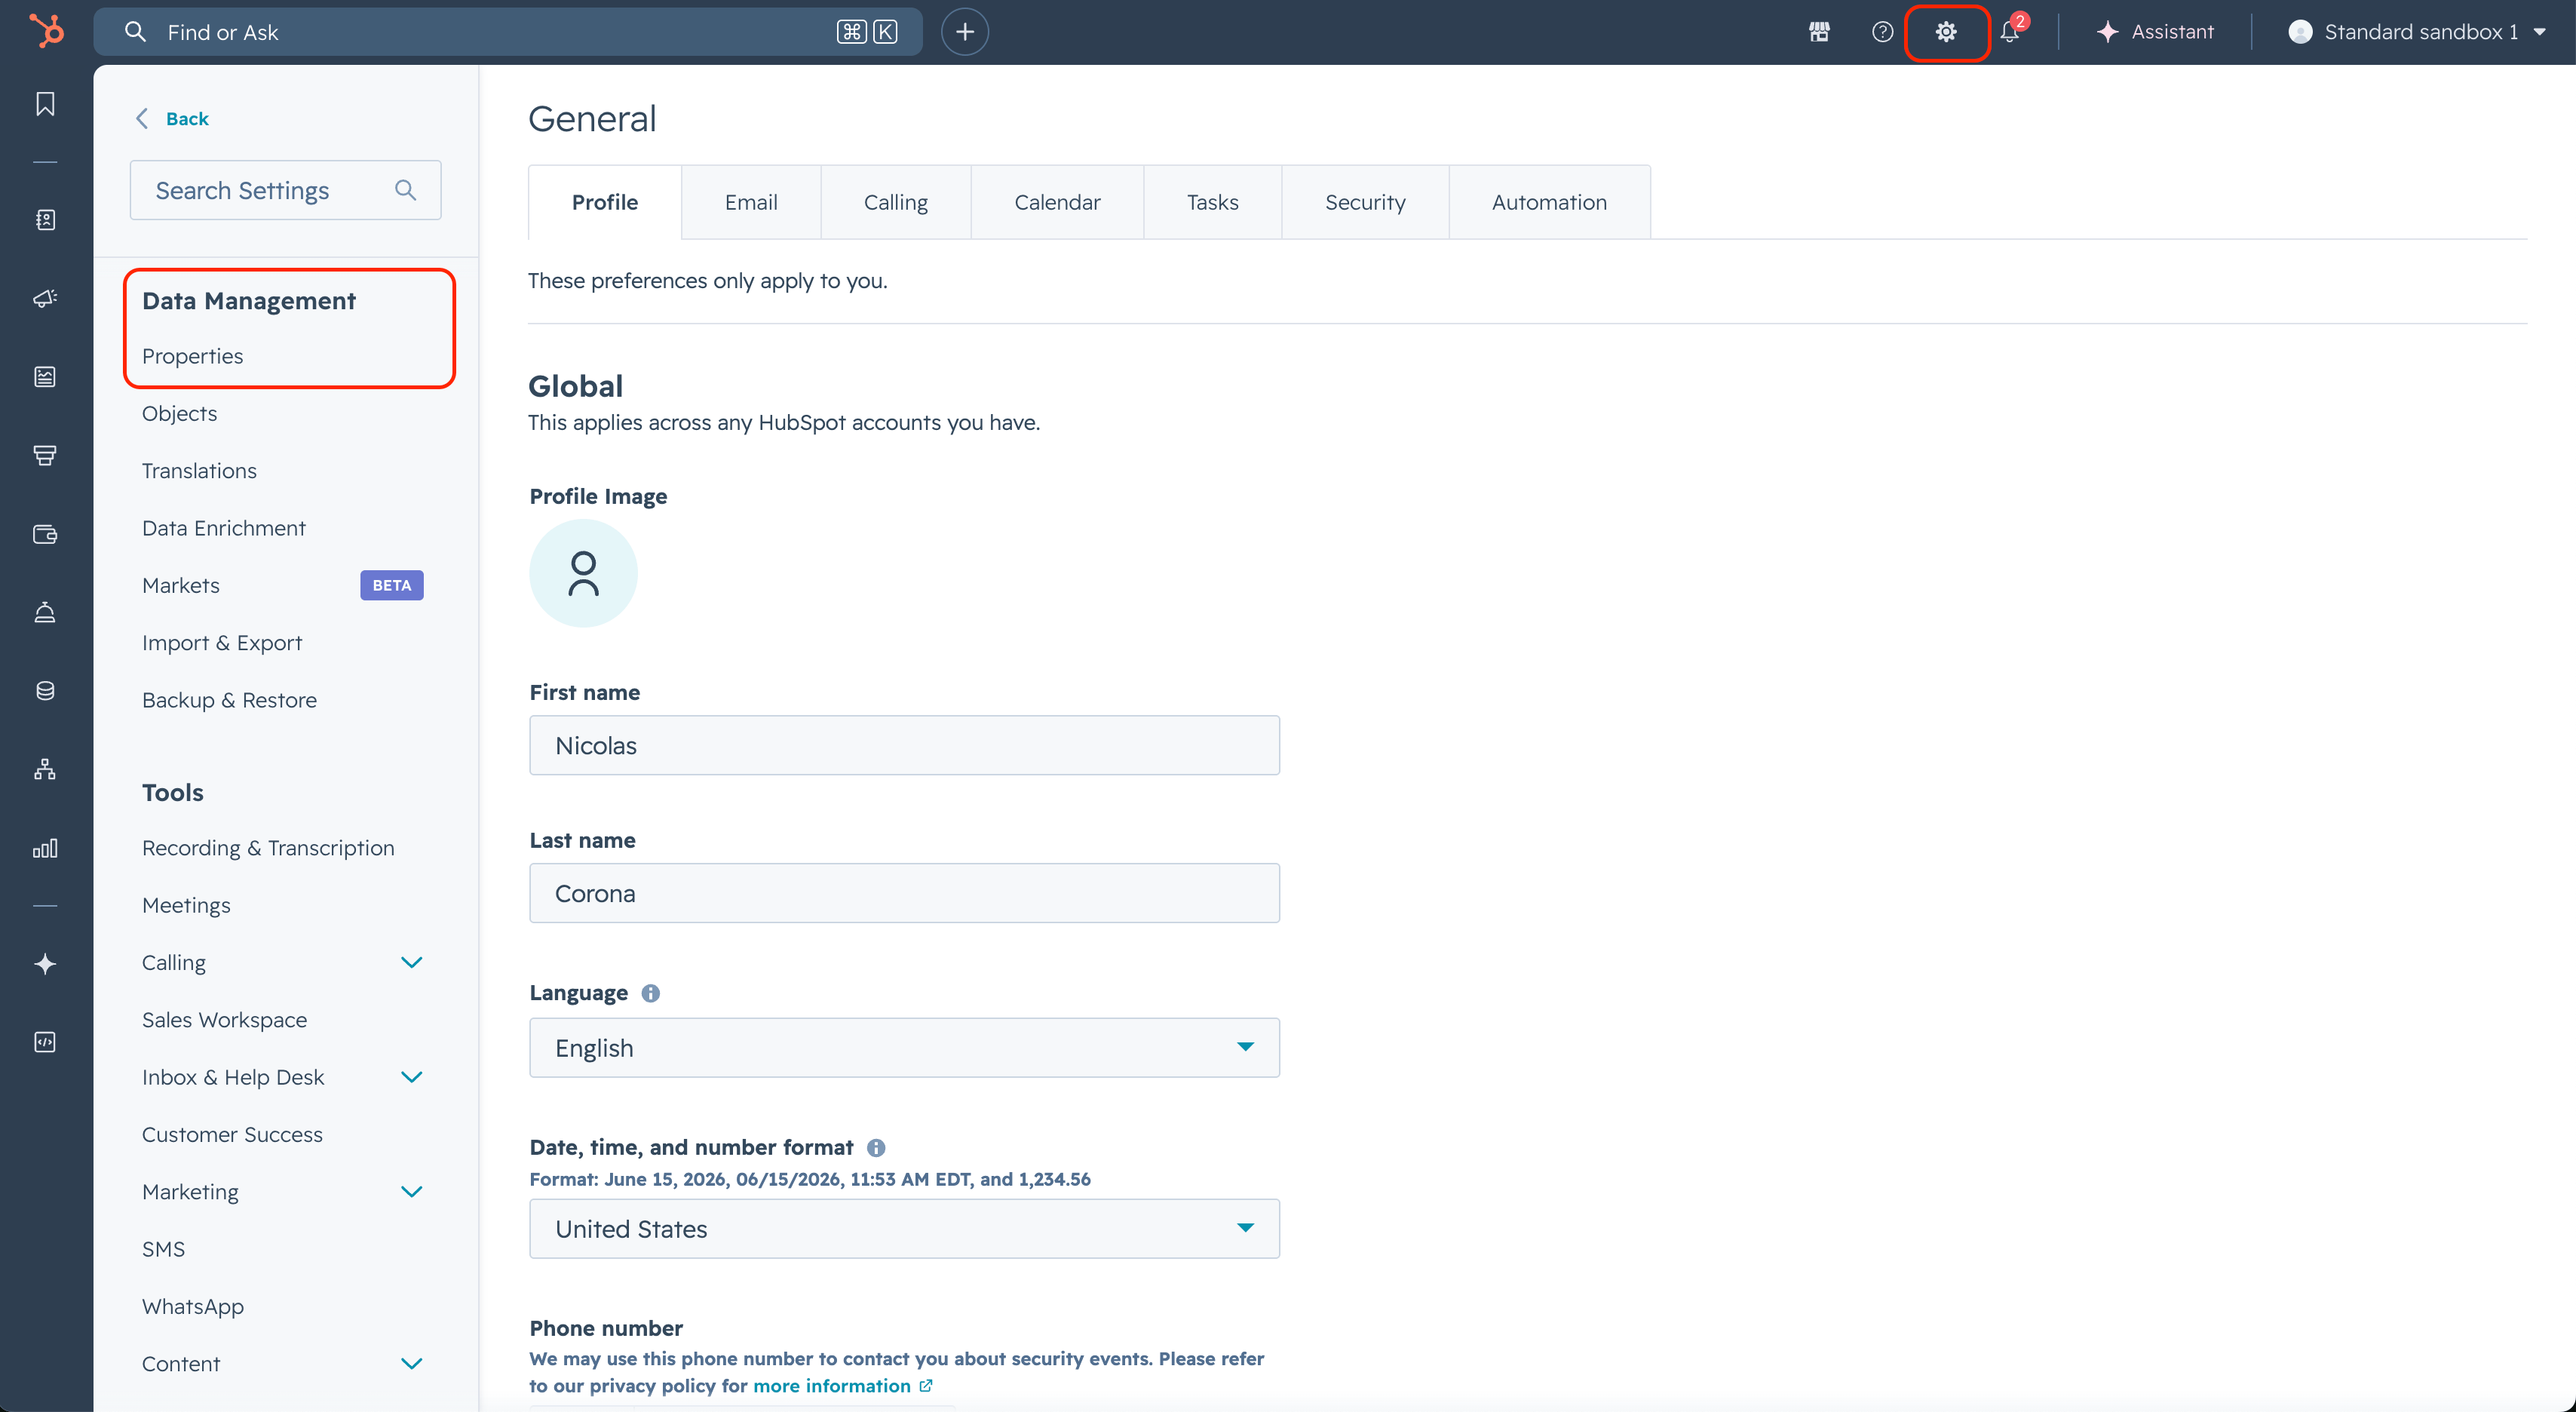
- In the Select an object dropdown, select Company properties, then click Create property (top right)\
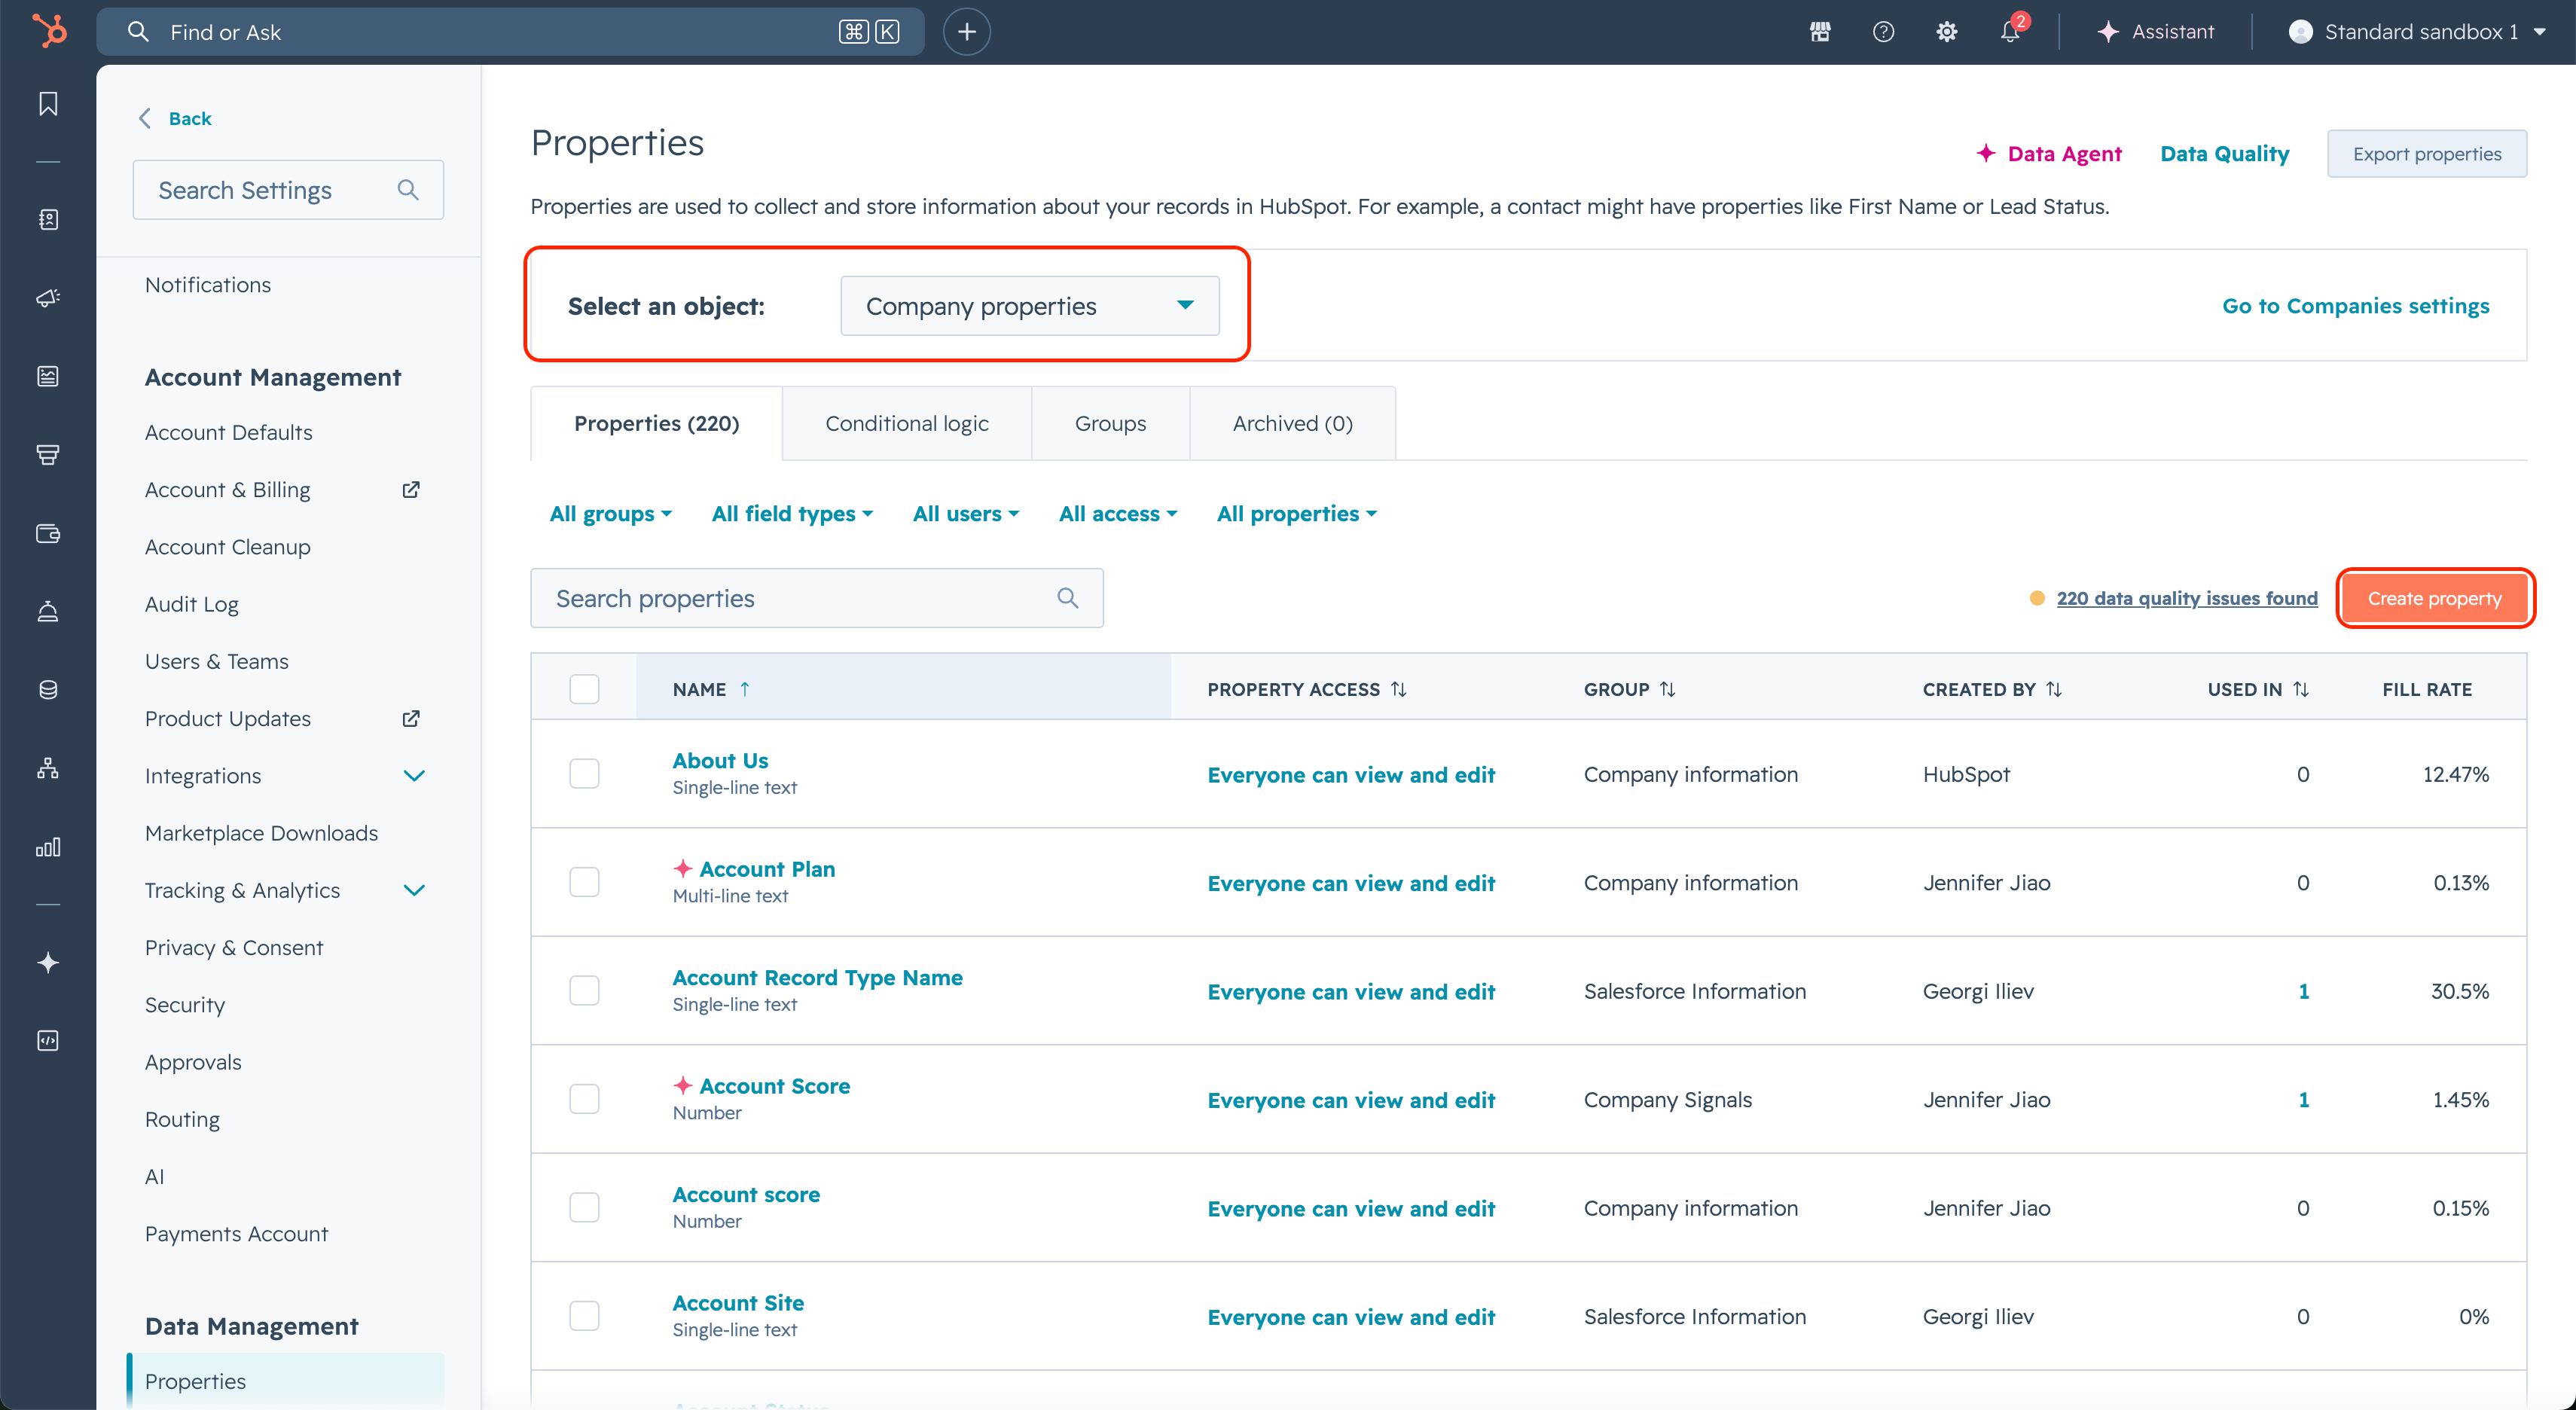
- Create the property — Starbridge Buyer ID:
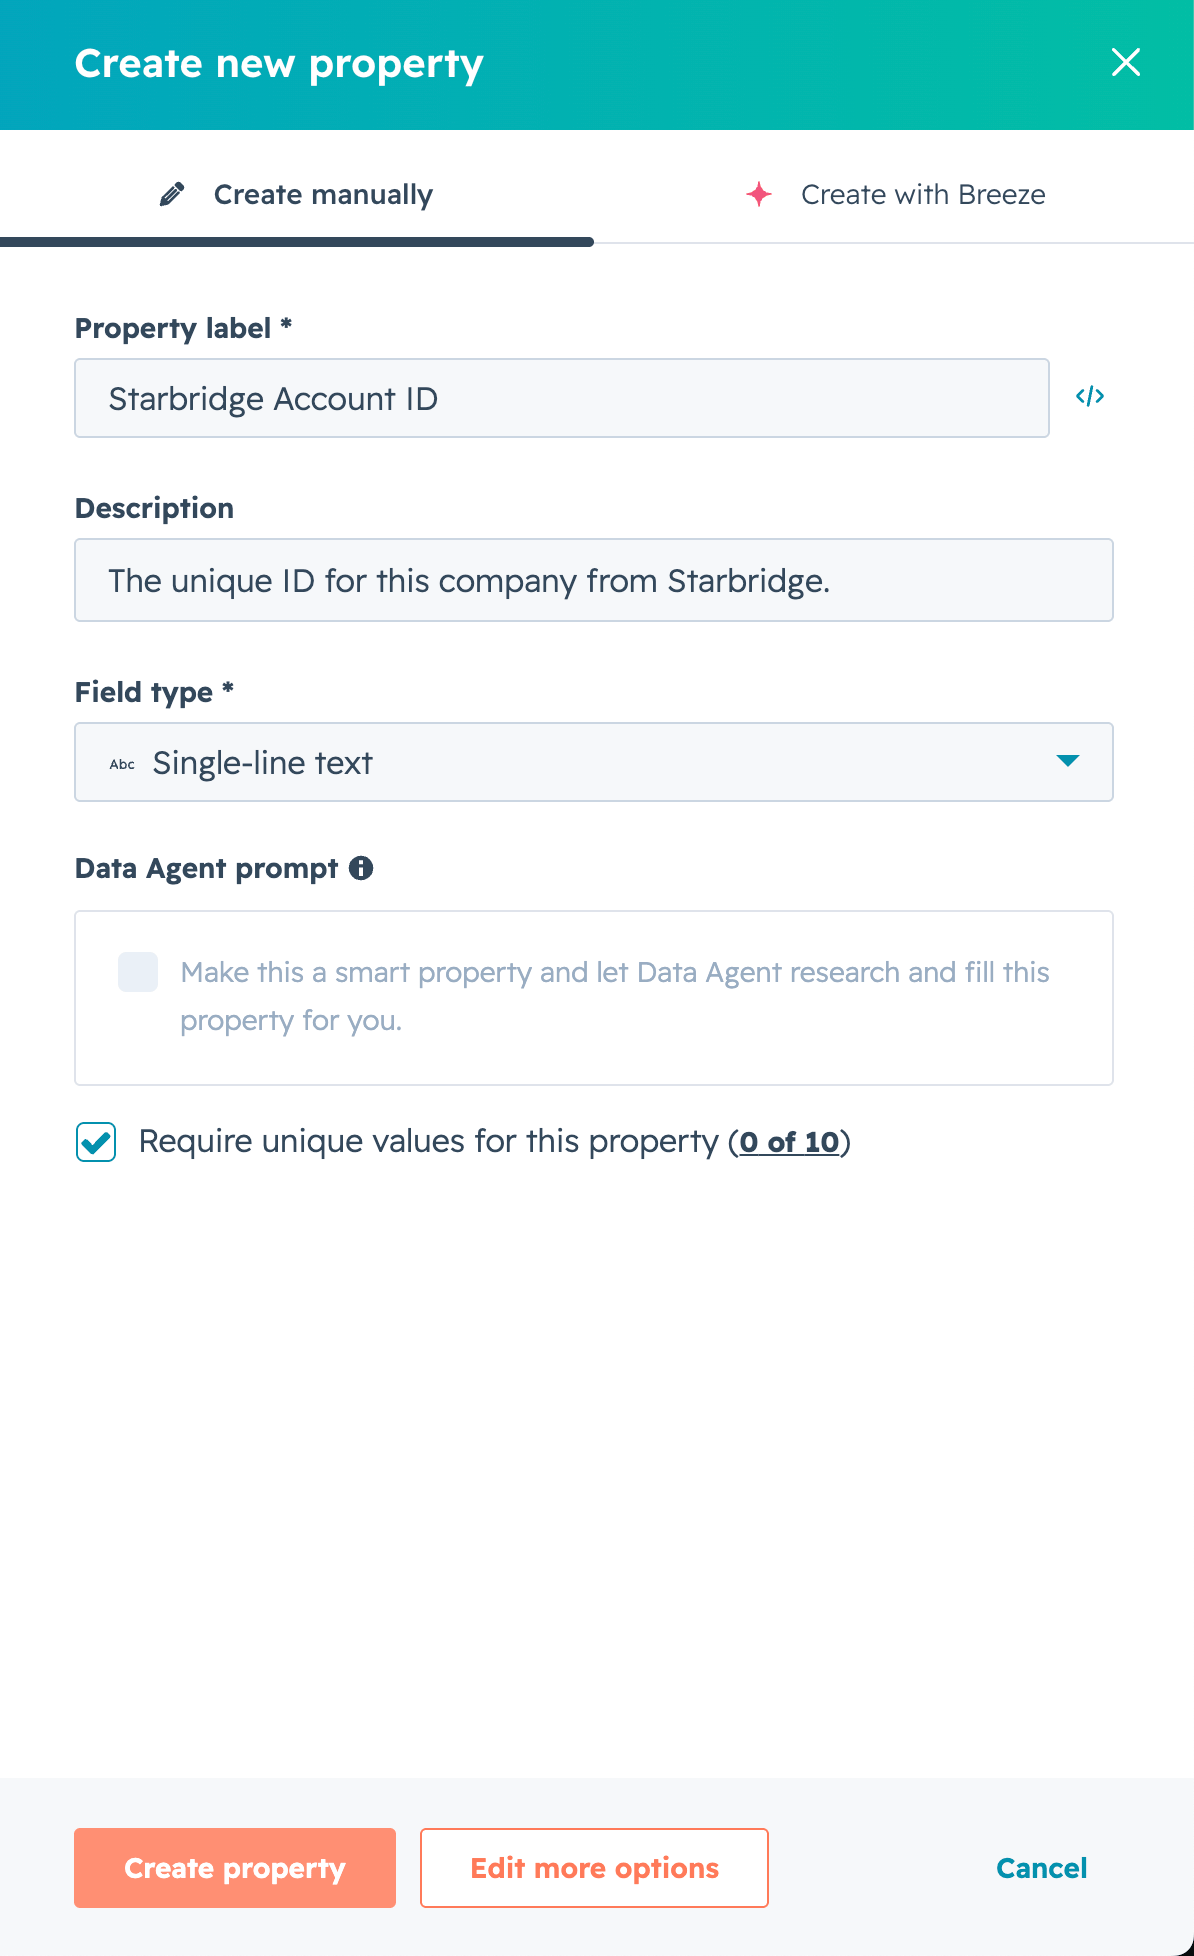
Click Create.
Step-by-step instructions for Salesforce
Step-by-step instructions for Salesforce
Before connecting Starbridge to Salesforce, you need to create two custom fields on the Contact object to store Starbridge data.
- In Salesforce, click the Gear icon (⚙) → Setup
- In the left sidebar, search for Object Manager and open it, or directly click Objects and Fields → Object Manager
- Click Contact → Fields & Relationships → New
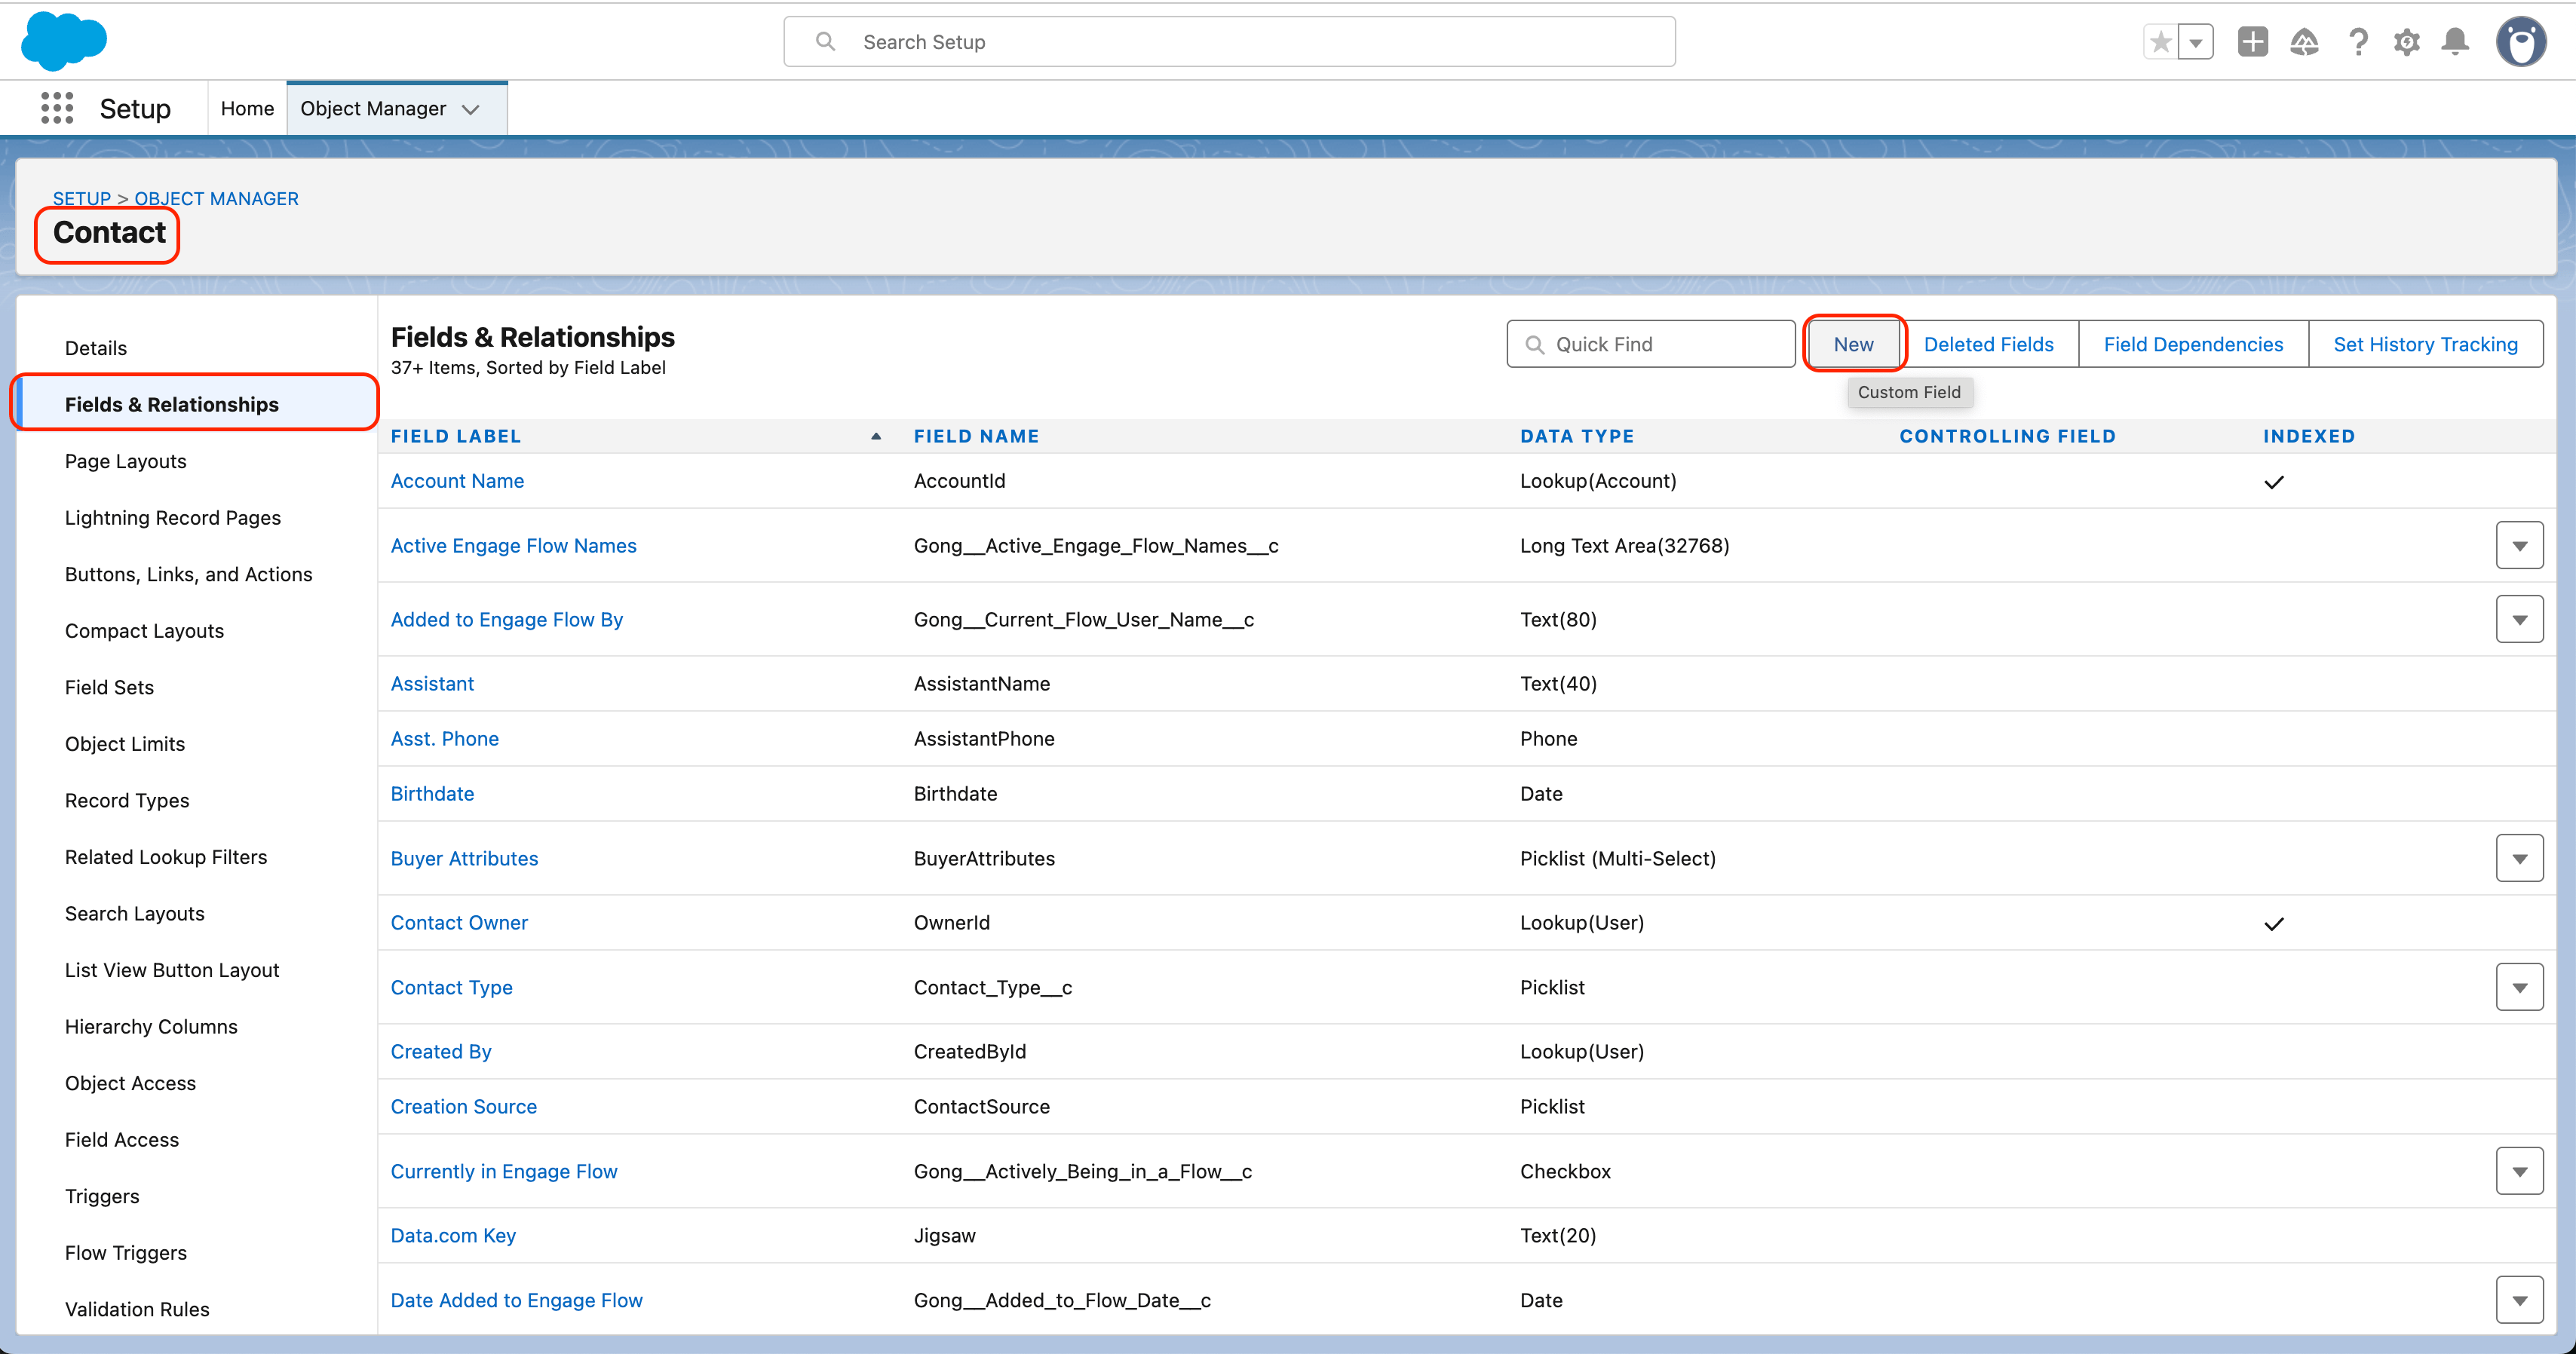
- Create the first field — Starbridge Contact ID:
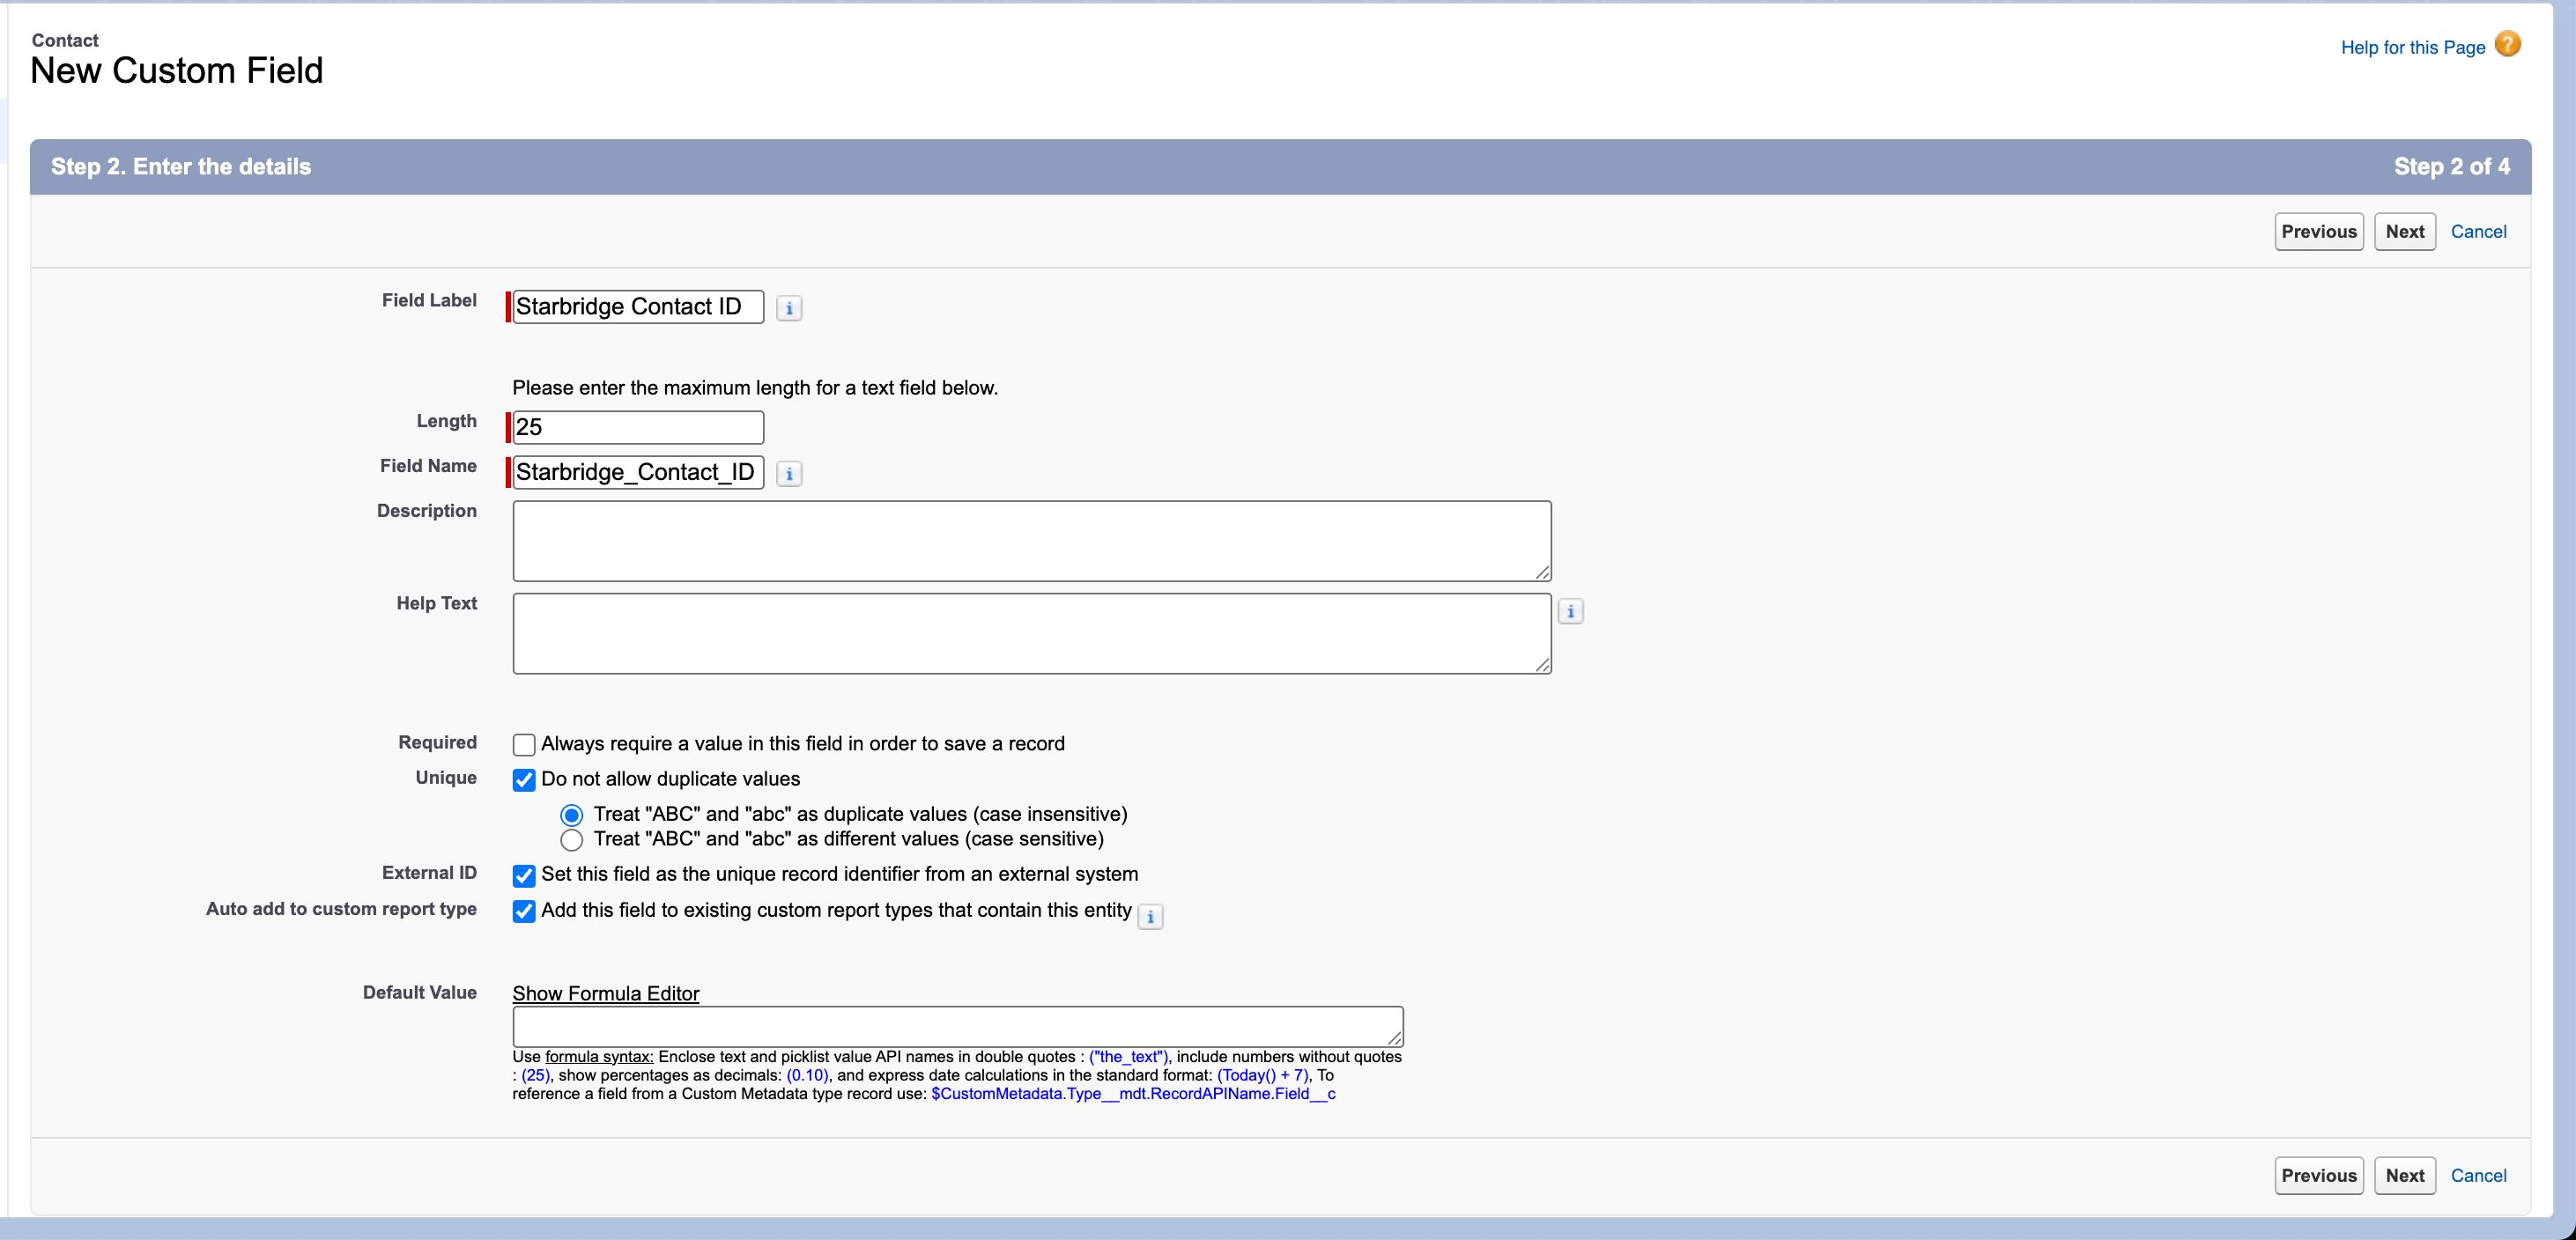
Click Next → Next → Save & New - Create the second field — Starbridge Is Active:
Click Next → Next → Save.
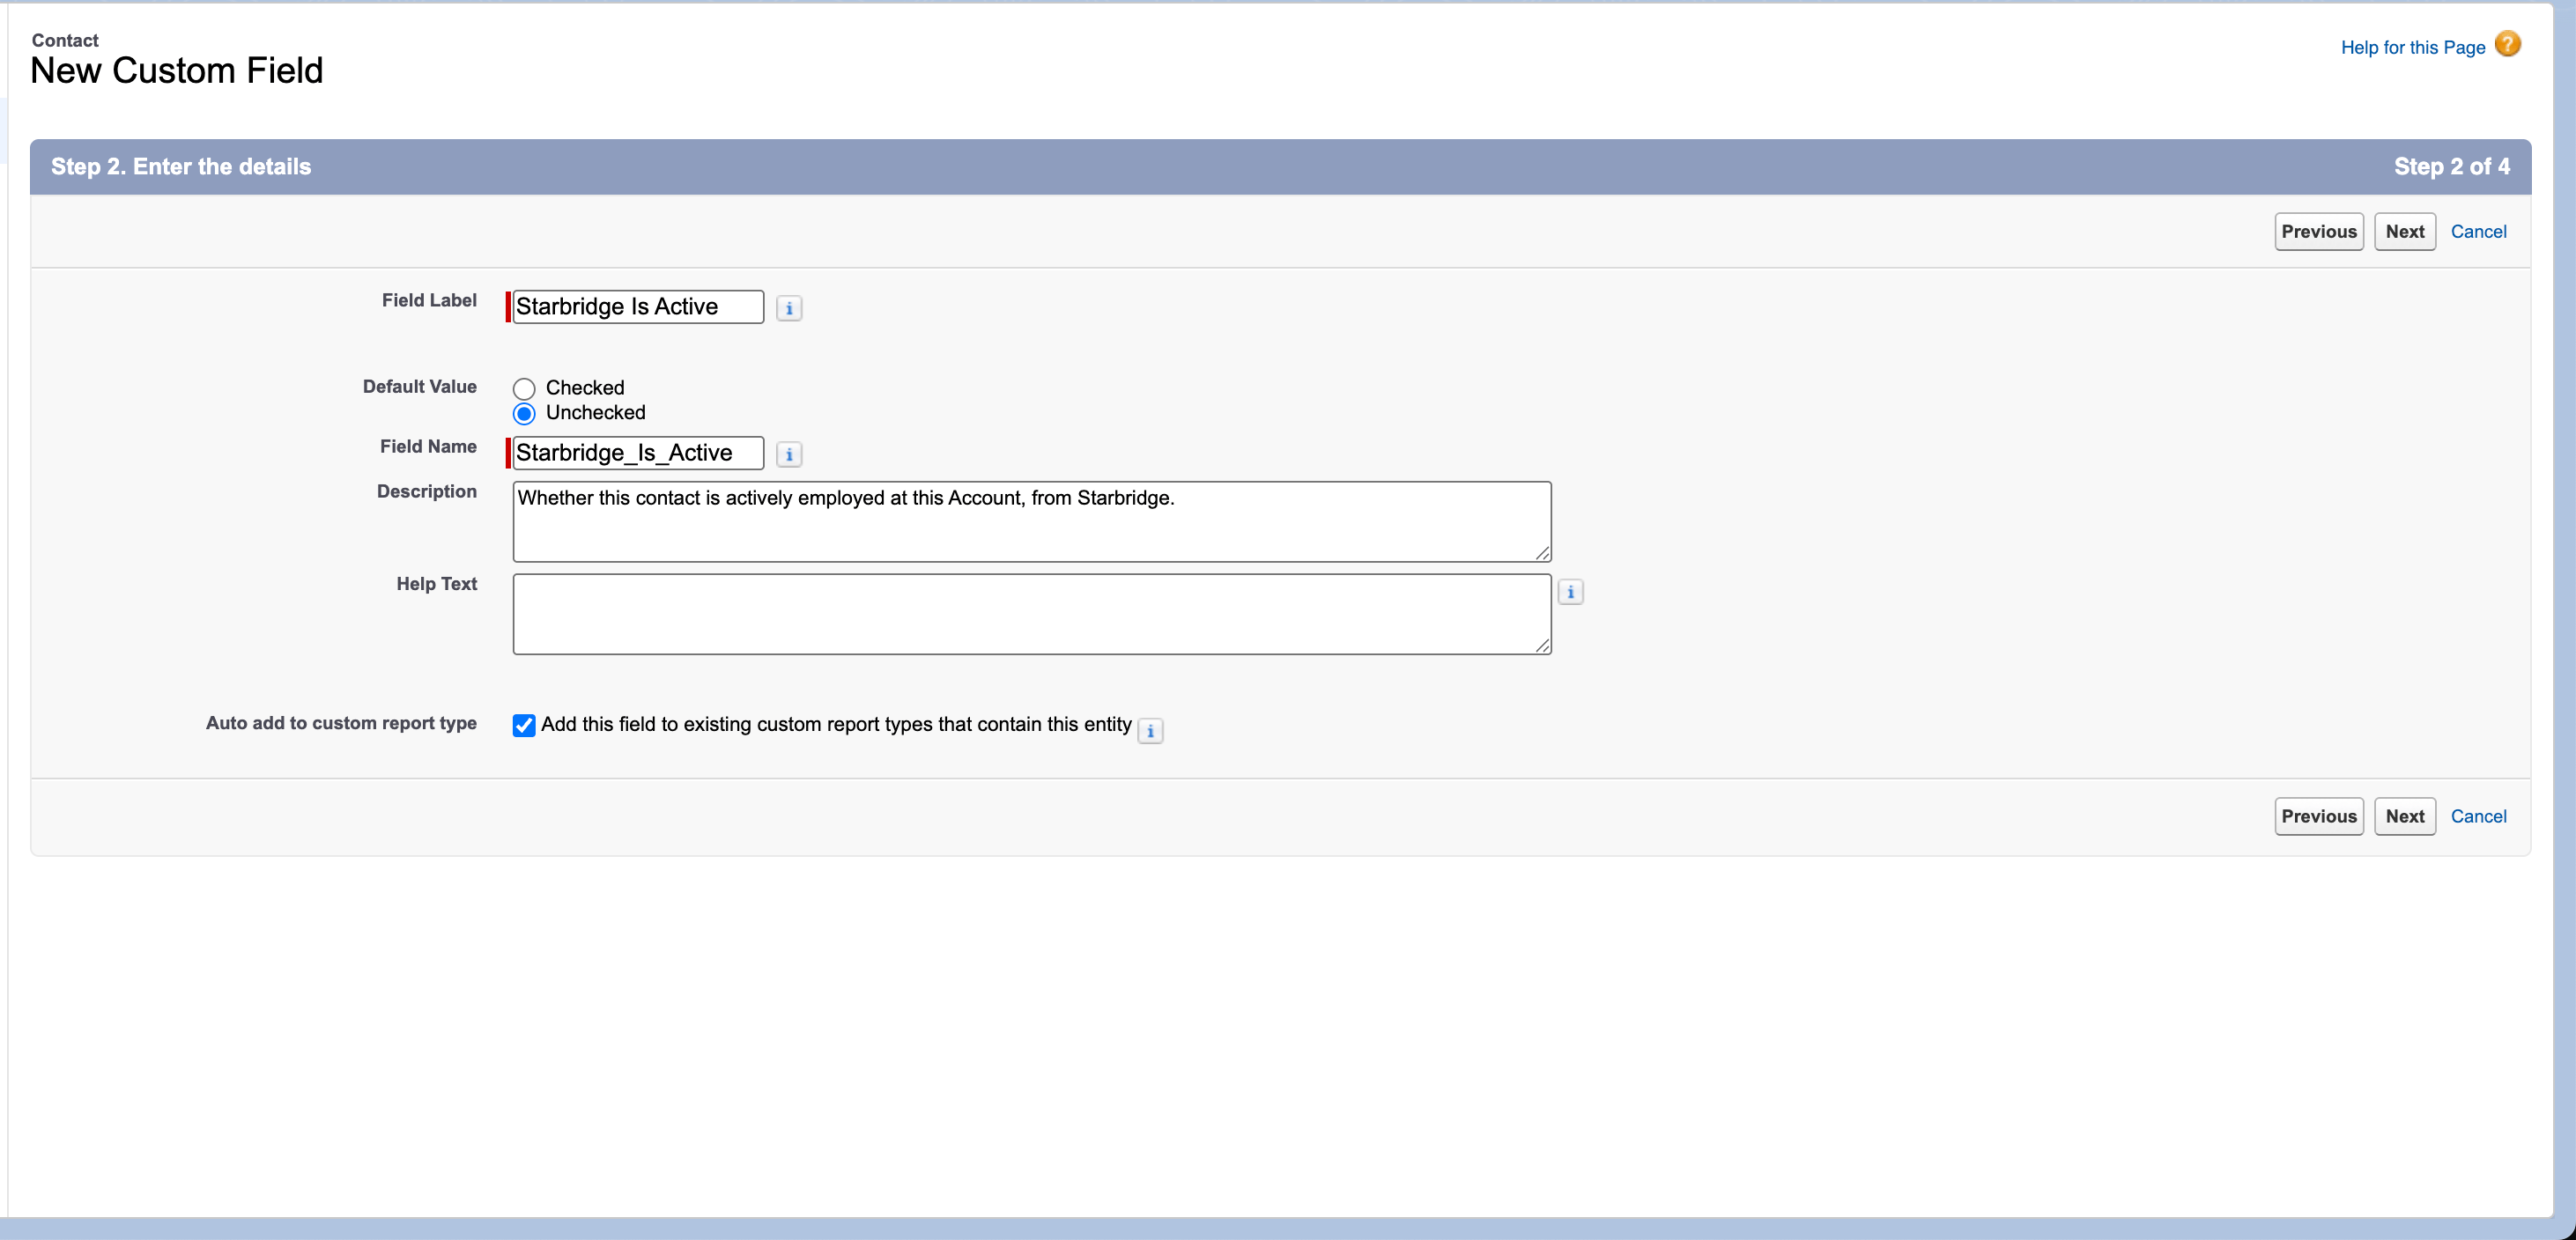
Salesforce automatically appends
__c to custom field API names (e.g. Starbridge_Contact_ID__c). This is expected.- Connect these fields to Starbridge
Go to Starbridge > Settings > Integrations > [your CRM integration] > Objects & fields. Click Refresh in the top right corner. Wait until the connection finishes refreshing (you will see the blue Refreshing icon in the top left change to a green Connected icon once it’s done), which will let Starbridge know you created the two new custom fields. Then, toggle on the two new fields on the Contact object and click Save changes.
Once your changes are saved and synced: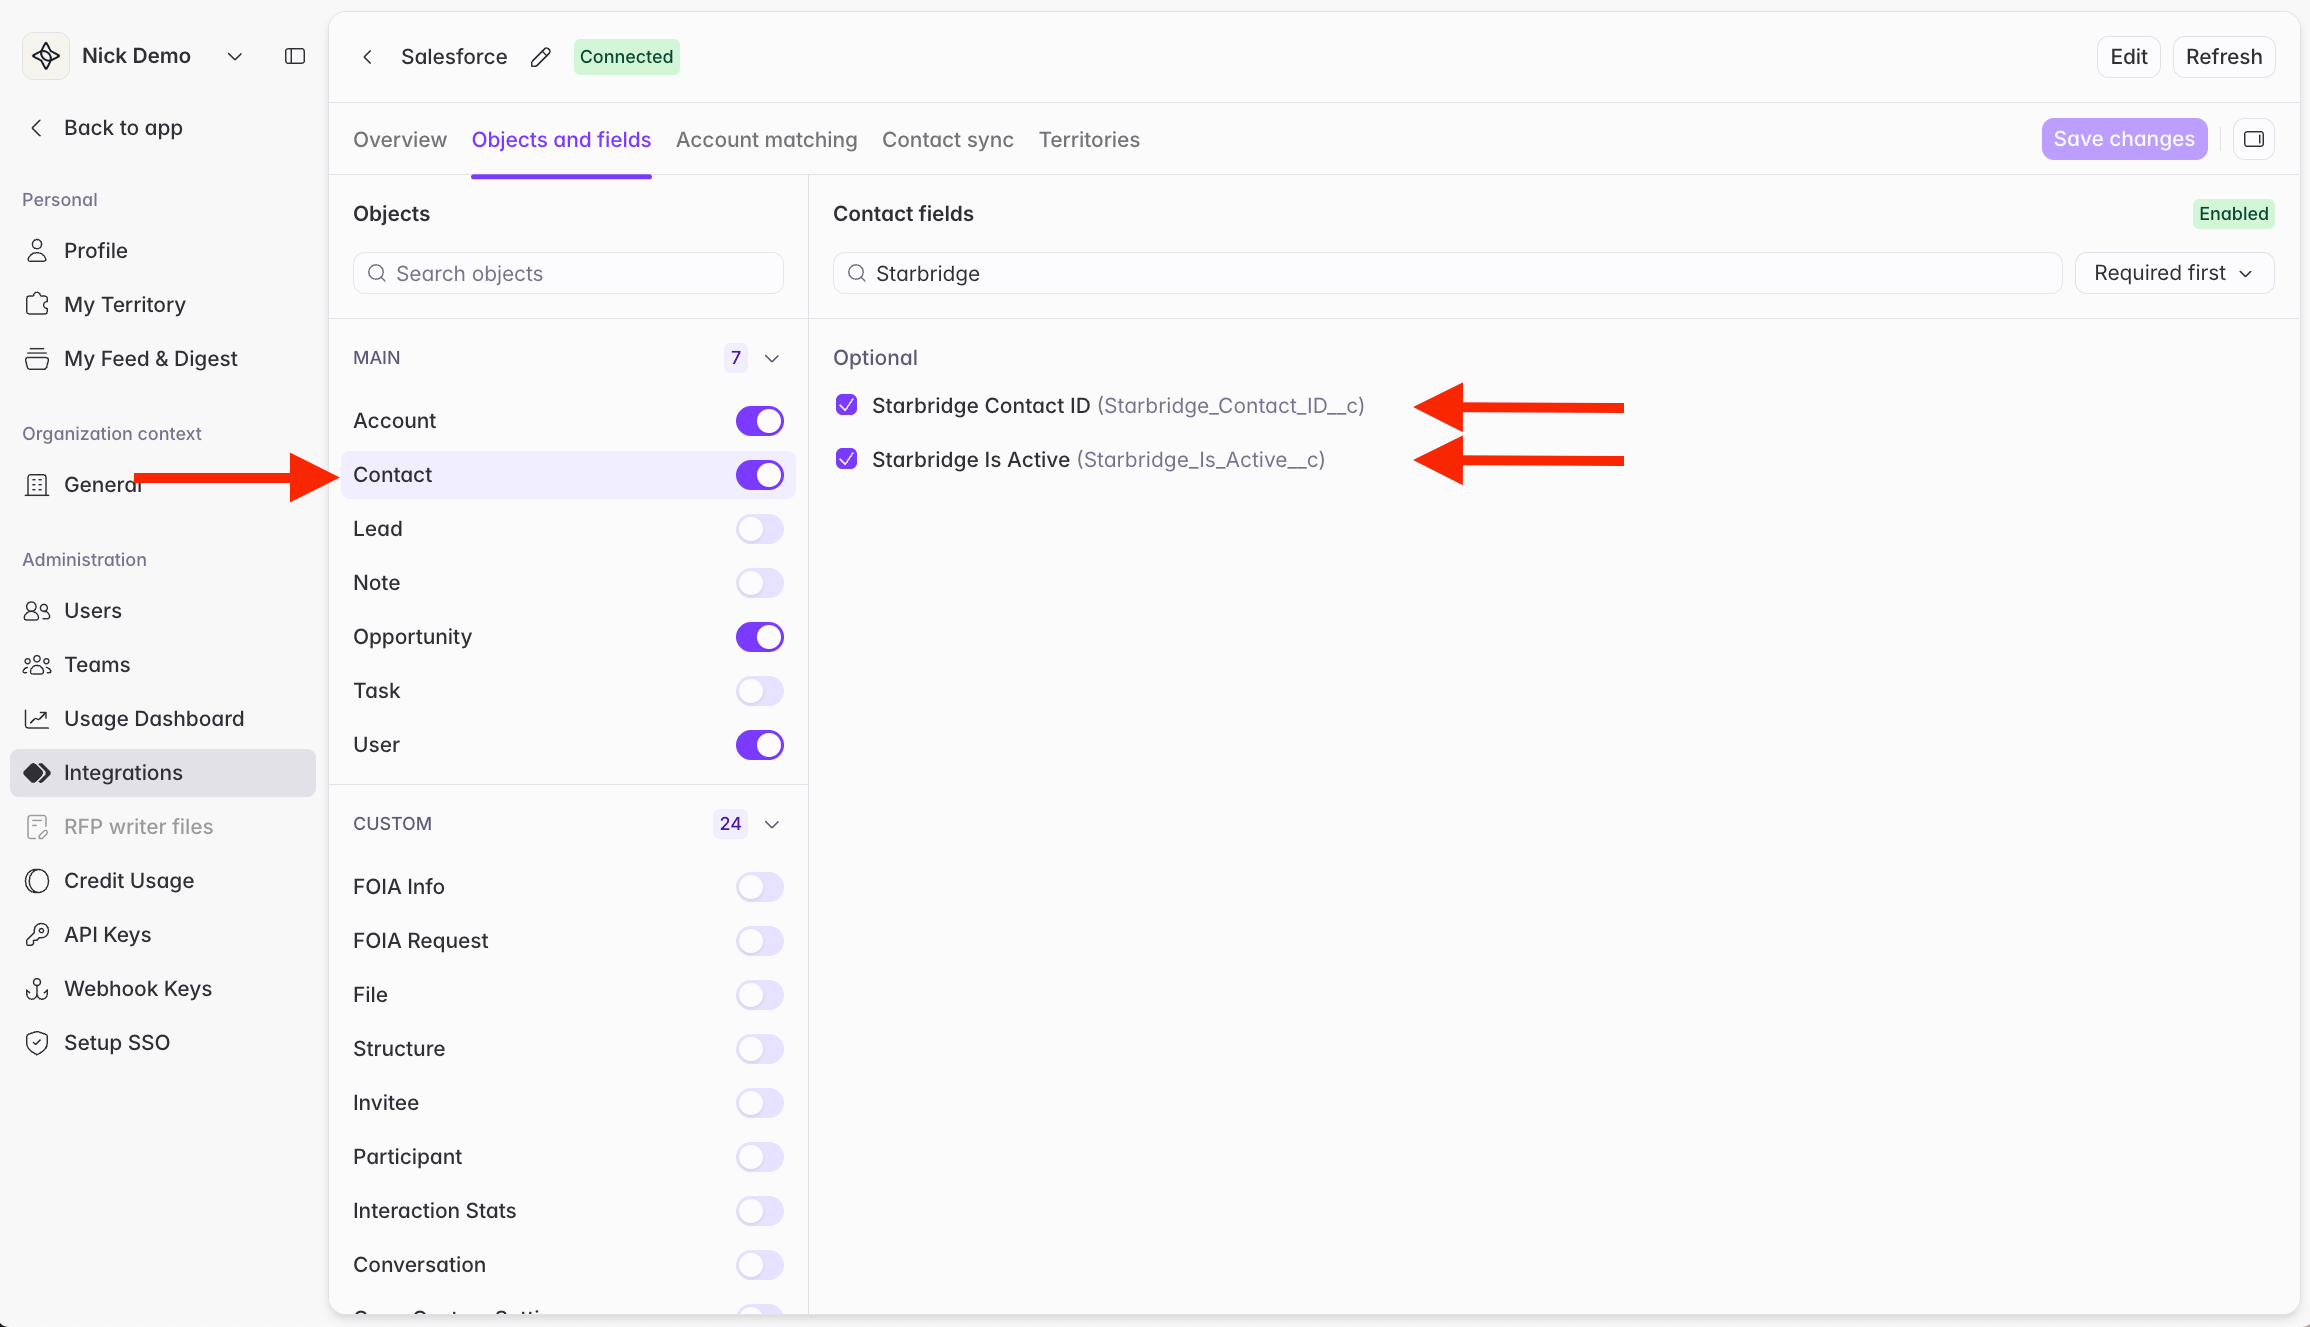
- If you are in the process of configuring contact sync, continue to Contact sync.
- If you are working through your initial CRM integration setup, proceed to the next step on this page.
Step-by-step instructions for HubSpot
Step-by-step instructions for HubSpot
Before connecting Starbridge to HubSpot, you need to create two custom properties on the Contact object to store Starbridge data.
- In HubSpot, go to Settings (Gear icon ⚙) → Properties
- In the Select an object dropdown, select Contact properties, then click Create property (top right)
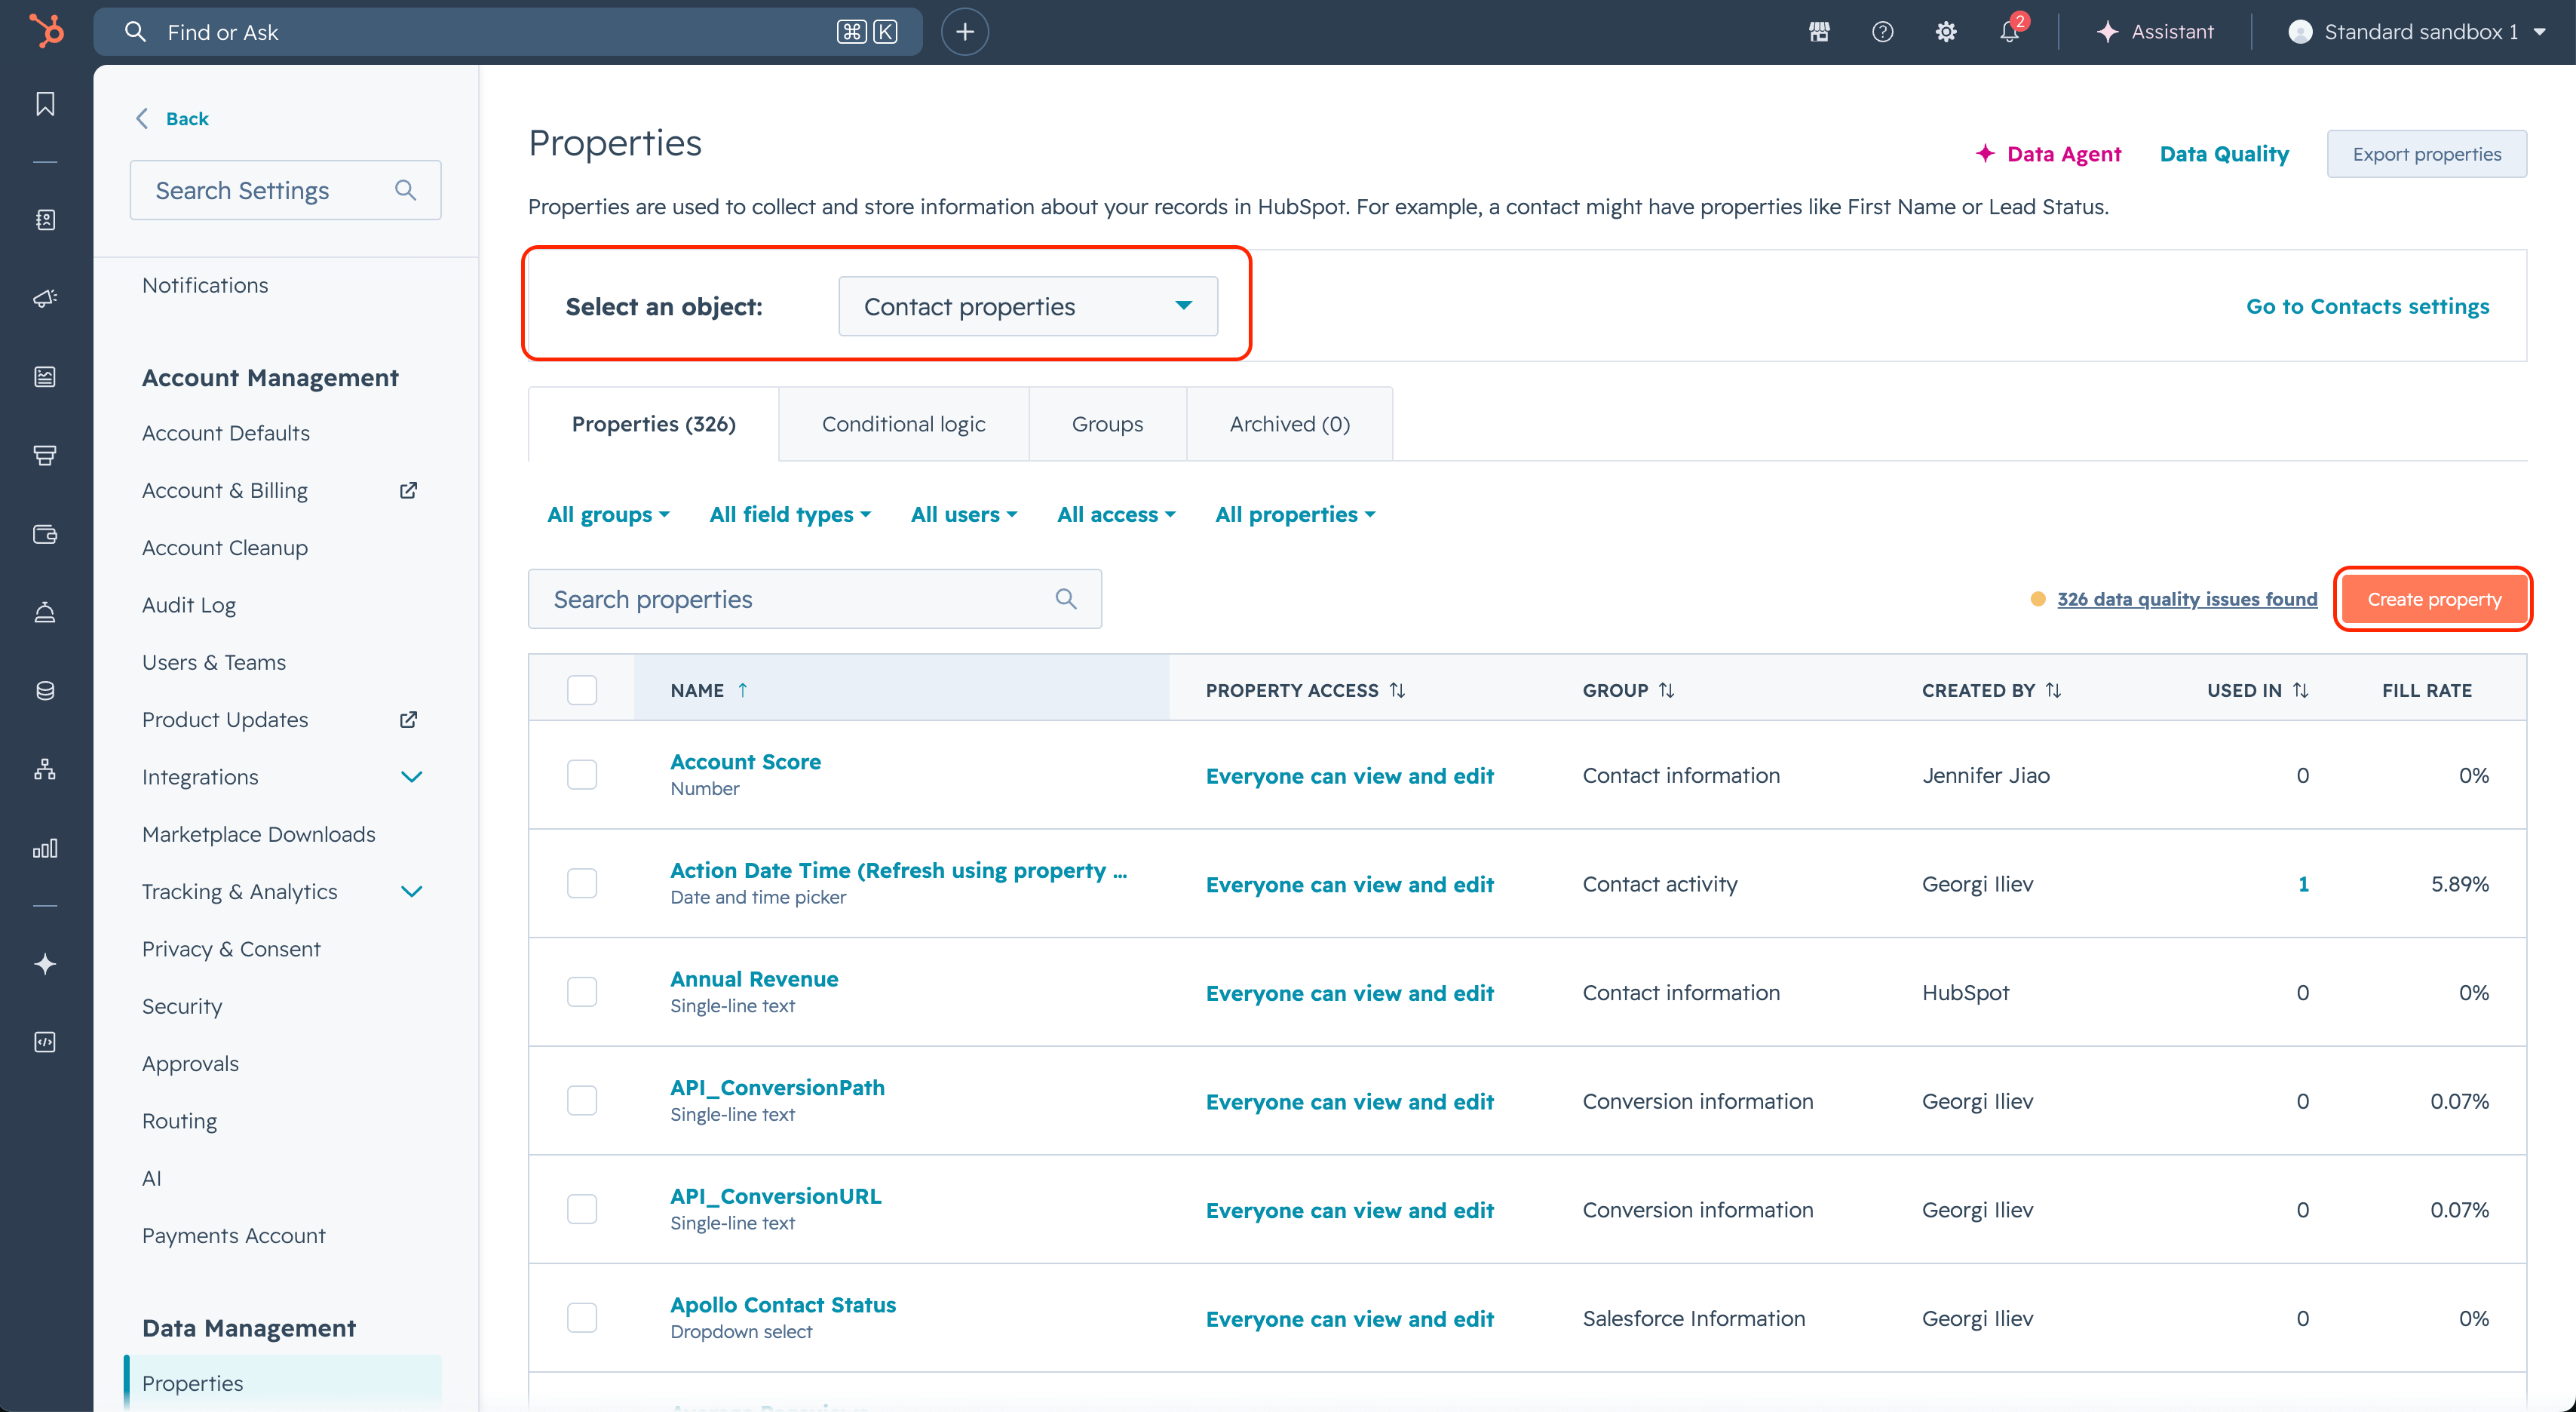
- Create the first property — Starbridge Contact ID:
- Create the second property — Starbridge Is Active:
- Connect these fields to Starbridge
Go to Starbridge > Settings > Integrations > [your CRM integration] > Objects & fields. Click Refresh in the top right corner. Wait until the connection finishes refreshing (you will see the blue Refreshing icon in the top left change to a green Connected icon once it’s done), which will let Starbridge know you created the two new custom fields. Then, toggle on the two new fields on the Contact object and click Save changes.
Once your changes are saved and synced: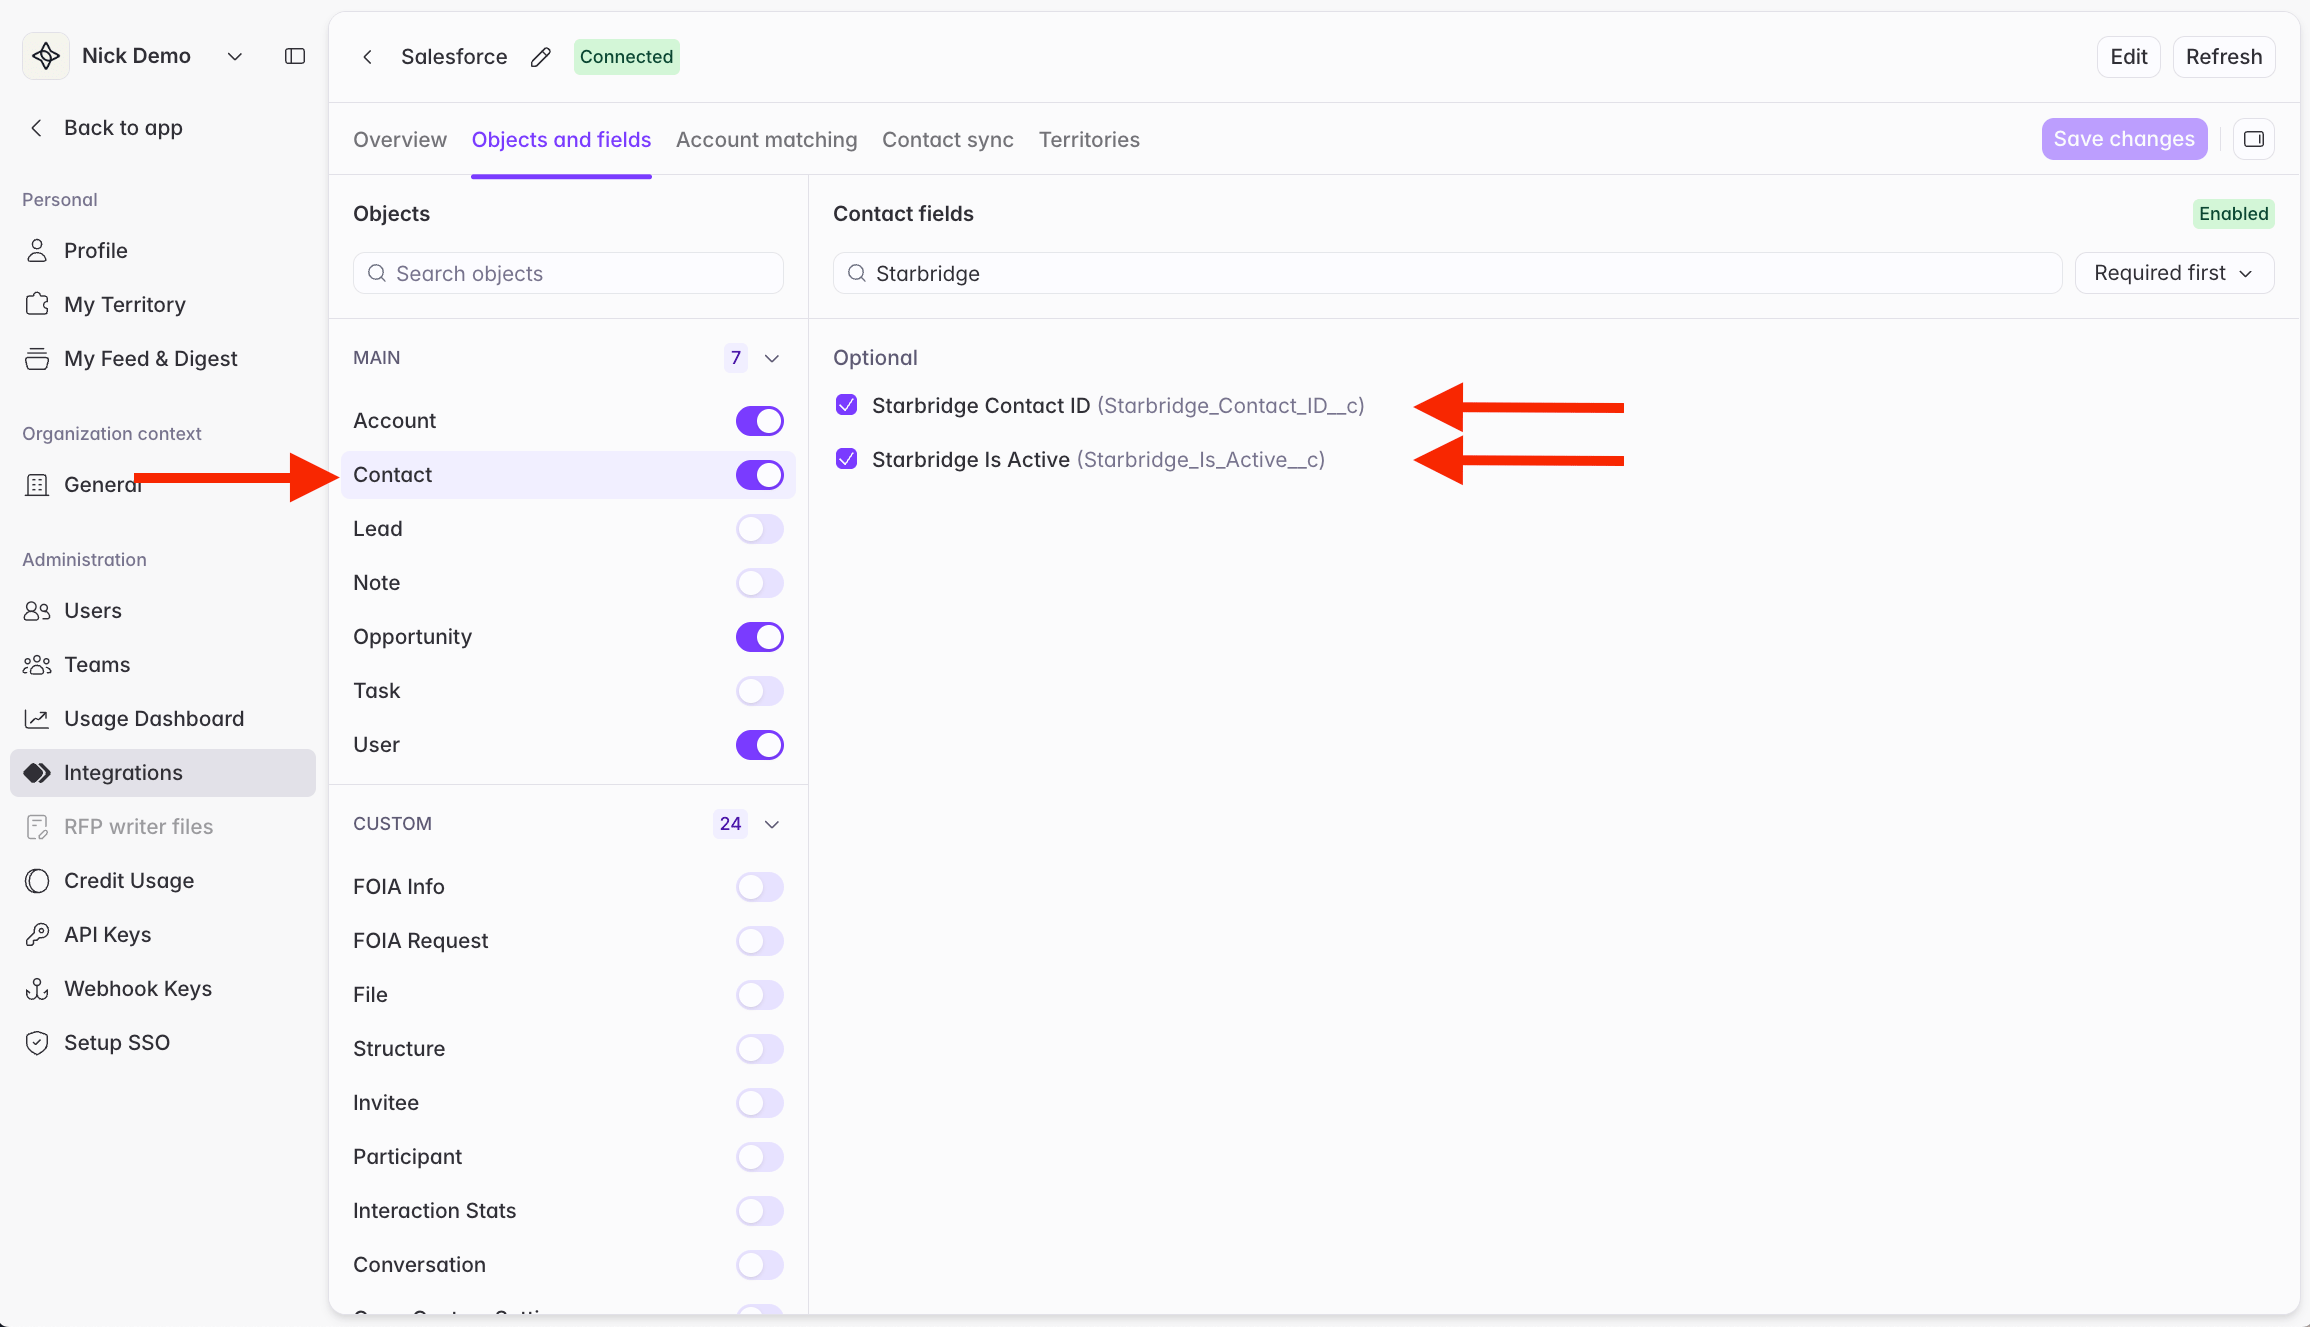
- If you are in the process of configuring contact sync, continue to Contact sync.
- If you are working through your initial CRM integration setup, proceed to the next step on this page.
2
Choose who will connect your CRM
The Salesforce or HubSpot account used to connect Starbridge to your CRM determines who owns the integration.Salesforce: We strongly recommend creating a dedicated API-only integration user rather than connecting as a personal admin account. This keeps your audit trail clean (all Starbridge writes are attributed to one system user, not a person), limits permissions to only what Starbridge needs, and ensures the connection isn’t disrupted by team changes.HubSpot: HubSpot’s OAuth model ties the connection to the account rather than an individual user, so there’s no equivalent integration user setup.
Step-by-step instructions for Salesforce
Step-by-step instructions for Salesforce
We strongly recommend connecting Starbridge using a dedicated API-only integration user rather than a personal admin account. This allows you to easily track Starbridge’s changes, retain the ability to roll back changes easily, and scope permissions to only what Starbridge needs. Most Salesforce Enterprise, Unlimited, and Performance orgs include up to 5 free Salesforce Integration user licenses.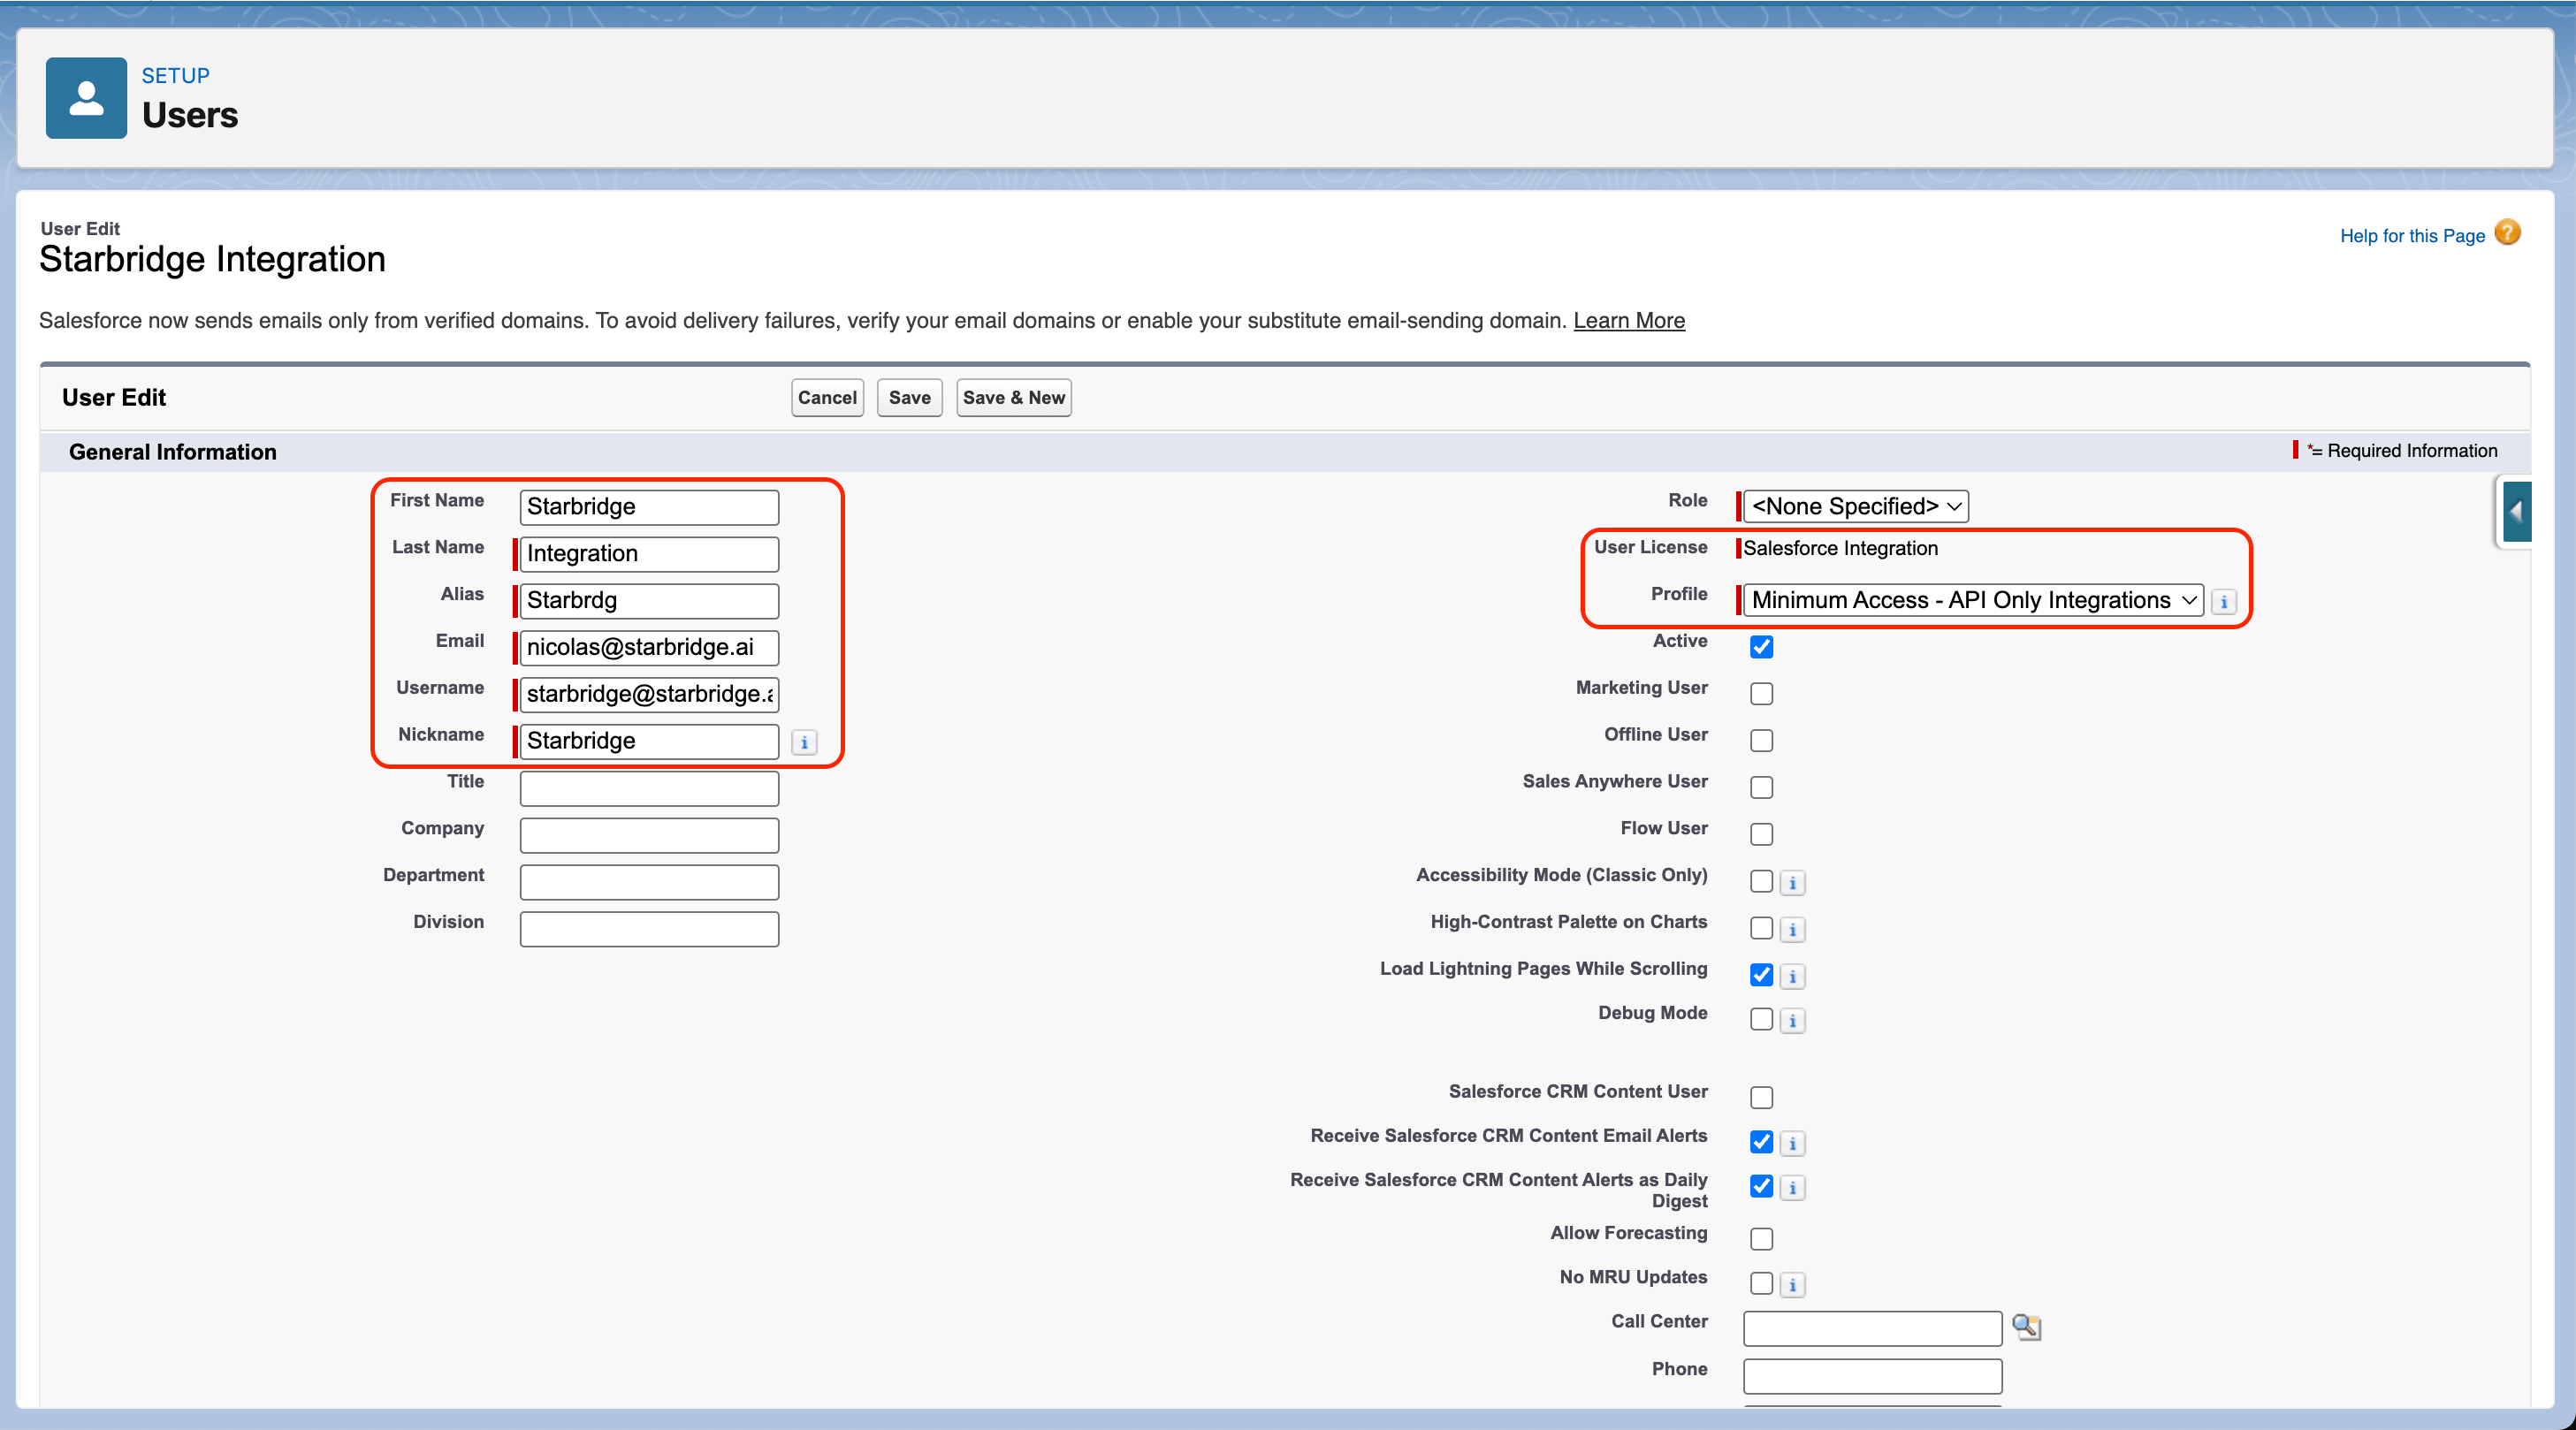
Click Save. Check your email and verify the new integration user account in the Salesforce verification email.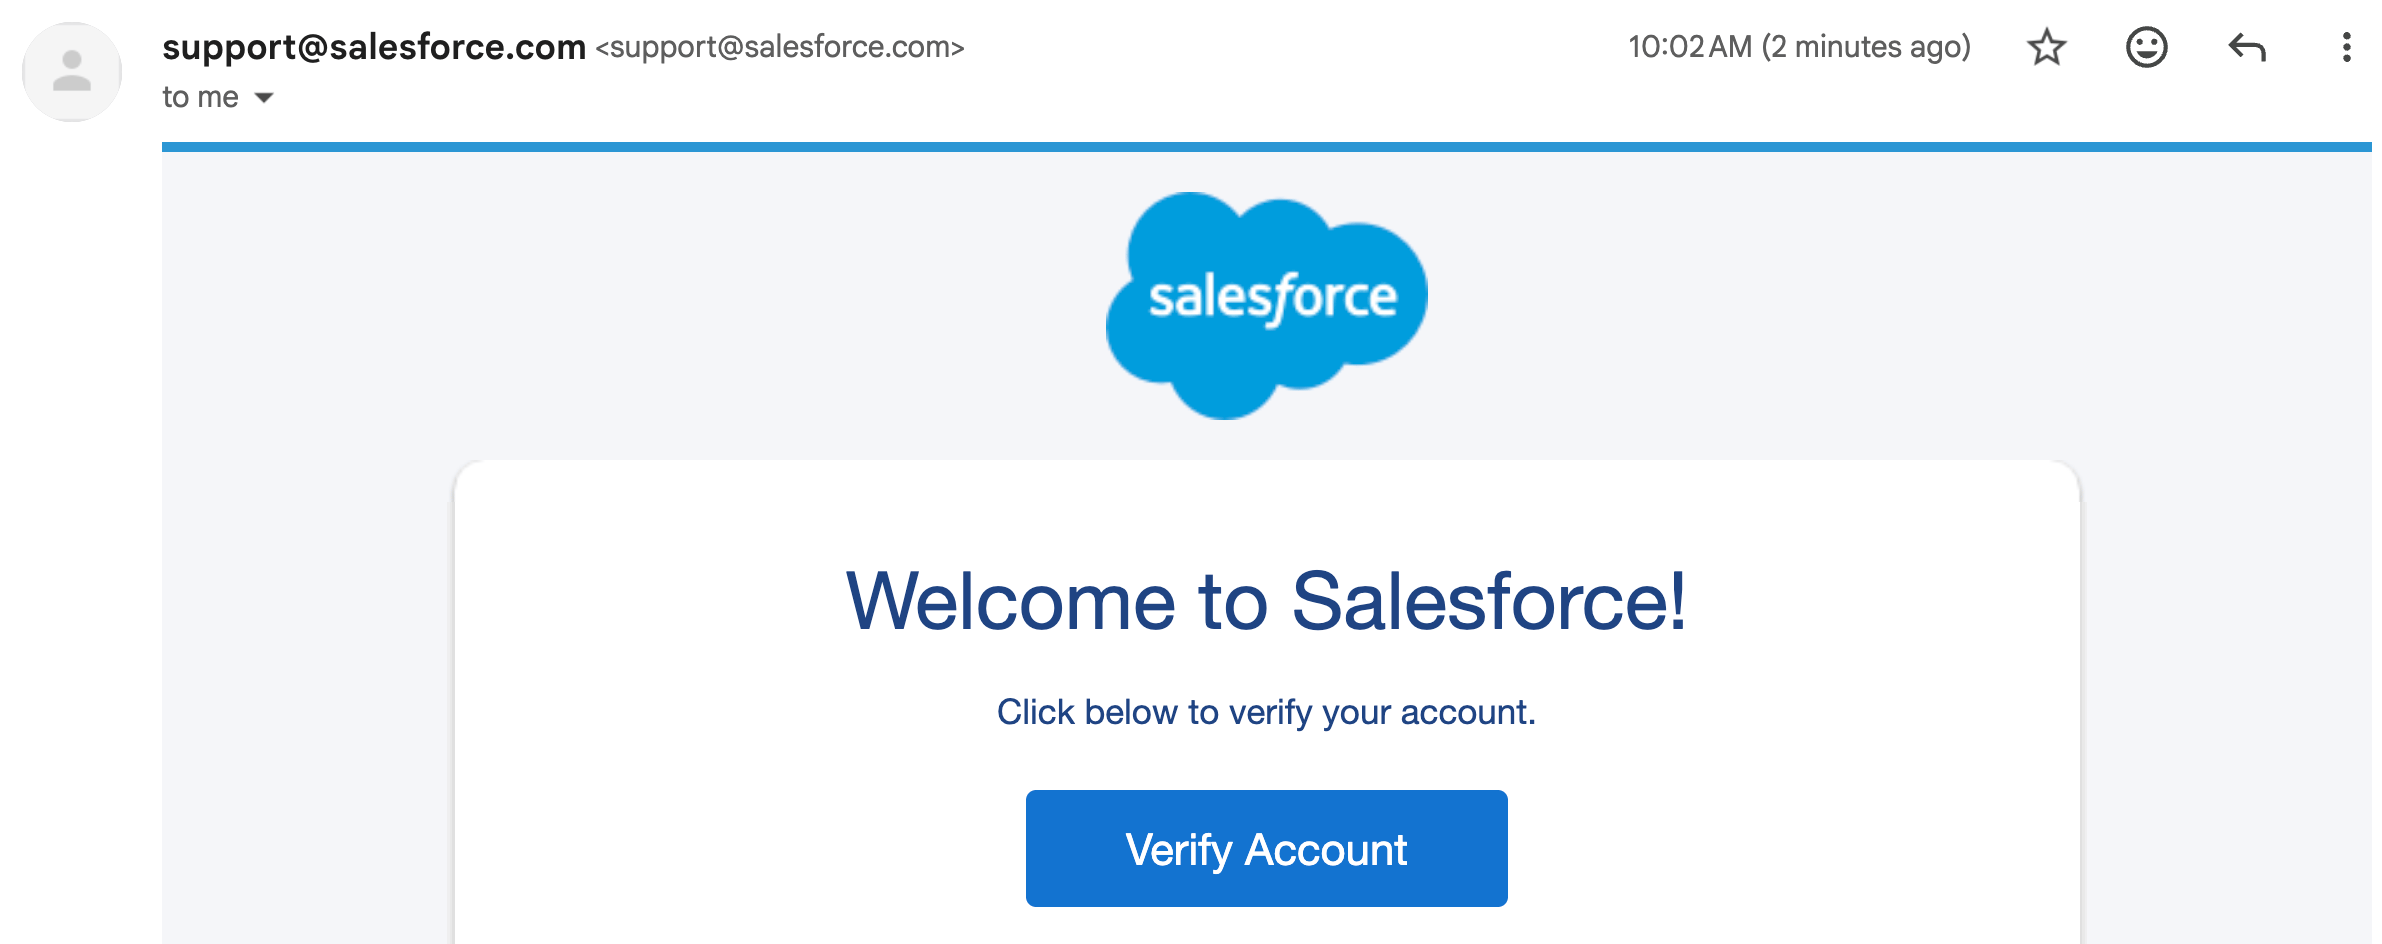
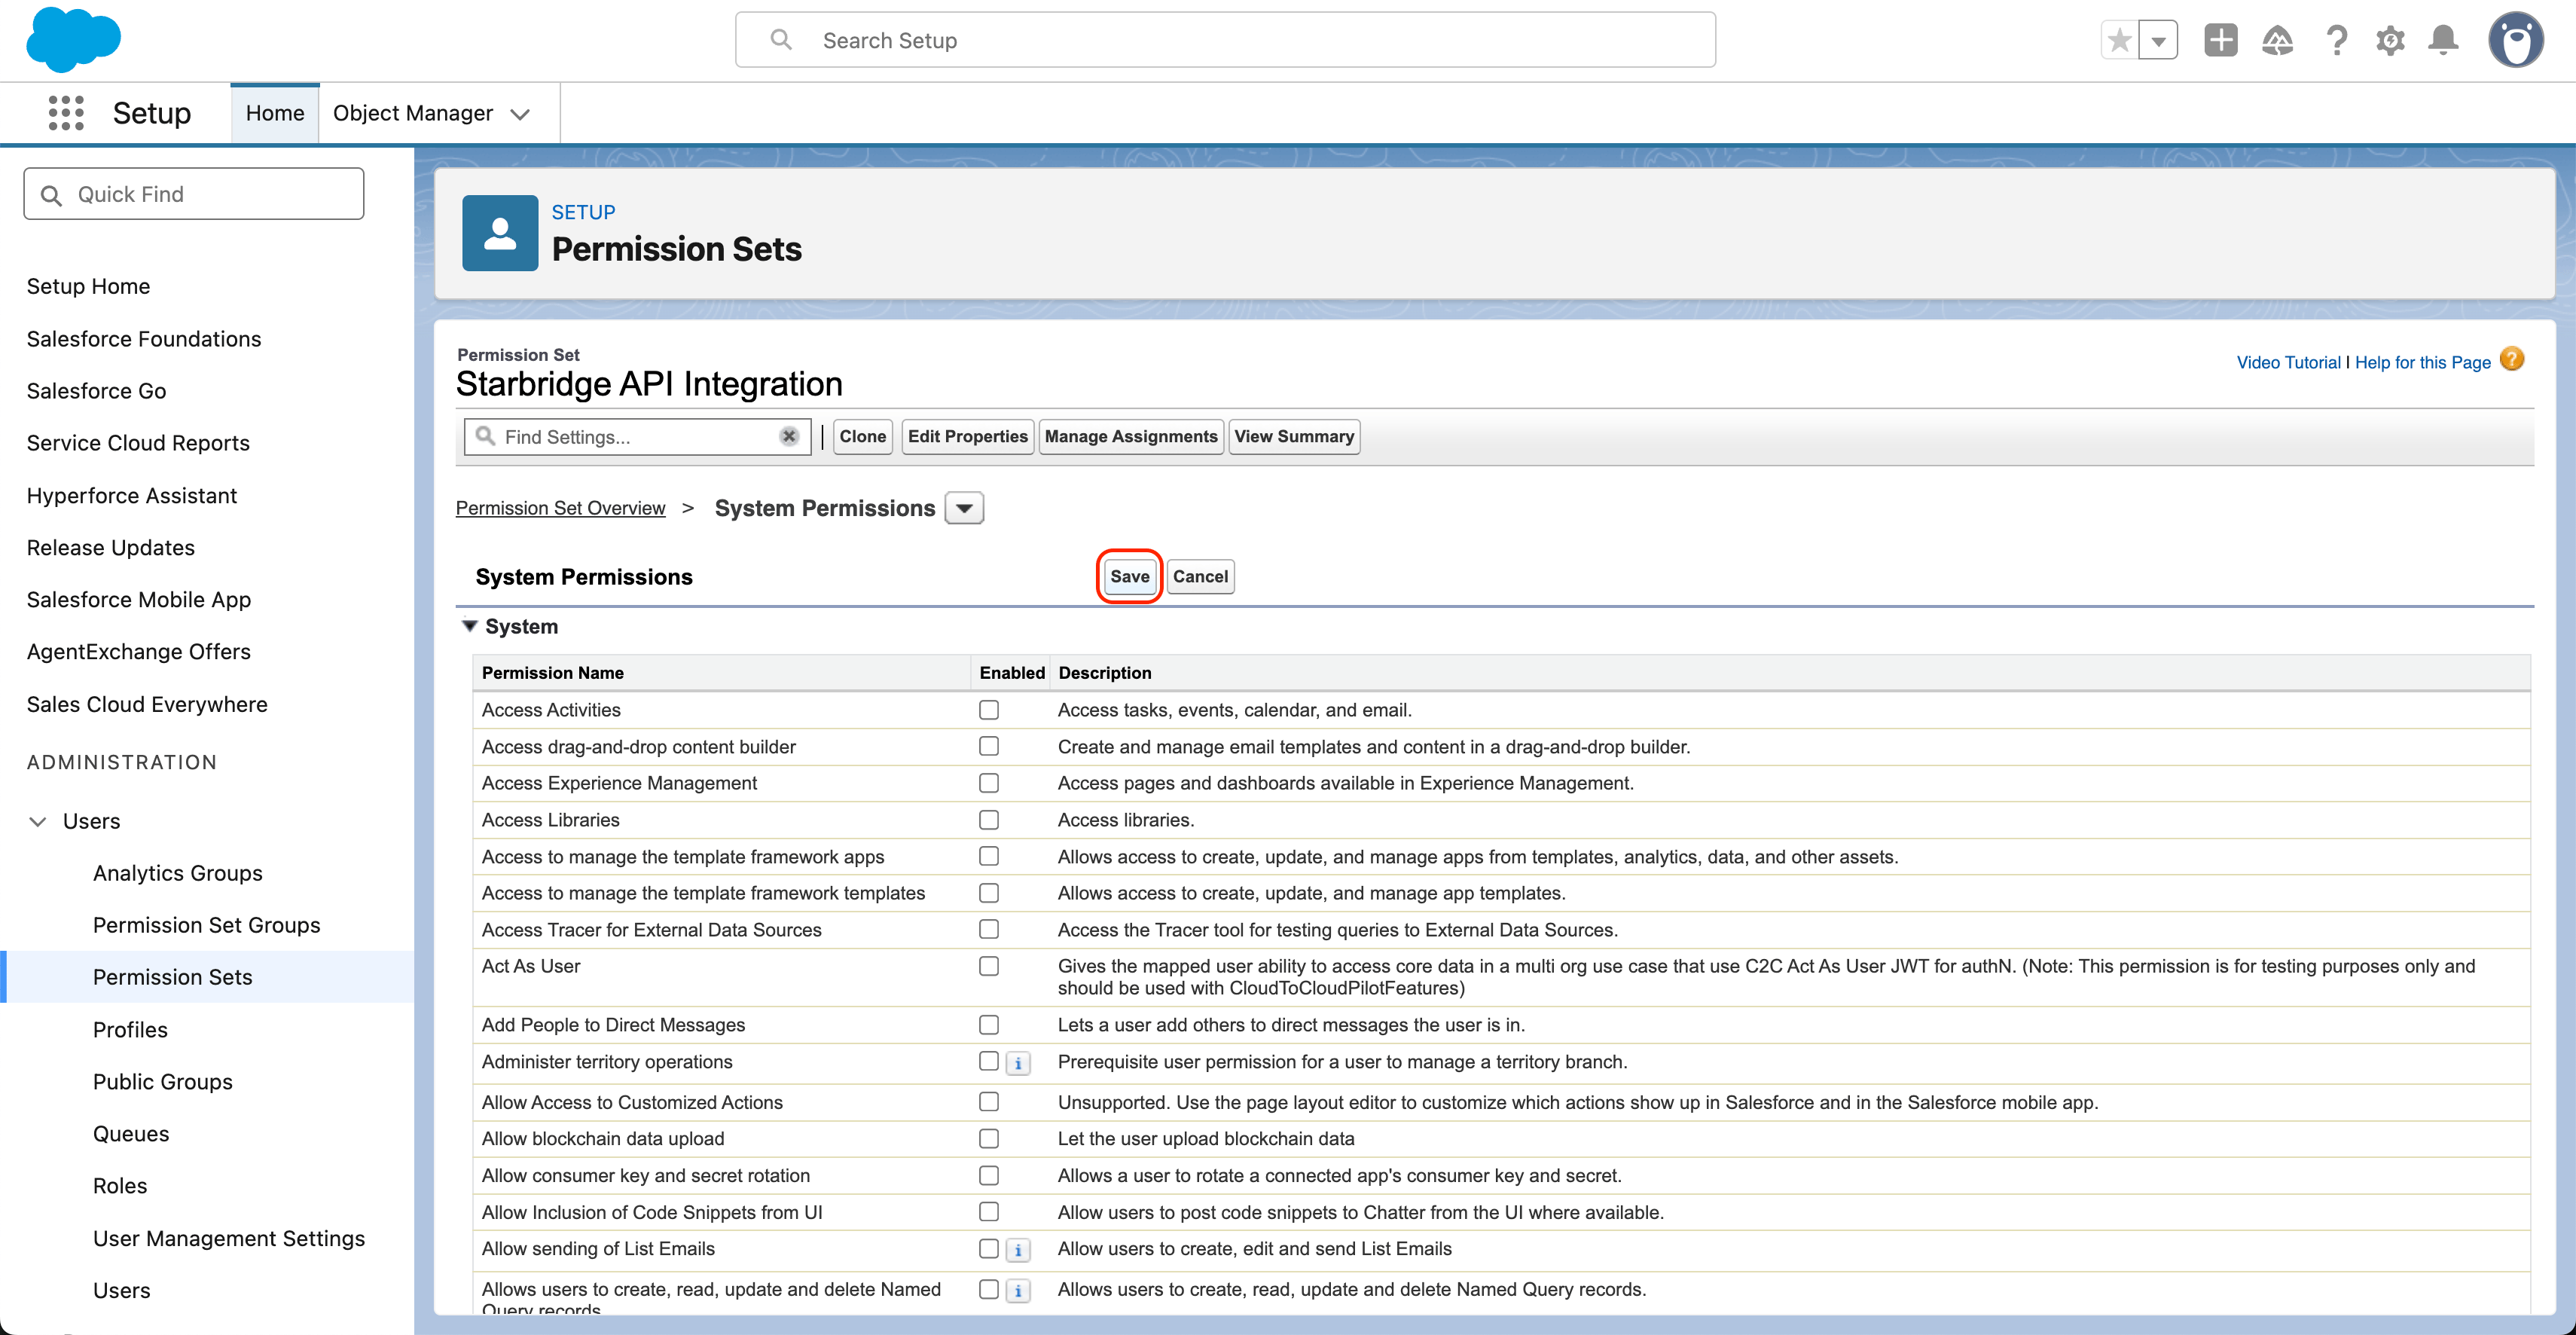
- In Salesforce, click the Gear icon (⚙) → Setup\
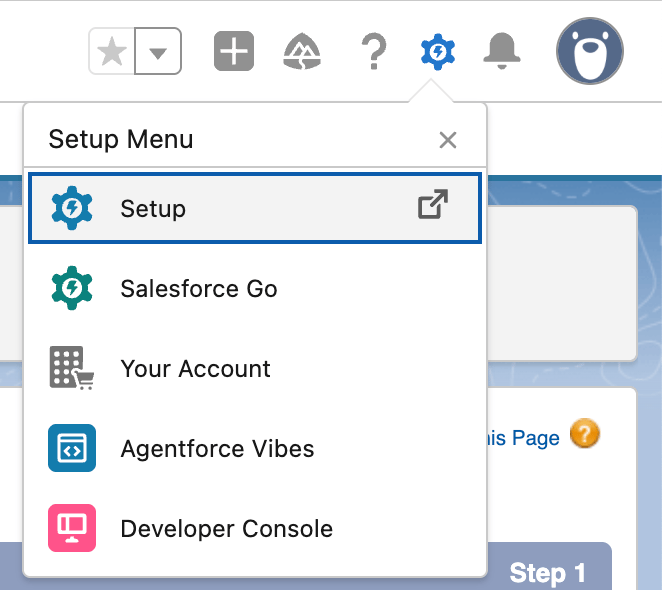
- Navigate to Users → Users → click New User and fill in the required fields:\
Click Save. Check your email and verify the new integration user account in the Salesforce verification email.
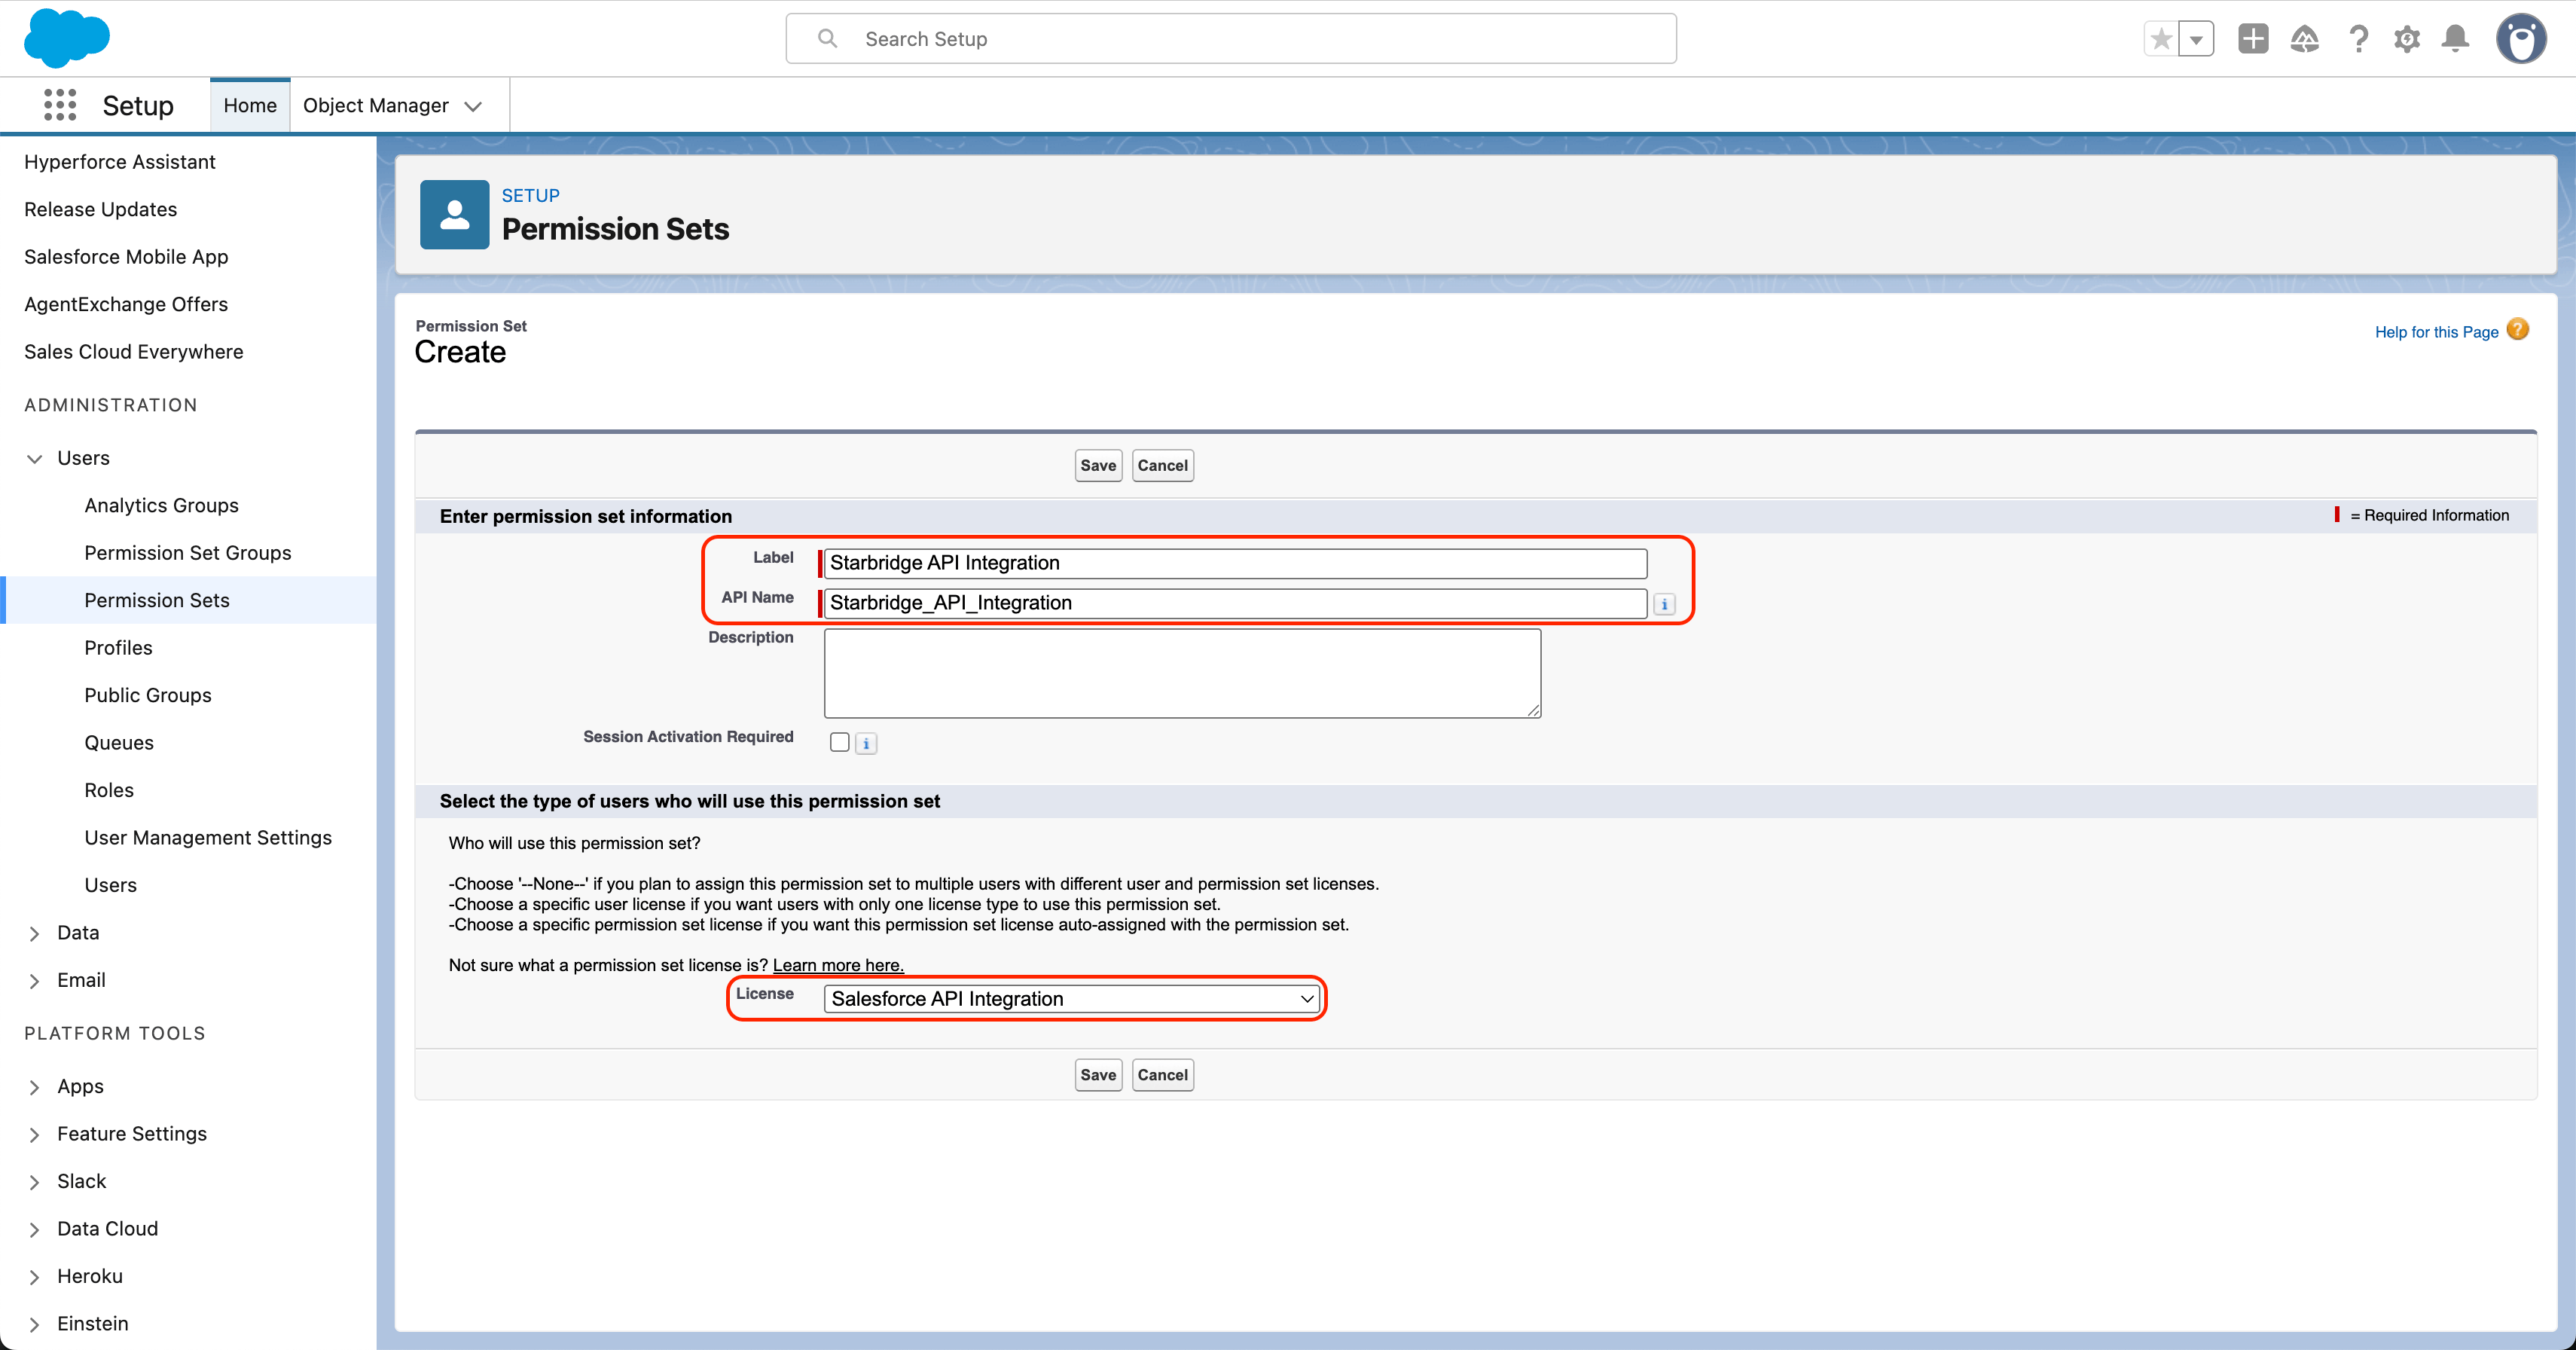
- Create a Permission Set for the integration user:
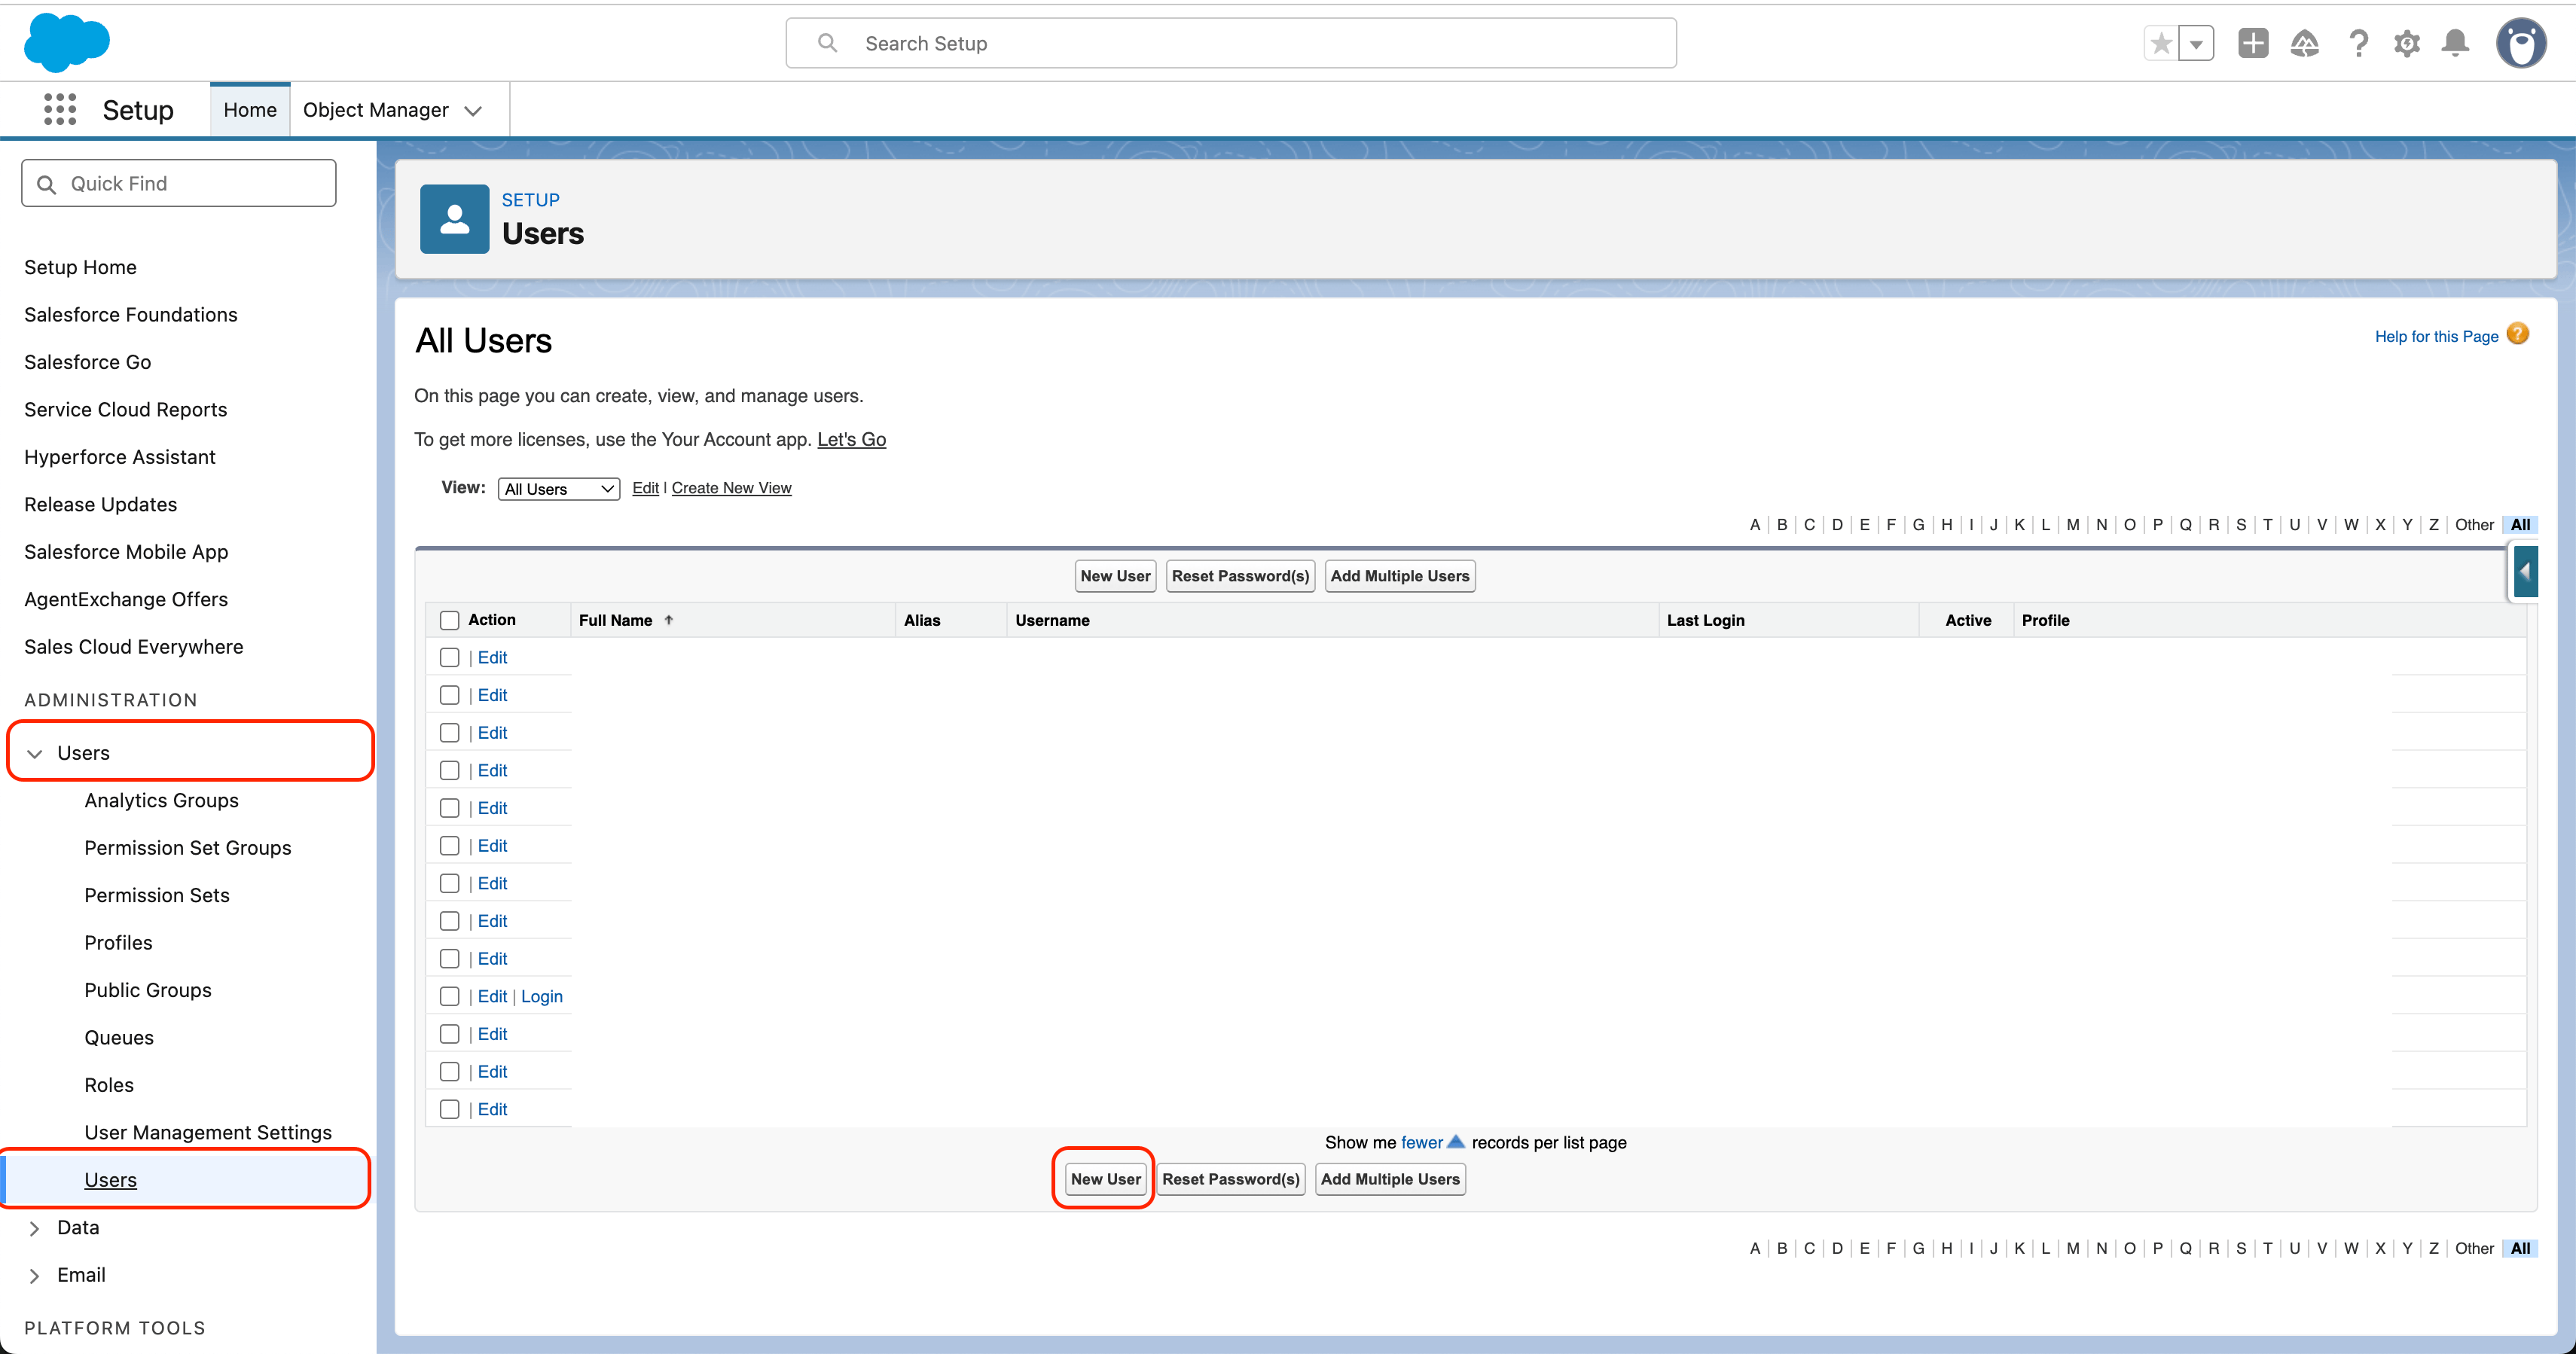
- Go to Setup → Permission Sets → New
- Label: Starbridge API Integration
- License: Salesforce API Integration
- Click Save
- Go to Setup → Permission Sets → New
- In the Permission Set named Starbridge API Integration, open Object Settings and enable at minimum:
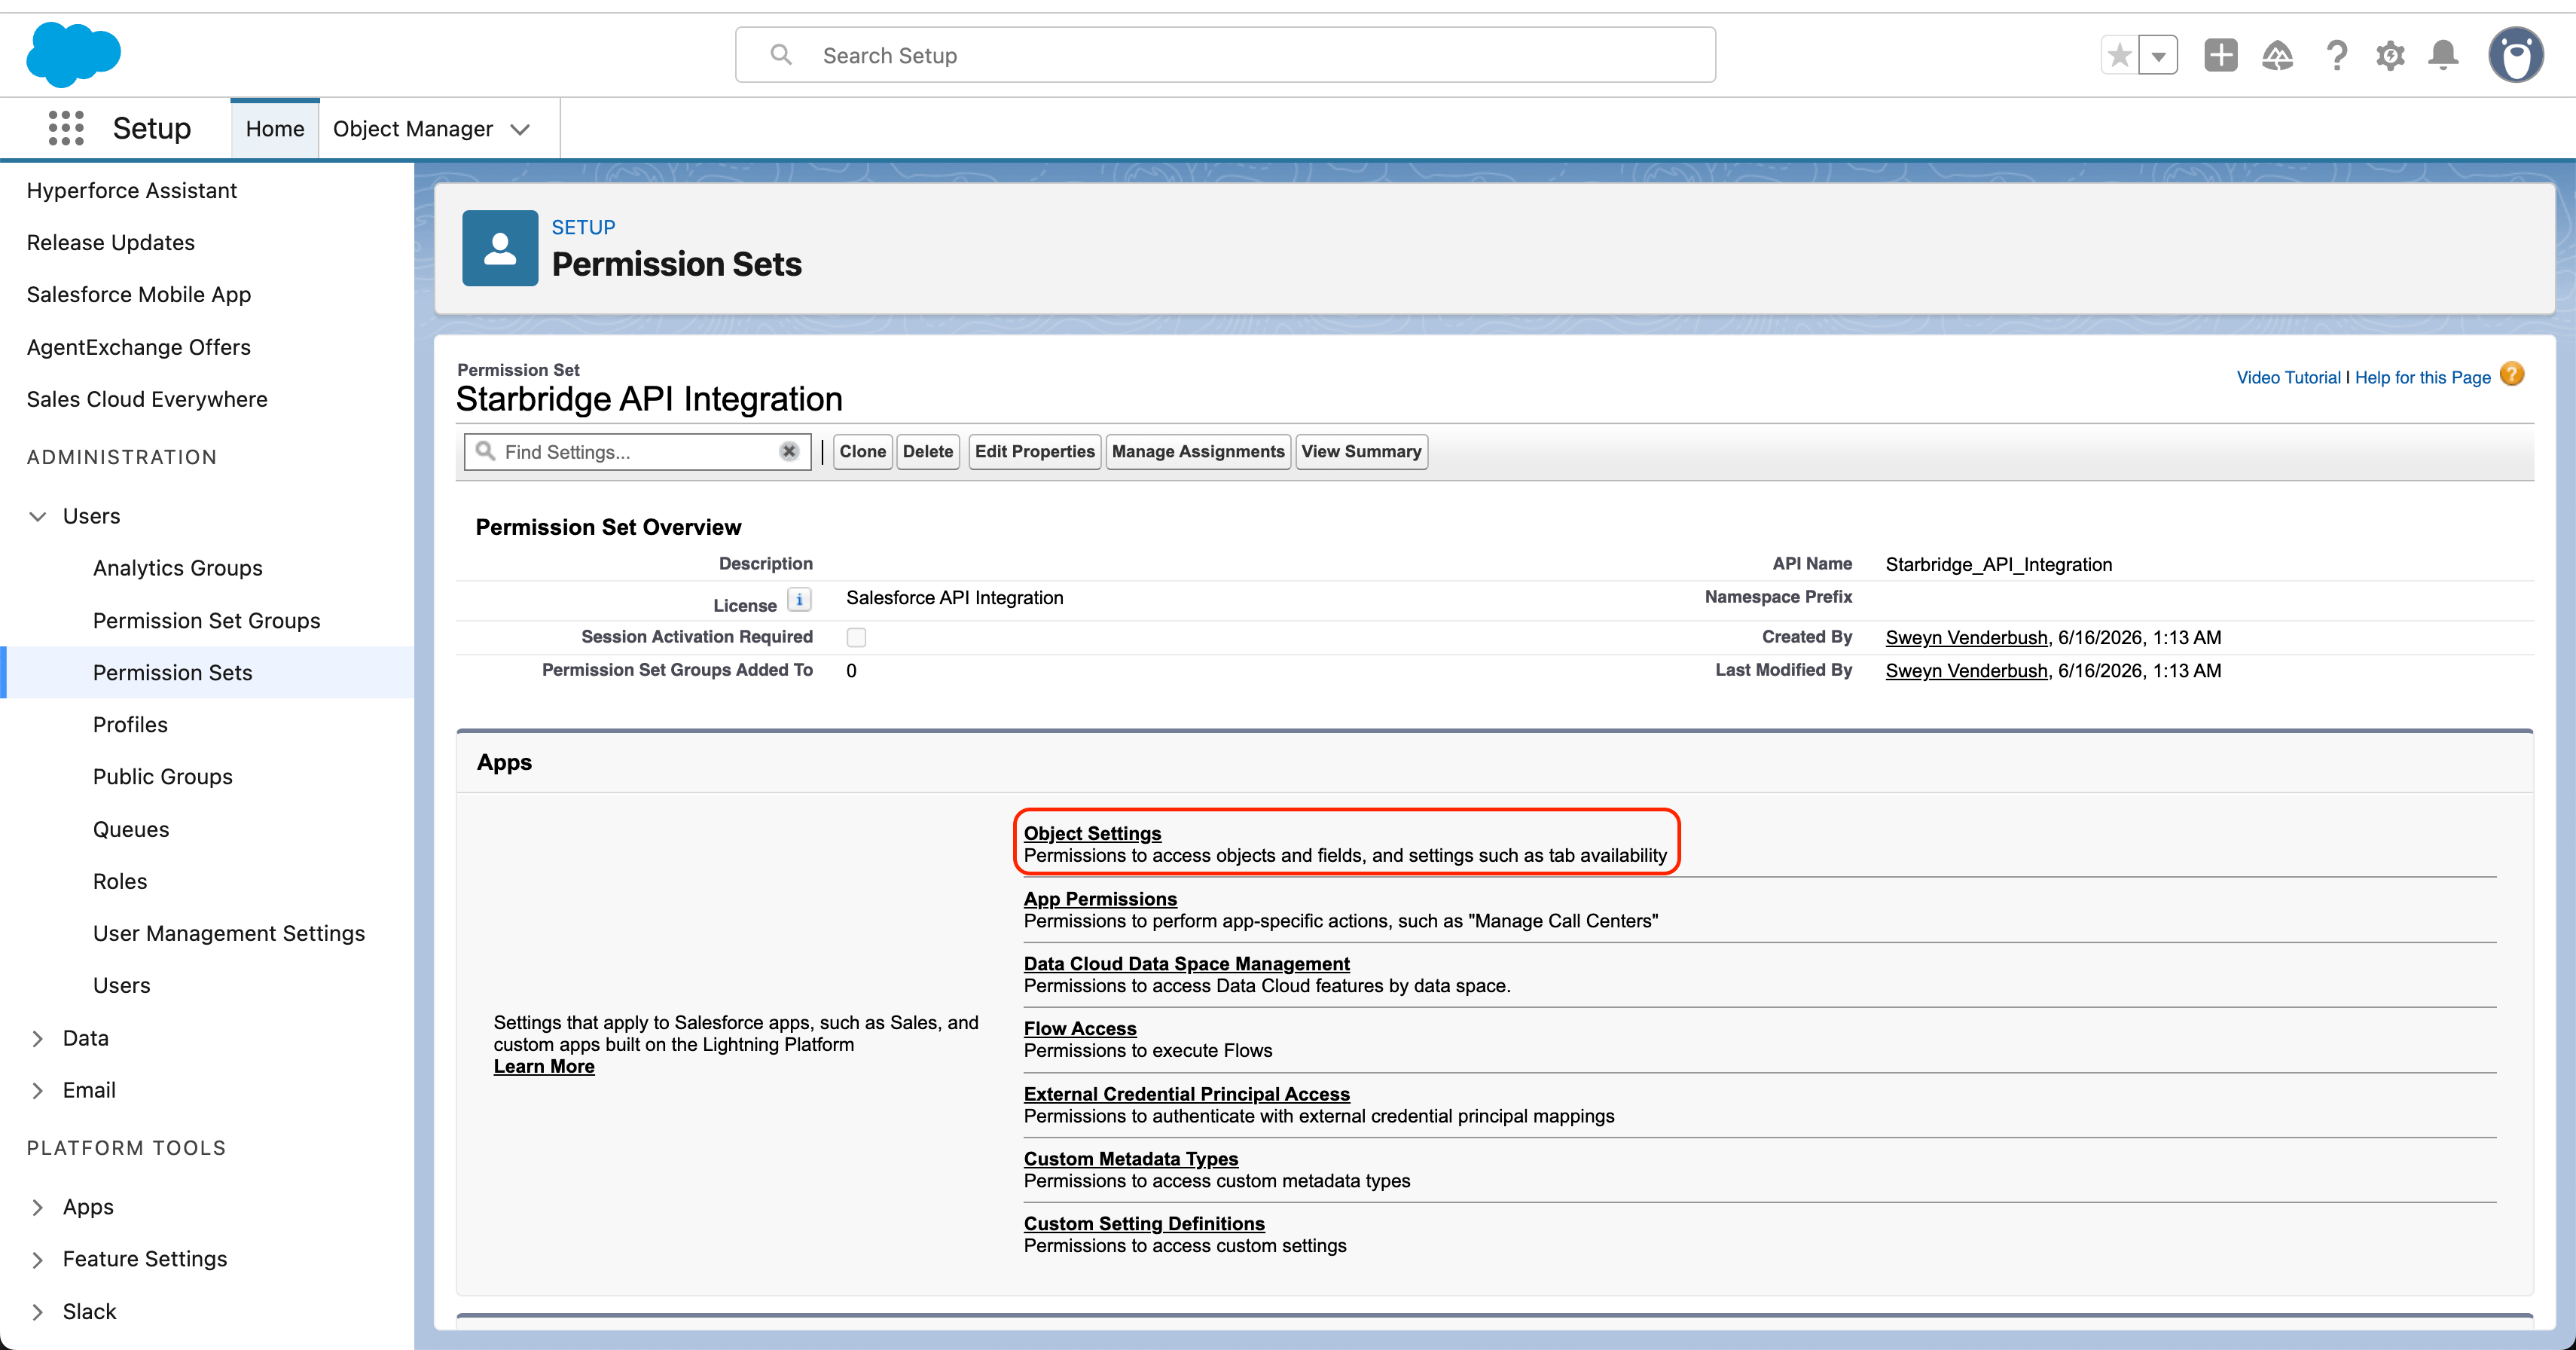
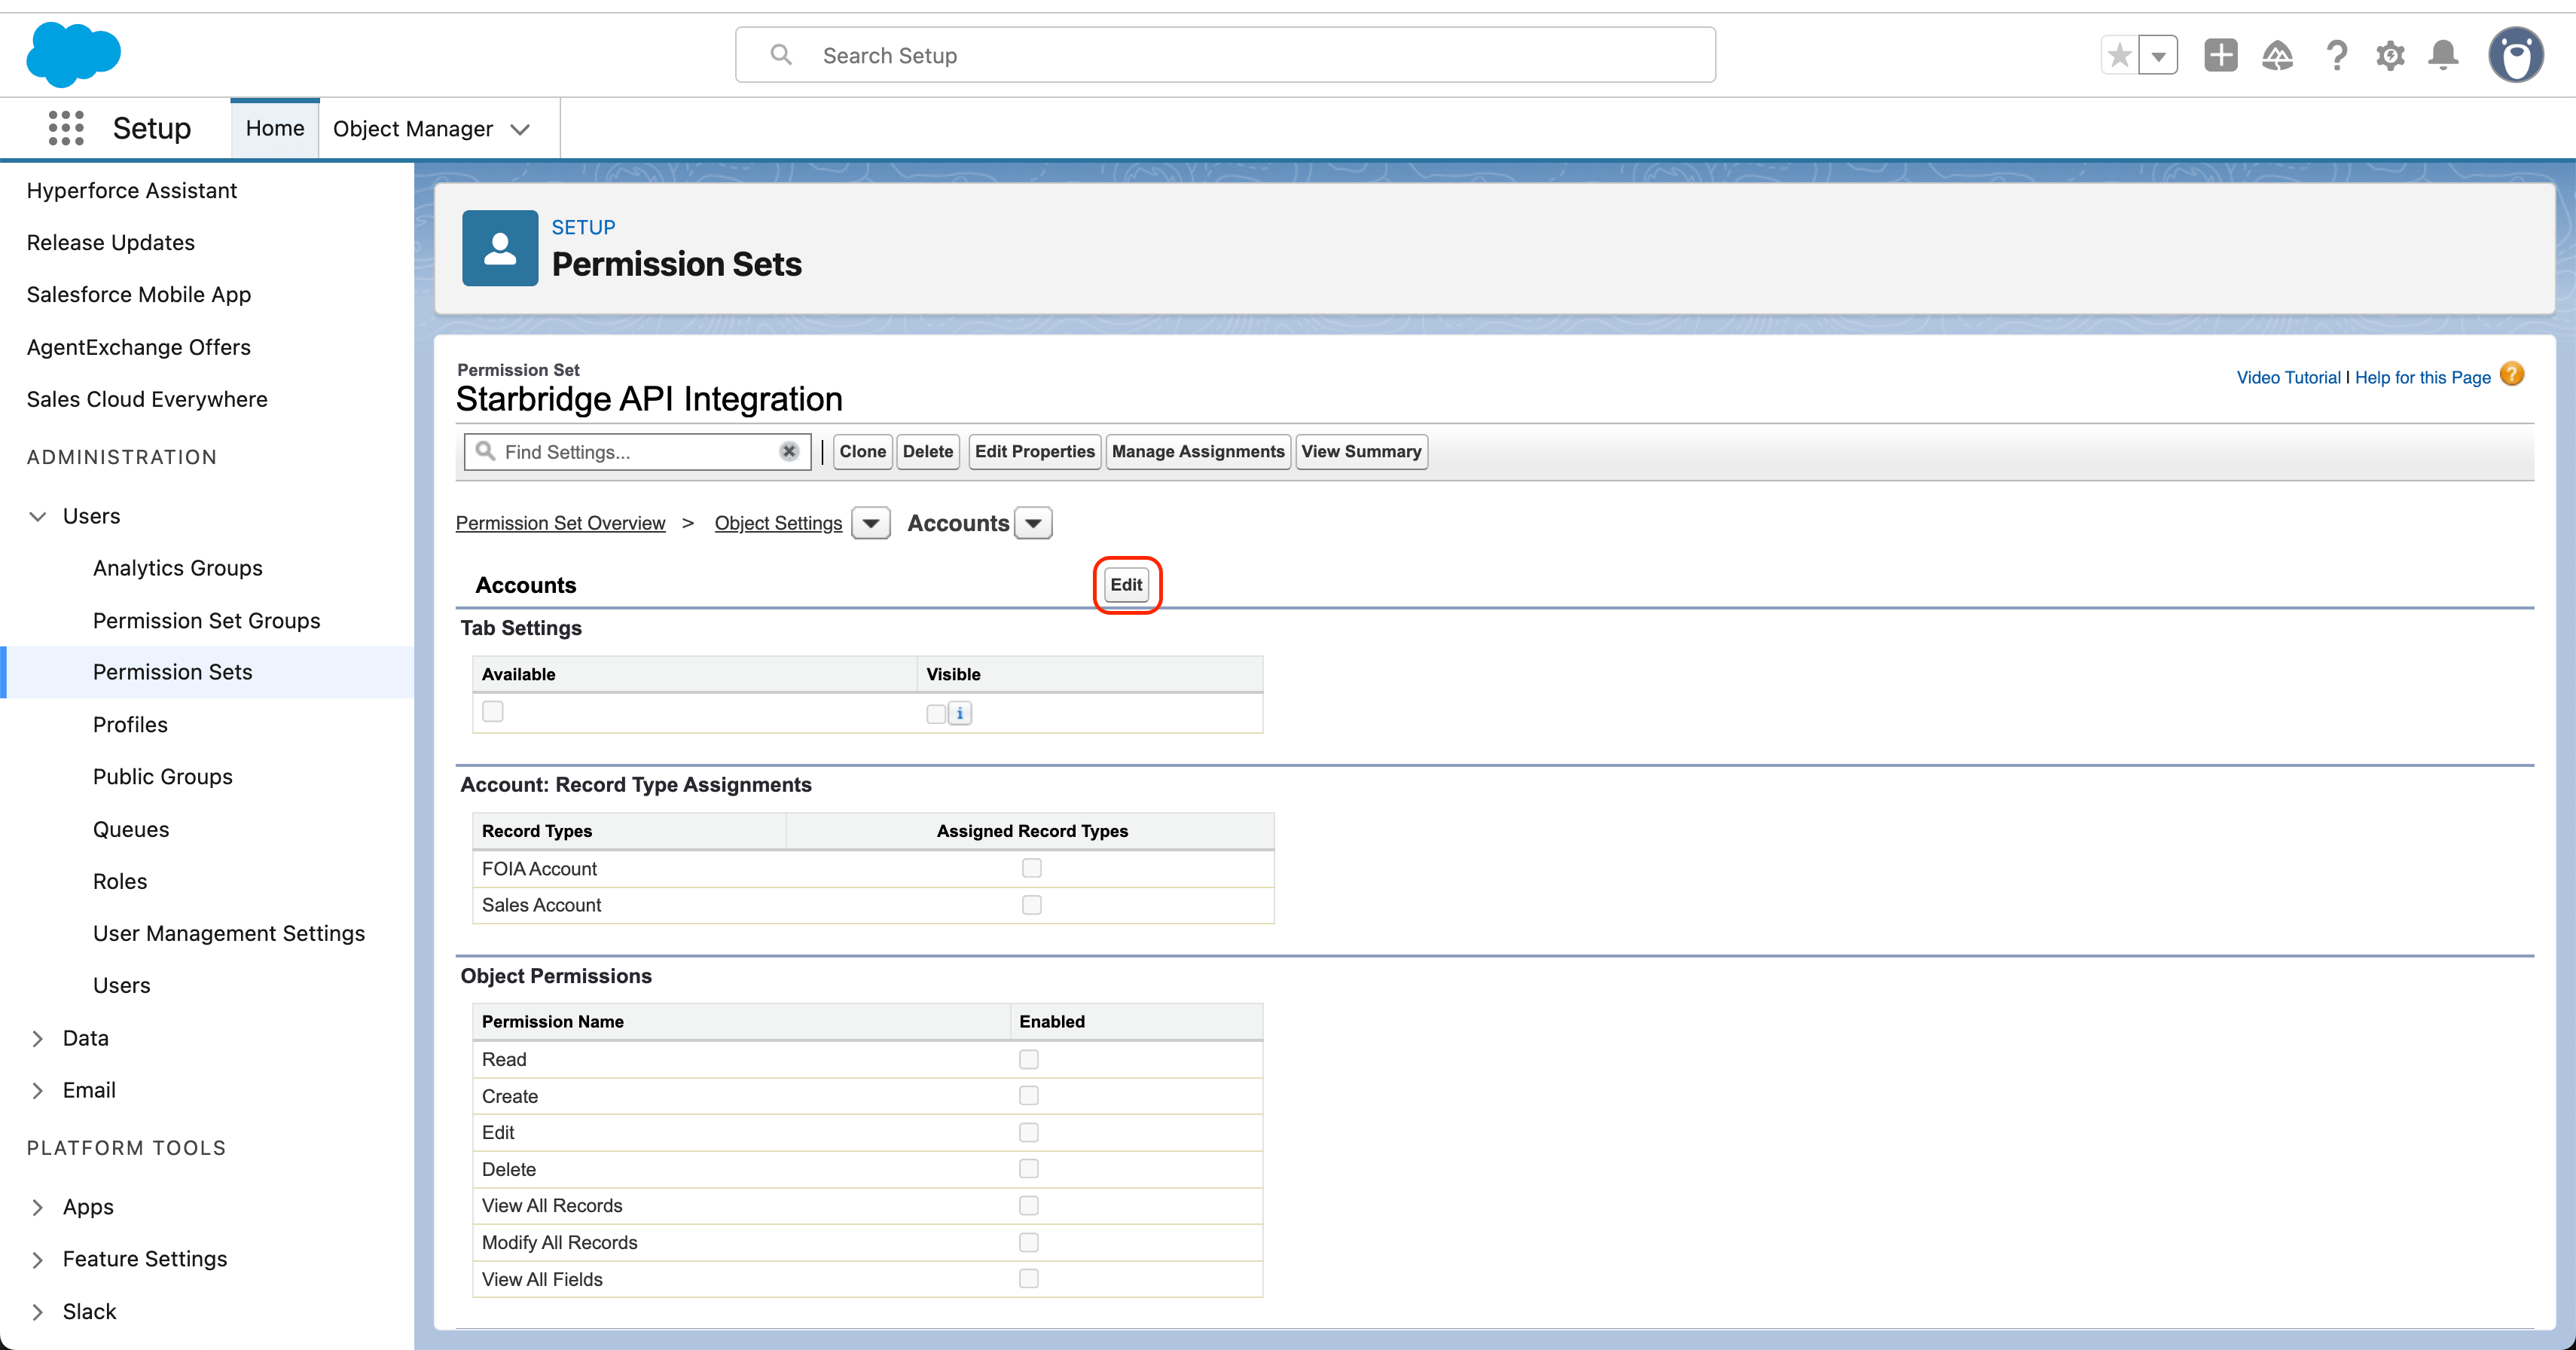
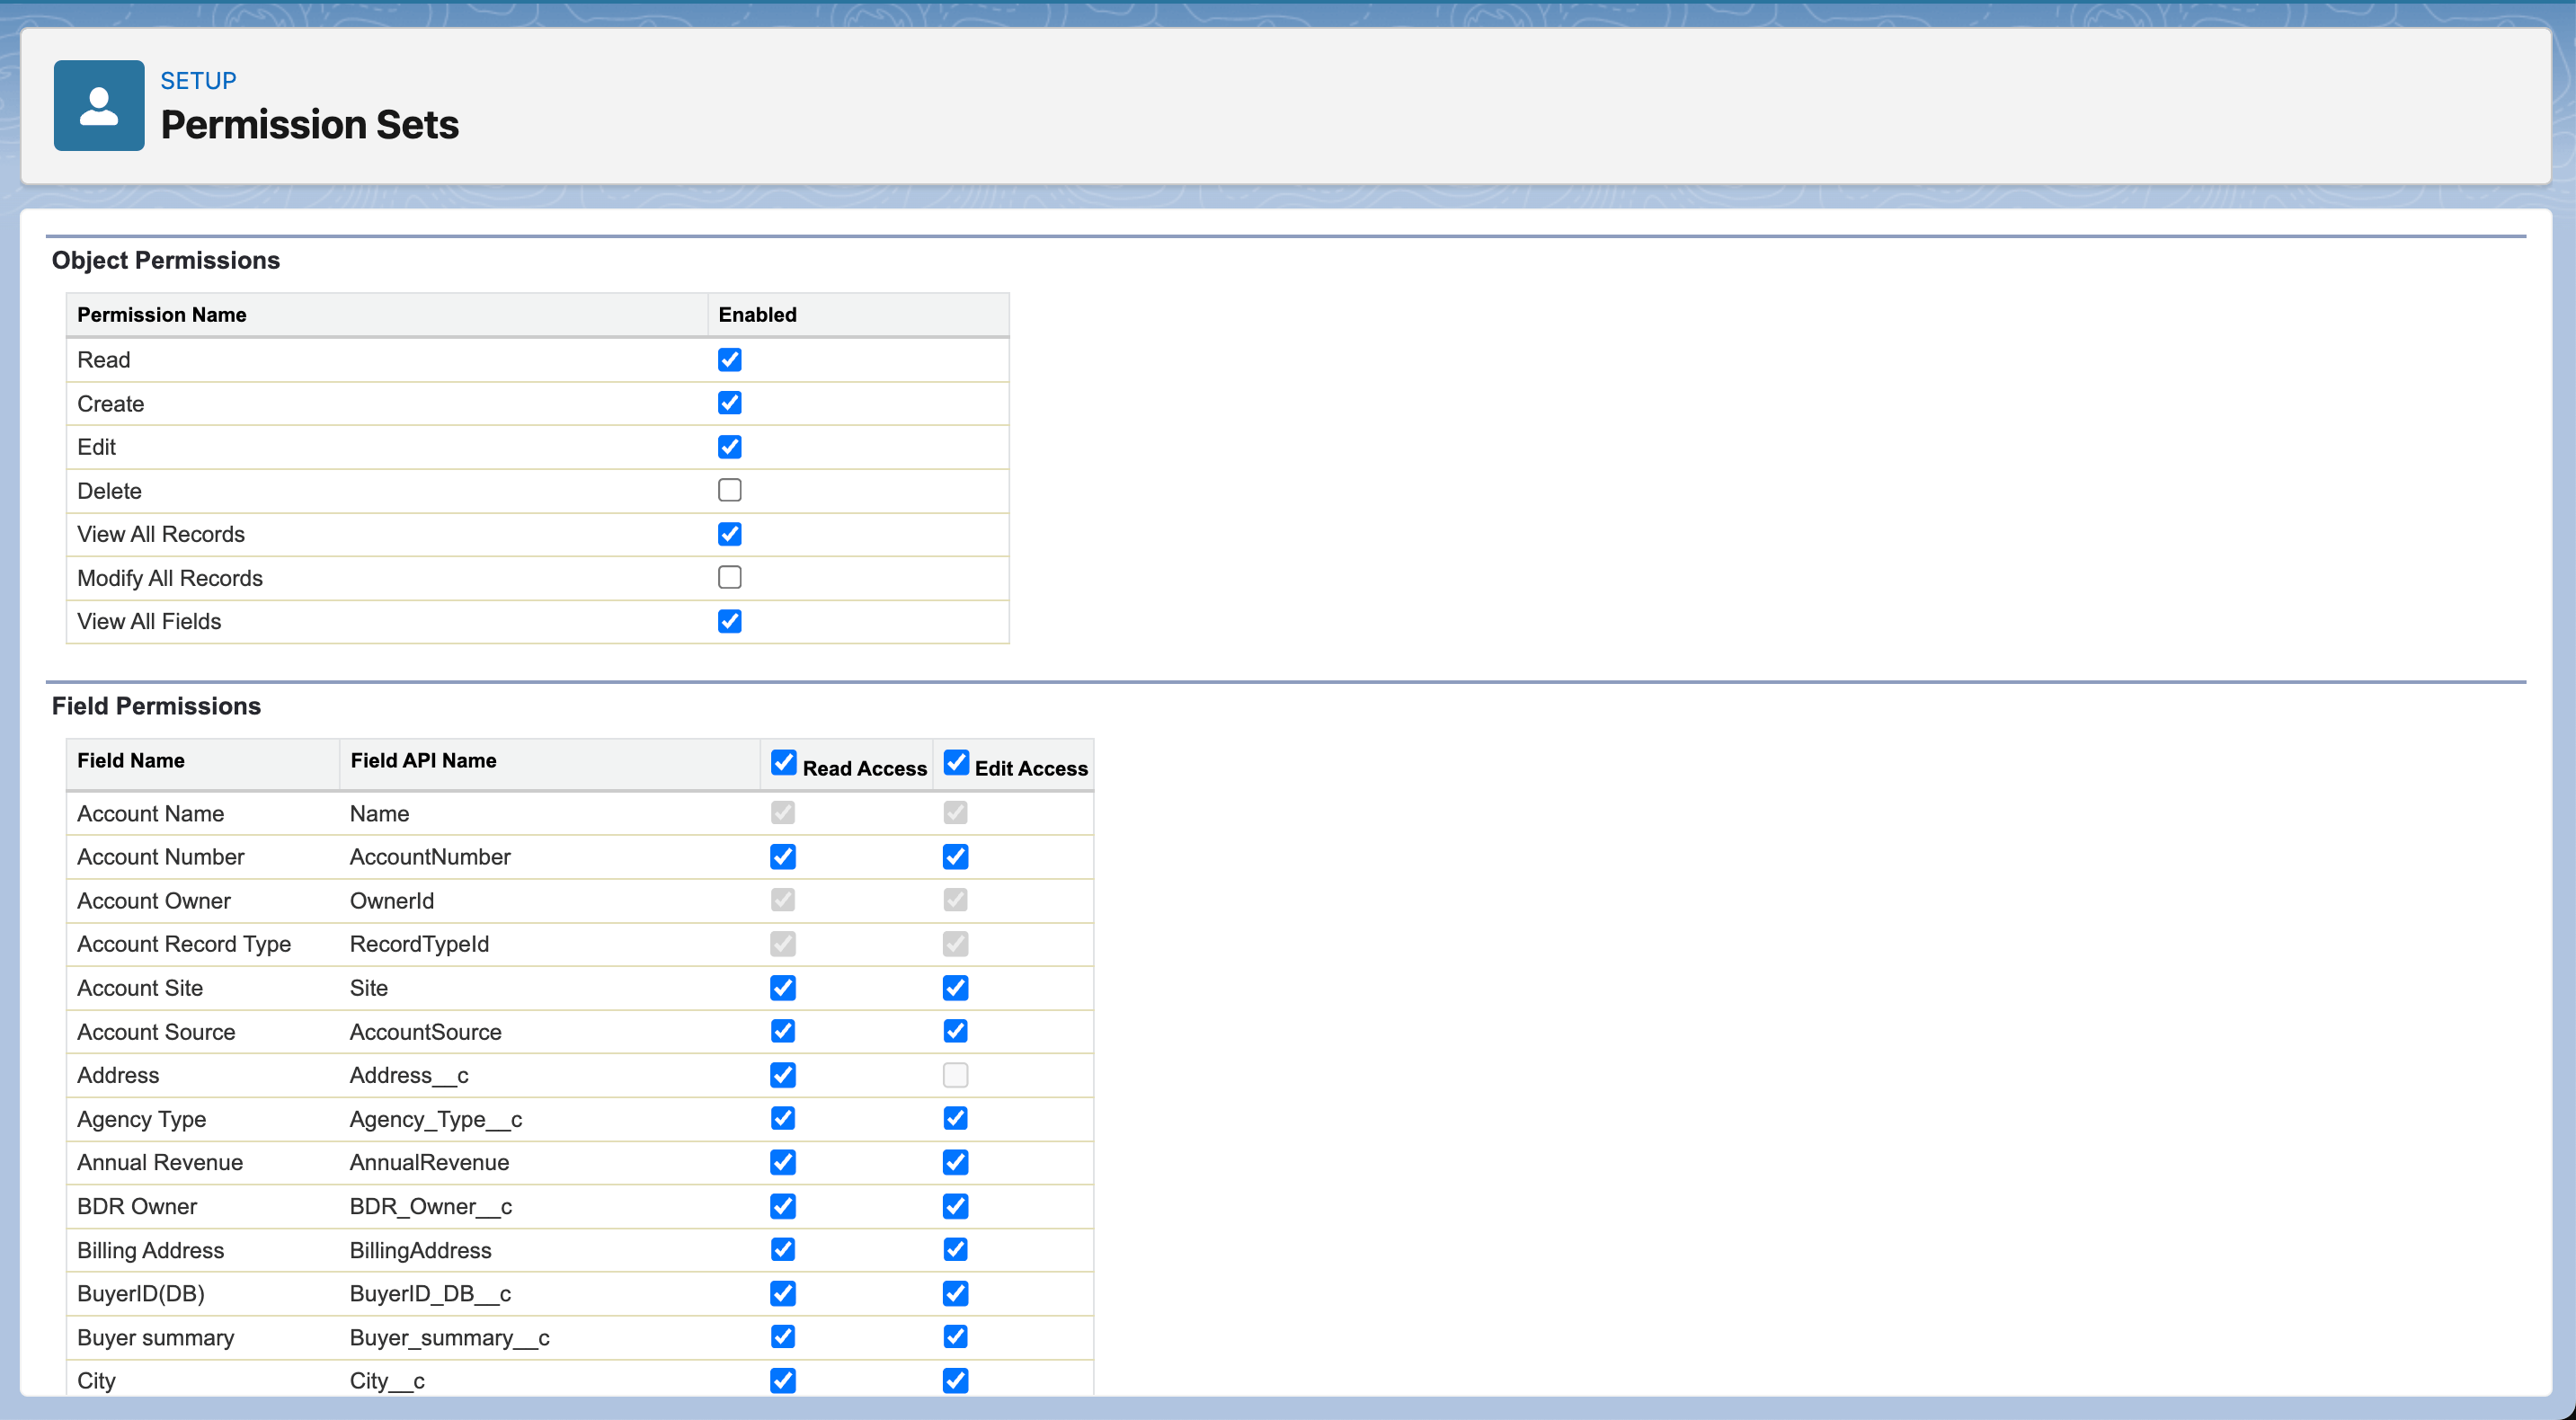
- To grant object access, click Edit and check the checkboxes listed above under Object Permissions.
- To grant field access, check the Read Access and Edit Access checkboxes to select all fields at once under Field Permissions. In the Permission Set named Starbridge API Integration:
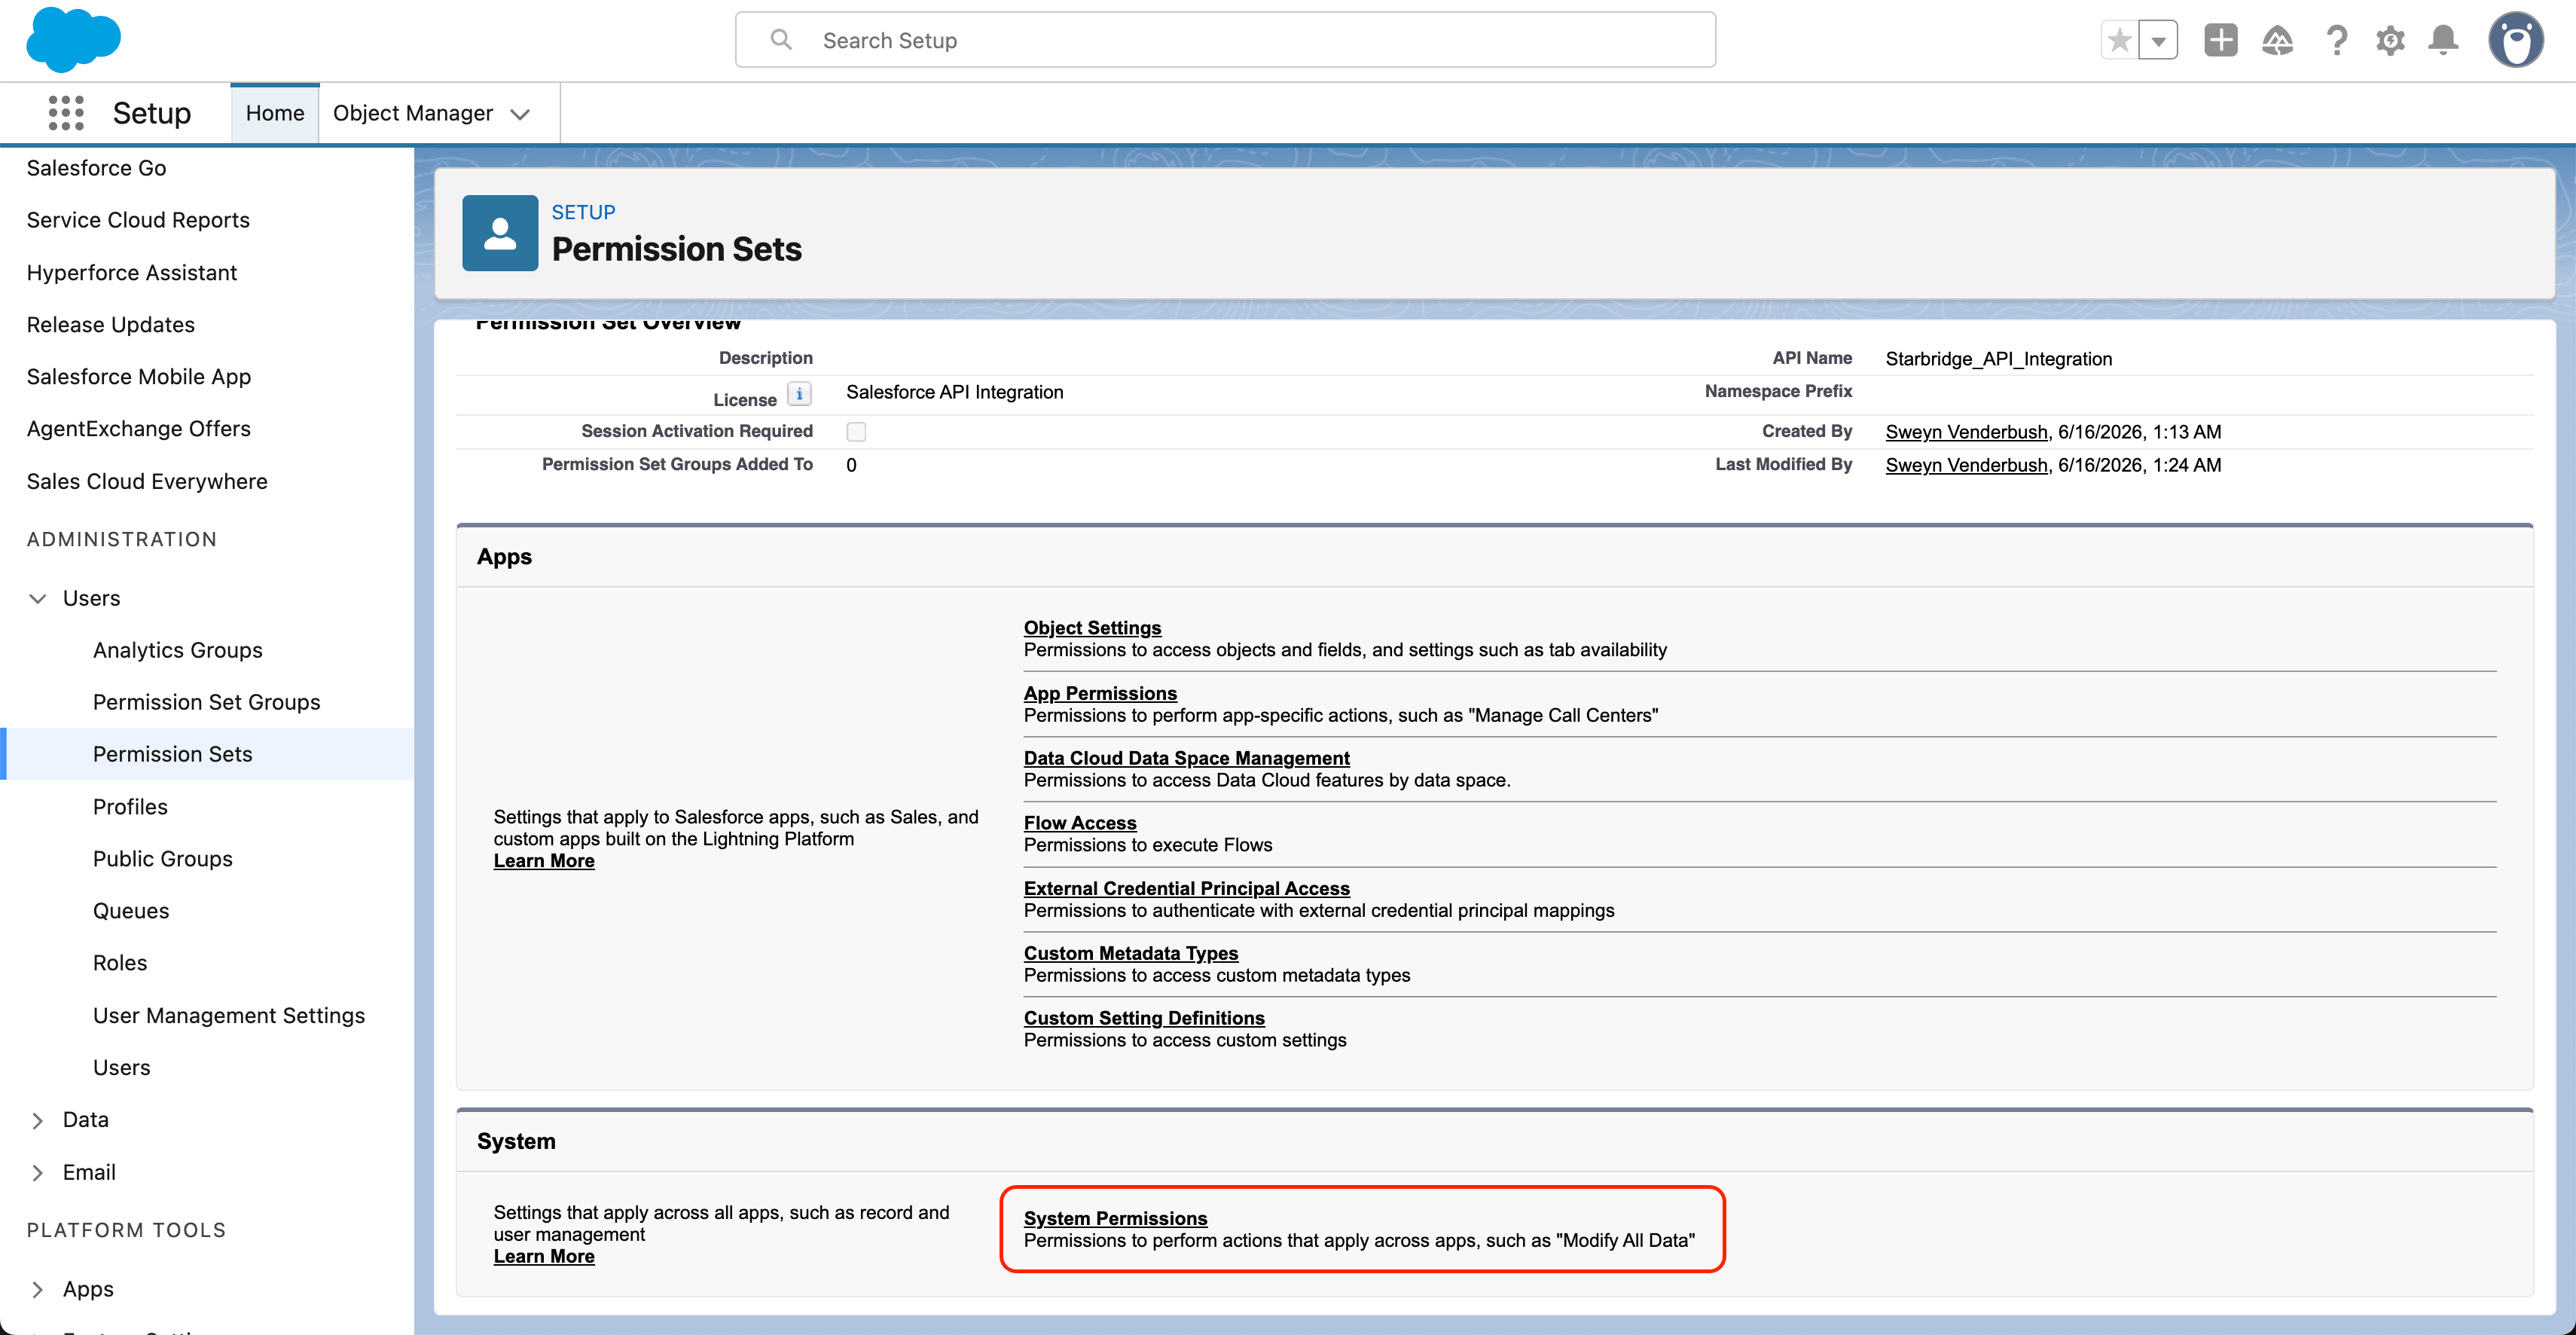
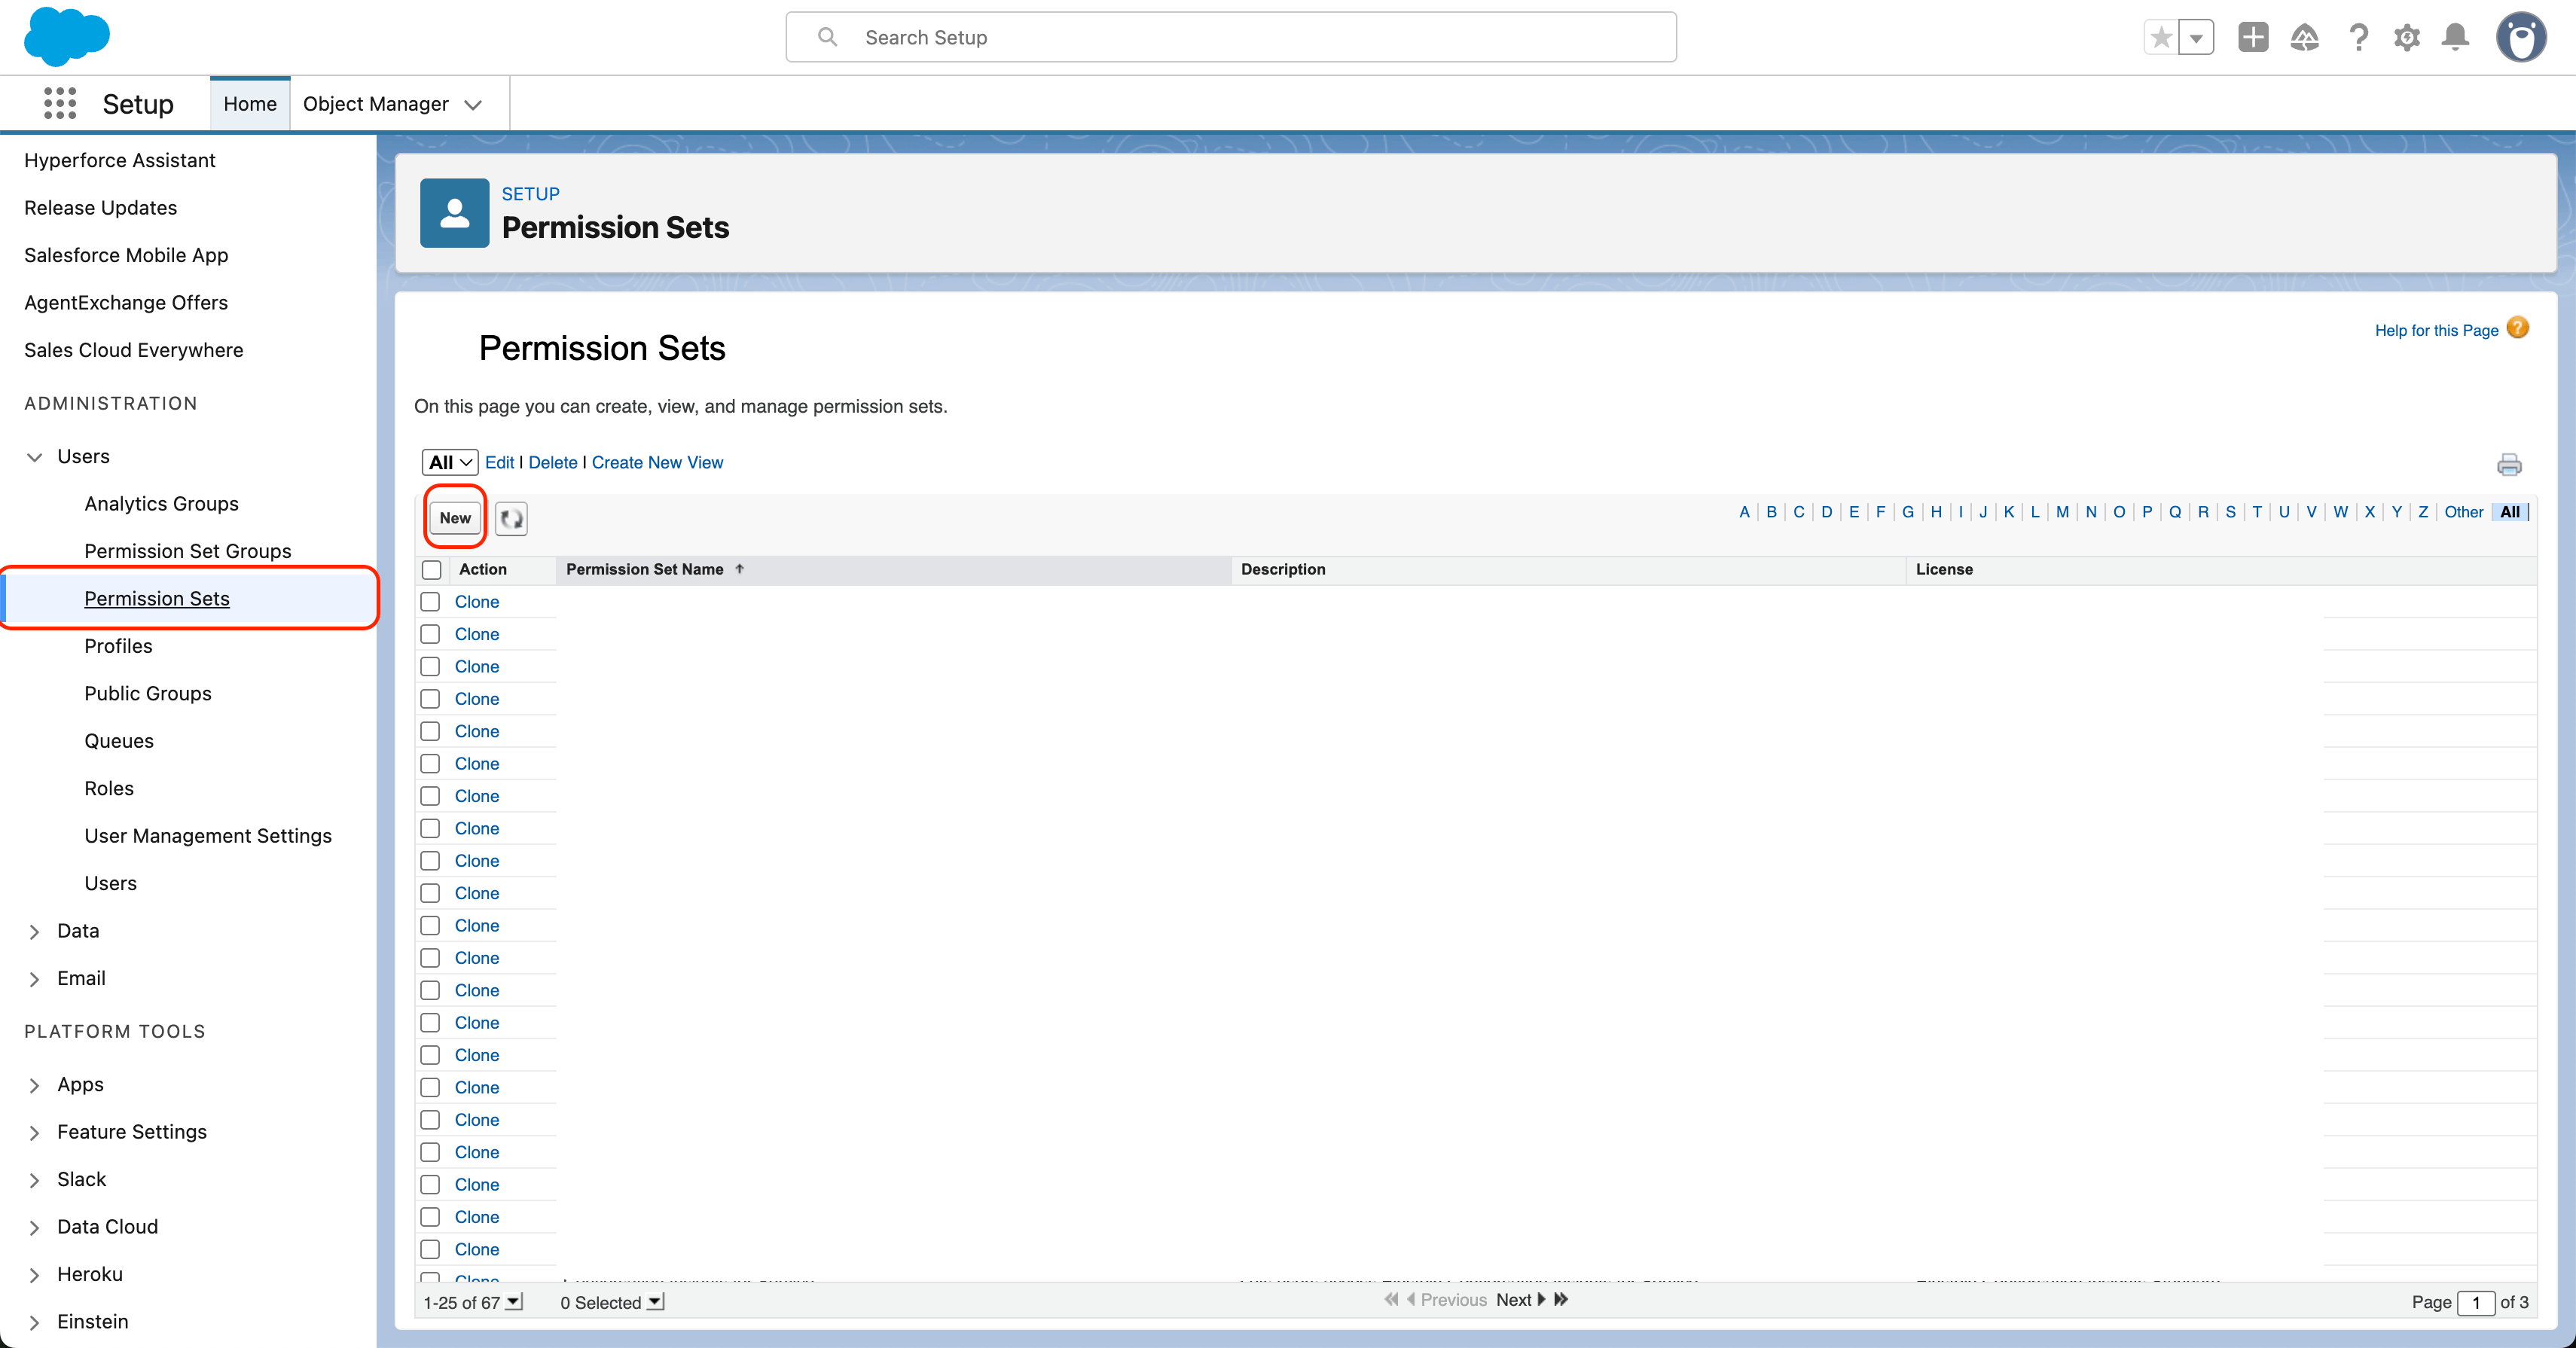
- Open System Permissions
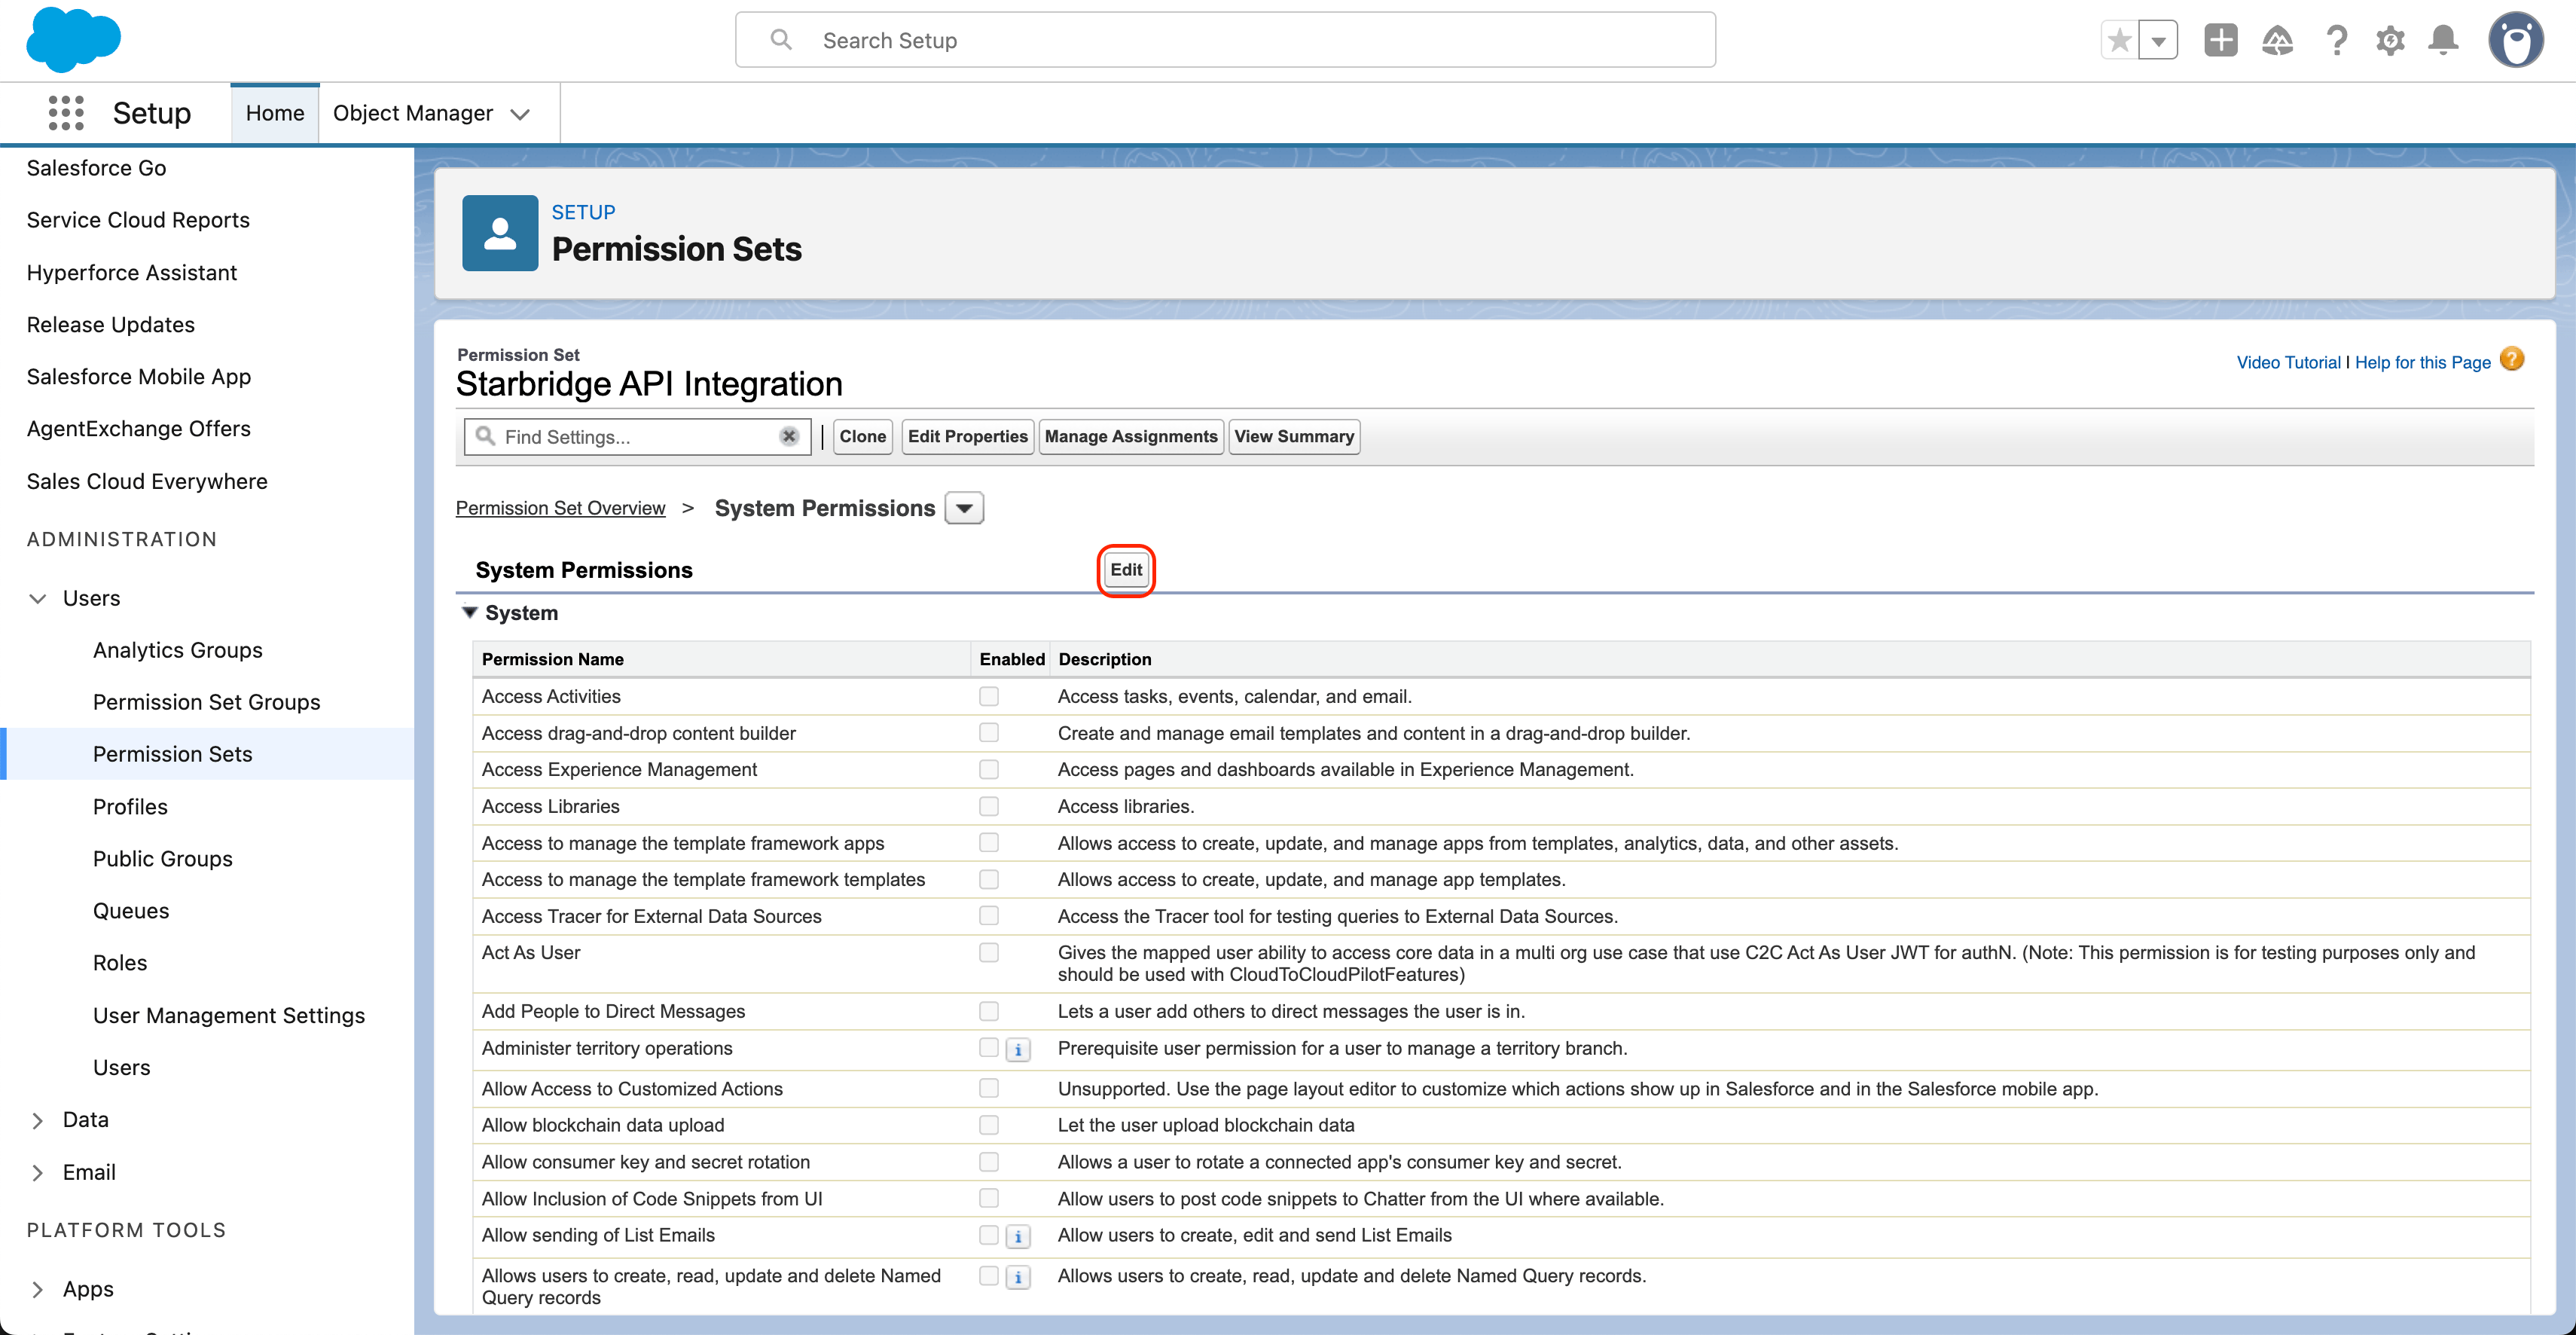
- Click Edit
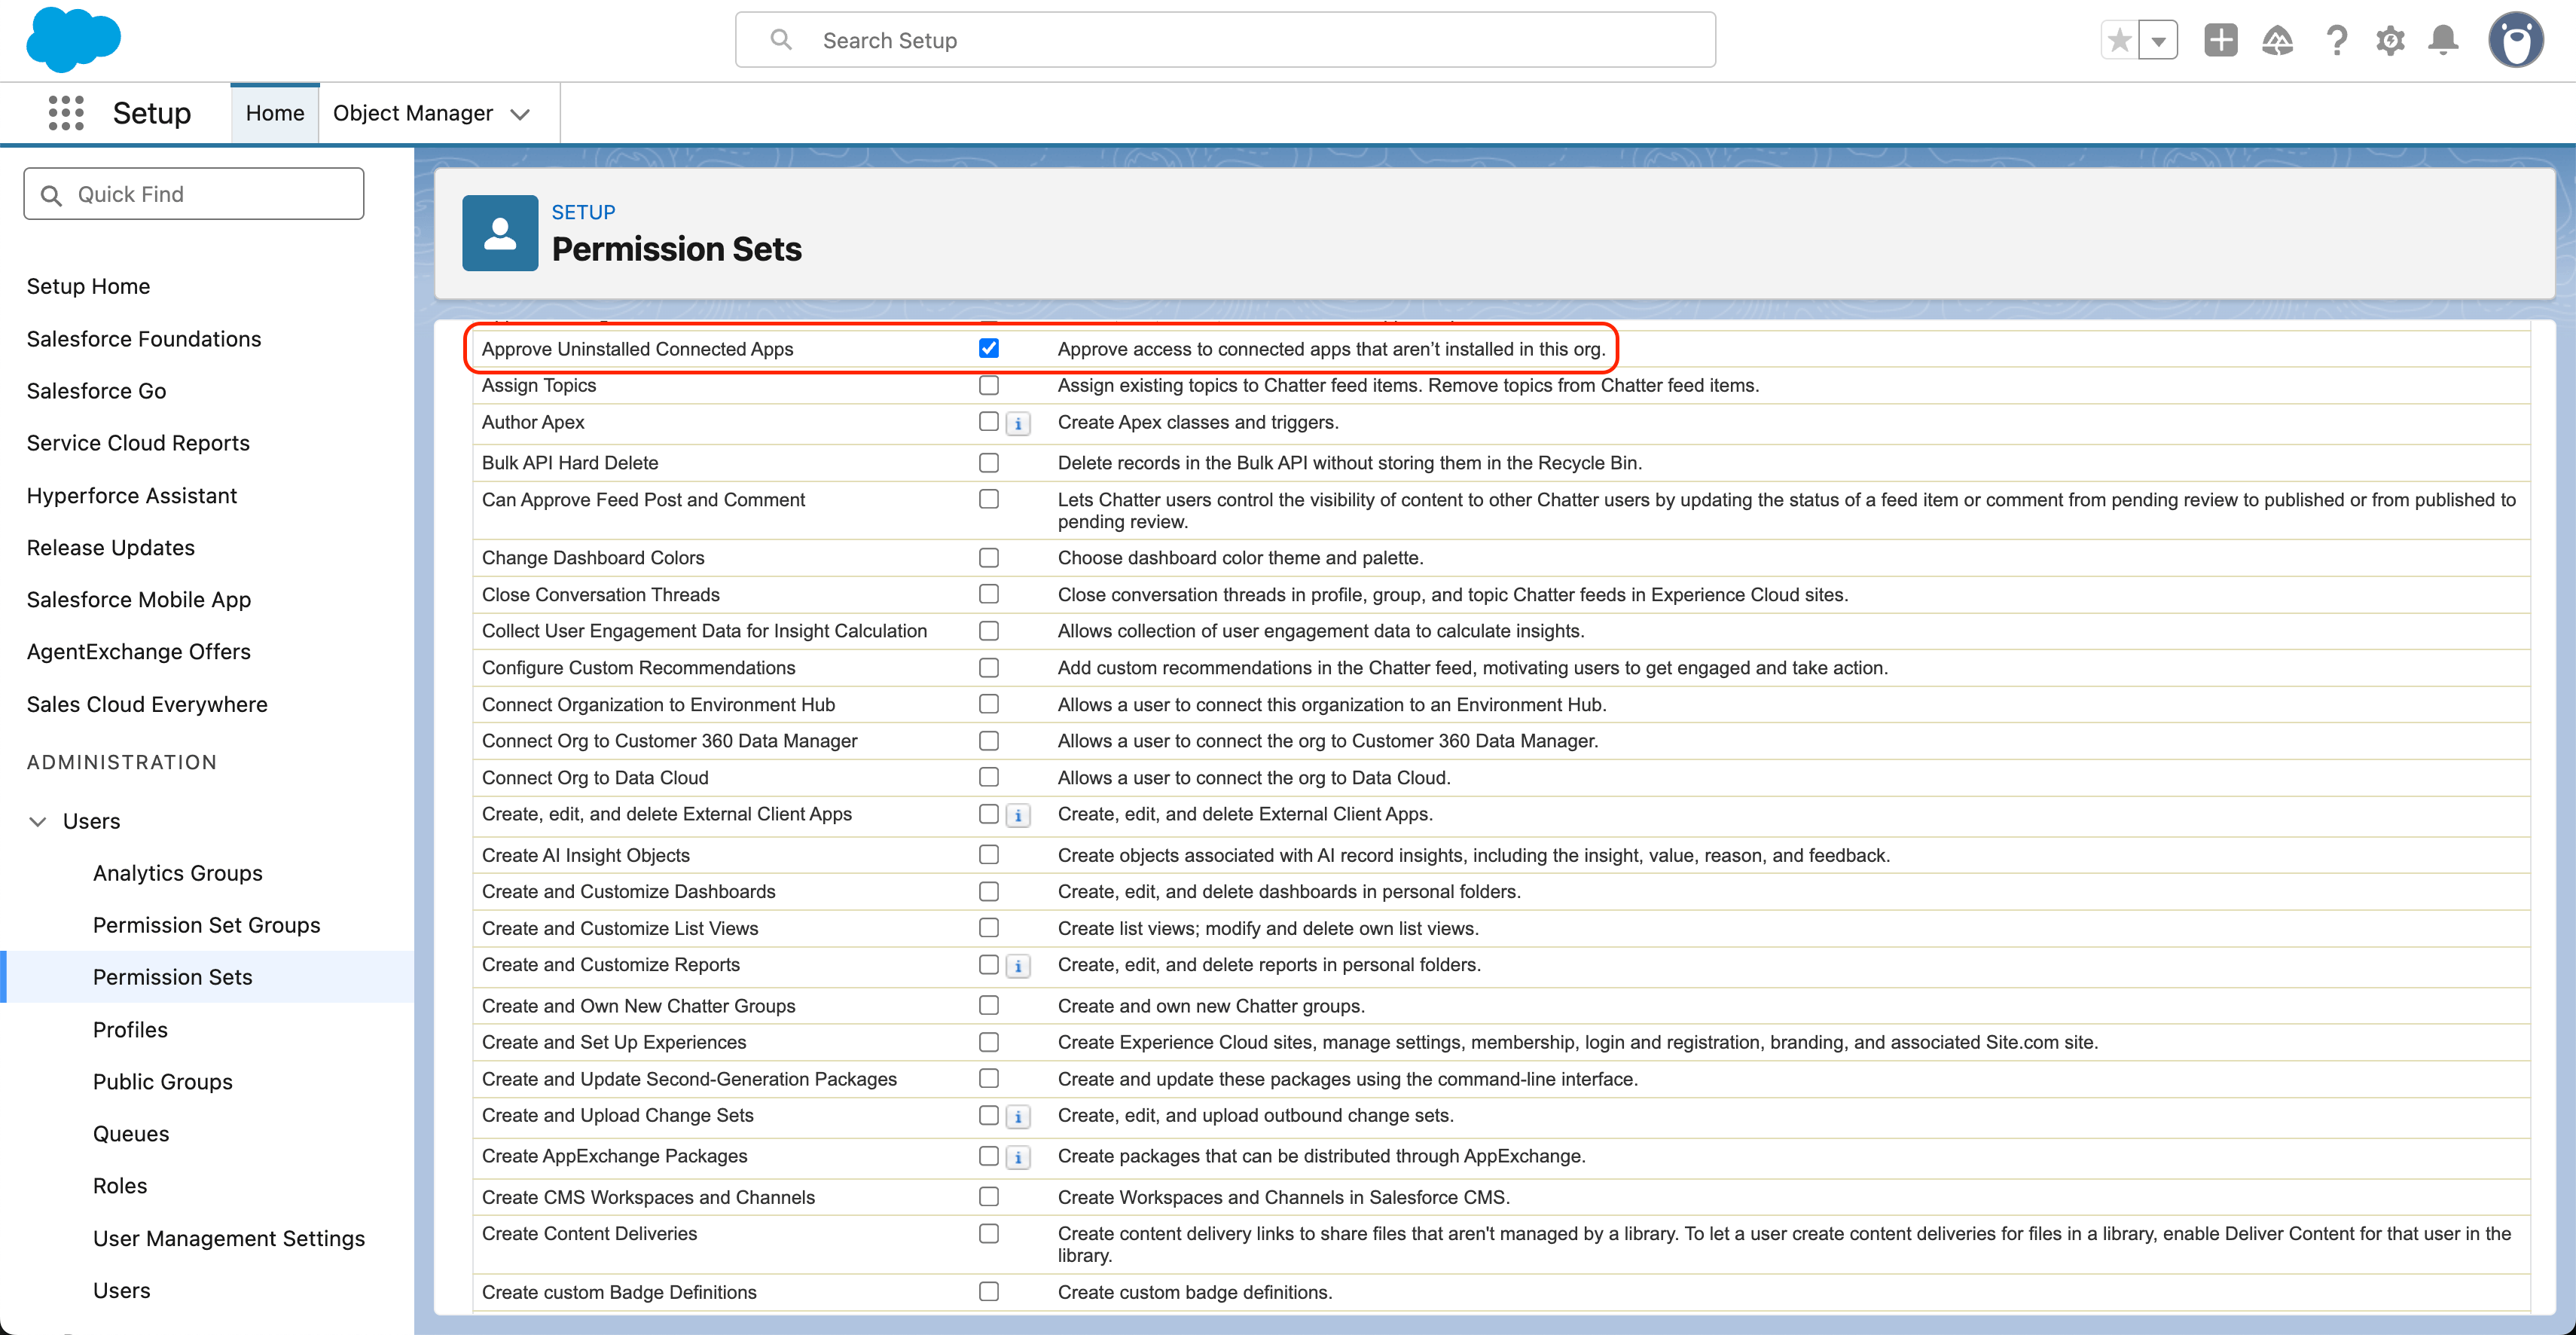
- Scroll down to Approve Uninstalled Connected Apps and check the checkbox
- Scroll back up and click Save
- Assign the Permission Set to the integration user:
- Go to Setup → Users
- Click the integration user’s name (go to the letter ‘I’ for
Integration, Starbridge)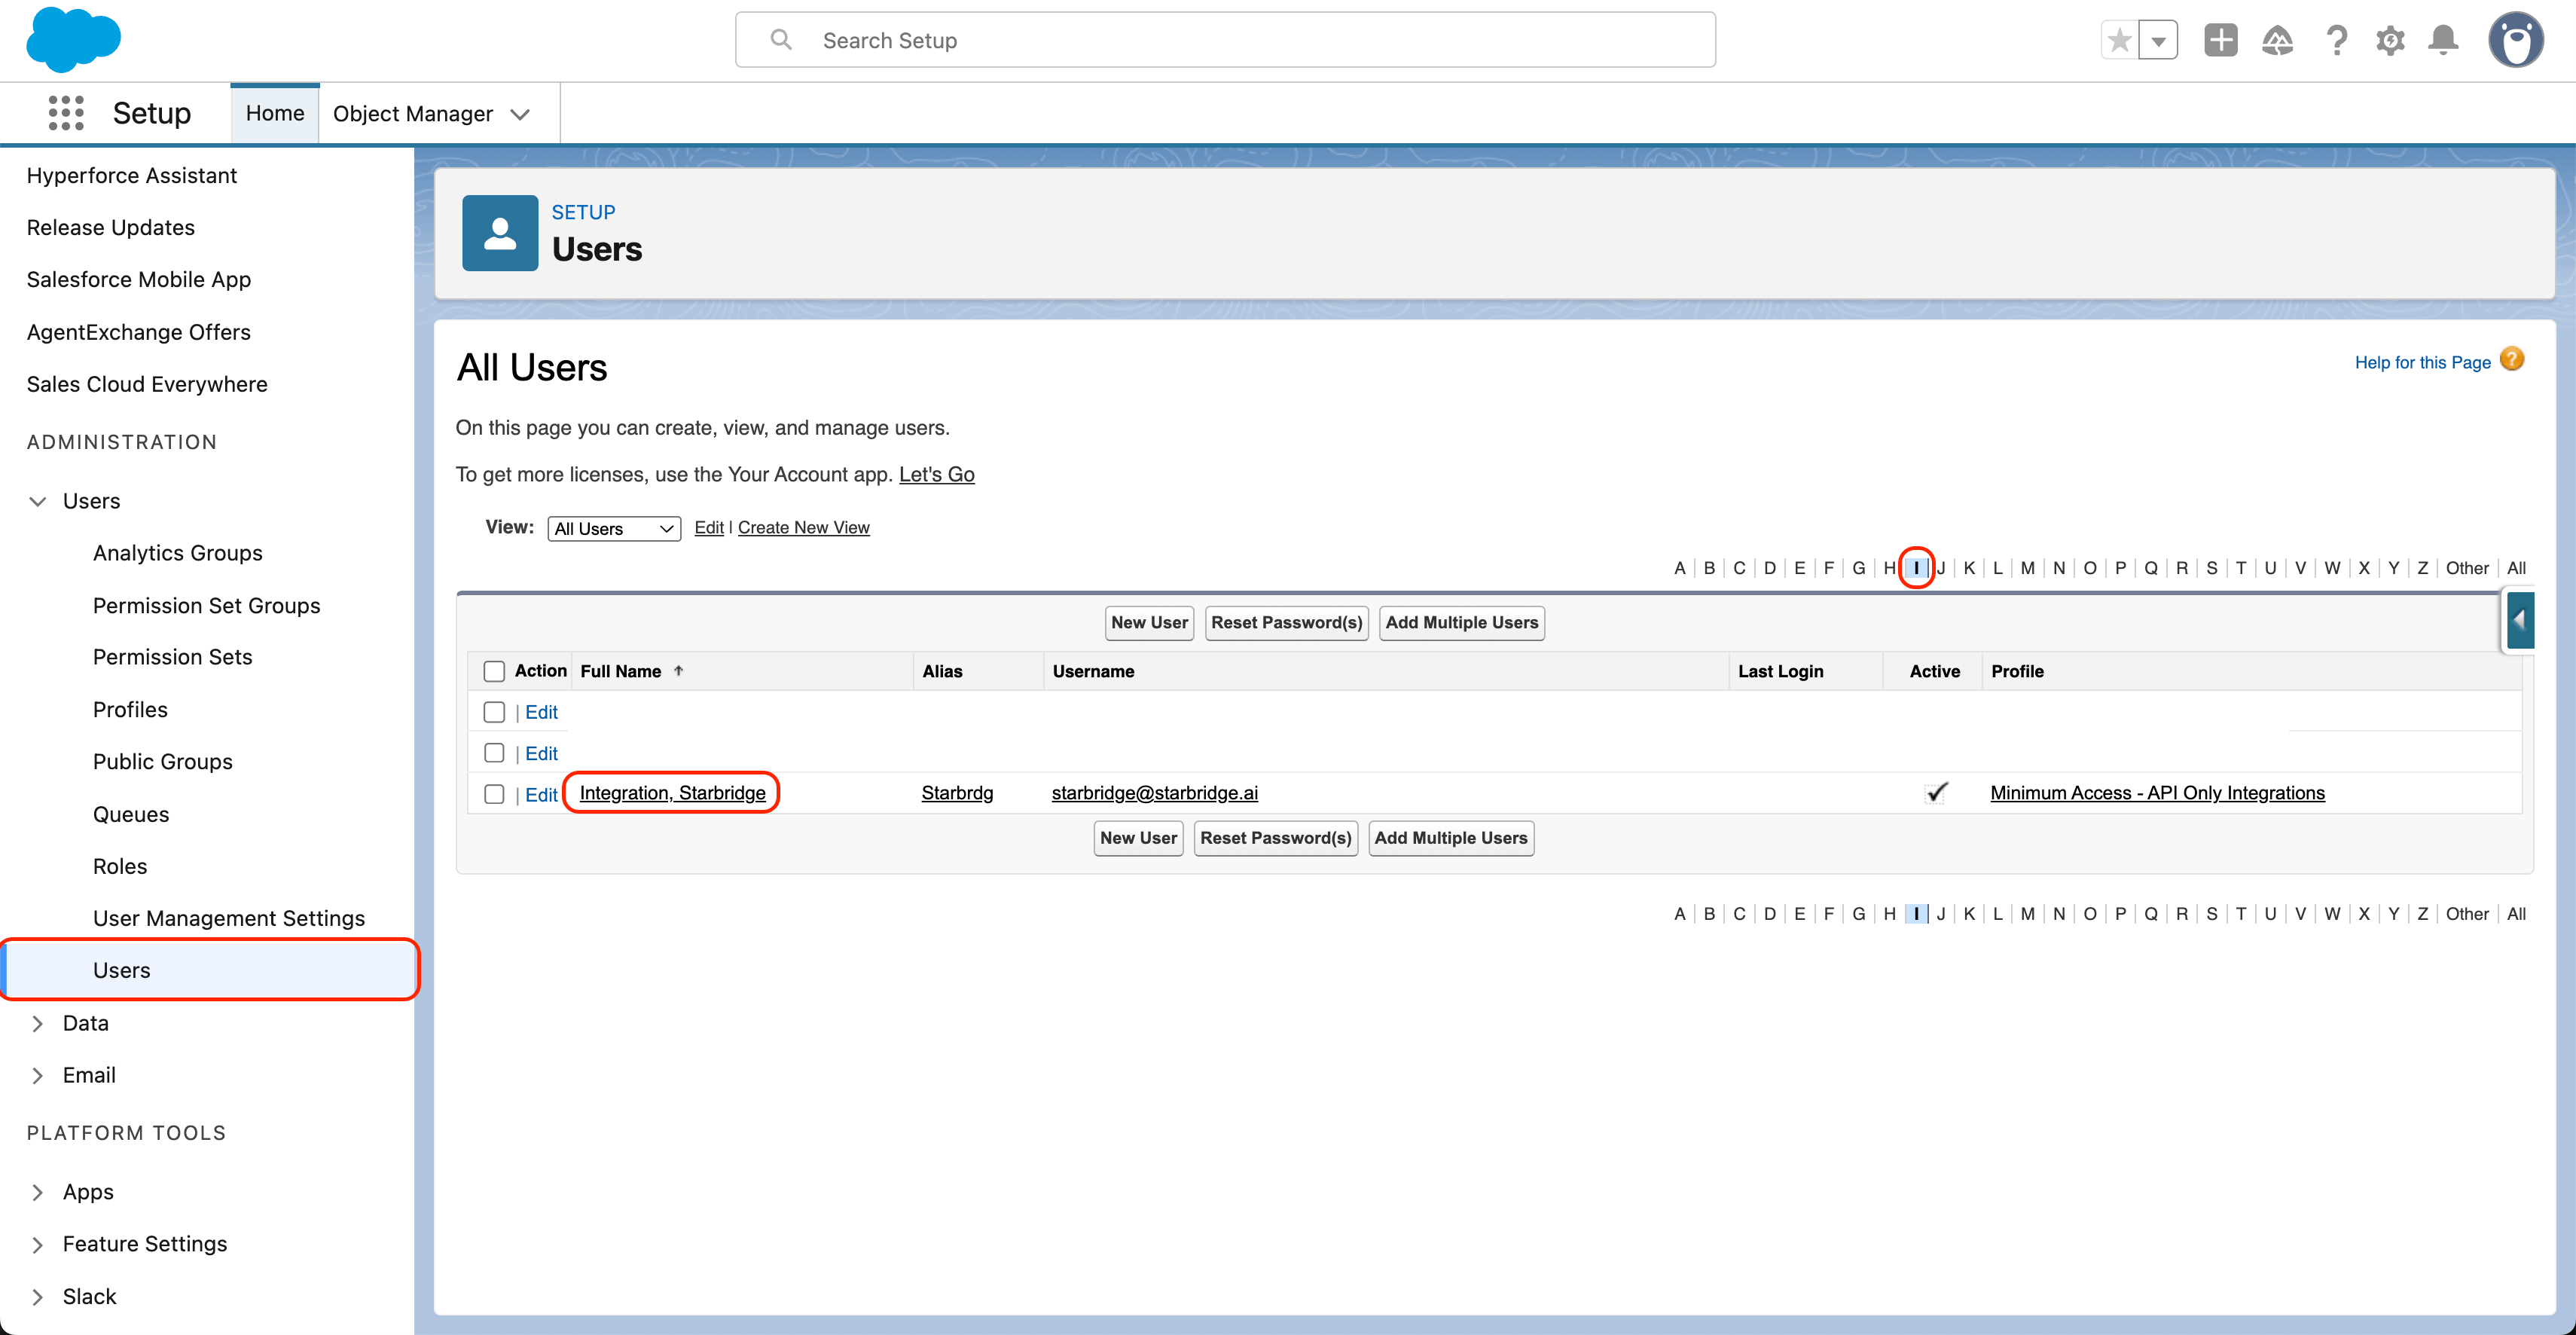
- Assign the Starbridge API Integration permission set:
- Hover over Permission Set Assignments
- Click Edit Assignments
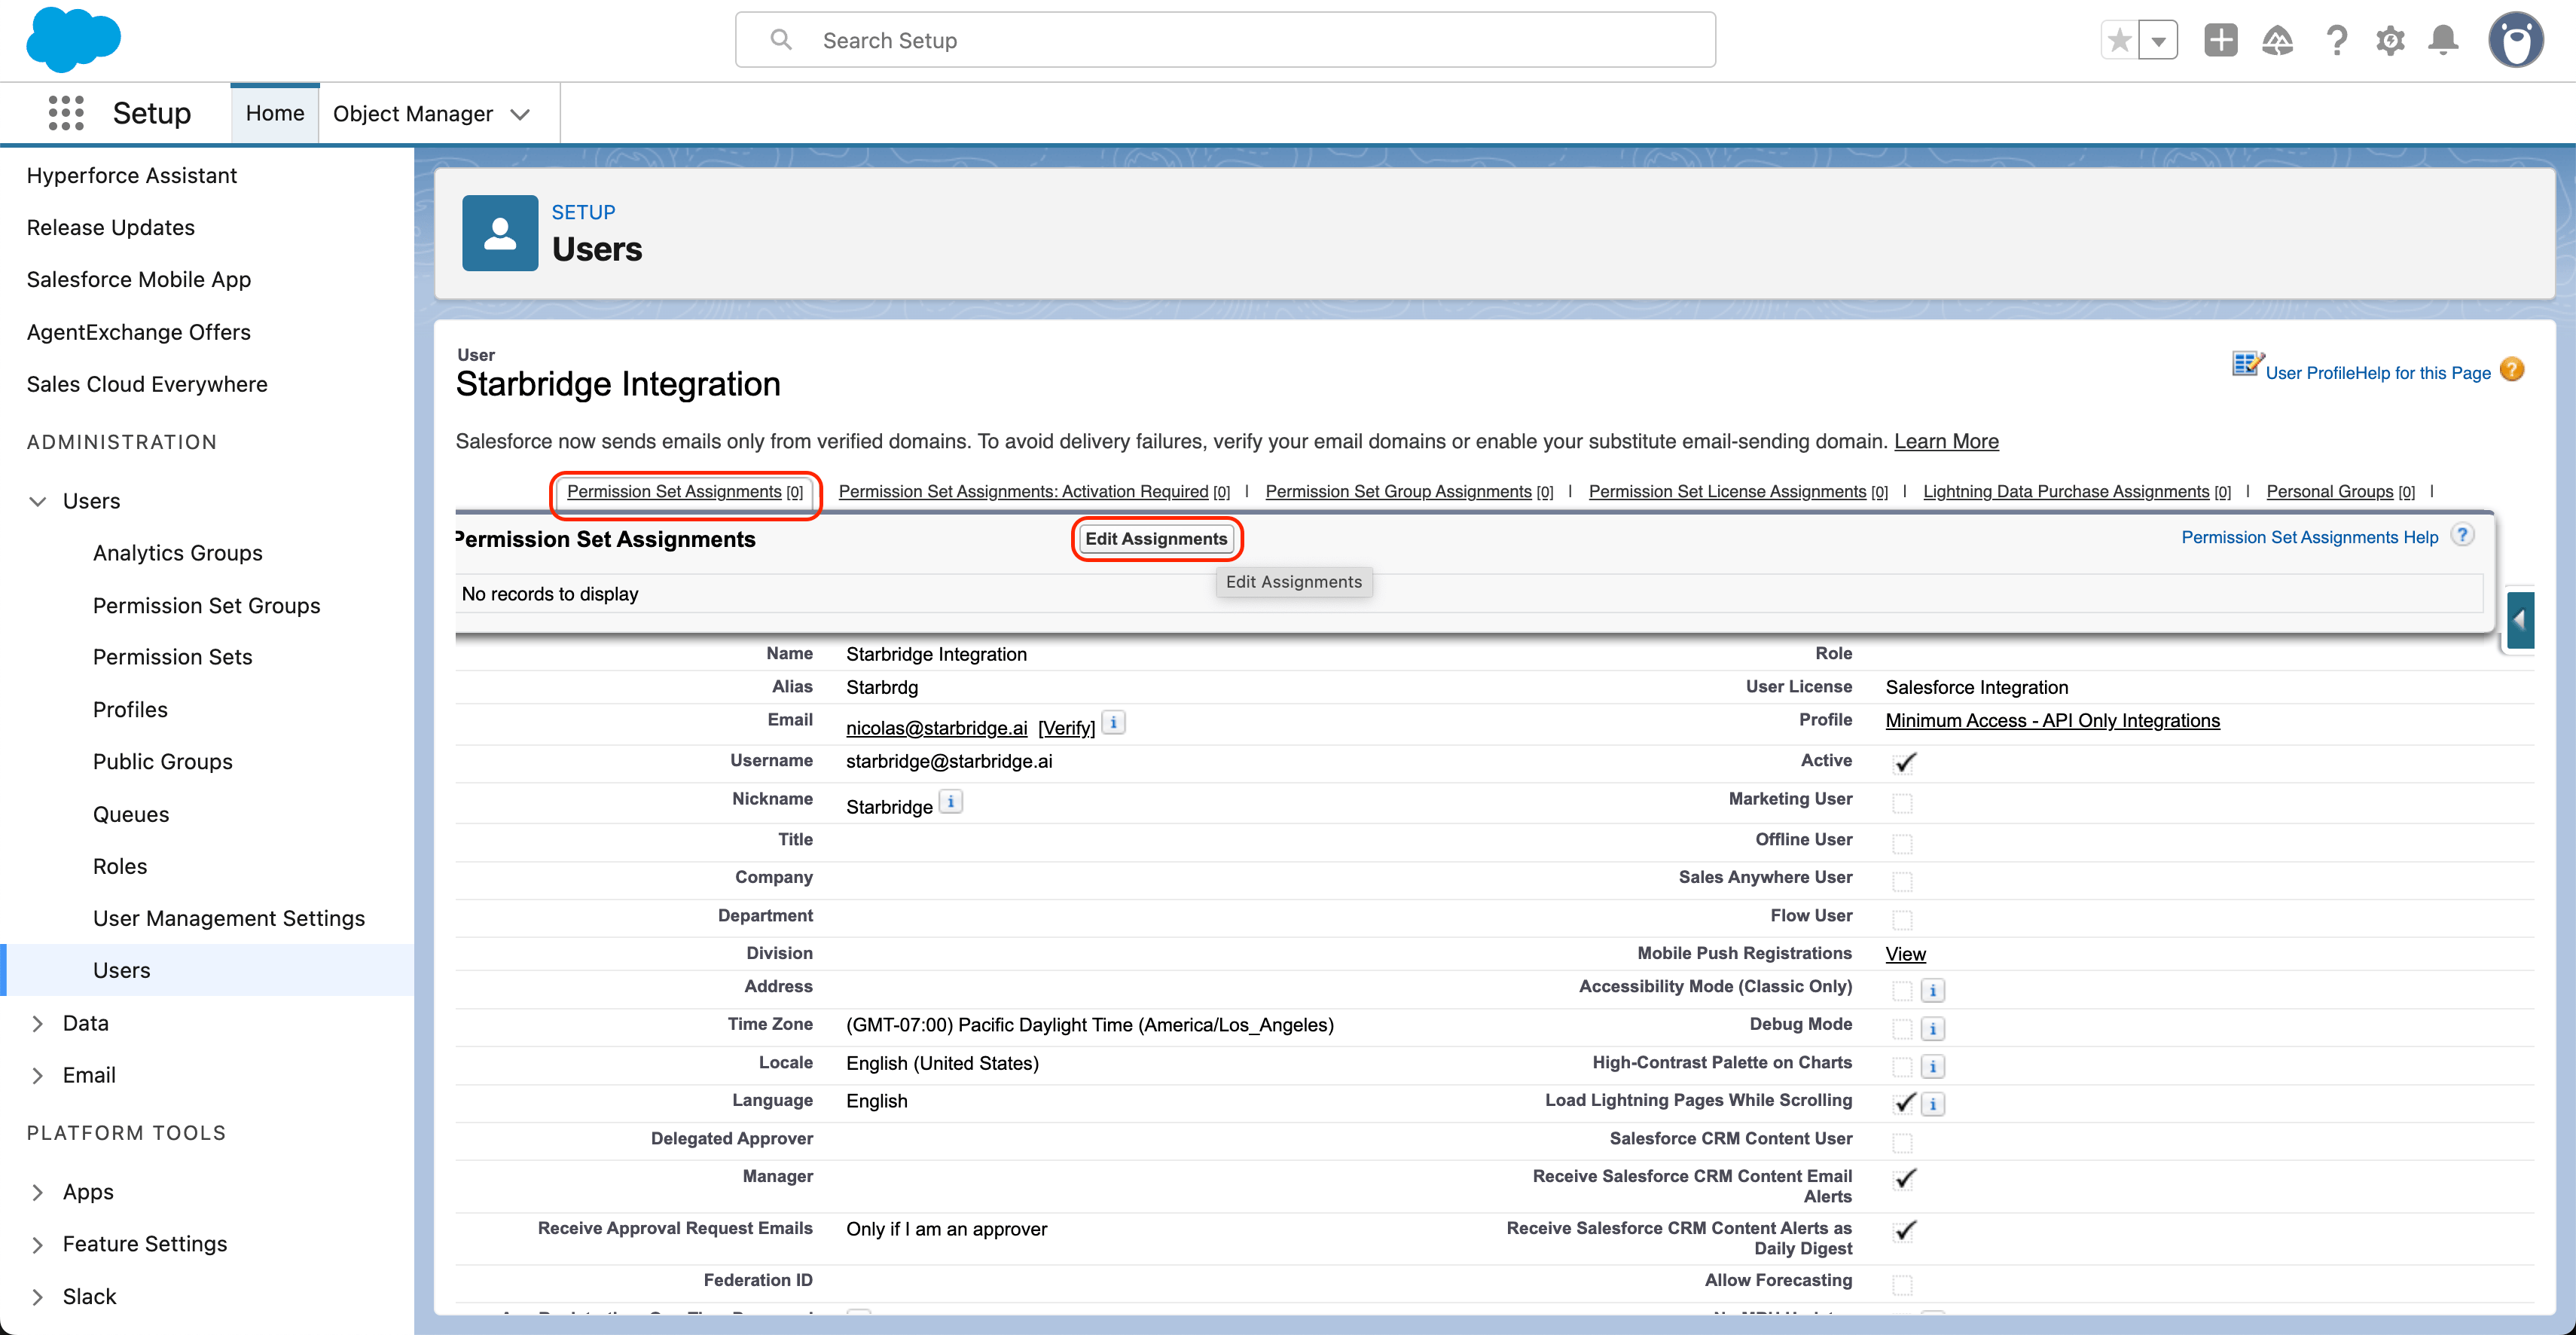
- Scroll down and select Starbridge API Integration from the Available Permission Sets, then click Add
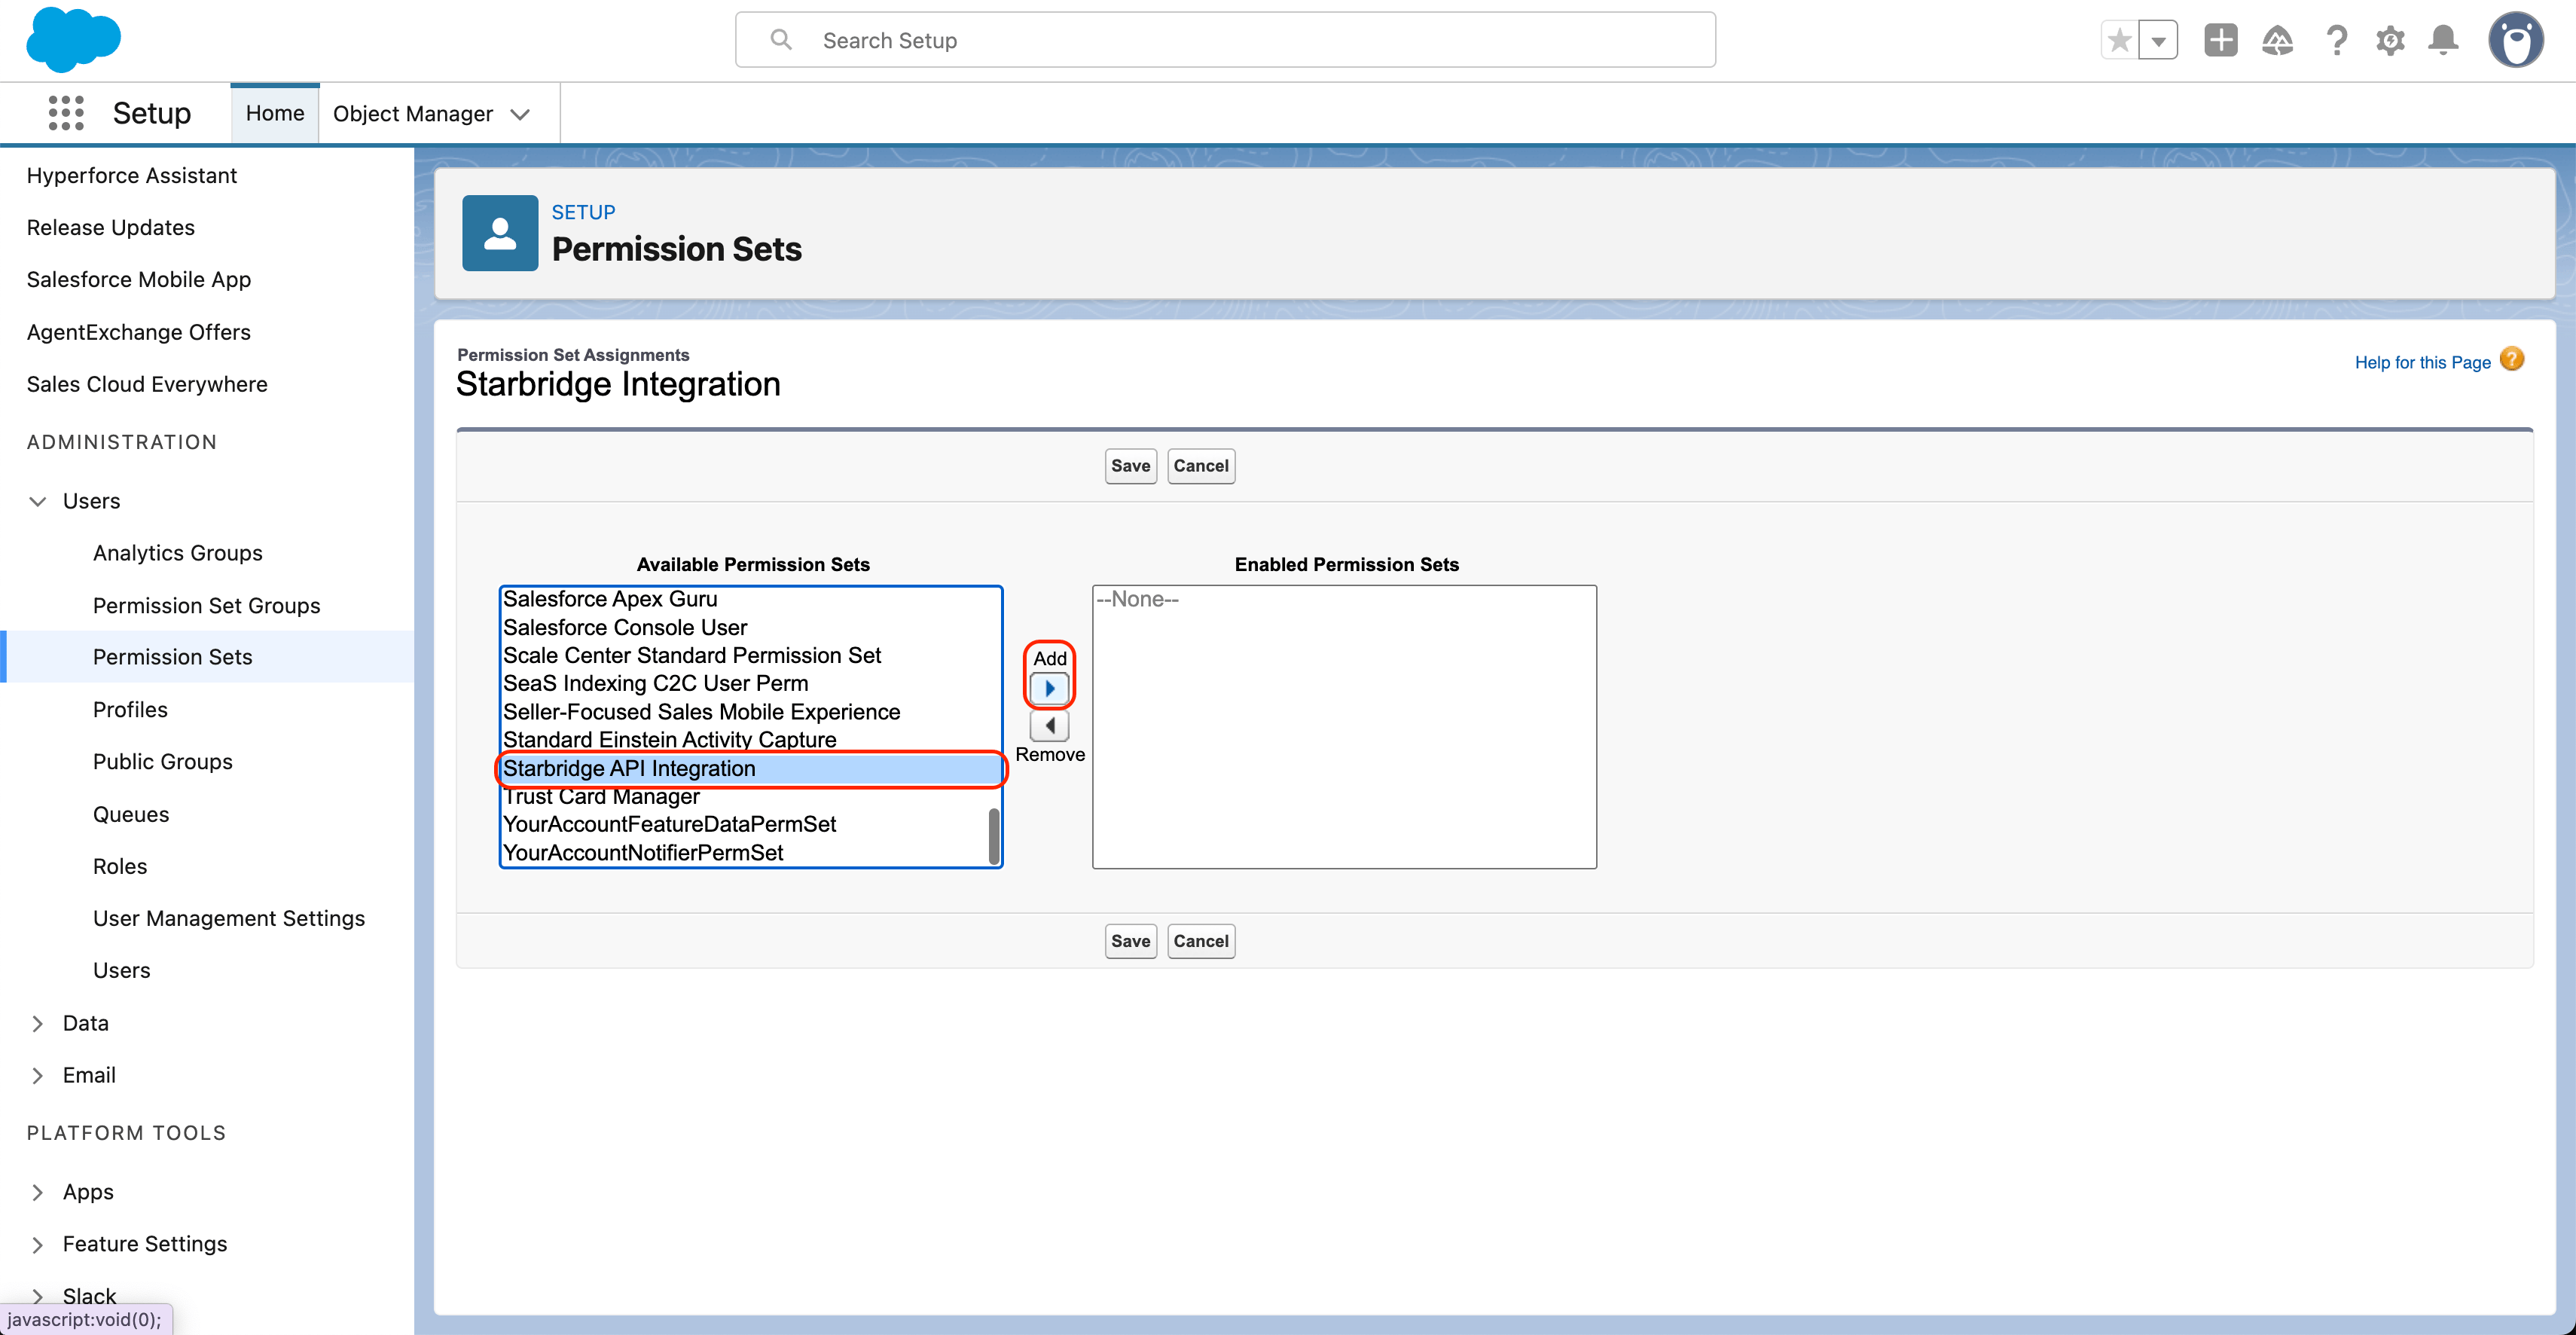
- Click Save
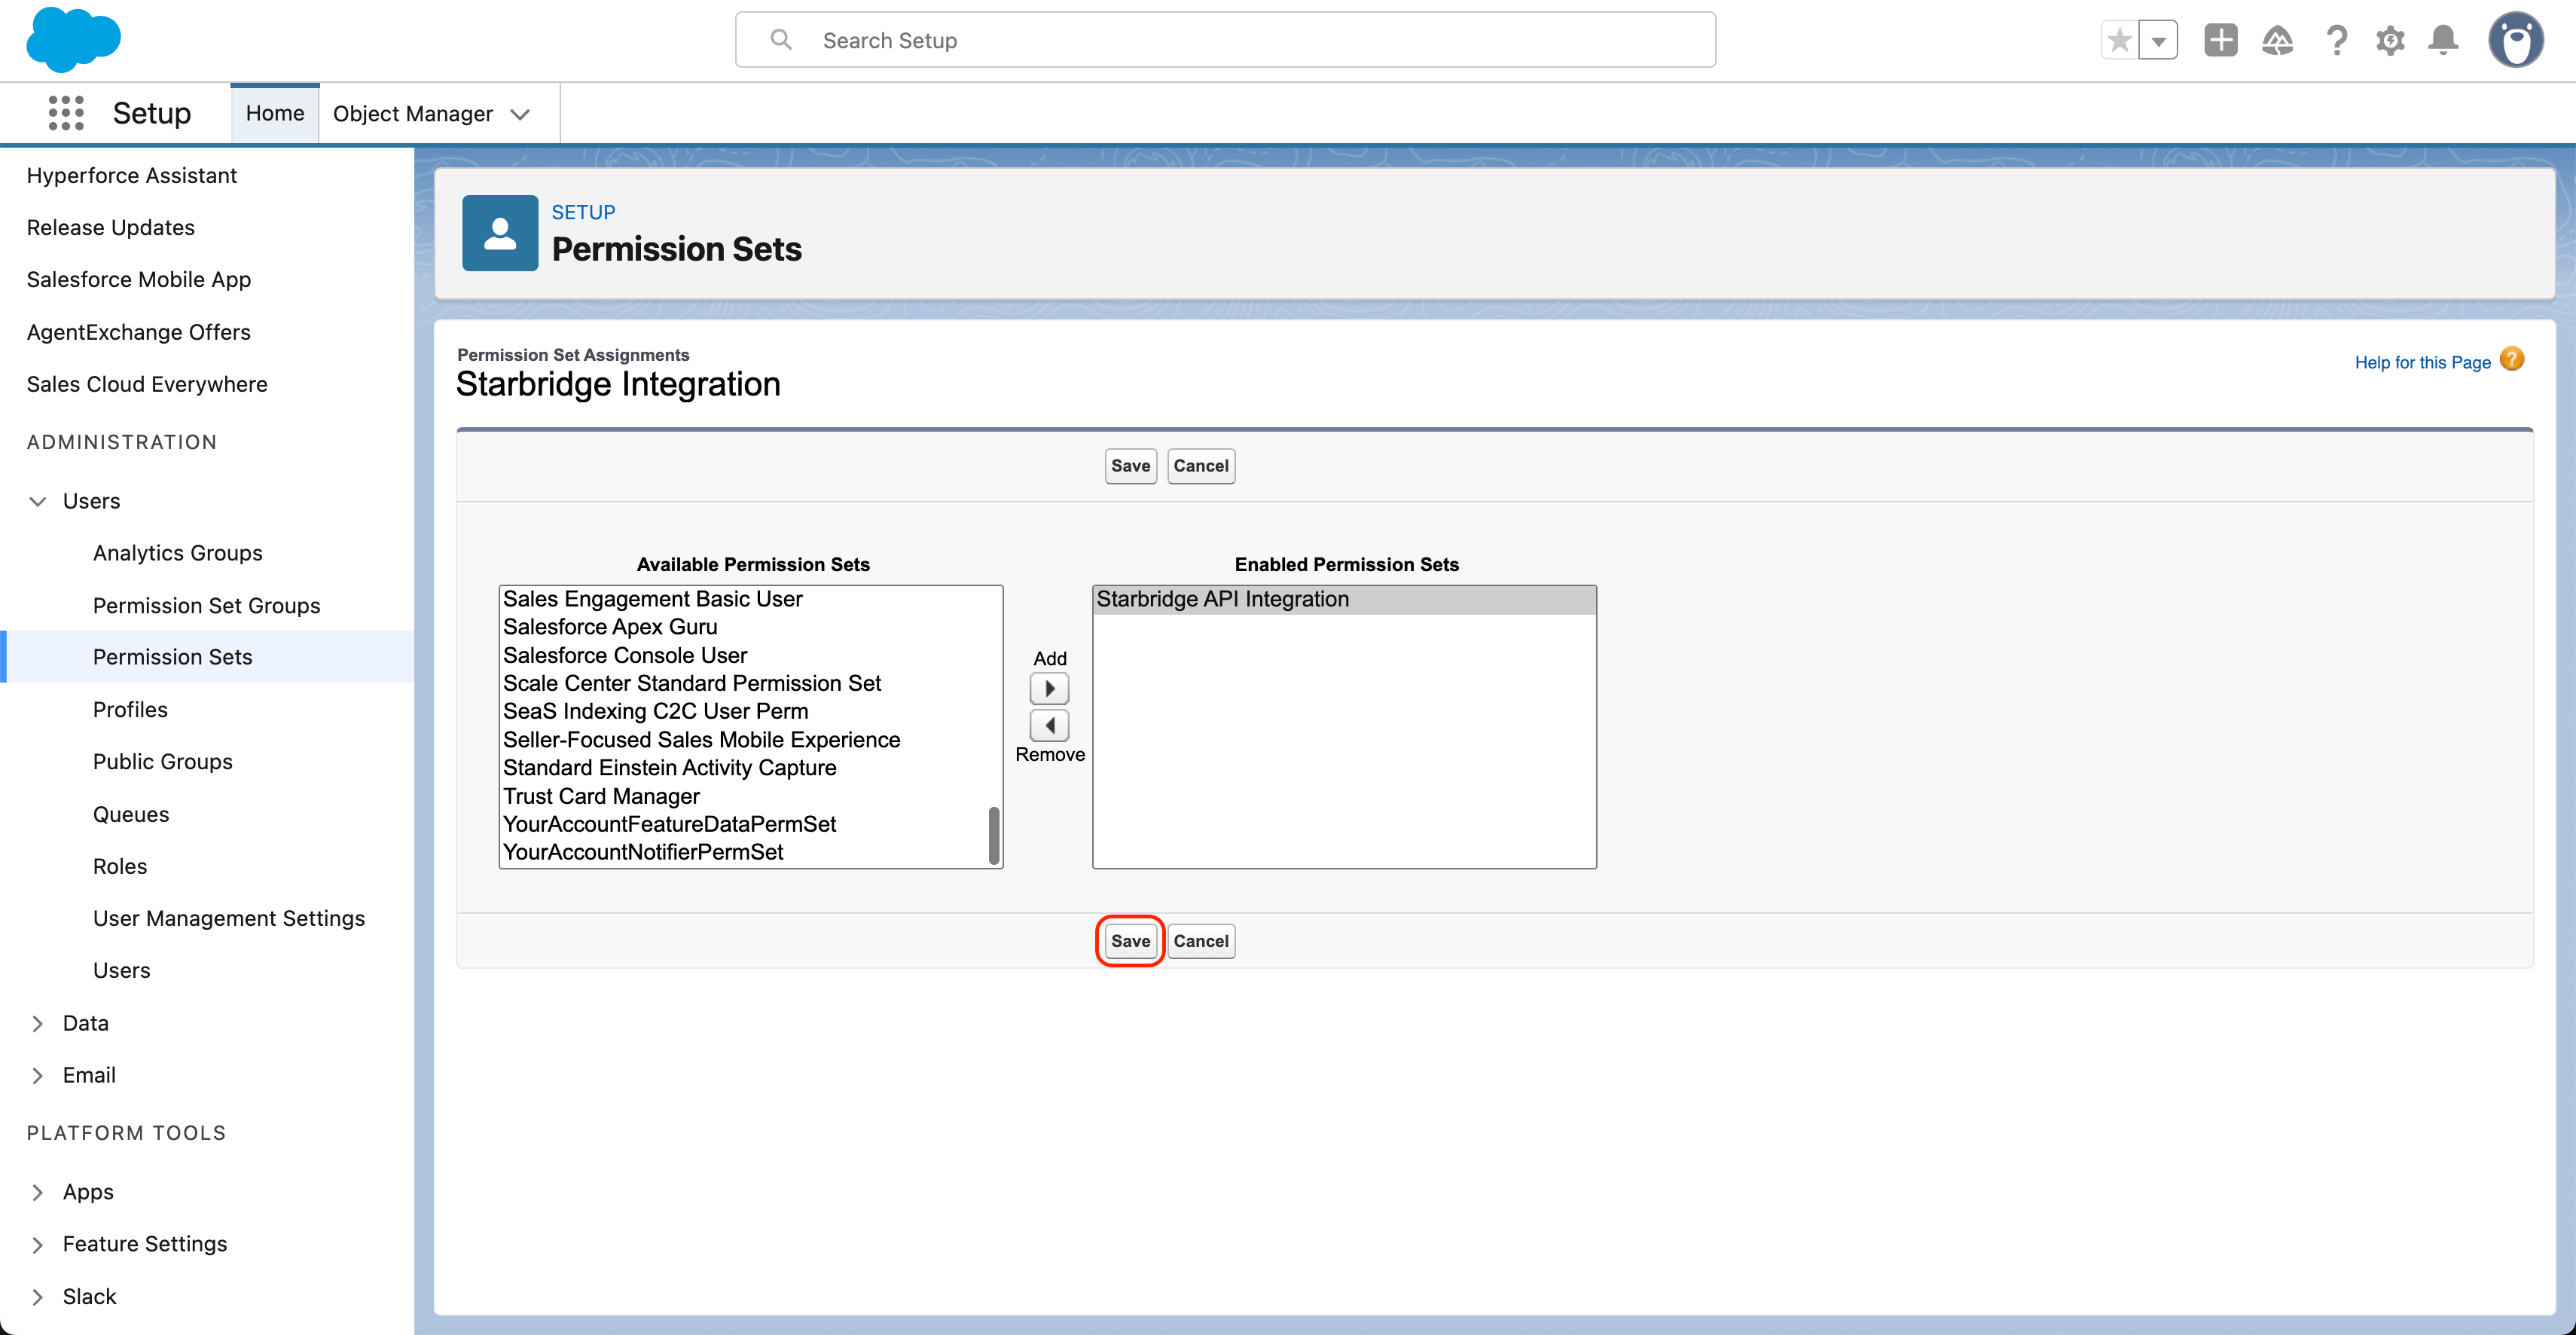
- Check your Contact organization-wide default (OWD) sharing settings:
- Go to Setup → Security → Sharing Settings. Then, read your organization-wide defaults for Contact.
- If Salesforce displays a Default Internal Access and Default External Access, look at the Default Internal Access.
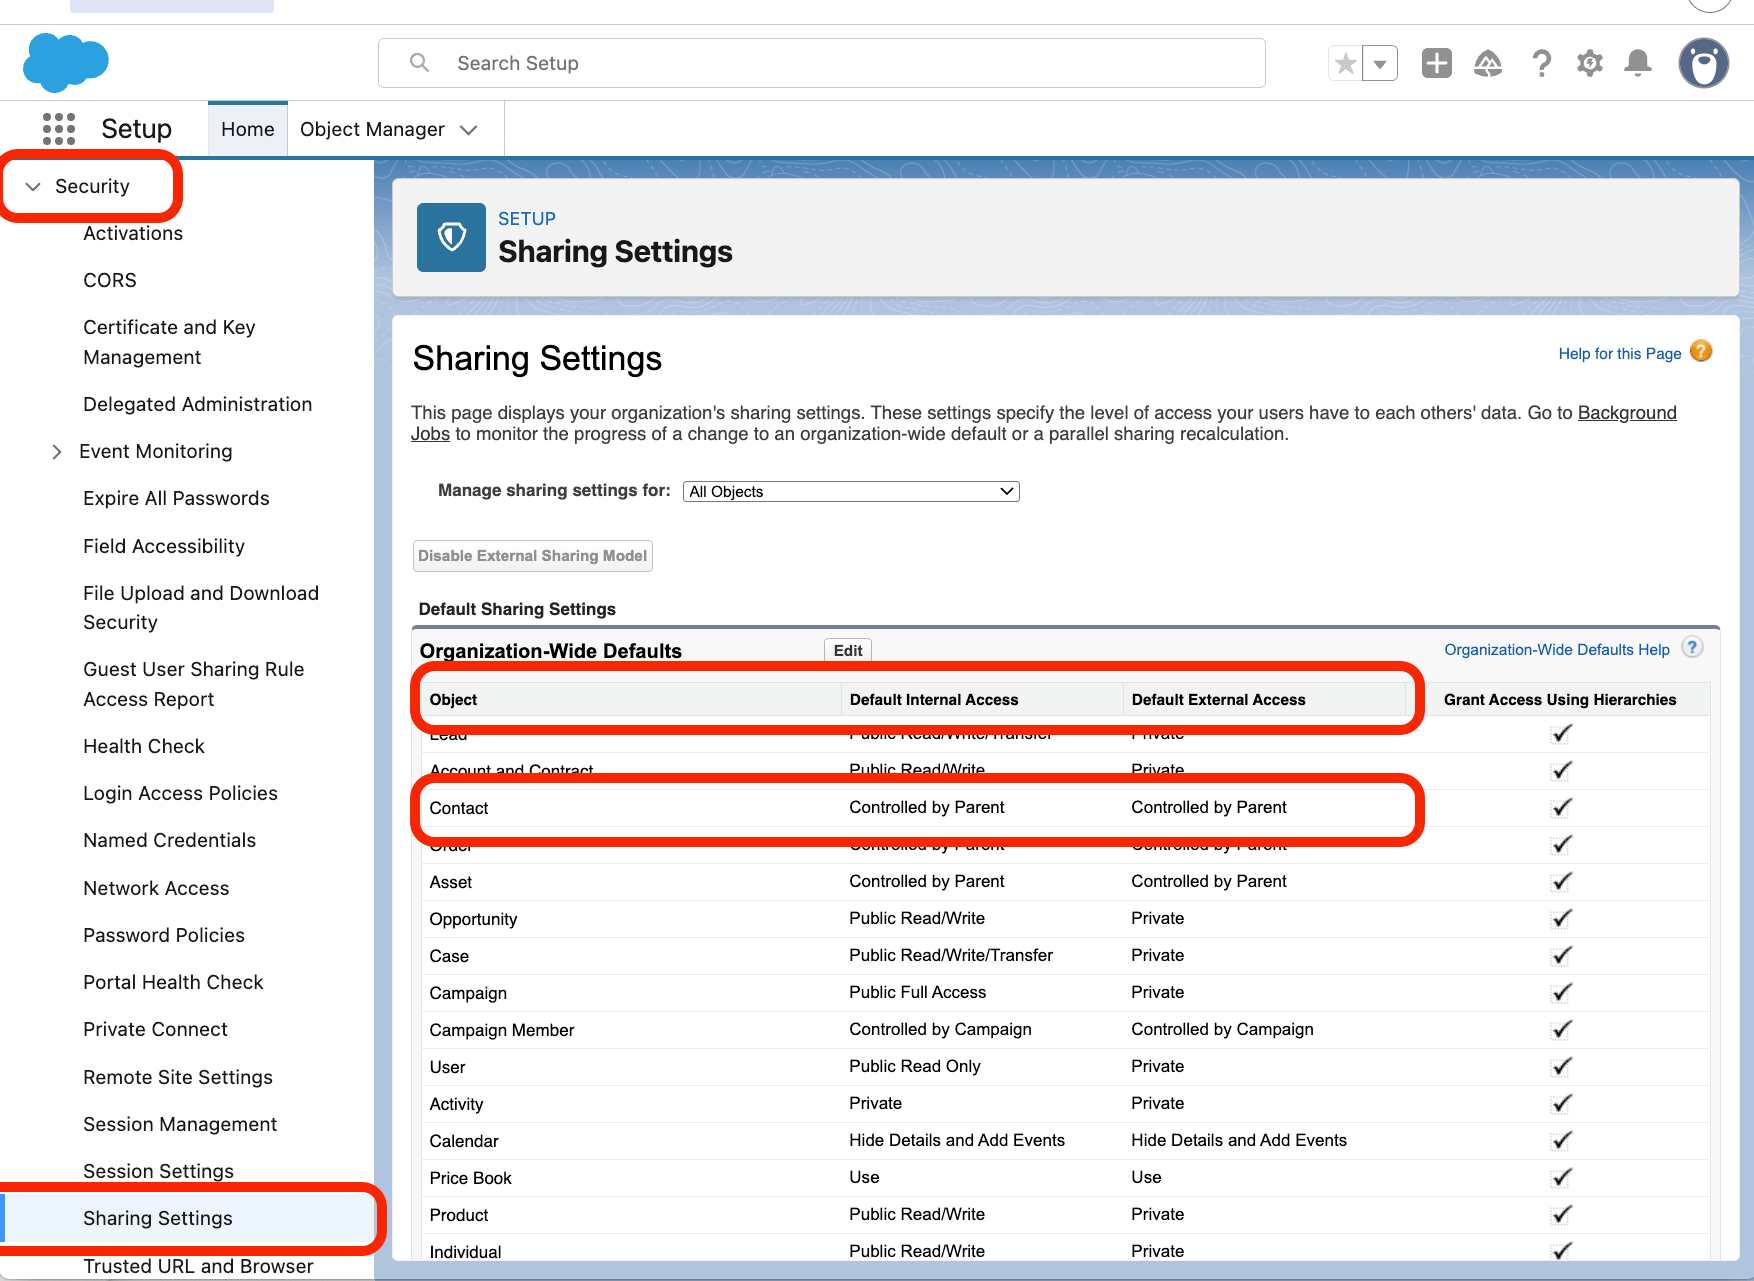
- If Contact Default (Internal) Access is Public Read/Write: nothing to do. Proceed to Step 7.
- If Contact Default (Internal) Access is Private, Public Read Only, or Controlled by Parent: complete the additional steps in Granting Starbridge write access to Salesforce contacts before proceeding to Step 7.
- Go to Setup → Security → Sharing Settings. Then, read your organization-wide defaults for Contact.
- Log in as the integration user before connecting to Starbridge:
- Log out of your current account in Salesforce
- Log in to Salesforce using the Starbridge API Integration user username (not your personal email) and password
- Once you log in, you will not be able to access the Salesforce UI, since you are logged in as an API only integration user. This is expected.
- Proceed with the steps described below in Starbridge.
Starbridge uses OAuth and does not store your Salesforce username or password.
Step-by-step instructions for HubSpot
Step-by-step instructions for HubSpot
Unlike Salesforce, HubSpot doesn’t have a dedicated integration user concept — the connection is made via OAuth and persists at the account level. Any admin with sufficient permissions can connect Starbridge. We recommend connecting as an admin or Super Admin with access to at minimum the Company, Contact, Owner, and Deal objects.
- Log into HubSpot as an admin or Super Admin
- Proceed with the steps below.
Starbridge uses OAuth and does not store your HubSpot username or password.
3
Navigate to the CRM integration
Go to Settings → Integrations, click Create, and select Salesforce or HubSpot.
If you want to connect a sandbox before connecting production, connect to a sandbox instance first. Starbridge supports separate sandbox and production connections.
4
Authenticate
Log into your Salesforce or HubSpot account when prompted.
The user you connect must have permission to read and write the objects you want Starbridge to access. Most teams use an admin user or a dedicated integration user to keep audit trails clean. See the instructions above under Choose who will connect your CRM > Step-by-step instructions for Salesforce.
5
Configure objects and fields
After connecting, open your CRM integration and click Objects & fields.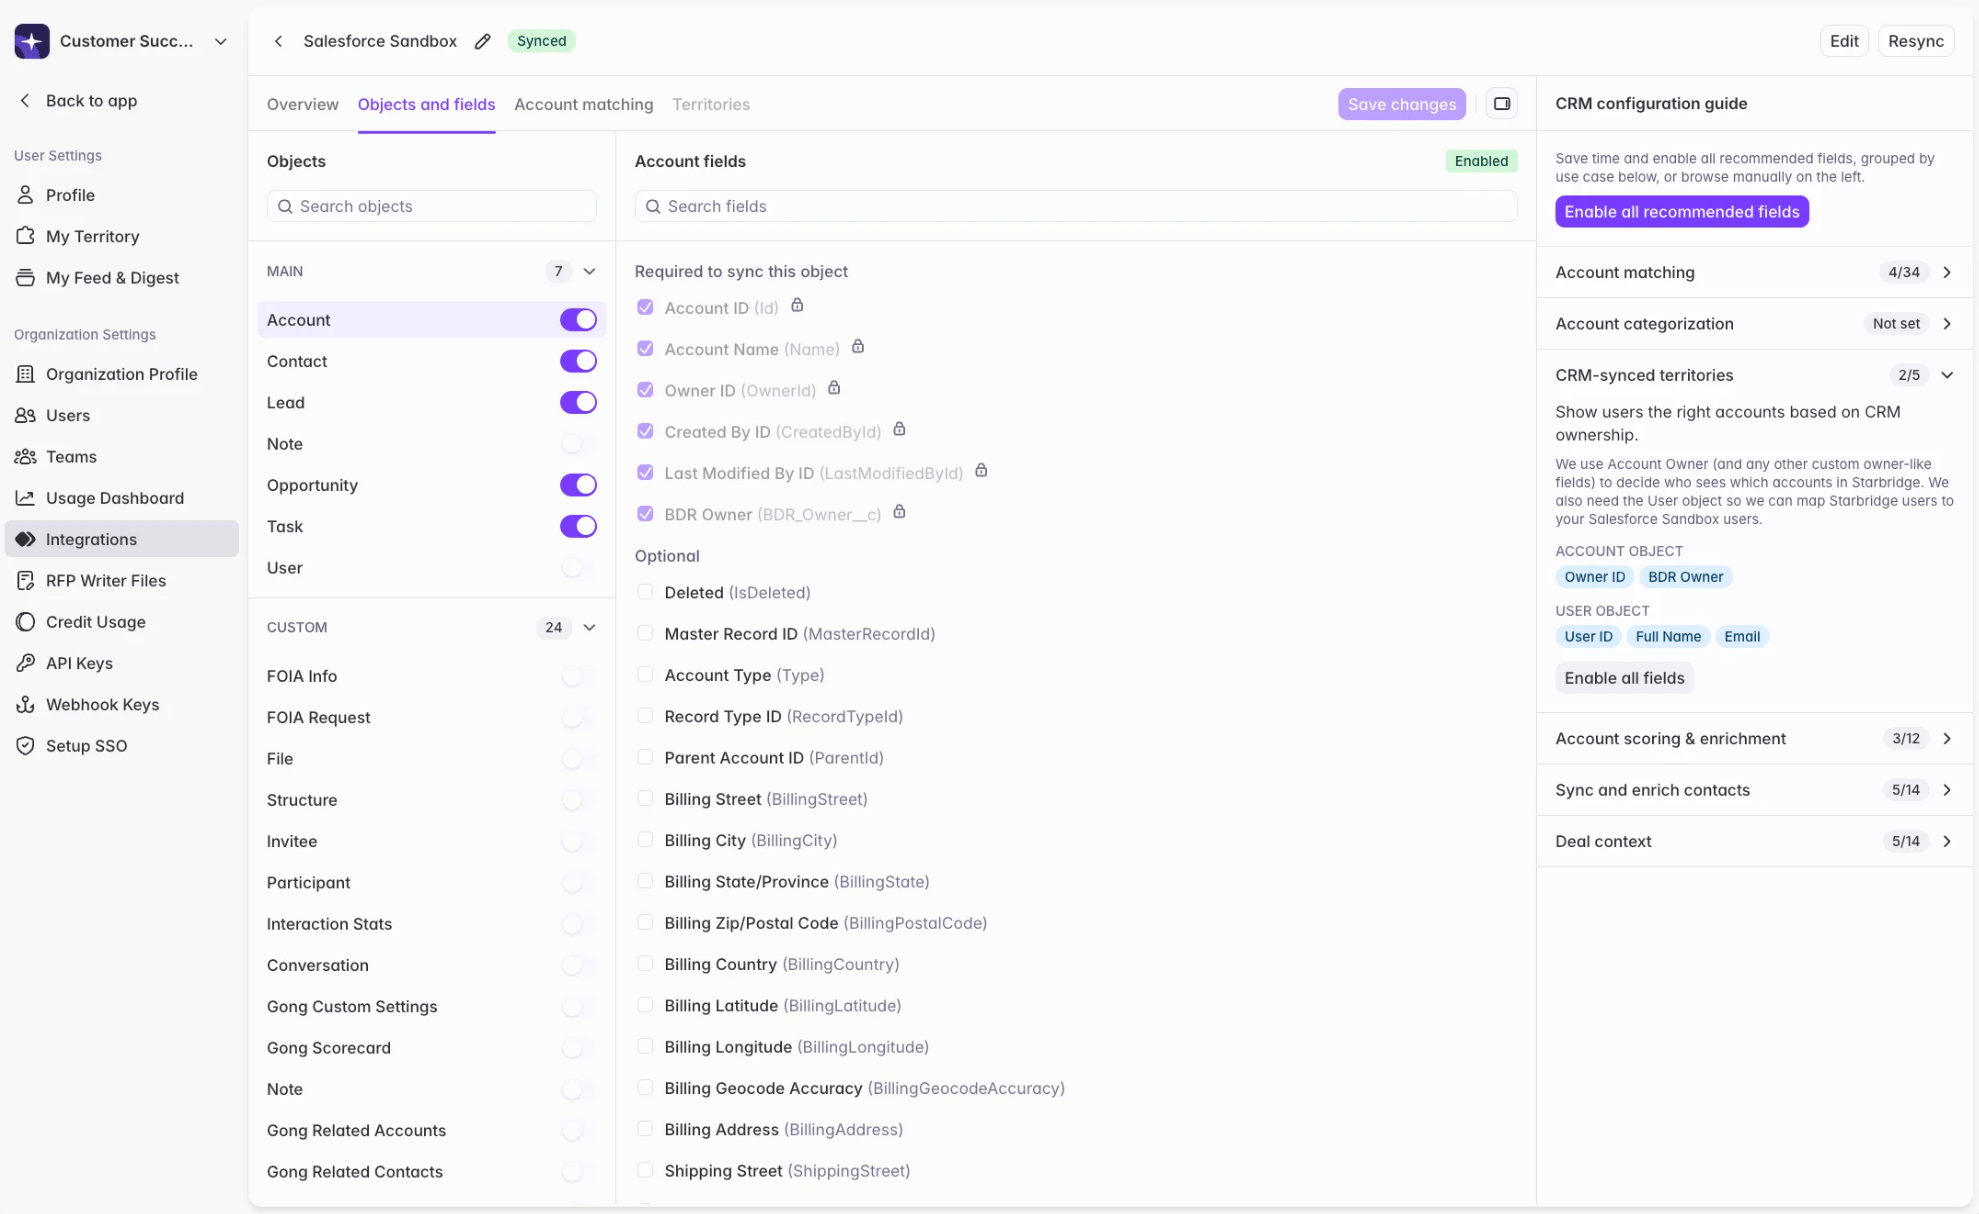
The Account categorization use case is strongly recommended. When enabled, reps can see account context from your CRM directly in Starbridge.Select the account field that best represents account type; by default we recommend Salesforce’s Account Type field or HubSpot’s Lifecycle Stage field, and this is included when you click Enable all recommended fields.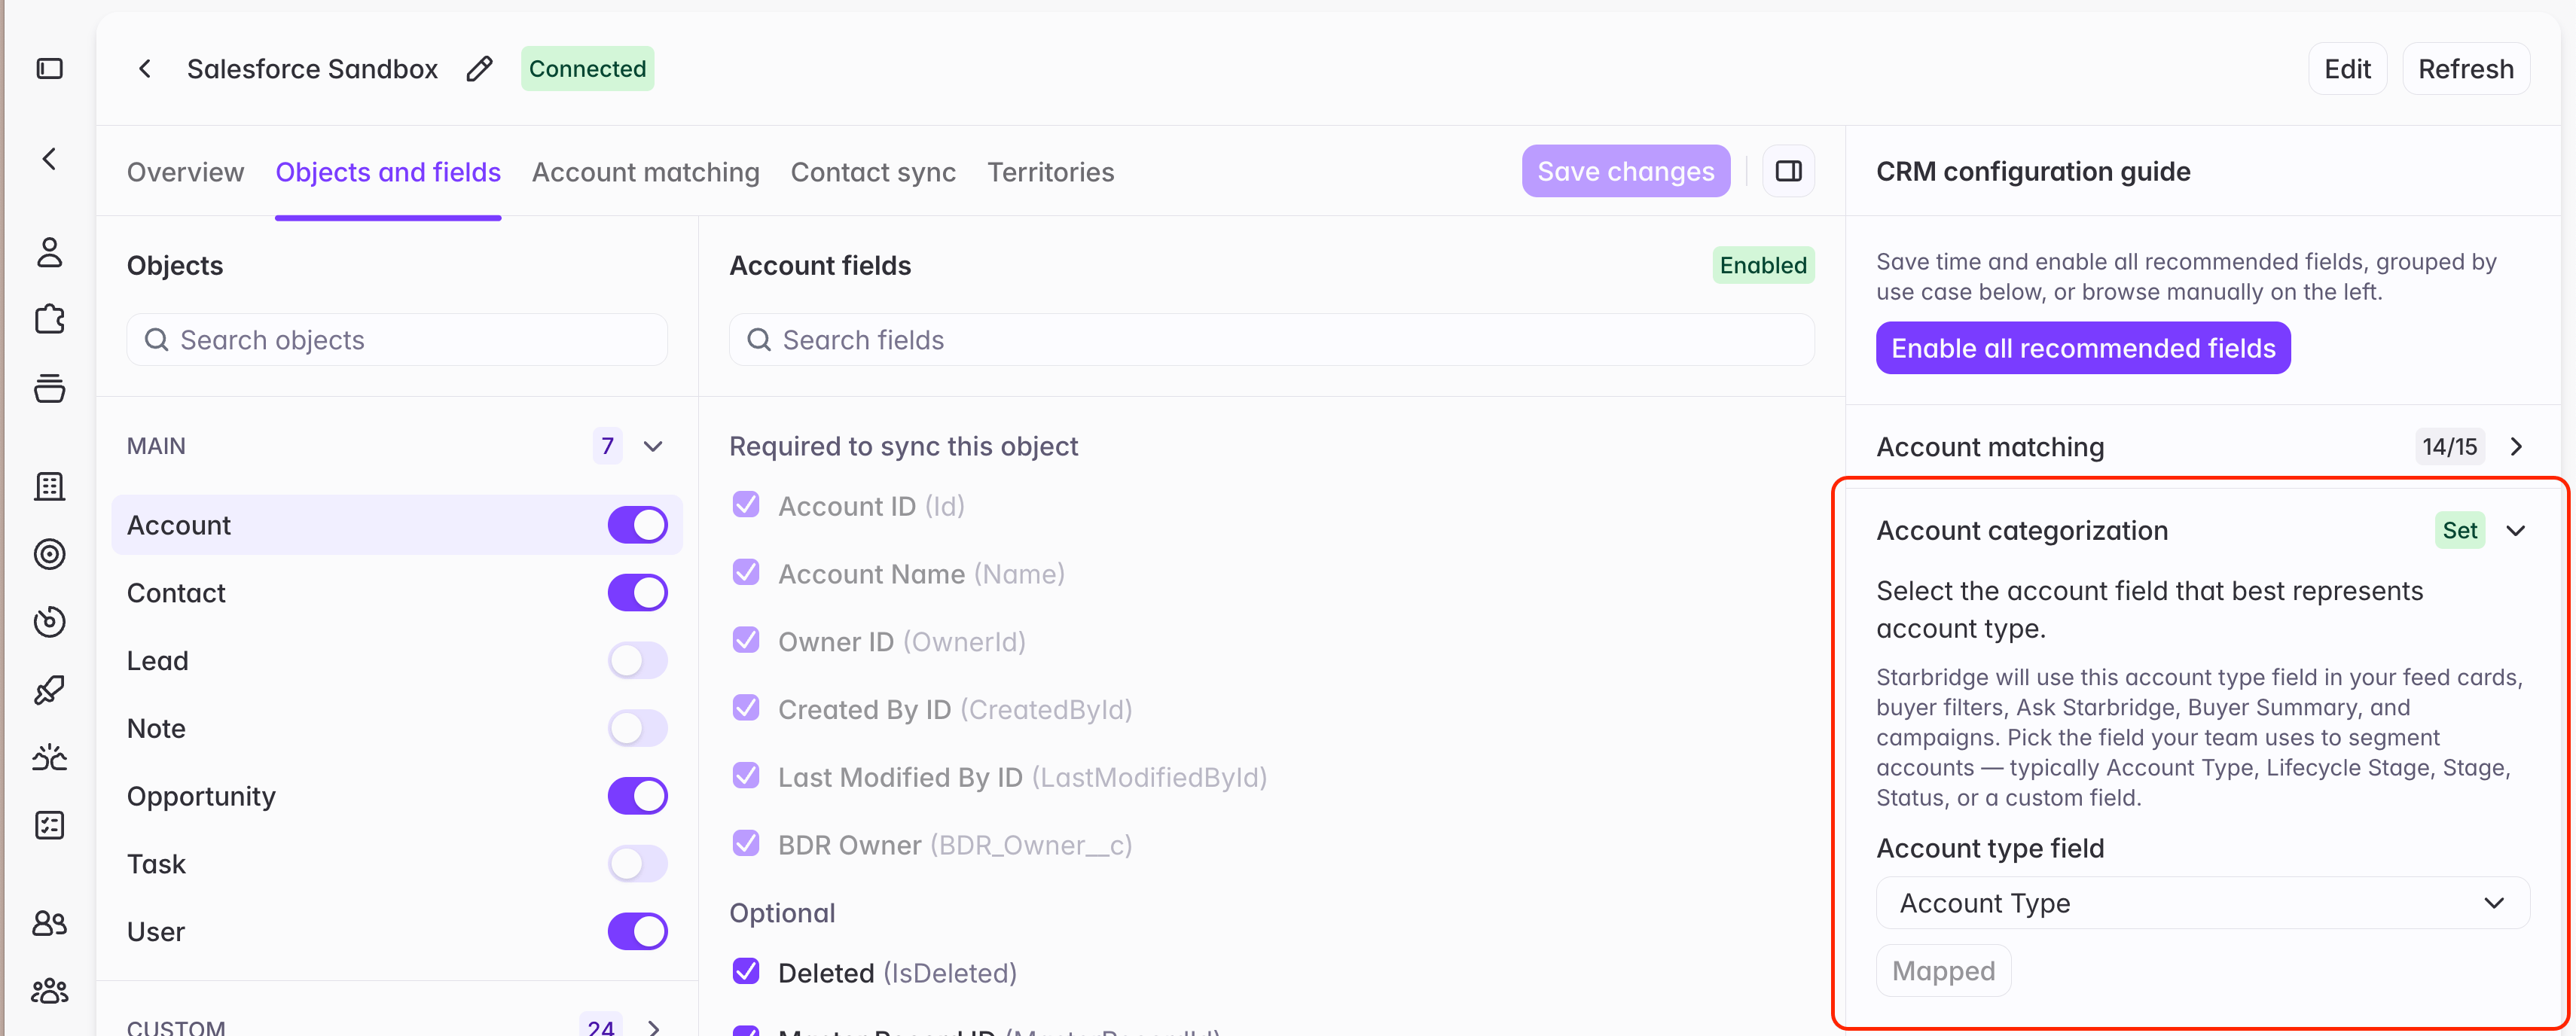
6
Save your changes
You’ll see a Refreshing status while Starbridge saves your changes and pulls the latest data from your CRM — duration depends on the size of your CRM. When complete, the status updates to Connected.
Reauthenticating your CRM connection
Use Reauthenticate when you need to refresh or swap the CRM credentials Starbridge is using, without disconnecting or reconfiguring your integration from scratch.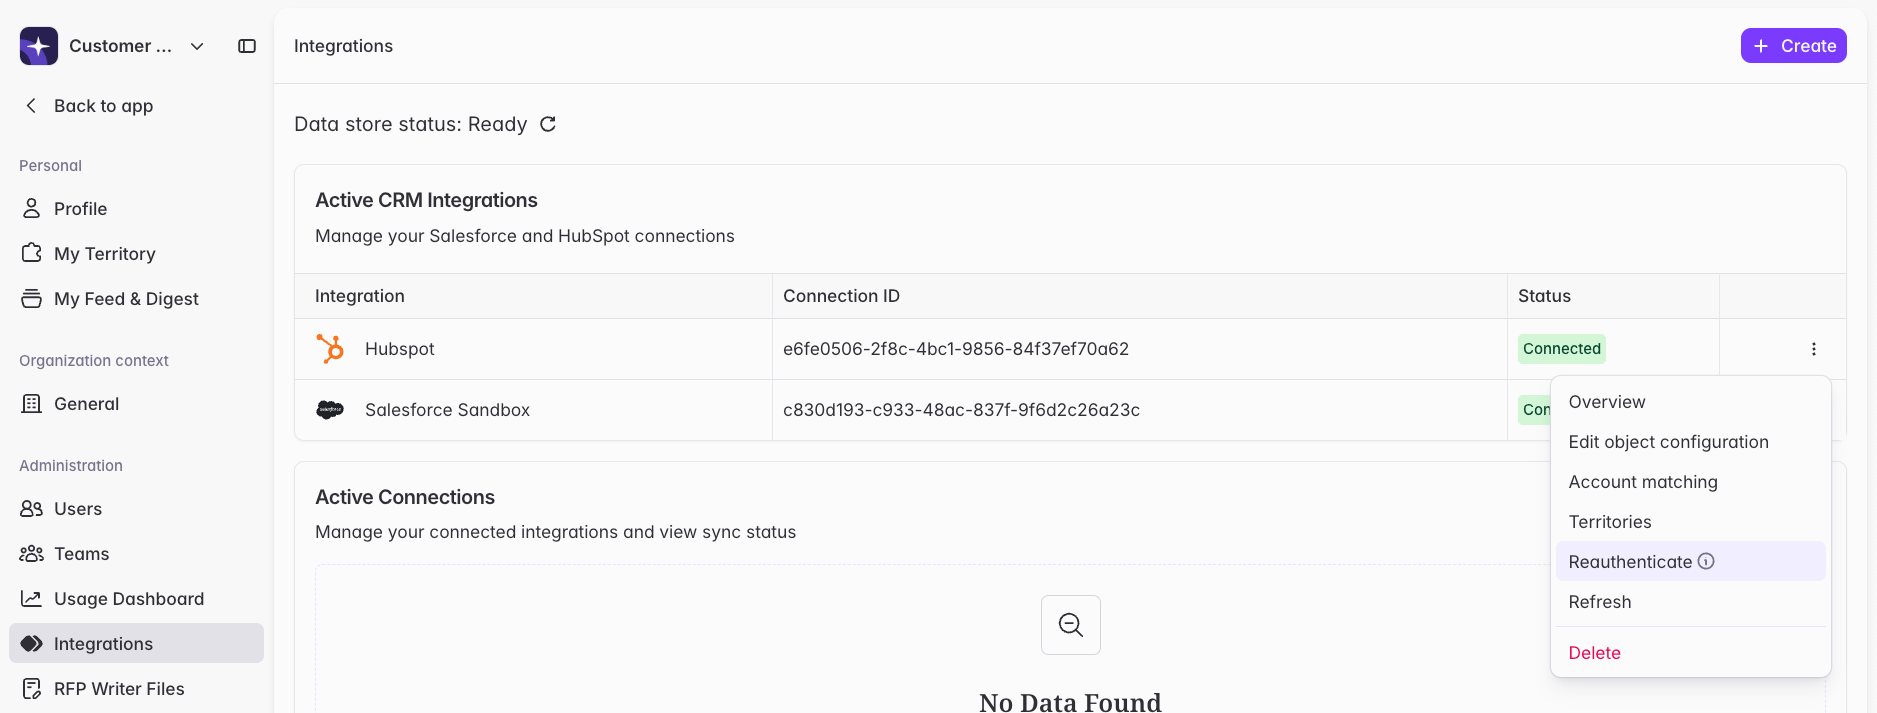
- Your integration status shows “Reauthentication required.” This happens infrequently, typically when an access token is refreshed on the CRM side.
- You want to switch the connected user. Common reasons: the original user left the company and their CRM access is expiring, or (Salesforce and Salesforce Sandbox only) the original connection used a personal user profile and you want to switch to a dedicated integration user as a best practice.
Next steps
With your CRM connected, the next step is account matching — mapping your CRM accounts to Starbridge buyers. This is required before territories, CRM-synced buyer lists, and lookup and sync columns will work.Account matching
Map your CRM accounts to Starbridge buyers.