

- Syncing territories from your CRM to ensure reps see buying signals relevant to their accounts
- Syncing buyer lists from Salesforce or HubSpot
- Looking up accounts and contacts in your CRM
- To enrich accounts and contacts in your CRM
- To insert new account and contact records in your CRM
Prerequisites
- A Salesforce or HubSpot CRM integration connected in Starbridge (Settings → Integrations)
- The Account object (Salesforce) or Company object (HubSpot), along with relevant fields, included in your CRM integration configuration
A note on scale
Account matching supports up to 250,000 accounts. If your CRM is larger than this, reach out to your CSA before getting started.Should you work with your CSA first?
If your CRM has data quality issues — lots of duplicates, inconsistent naming, missing state codes, or accounts you’ve been meaning to clean up — consider working with your CSA before running matching. They can help you prepare your data so you get cleaner results on the first pass. If your CRM data is reasonably clean, go ahead and start below.Step 1: Configure matching in the ‘Map fields’ step
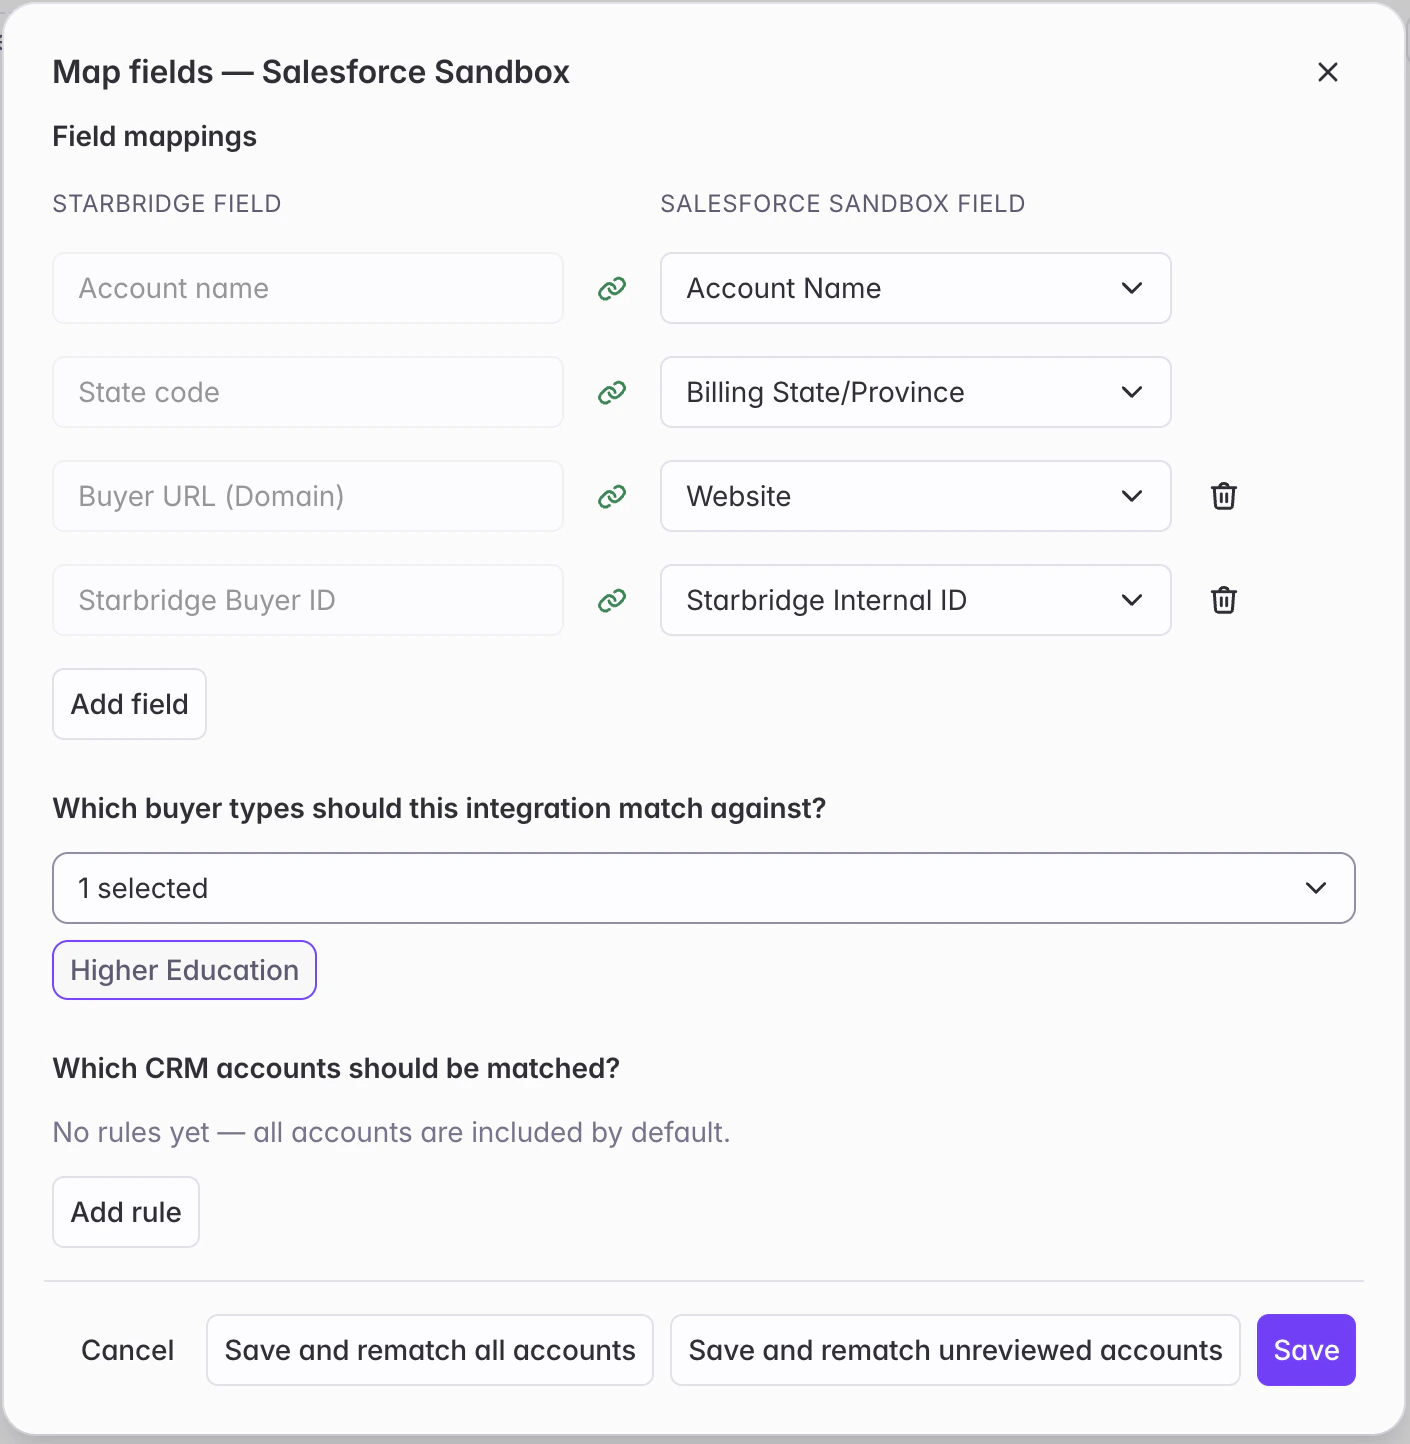
Open Settings → Integrations, open your CRM integration, and go to the Account matching tab. This is where you set everything Starbridge needs before matching can run.Field mappings
Map fields from your Account (or Company) object to Starbridge buyer fields. Required:- Buyer Name
- Buyer State Code (e.g., NY)
- Buyer Type
- Buyer City
- Buyer URL / Domain
- Buyer Zip Code
- NCES ID
- IPEDS ID
- Census ID PID6 / GIDID
- Starbridge Buyer ID
Buyer types
Select which Starbridge buyer types are represented in your CRM. When you tell Starbridge which types to focus on — school districts, higher ed institutions, cities, or whatever your accounts cover — the matching pipeline concentrates on those types rather than evaluating every account against Starbridge’s full buyer database. This produces better match quality and faster matching.Rule filter
The rule filter lets you scope which CRM accounts enter the matching pipeline at all. Accounts that don’t match the filter are excluded from the matching pipeline. Use this to exclude: international accounts (outside of the US and Canada), private sector records, account types that don’t belong in Starbridge, or any segment you don’t want to match. If you later relax the filter, previously-excluded accounts will be included when you re-run matching.Save options
After your initial matching, the ‘Map fields’ modal offers three save options so you can control how aggressively existing matches are revisited after a configuration change:- Save — saves your changes and uses them for new accounts going forward. Existing accounts are not re-matched.
- Save and rematch unreviewed accounts — re-runs matching on every account you haven’t reviewed yet. Reviewed accounts are left untouched.
- Save and rematch all accounts — re-runs matching on every account, including ones you’ve already reviewed. Use this when you want a clean slate.
Step 2: Run account matching
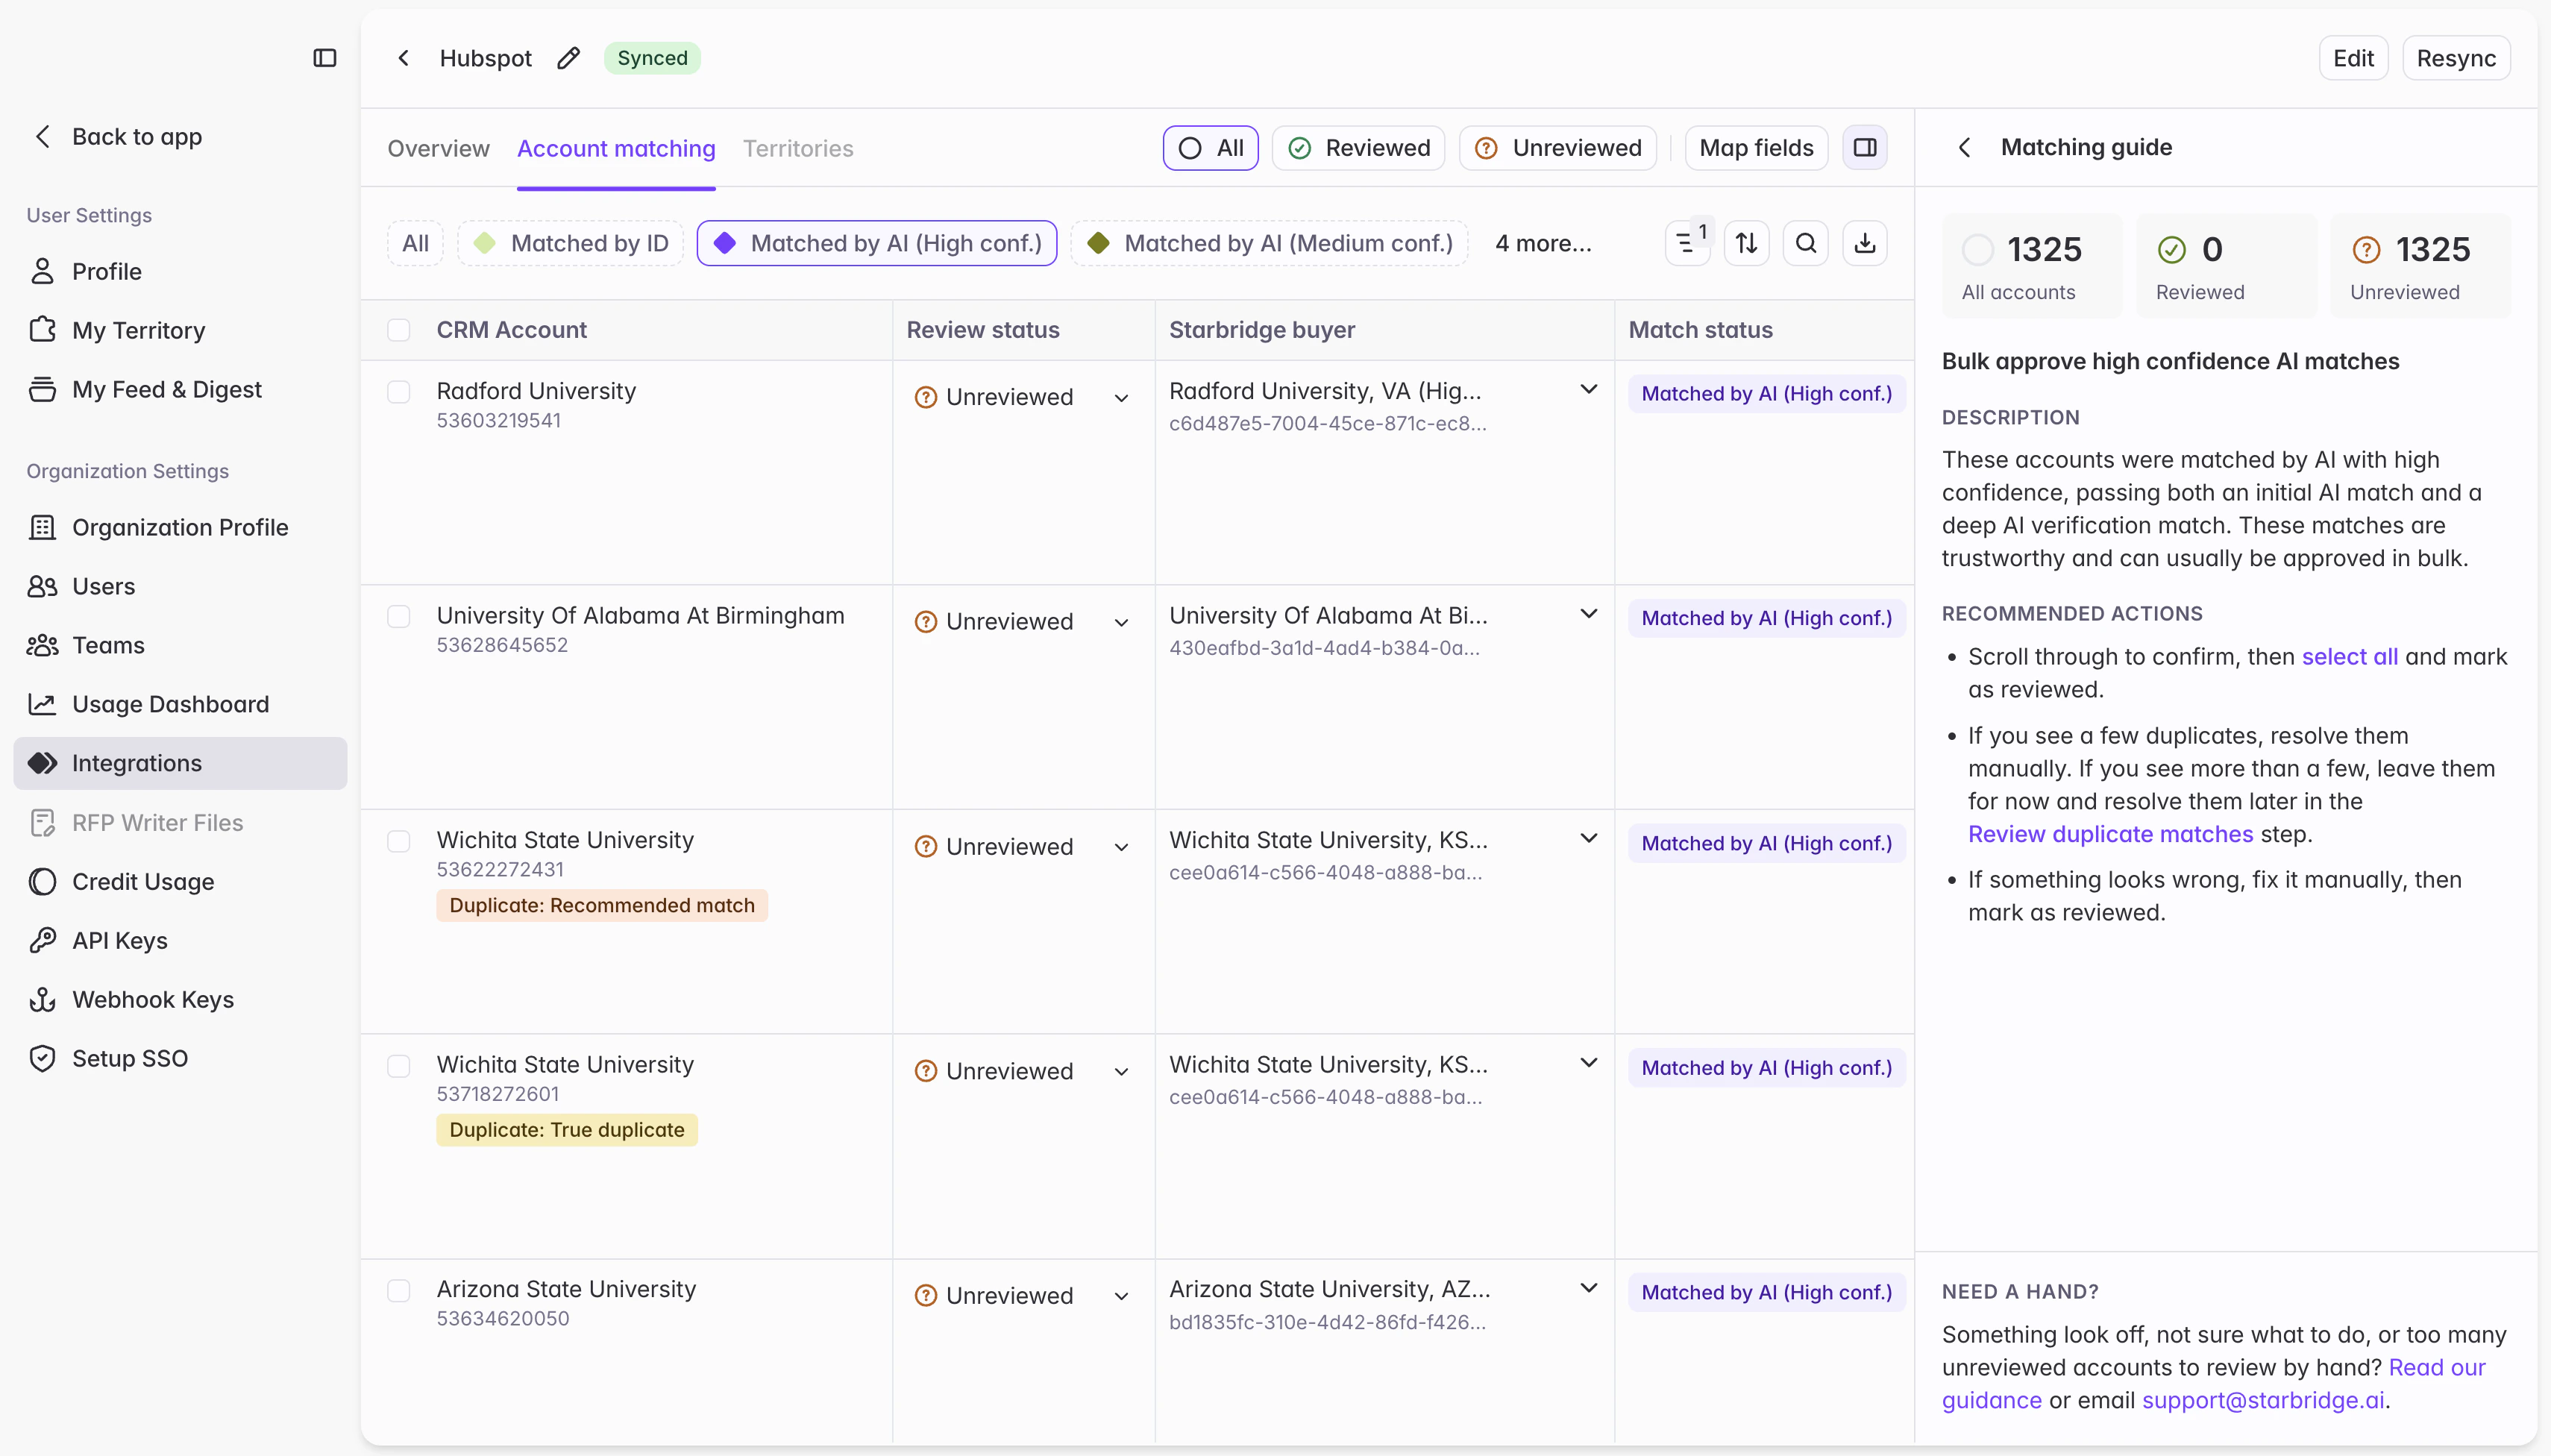
Click Map fields. Account matching will start running. The matching table will be unavailable while matching runs — this typically takes a 5-60 minutes depending on the number of accounts in your CRM. You can leave the page; matching continues in the background. Once matching completes, you will see the matching table with a guidance panel on the right.Step 3: Work through the review flow
What does reviewing a match mean?
Marking a match as Reviewed is your sign-off that the pairing is correct: this CRM account maps to this Starbridge buyer. That matters because Starbridge treats the Reviewed status as a gate: no account match is used in Starbridge features until it’s marked as Reviewed. A guide panel is available on the right side of the page. It explains how to review accounts in cohorts, and what your options are. It updates automatically to offer appropriate guidance as you switch between filtered views of the table.Matched by ID
These accounts were matched using a unique identifier — NCES ID, IPEDS ID, Starbridge Buyer ID, or a Census GEOID. What to do: Scroll through the first few matches to spot-check. If everything looks right, select-all and bulk-approve. If you spot a problem on an individual row, you can fix it inline before approving the rest. If you see a lot of duplicates, you may disregard them for now or jump ahead to Resolving duplicates below.Matched by AI (High conf.)
These accounts were matched by AI with high confidence. They’re highly reliable. What to do: Scroll through the first few matches to spot-check. Fix any individual rows that look wrong, then select-all and bulk-approve the rest. If you’re finding more errors than you can reasonably fix or review manually, work with your CSA. If you see a lot of duplicates, you may disregard them for now or jump ahead to Resolving duplicates below.Matched by AI (Medium conf.)
These accounts were matched by AI with medium confidence. These accounts are a reasonable match but might have one or two conflicting pieces of metadata, or a close but not obviously correct match by account name and state or URL. What to do: Scroll through the first few matches to spot-check. Fix any individual rows that look wrong. If you’re finding more errors than you can reasonably fix or review manually, work with your CSA. If there are few errors or all look accurate, then select-all and bulk-approve the rest. If you see a lot of duplicates, you may disregard them for now or jump ahead to Resolving duplicates below.No match
These are accounts where Starbridge didn’t find a matching Starbridge buyer. Ask yourself: should this account be matched at all? Private sector companies, vendors, partners, and competitors typically shouldn’t be matched — Starbridge covers SLED institutions, not the private sector. If most of your no-match accounts clearly don’t belong in Starbridge, bulk-approve them as reviewed no match after a quick scroll. If some accounts should be matched but weren’t, assign them manually by selecting the correct buyer from the dropdown. If the list is too long to work through manually, contact your CSA.Duplicates
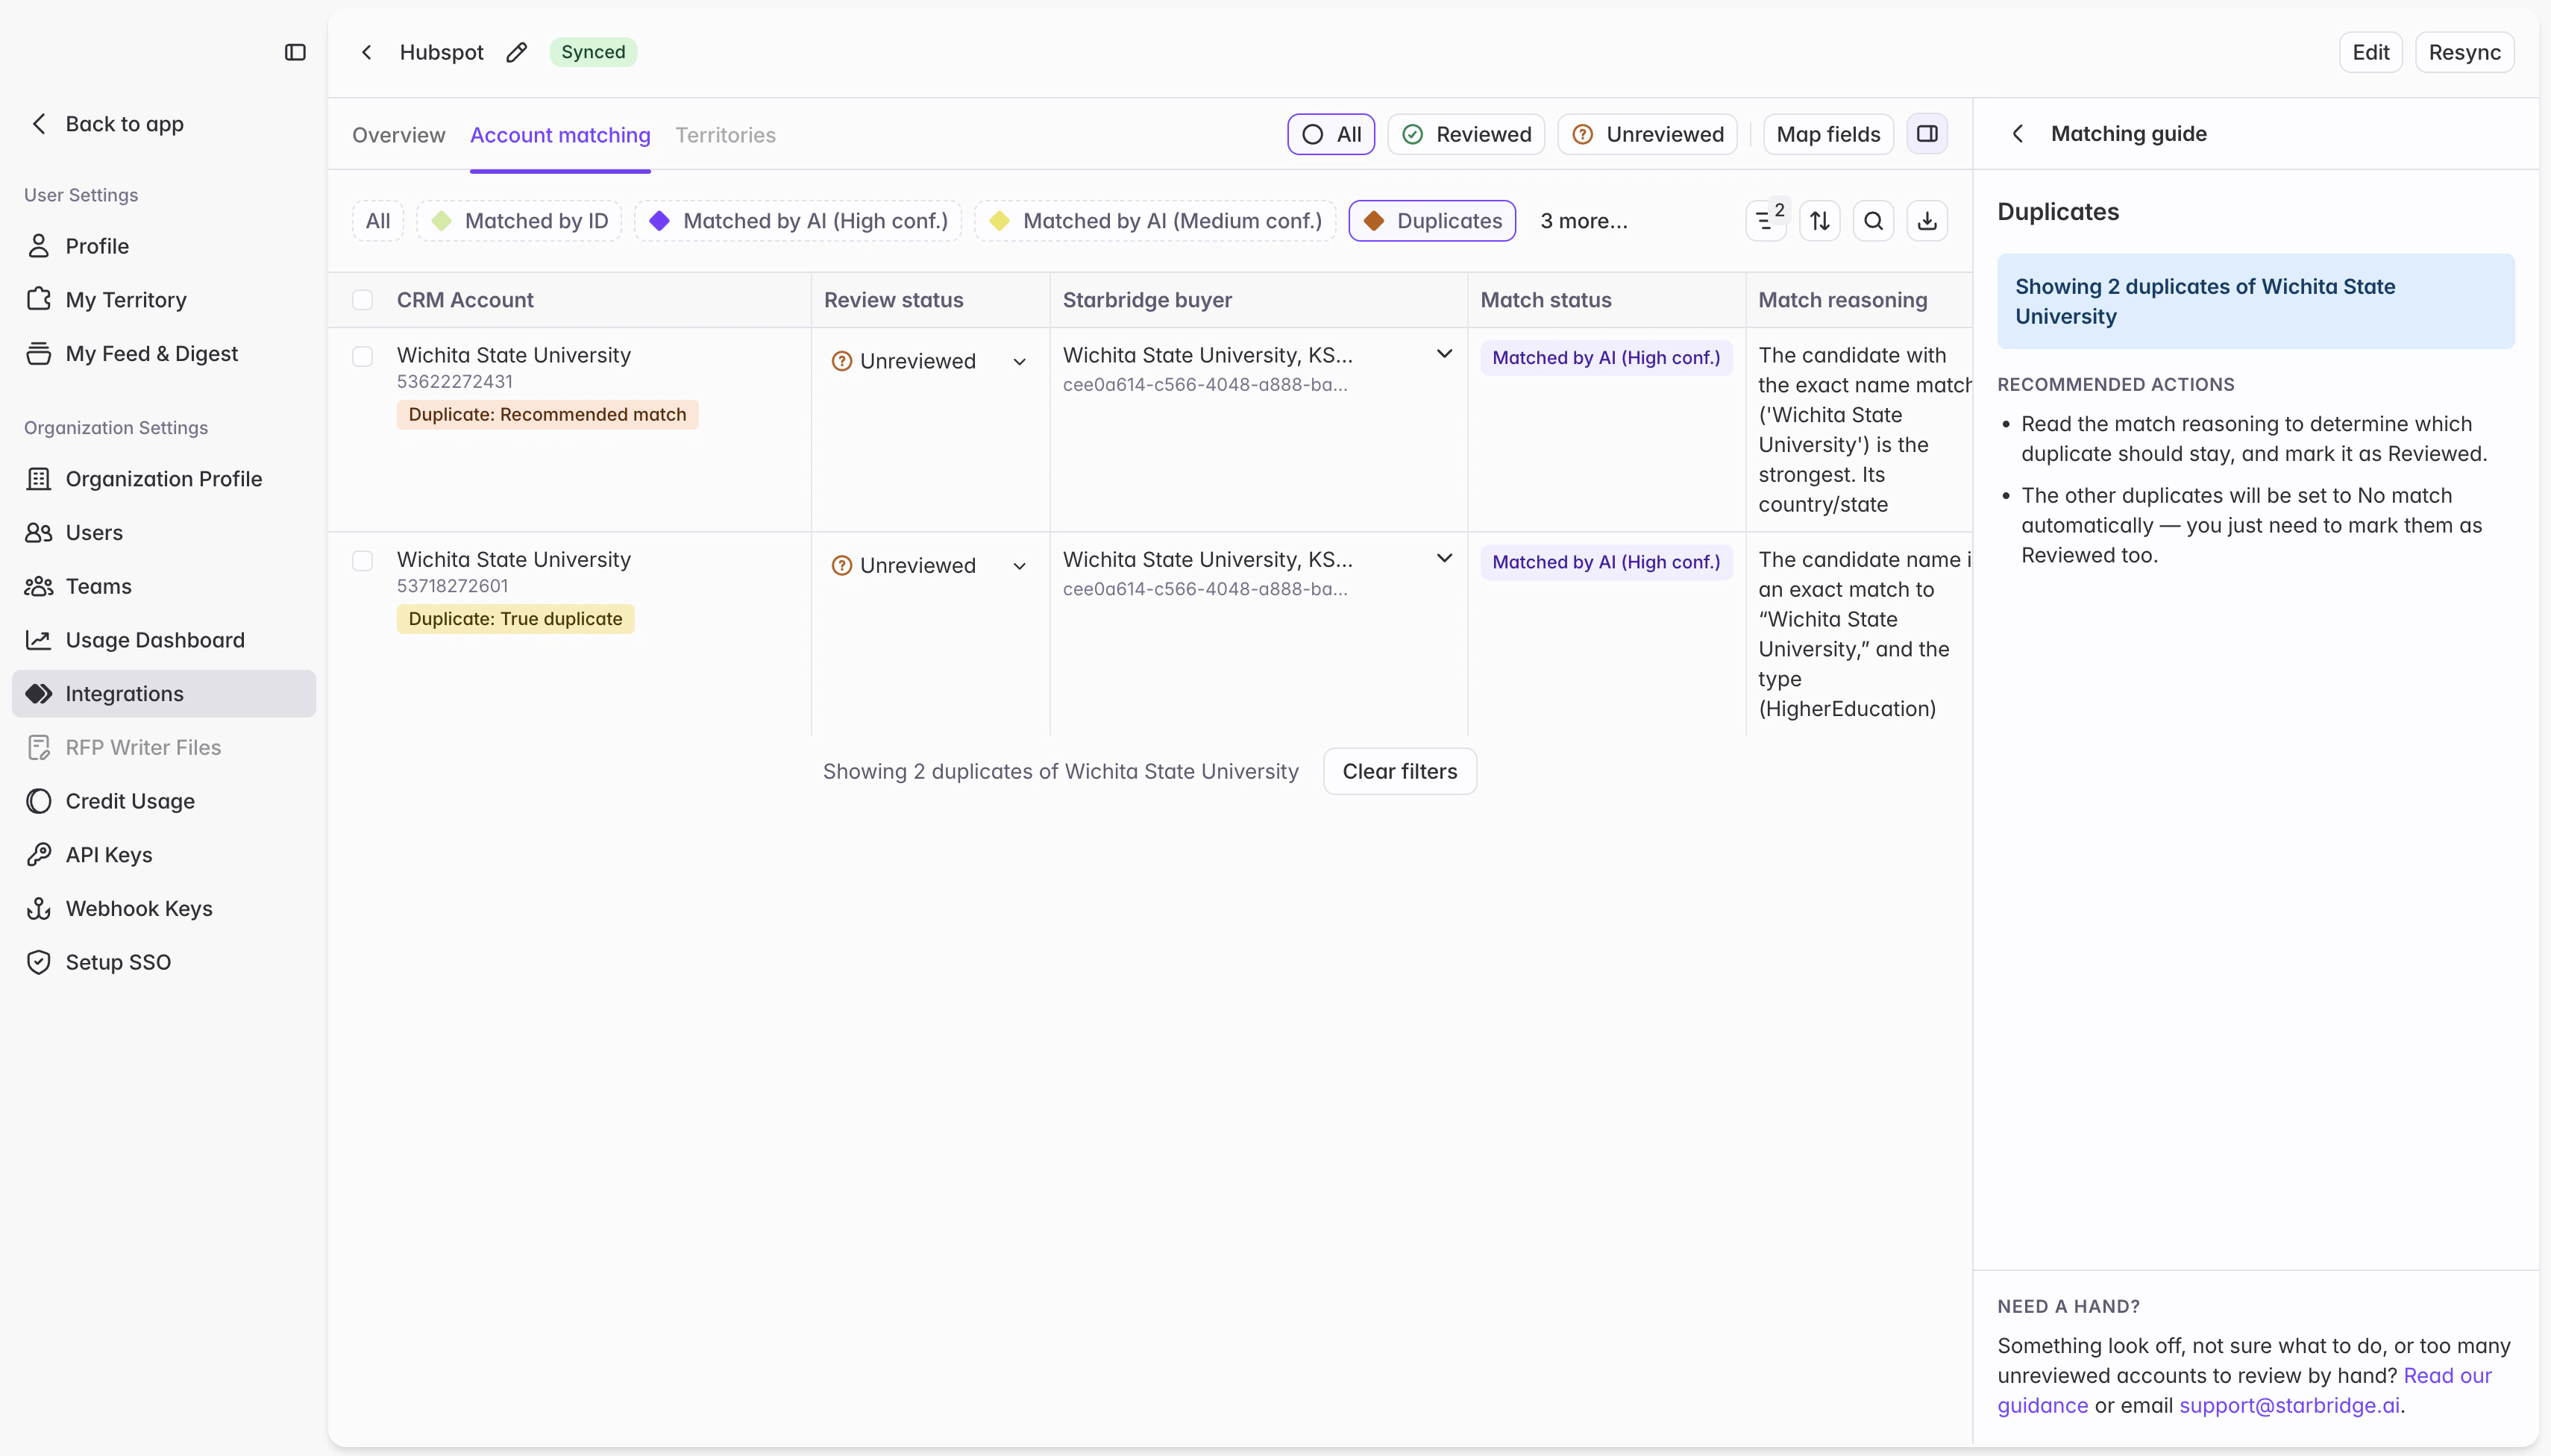
Duplicates occur when multiple CRM accounts matched to the same Starbridge buyer. This step has the most depth — see Resolving duplicates below.Failed
Accounts in this cohort encountered an internal error during matching — not a data problem. Re-run them by selecting all failed accounts and clicking Re-match. They’ll be processed and land in the appropriate cohort when complete.Matched by admin
This cohort shows accounts you’ve manually matched — accounts where you selected a specific Starbridge buyer yourself rather than accepting or rejecting a Starbridge-generated match. They land here unreviewed so you can confirm your own overrides before they’re counted as reviewed.Resolving duplicates
When Starbridge matches multiple CRM accounts to the same Starbridge buyer, it flags them as duplicates. Before you can review a duplicate group, Starbridge automatically runs a sub-classification process — name similarity scoring, domain comparison, and LLM-based classification — to help you understand what each account actually represents. Each account in a duplicate group receives one of three sub-statuses:- Recommended match — the account Starbridge identifies as the best fit for this Starbridge buyer. At most one per group.
- True duplicate — the account represents a good fit for this Starbridge buyer, but has less data than the recommended match account. Starbridge’s recommendation: merge this account into the recommended match account in your CRM. This account has no useful independent existence.
- Hierarchy child — a distinct sub-entity of the matched buyer: a department, foundation, campus, or financing authority that Starbridge models as part of the parent buyer. Starbridge’s recommendation: unmatch these in Starbridge, and mark them as a child of the parent account in your CRM. Your CSA can advise on best practices for managing these duplicates in your CRM.
Row-level actions
These actions are available on every row, in every cohort:- Select a different buyer — opens a buyer dropdown to assign a different Starbridge buyer. The row becomes Matched by admin and is reset to Unreviewed so you can confirm it.
- Clear the match — removes the buyer and sets the row to No match. Requires a single-row confirmation.
- Mark as Reviewed / Unreviewed — flips the review status on the row.
- Rematch — reruns the account through matching and duplicate resolution with your latest field mapping configuration.
Match reasoning
Every row has a match reasoning log that records what happened to it. Each entry is timestamped and covers: how the account was first matched, any re-matches, admin overrides, and system cascades triggered by duplicate resolution decisions. You can view this on any row to understand and audit its full history.How Starbridge stays in sync
Starbridge re-syncs your CRM accounts nightly:- New accounts are automatically run through matching and given Unreviewed status.
- Deleted accounts are removed from matching.
- Updated accounts are not automatically re-matched.
Re-running matching
There are a few common reasons to re-run after your initial pass:- Failed accounts — always re-run these. They encountered an internal error, not a data problem.
- You omitted important fields from your initial field mapping — for example, you omitted NCES IDs on school district accounts and Starbridge relied on its AI matching instead of matching by NCES ID.
- You corrected data quality issues — merging duplicates in your CRM, filling in missing state codes, cleaning up account names, or populating domain URLs.
Troubleshooting
Match quality is low. State codes, ZIP codes, domain URLs, and unique identifiers (NCES, IPEDS, Census GEOIDs) each improve match quality. If results are still poor after mapping all these fields, reach out to your CSA. Specific types of accounts aren’t being matched - like schools, or universities. Double-check your Map fields settings, under the Which buyer types should this integration match against? setting. Make sure you select all the buyer types represented in your CRM as accounts. If you missed any, select them now and click Save and rematch all unreviewed accounts. Matching is taking a long time. If matching takes longer than 4 hours, reach out to your CSA for support.What’s next
Reviewed account matches are the foundation for several Starbridge features:Set up territories
Generate a territory for each rep based on CRM account ownership.
CRM-synced buyer lists
Create a Starbridge buyer list directly from a Salesforce list view or HubSpot segment.
CRM enrichment columns
Use account matching to find the right CRM record for each row in a bridge.